How to Draw Clothing Wrinkles in Digital Art: 12 Types of Folds You Need to Know When Drawing Costumes
Guide on how to draw clothing wrinkles in digital art with 12 common types of folds: stretch folds, compression folds, pipe folds, zigzag folds, spiral folds, draped fabric, wind-blown fabric, thin fabric, thick fabric, and shiny materials.
 Free
Free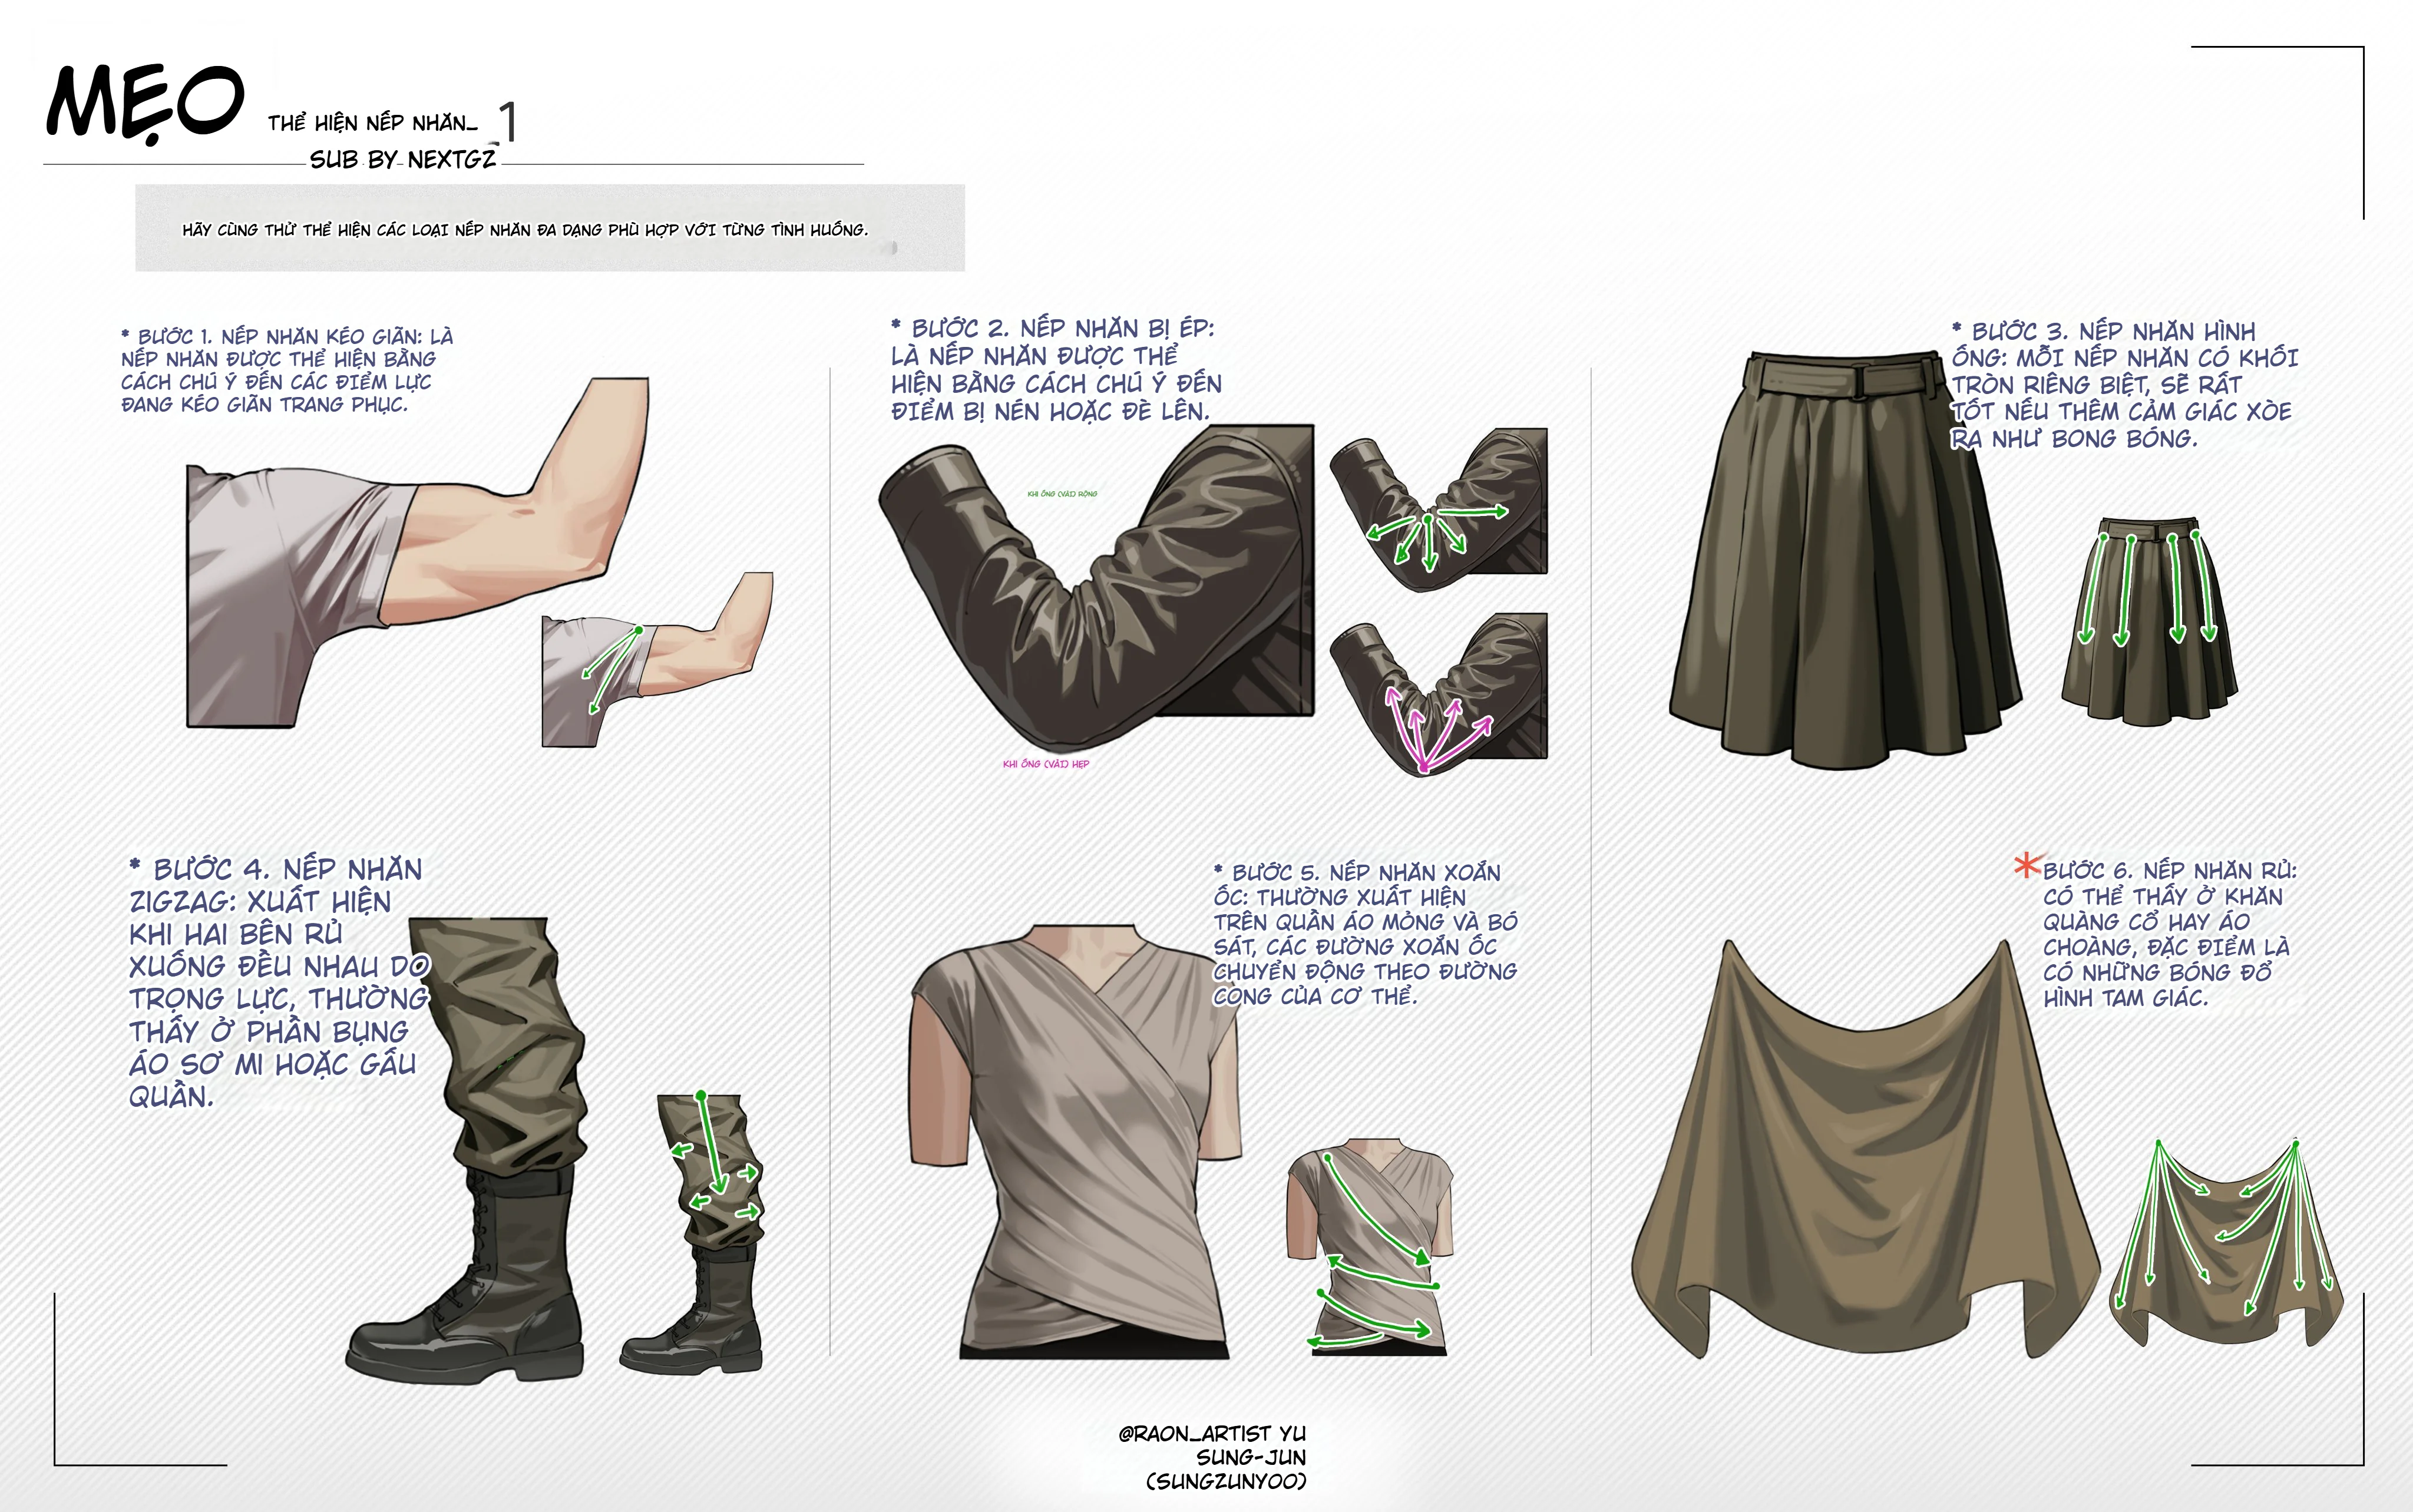
Drawing clothes isn't just about "covering a layer of fabric" over a character's body. To make clothing look like it has volume, weight, and fits the body's movements, an artist needs to understand where wrinkles come from. In digital art, folds are usually governed by a few key factors: hanging points, tension, compression, gravity, material thickness, and fabric surface.
Clip Studio's guide materials also emphasize that when drawing clothes, you should imagine the fabric clinging to the body's masses, then identify the areas being pulled, the areas being compressed, and the direction the fabric falls. This is an important foundation to prevent folds from being drawn randomly.
This set of images breaks down clothing wrinkles into 12 very easy-to-understand types. Each type is suitable for a different situation, from tight t-shirts, bent sleeves, pleated skirts, thick hoodies, draped scarves, to shiny materials like leather or PVC.
1. Stretch Folds: When fabric is pulled in one direction
Stretch folds appear when fabric is taut due to body movement or tension from a fixed point. In the image, the example is on the sleeve part when the arm is extended forward. The fabric is pulled from the shoulder down to the arm, so the folds usually run in the direction of the tension force.
This type of fold is very common at the elbow, shoulder, chest area, waist, or areas where the character is stretching an arm, twisting, or bending down. When drawing, don't place folds randomly. First ask: "Where is the fabric being pulled from and to?" Then draw the fold lines following that force.
An easy tip is to draw folds as lines leading towards the tension point. The clearer the tension point, the more orderly the folds. If the character stretches their arm strongly, the folds will be longer and more distinct. If it's just a slight movement, the folds should be shorter and softer.
2. Compression Folds: When fabric is compressed
Compression folds appear when an area of fabric is bunched up due to a body joint bending, an object pressing against it, or the fabric layer being pushed towards one point. The clearest example is the sleeve at the elbow when the arm is bent. The fabric on the inside of the elbow is compressed, creating many small, thick folds that overlap.
This type of fold is extremely important when drawing characters in dynamic poses. If the arm is bent but the sleeve is still flat, the image will lose its sense of realism. Conversely, if you draw too many thick folds without logic, the sleeve will look messy.
Remember the principle: compressed areas usually have many small, dark folds close together. Stretched areas usually have longer, sparser folds that run in the direction of the tension.
3. Pipe Folds: Commonly seen in pleated skirts or fabric falling straight down
Pipe folds appear when fabric falls due to gravity and forms long, rounded tube-like shapes. In the image, this type is illustrated with a skirt. The folds run from the waistband down to the hem, creating a sense of fabric weight and drape.
This type is very useful for drawing skirts, cloaks, curtains, long scarves, or wide-leg pants. Because the folds are tube-shaped, light and dark areas usually alternate: one side catches the light, one side falls into shadow. If you only draw the outline without defining light and shadow, the skirt will look flat.
When drawing pipe folds, you should first determine the starting point at the top. If the fabric is held by a waistband, belt, or seam, the folds will flow down from there. Clip Studio Art Rocket also emphasizes the role of fabric material, external forces, and the underlying body area when analyzing clothing folds.
4. Zigzag Folds: When fabric is bunched up in a narrow area
Zigzag folds usually appear at the wrist area of sleeves, the ankle area of pants, the part of pants tucked into boots, or fabric blocked by a hard object. In the image, the example is the pants bunched up on a boot. The fabric cannot fall further down, so it is pushed back up, creating broken, zigzag folds.
This type of fold helps clothing look much more weighted. When long pants cover shoes but have no zigzag folds, the fabric feels very fake. Zigzag folds tell the viewer that the fabric is being caught, blocked, and bunched up.
The best way to draw them is to create uneven fold lines, some sharp, some soft, some overlapping. Don't draw zigzags too evenly like a decorative pattern, because real fabric folds usually have an irregular rhythm.
5. Spiral Folds: When fabric wraps around the body's mass
Spiral folds usually appear on soft, form-fitting clothing, especially wrap tops, thin fabric shirts, bodycon dresses, or garments with fabric running diagonally. In the image, the top has folds that go around the torso, following the curves of the chest, waist, and hips.
The important point of this type of fold is understanding the body mass underneath. The fabric doesn't lie on a flat plane; it's wrapping around the ribcage, stomach, and waist. Therefore, the folds must curve along the body's form and should not be drawn straight.
If you want spiral folds to look better, imagine the body as a soft cylinder. The fabric folds run around that cylinder; the parts closer to the viewer are clearer, while the hidden parts are fainter and shorter.
6. Drop Folds: When fabric hangs from one or more points
Drop folds are commonly seen in scarves, cloaks, curtains, long skirts, or pieces of fabric held at two ends. In the image, the fabric drapes down, creating soft curves that converge towards the hanging points at the top and sides.
This type is strongly influenced by gravity. The heavier the fabric, the deeper the folds, and the more pronounced the sagging part. The thinner the fabric, the more numerous, soft, and smaller the folds. A course on folds from SVS Learn also describes learning the "anatomy of folds" including tension, compression, overlapping edges, and many types of folds like pipe folds, half-lock folds, drop folds as a foundation for drawing fabric folds more convincingly.
When drawing draped fabric, determine the hanging points first. Then let the folds fall according to gravity. The fold lines usually have a triangular or sagging curve shape; they should not be pulled completely straight.
7. Wind Folds: When fabric is affected by an external force
Wind folds appear when fabric is not only falling due to gravity but is also blown off to one side. In the image, the flying fabric has irregular fold lines, wavy edges, and folds extending in the direction of the wind.
This type of fold is very useful for drawing action scenes, characters running, cloaks billowing, or backgrounds with strong wind. Wind folds give the image movement, creating a feeling that the character is in a living space.
When drawing this type, you should establish a consistent wind direction. If the wind blows from left to right, most of the fabric lines, edges, and major folds should follow that direction. A few small folds can deviate to create naturalness, but the overall look still needs a common logic.

8. Small Distributed Folds on Tight-Fitting Tops
This type appears on t-shirts or soft, form-fitting materials. In the image, small folds are scattered around the chest, waist, and stomach. They are not as large as drop folds, nor as thick as compression folds, but are small signs that the fabric is clinging to the body's form.
This is a type of fold many beginners easily overlook. When drawing a tight t-shirt, if you shade it too smoothly, the character will look like they are wearing a layer of plastic. But if you add too many folds, the shirt looks dirty and old. You need restraint, placing folds only in areas under stress like the chest, armpits, waist, stomach, and hips.
For tight tops, folds should be thin, light, and follow the body's curves. Areas of fabric under tension will have fewer folds, while areas that are bunched up or loose will have more distinct folds.
9. Folds on Shiny Materials like Leather, PVC, or Latex
In the image, the shiny black shorts clearly illustrate how to draw materials with a highly reflective surface. With this type of fabric, folds are not only shown by wrinkle lines but also by sharp, high-contrast highlights.
Unlike cotton or soft fabric, shiny materials usually have distinct white highlights, sharp bright edges, and deep dark areas. If you only use soft shading, the surface won't feel like PVC or shiny leather. Conversely, if the highlights are too chaotic, the material will look like metal or hard plastic.
A reasonable approach is to choose a few main highlight areas: the edge of the thigh, the front of the pants, major fold creases, and areas near seams. Highlights should follow the direction of the fabric surface, not be placed randomly.
10. Folds of Thick Materials: Hoodies, Jackets, Oversized Fit
Folds on thick fabric are usually large, heavy, and fewer than on thin fabric. In the image, the hoodie has large folds that sag according to the weight of the garment. Because the material is thick, the folds are not fragmented but form large blocks.
When drawing a hoodie or oversized jacket, it's important to create the feeling that the fabric mass has thickness. The edges of the garment, sleeves, hood part, and folds on the chest should have clear drop shadows. Thick fabric usually doesn't cling tightly to anatomy like a t-shirt, but creates an outer layer covering the body.
If you draw a hoodie too form-fitting, it loses its character. If you draw folds too small and dense, the material will look like thin fabric. Therefore, use large folds, broad light and dark areas, and fold edges with moderate softness.
11. Folds of Thin Materials: The thinner the fabric, the more it clings to the body
In the image, the white tank top illustrates thin, form-fitting material. Thin fabric usually clings to the body more, so the folds follow the anatomy closely. Small folds appear around the chest, waist, stomach, and areas where the fabric is pulled.
With thin materials, the artist needs very careful control to avoid making the drawing look too heavy. Folds should be light, thin, with soft transitions. Drop shadows should not be too dark unless the fabric is deeply folded or strongly compressed.
A simple tip is to draw the body form first, then drape the clothing over it. If you don't understand the masses of the chest, waist, shoulders, and stomach, the folds on thin clothing will easily be wrong.
12. Angular Folds on Stiff Materials
Angular folds usually appear on stiff shirts, structured jackets, thick fabric, or materials that have been tailored to hold a shape. In the image, the shirt has broken folds on the sleeves, body, and button area.
This type of fold is very necessary for office wear, uniforms, jackets, shirts, or structured designer clothing. Unlike soft fabric that creates soft, draping curves, stiff fabric creates more distinct broken segments. The folds often have sharp edges, clear drop shadows, and sudden changes in direction.
When drawing, combine short straight lines, broken angles, and large shadow areas. Don't make everything too soft, as it will lose the feel of stiff fabric.
How to Quickly Memorize the 12 Types of Folds
If you want to practice quickly, you can group these 12 types into 4 easy-to-remember groups.
The first group is folds caused by force: stretch folds, compression folds, zigzag folds. These are folds that appear when fabric is directly affected by the body or an object.
The second group is folds caused by gravity: pipe folds, drop folds, thick fabric folds. These are folds that appear when fabric falls, hangs, or is pulled down by its weight.
The third group is folds caused by material: thin fabric, thick fabric, shiny material, stiff material. Each material will have a different way of catching light and creating folds.
The final group is folds caused by movement: spiral folds, wind folds, small distributed folds on tight tops. This group helps the drawing feel more lively, especially when drawing characters in action.
Practice Exercises for Beginners
To practice effectively, don't start with an overly complex, complete drawing. Choose one type of fold each day and draw it using simple shapes.
On the first day, you could practice a stretched sleeve. The next day, practice a compressed elbow. Then practice a pleated skirt, a draped scarf, a thick hoodie, a thin t-shirt, and shiny leather pants. Each exercise only needs 20 to 30 minutes, but you must focus on the cause of the folds.
A good practice exercise should have three steps: draw the body mass or object underneath, identify the tension point or hanging point, and then draw the folds. If you skip the first two steps, the folds can easily become decorative, looking nice in sections but wrong overall.
Common Mistakes When Drawing Clothing Folds
The most common mistake is drawing too many folds. Not every area on clothing needs wrinkles. Areas under tension usually have fewer folds. Areas that are compressed, loose, or bunched up have more folds.
The second mistake is not paying attention to the material. A t-shirt, hoodie, dress shirt, shiny leather, and a scarf cannot have the same type of folds. If all materials are rendered the same way, the clothing will lose its sense of realism.
The third mistake is not understanding the body underneath. Clothing always lies on the human form. If the anatomy is wrong, the fabric folds will also be wrong. This is why, when learning to draw clothes, you still need to practice gesture, body masses, and direction of movement.
The final mistake is lighting that doesn't follow the folds. A fold is not just a line. It needs a light area, a dark area, a crease edge, and tonal transitions. Especially with shiny materials, highlights are the key factor that helps the viewer recognize the fabric surface.
Conclusion
These two guide images are very useful because they not only show "how to draw folds," but also explain "why folds appear." When you understand the cause of folds, you will no longer have to draw clothes based on feeling alone.
To draw character clothing better, remember this simple formula: determine the body form, determine the tension point or hanging point, consider the fabric material, and then draw the folds. Thin fabric will cling and have many small folds. Thick fabric will be heavy and have few large folds. Shiny fabric needs strong highlights. Stiff fabric creates broken angles. Draped fabric is always subject to gravity.
Once you grasp these principles, you can apply them to almost any type of clothing in digital art: t-shirts, shirts, hoodies, skirts, cloaks, fantasy costumes, modern outfits, cloth armor, or game character outfits.
Đánh giá bài viết
More from author
Tự Học Clip Studio Paint Cơ Bản: Hướng Dẫn Toàn Diện Cho Người Mới Bắt Đầu

Bộ Sưu Tập 48 Brush Information Volume Tạo Chi Tiết Và Texture Cực Đỉnh Cho PS, Procreate, CSP

Cách tô màu tóc anime trong ibisPaint X theo quy trình 12 bước, lên khối đẹp mà không bị bệt

Hướng dẫn tinh chỉnh tranh vẽ: Sửa lỗi phối cảnh mắt và tô bóng chuyên nghiệp
You might also like
Cách tô màu tóc bạc anime: quy trình đổ bóng, hòa màu và hoàn thiện tóc xám đẹp hơn
Cách tô màu tóc anime trong ibisPaint X theo quy trình 12 bước, lên khối đẹp mà không bị bệt
Hướng dẫn sinh tồn Cho Digital Artist 2026: Khi Kỹ Thuật Gặp Cá Tính
Bình luận
0 bình luận
Đăng nhập để tham gia thảo luận cùng cộng đồng!
Đăng nhập ngayĐang tải bình luận...