

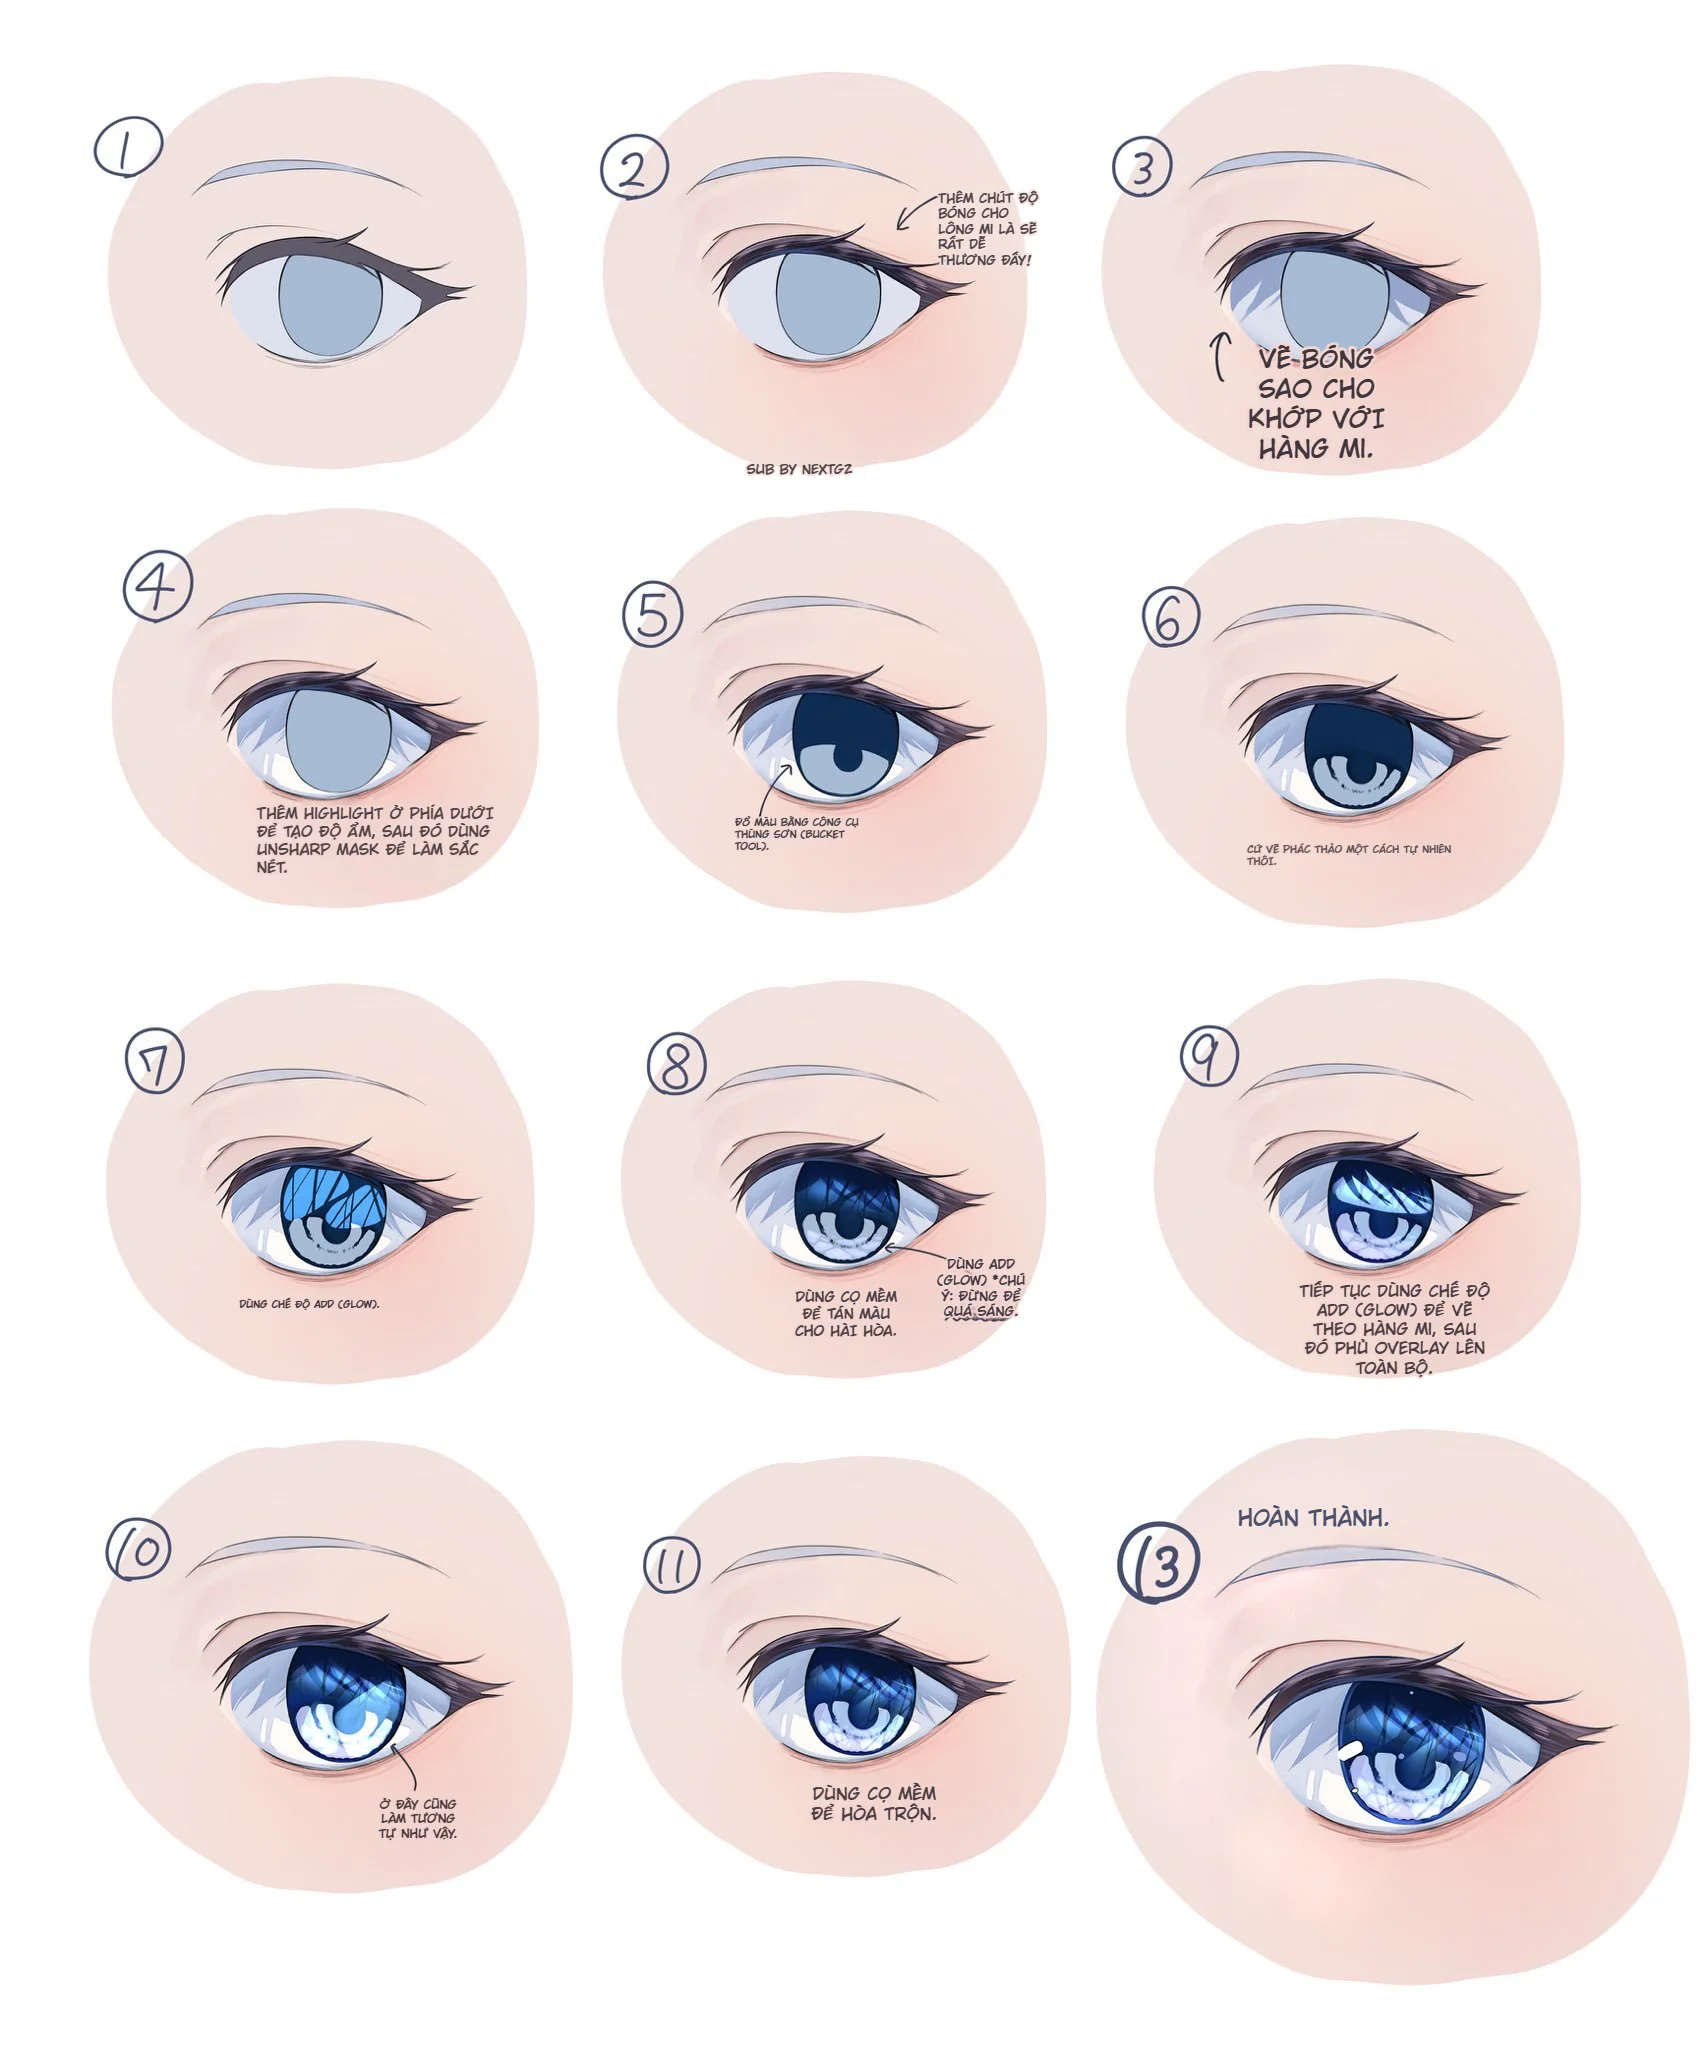
Overall, this is a tutorial for drawing eyes in a style that is clear, cool, with depth and extremely bright highlights, not the harsh neon pink-purple style from the previous set. The strength of this image is that it breaks the process down into very clear steps: from the basic line art, adding eyelid shading, building shadows that follow the lash line, laying down the base color for the iris, and then moving into layers of reflection, highlights, and post-processing. Just looking at the annotations in the image shows this workflow strongly leans towards a "multi-layered yet clean" eye painting system, very suitable for soft-colored anime girl illustrations. In terms of tools, terms like Add (Glow), Overlay, Fill/Bucket Tool, and Unsharp Mask are all functions available in Clip Studio Paint, and the official CSP documentation also confirms these blending modes are used to create glow, shadow, and lighting effects, while Unsharp Mask is used to increase sharpness by boosting contrast at color edges.
What kind of eye style is this?
The eye style in the image is a crystal blue anime eye, where the overall beauty doesn't come from an excessive amount of detail, but from the arrangement of the shadow on top, the clarity in the lower half, the large white highlight area, and the diagonal reflective streaks inside the iris. It looks like a thin layer of glass is placed on top: the eyeball isn't just a colored circle, but resembles a form with multiple layers of light and dark and many small reflective surfaces. That's why this workflow is most suitable for anime portraits, idol illustrations, light fantasy, or any artwork needing a "clean, bright, cool" gaze that's very eye-catching in thumbnails.
Step-by-step image analysis
Step 1: Build clean eye line art first, keeping the sclera and iris very neat
The first frame shows the eye is lined quite lightly, the upper eyelid is clearer than the lower one, and the iris is just a light blue-gray base. This step is very important because if the line art is messy or too heavy from the start, the later light layers can easily feel "trapped within the lines." A good workflow for this eye style requires line art that is neat enough to leave room for light and internal shadows.
Step 2: Add shading to the eyelashes and upper eyelid
In frame 2, the author increases the density in the eyelash and upper eyelid area. This is a small but extremely valuable step, as the top of the eye almost always holds the most visual weight. If the top line is as light as the bottom line, the eye can easily look lost. Here, the eyelid shading acts like an "awning," preparing the ground for the top shadow of the iris in the next step. In terms of layer theory, CSP describes blending modes as a way for layers to interact to create glow and shadow effects, so separating light and dark areas like this is completely in line with the spirit of layer-based rendering.
Step 3: Draw the shadow inside the eyeball to match the lash line
Frame 3 states very clearly: draw the shadow to match the lash line. This is an extremely standard principle. The shadow in the iris shouldn't be separate from the eye's structure; it must suggest that the upper eyelid is blocking light and the lashes are casting a shadow onto the iris surface. Getting just this one step right immediately gives the eye much more depth. This shadow also leaves room below for reflections and highlights.
Step 4: Add a highlight at the bottom to increase wetness, then sharpen
Frame 4 is where the tutorial starts to "pop." The author adds a bright area in the lower half of the iris to create a wet and clear feeling. It also mentions sharpening with Unsharp Mask. In the official Clip Studio Paint documentation, Unsharp Mask is a filter that sharpens an image by increasing contrast at color boundaries; you can adjust strength, radius, and threshold to control the effect. Using it lightly at this stage is appropriate, because soft bright areas can easily become blurry without a light sharpen to maintain the reflection edges.
Step 5: Fill the main color for the iris using a fill tool
Frame 5 shows the iris starting to take on a darker blue color, and the annotation clearly states filling color using the bucket tool. In Clip Studio Paint, the Fill Tool has many options like layer reference, anti-aliasing, and gap handling, making it very suitable for quickly filling a clean color base before blending and further painting. This is a step that should be done neatly, because if the base isn't clean, later lighting effects will have messy edges.
Step 6: Sketch the internal eye patterns naturally
By frame 6, the author begins placing shapes inside the iris. This isn't the stage for strong highlights yet, but the step to "enrich the structure." A clear eye is often beautiful because inside it has many overlapping layers of shapes: bright rings, dark rings, streaks pulled towards the center, and soft reflective patches. The important thing is not to turn it into a monotonous colored circle.
Step 7: Use Add (Glow) to push the first light layer
Frame 7 clearly marks the use of Add (Glow). The Clip Studio Paint feature documentation lists Add (Glow) as a built-in blending mode, and CSP's blending mode guide states these blend modes can be used to create glow and strong light effects. If you want an eye that looks sparkling and "alive" immediately, Add (Glow) is a very suitable step for placing the first bright areas.
Step 8: Use a soft brush to blend colors harmoniously, but keep Add (Glow) for overly bright areas
Frame 8 is quite clever: the author doesn't just keep adding light, but also uses a soft brush to blend the colors to be softer. This is a major difference between "eyes with glow" and "eyes with blown-out highlights." The strong bright areas should still be kept on Add (Glow), but the transition areas need to be softened so the eye rendering retains a clear, transparent feeling and doesn't look harsh.
Step 9: Continue Add (Glow) and overlay Overlay on everything
Frame 9 is a very worthwhile step to learn. The author continues using Add (Glow) to draw more bright areas, then overlays Overlay on everything. According to the Clip Studio Paint function list, Overlay is a built-in blending mode like Add (Glow). In practice, Overlay is often used to increase color saturation and make light and dark colors "blend" together more without destroying the form too much. For this eye, it helps the blue become deeper and richer, instead of just being a blue base with white highlights slapped on top.
Step 10: Keep a large bright patch at the bottom of the eye to create a watery, moist feeling
Frame 10 emphasizes a fairly large bright patch in the lower half of the eye. This is an extremely effective trick. A large, slightly soft highlight placed low creates a feeling of a wet surface and gives the iris a realistic curvature. If the highlight is just a few small dots at the top, the eye can easily look dry or just "sparkly" but not "clear."
Step 11: Blend with a soft brush
Frame 11 states clearly: use a soft brush to blend. This step prevents everything from looking too coarsely layered. But the important point is not to blend everything into a smooth, flat mess; you must still keep some sharp edges at the reflections and shadow borders so the eye retains its light-catching quality.
Step 12/13: Finishing
The final frame shows the complete eye has all four elements:
top shadow with sufficient depth
the middle iris area has texture and diagonal reflections
the bottom of the eye has a large mass of light
the upper eyelid and lashes retain enough weight so the eye doesn't look "floaty"
That's why the overall look is very clean, cool, and elegant.
Important takeaways from this tutorial
The most valuable thing to learn isn't the number of steps, but the order of the light and dark layers. This image shows a very solid formula for clear blue eyes:
lock in clean line art
add weight to the upper eyelid
place the top shadow correctly aligned with the lash line
build a clean iris base
add patterns inside the iris
push bright areas with Add (Glow)
use Overlay to enrich the color
sharpen lightly with Unsharp Mask if needed
blend again with a soft brush
The beauty is that this formula is just "heavy" enough to give the eye depth, but not to the point of over-rendering.
Why is this eye style beautiful?
Because it balances very well between:
solid dark area on top
soft bright area below
sparkling details in the middle
and sufficient blue color saturation to avoid being overly cold
Simply put, this is an eye style that wins not by the quantity of detail, but by the structure of light.
How to adapt this tutorial to a different color tone?
Very easy. Keep the same workflow but change the base:
blue → dark purple will result in a cool fantasy eye
blue → gray-green will result in a softer, more natural eye
blue → pink-purple will result in a more candy-like, moe vibe
What needs to be kept isn't the blue color, but the method of dividing light – dark – reflection.
Conclusion
This tutorial is very worth keeping because it's a clean and intelligent eye rendering template. It doesn't rely too much on random textures, nor does it paint the eye with a single fill color and randomly add a few white highlights. Instead, it builds the eye in a very clear order: line, eyelid shadow, shadow matching the lash line, iris base, Fill Tool for clean areas, Add (Glow) for strong bright areas, Overlay to enrich the color, Unsharp Mask to maintain sharpness, and a soft brush to blend the layers. These tools and modes are all built-in features of Clip Studio Paint.
Where should you start when painting clear blue anime eyes?
Start from clean line art, then add weight to the upper eyelid and place the shadow above the iris to match the lash line. This method gives the eye depth right from the start.
What is Add (Glow) used for when painting anime eyes?
In Clip Studio Paint, Add (Glow) is a blending mode that can be used to create strong light and glow effects. It's very suitable for drawing the main highlight areas in the iris.
What is the purpose of Overlay in this eye tutorial?
Overlay helps make the eye color richer and increases the interaction between light and dark areas, making it very suitable for a light overlay after you have the base and highlights.
Should Unsharp Mask be used when painting eyes?
Yes, but use it lightly. In Clip Studio Paint, Unsharp Mask sharpens the image by increasing contrast at color edges, making it suitable for clarifying highlight areas or reflection edges after soft blending.
Is the Fill Tool useful when painting the iris?
Yes. Clip Studio Paint's Fill Tool allows for quick color filling and has options like layer reference, anti-aliasing, and gap handling, making it very convenient for creating a clean iris base before further rendering.


Bình luận
0 bình luận
Đăng nhập để tham gia thảo luận cùng cộng đồng!
Đăng nhập ngayĐang tải bình luận...