 Digital Painting








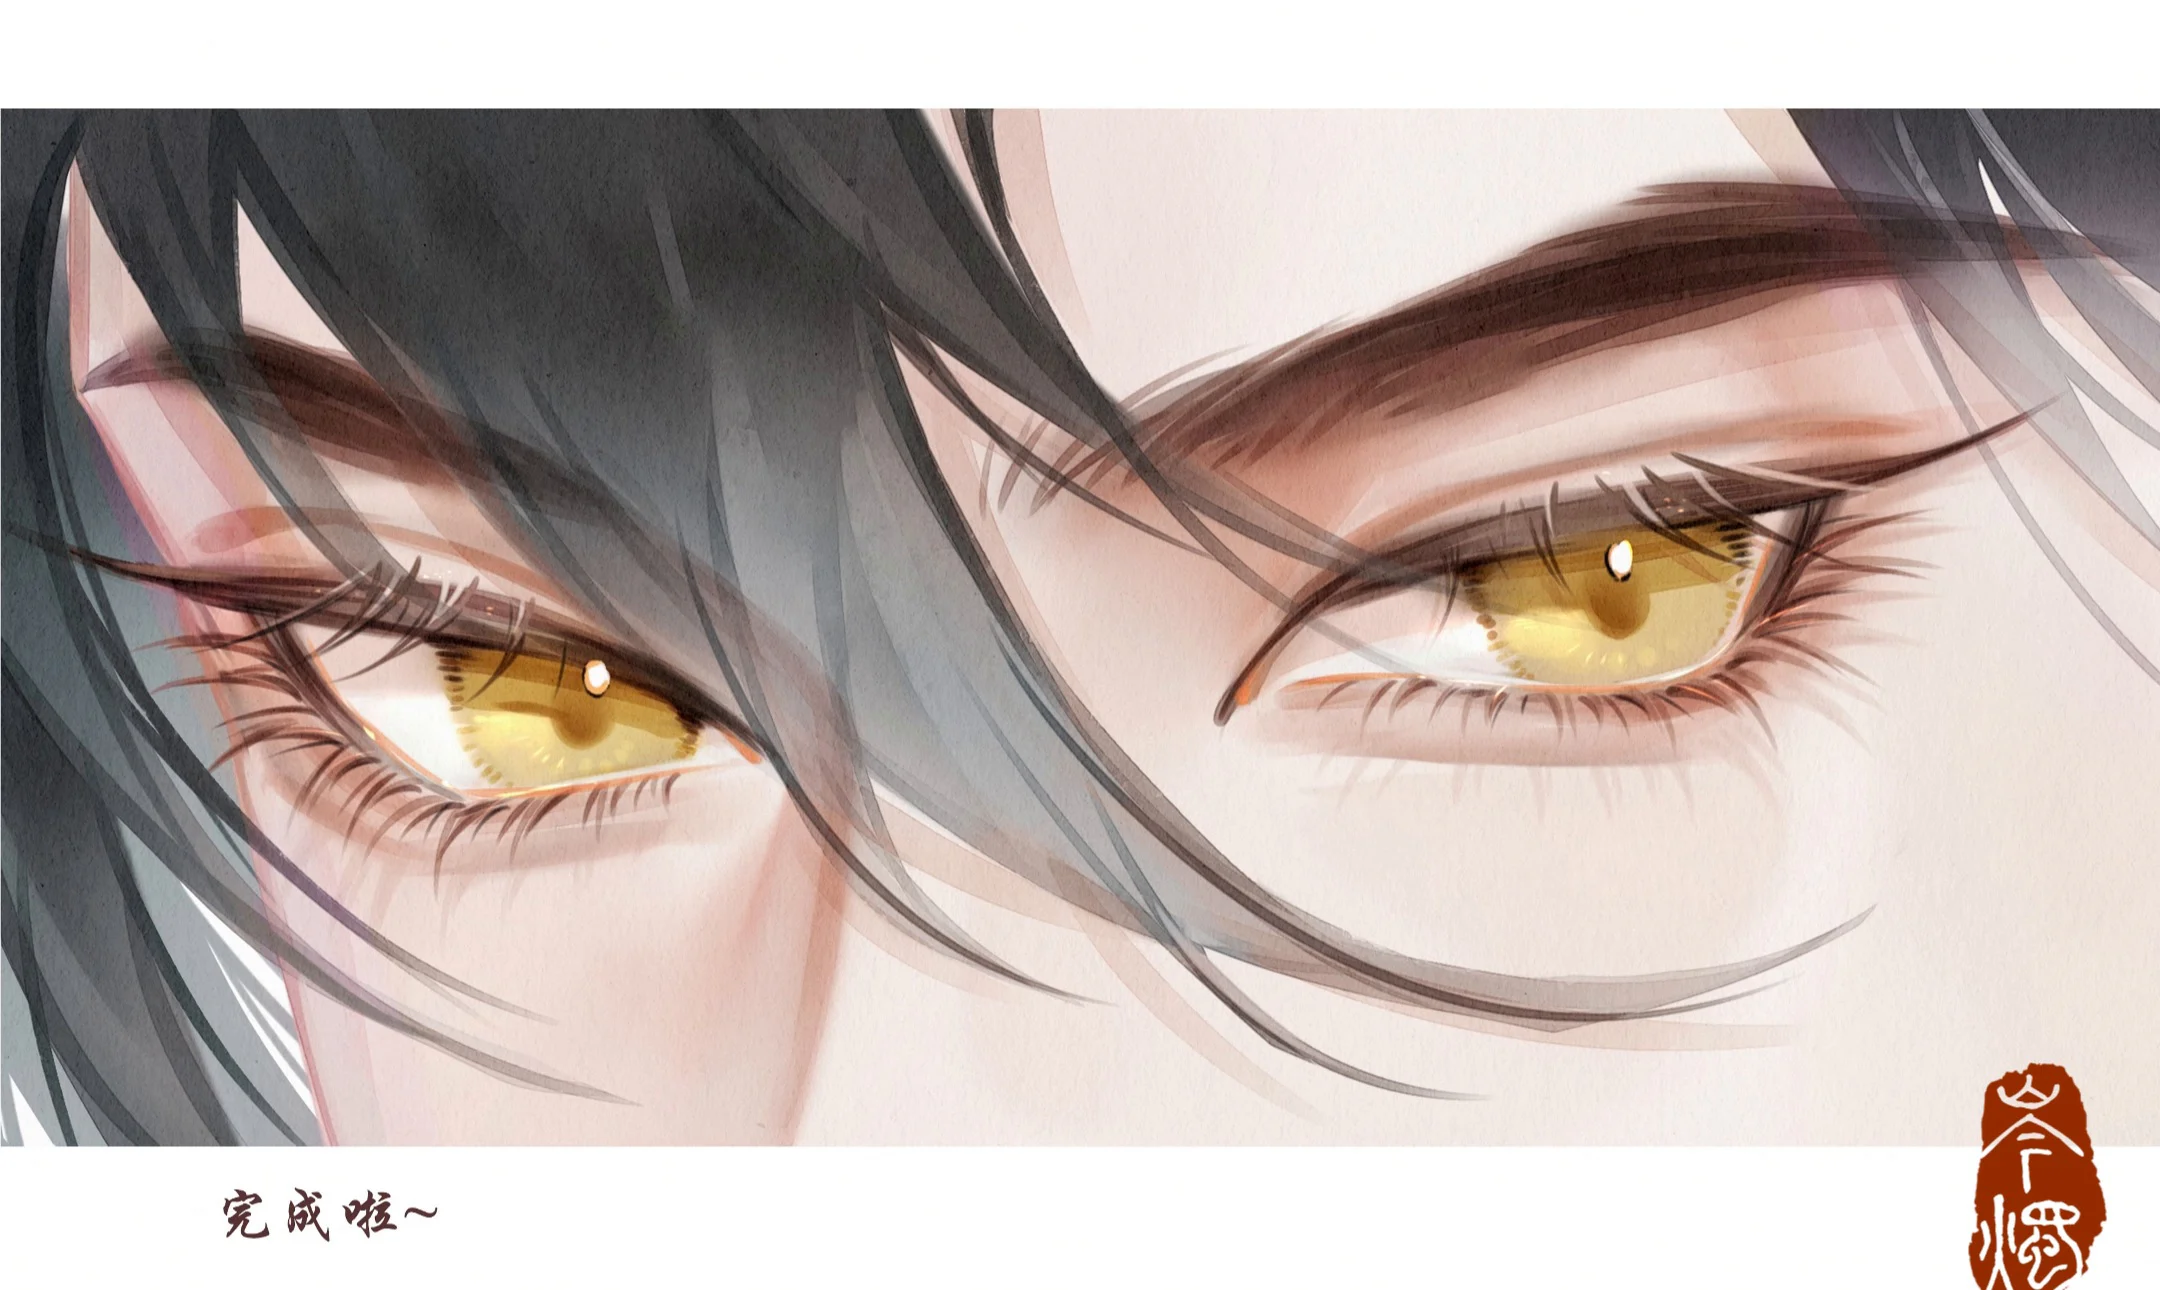
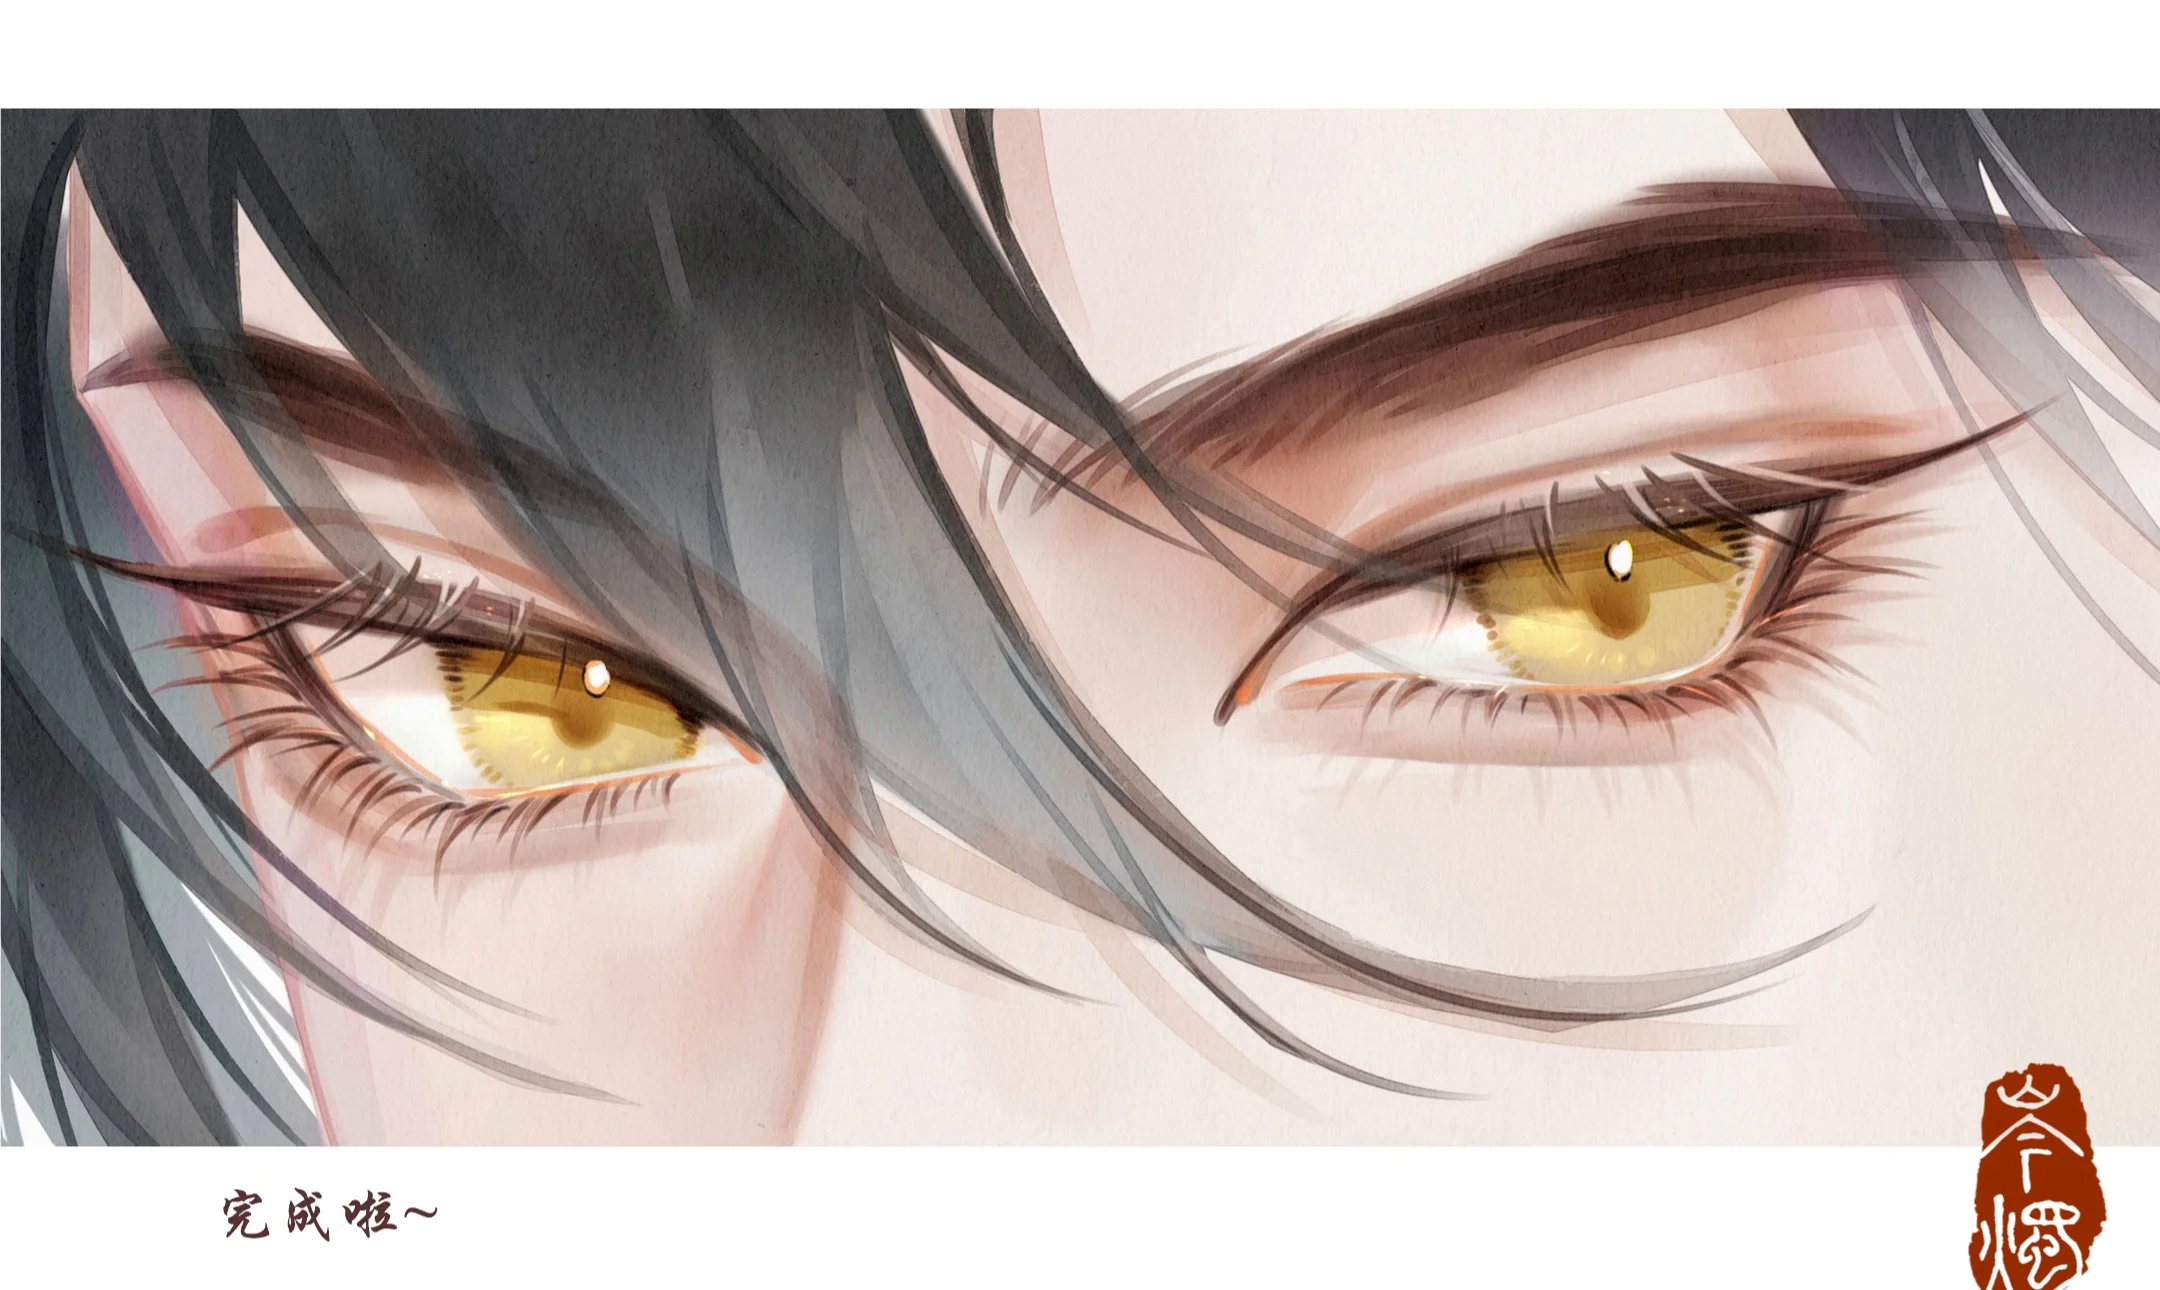
An eye that feels "sparkling" doesn't necessarily require using a glitter brush or adding lots of shiny dots. In the tutorial video lasting about 1 minute 44 seconds, this effect is created mainly by controlling the light and dark areas around the eyelid, softening boundaries in the right places, redrawing edges that need to be sharp, and placing a few intentional reflective highlights.
The guide below breaks down the entire process in the video stage by stage. The demonstration interface is Photoshop, but you can apply the same methods in Clip Studio Paint, Procreate, ibisPaint, or other software with layer blending modes like Multiply, Normal, and the lock transparency function.
Target result: the upper eyelid has thickness, the eye socket has depth, the eye socket area transitions smoothly, the eyelashes remain clear, and the pupil has strong enough highlights to create a glossy look without being plastic or overly bright.
Quick analysis of the technique in the video
The artist's process does not treat "drawing the eyelid" as a single, separate stroke. The eyelid is built simultaneously through four elements:
- Colored lineart: the lines are not pure black but changed to grayish brown or a color close to the skin, making the overall look softer.
- Multiply shading around the eye socket: shadows concentrated in the eyelid crease, outer corner of the eye, eyebrow area, and near the lash line.
- Alternating hard and soft edges: the eyelid crease and lash line need to be clear; areas blending into the skin must be smudged softly.
- Small reflective highlights: one or two bright spots on the iris, plus a thin bright line around the lower lash line, creating a moist and sparkling feel.
The most important point is not to blur everything. If all edges are soft, the eye will look dull and lack focus. If all edges are sharp, the eyelid area will resemble a hard makeup patch. The beautiful effect comes from alternating between sharp areas and smooth transitions.
Full video timeline
| Time | Main Content | Objective |
|---|---|---|
| 00:00–00:12 | Introducing the result and preparing the sketch | Define eye shape, angle, and eyelid crease |
| 00:12–00:24 | Arranging layers, changing lineart color using lock transparency | Make lines blend with skin and hair colors |
| 00:24–00:34 | Setting the eye base color and creating the first Multiply layer | Build shading around the eye socket, outer eye corner, and nose bridge |
| 00:34–00:46 | Merging layers, using Smudge to soften transitions | Remove the harsh color-block feel |
| 00:46–00:58 | Redrawing the eyebrow, lash line, and eyelashes | Restore sharp edges after softening |
| 00:58–01:10 | Merging layers a second time, cleaning up smudged areas | Balance sharpness and softness |
| 01:10–01:16 | Adding highlights on the iris and eyelid | Create a moist, bright, and sparkling feel |
| 01:16–01:36 | Finishing the hair, hair shadows, and color adjustments | Place the eyes within the overall face |
| 01:36–01:44 | Final color adjustments and viewing the finished result | Enhance unity, complete the focal point |
Tools and layer structure to prepare
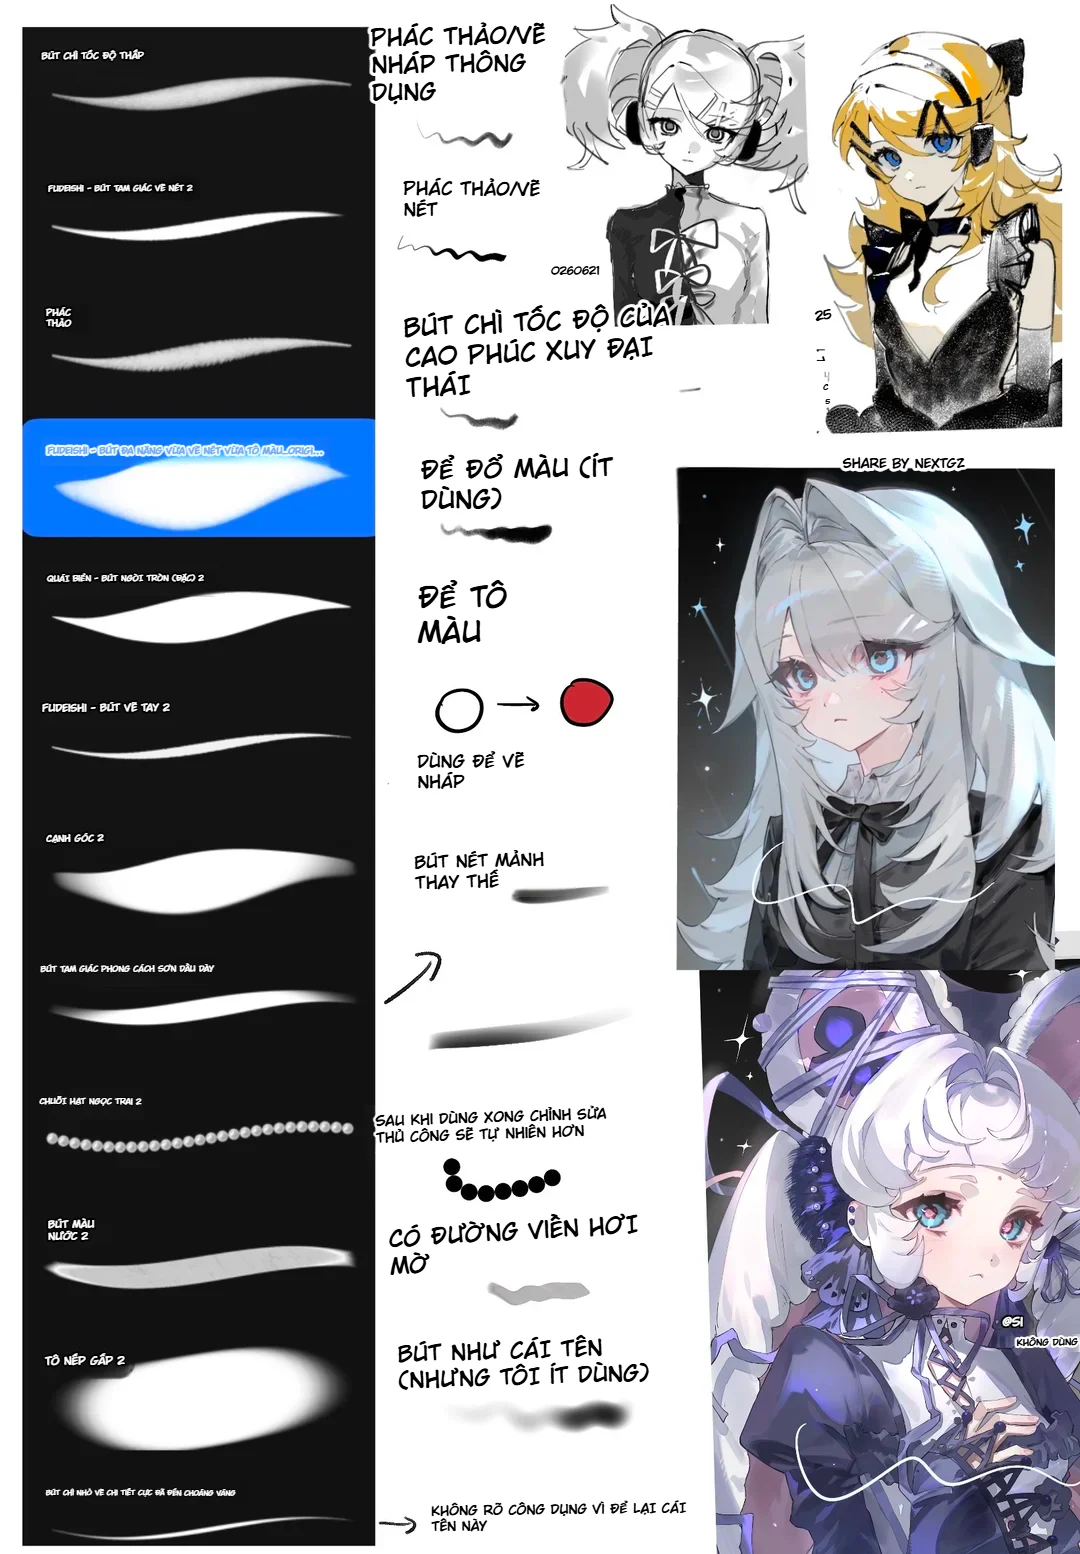
You don't need a complex brush set. A minimal set includes:
- A round brush with pressure sensitivity or a tapered lineart brush for drawing the eyelid crease, eyebrow, and eyelashes.
- A soft brush or a brush with low opacity for applying shading.
- A Smudge or blending brush to connect light and dark areas.
- A soft eraser to thin out line ends and clean up transition areas.
An easy-to-manage layer structure:
- Sketch.
- Lineart.
- Skin color and eye base color.
- Multiply layer for large shading.
- Detail adjustment layer for the eyelid and eyelashes.
- Highlight layer in Normal or Add/Screen mode at moderate opacity.
- Final color adjustment layer.
The artist in the video has a habit of merging layers multiple times. Beginners should duplicate the layer group before merging to retain the ability to go back and edit.
Step 1: Sketch the eye shape and eyelid crease before coloring
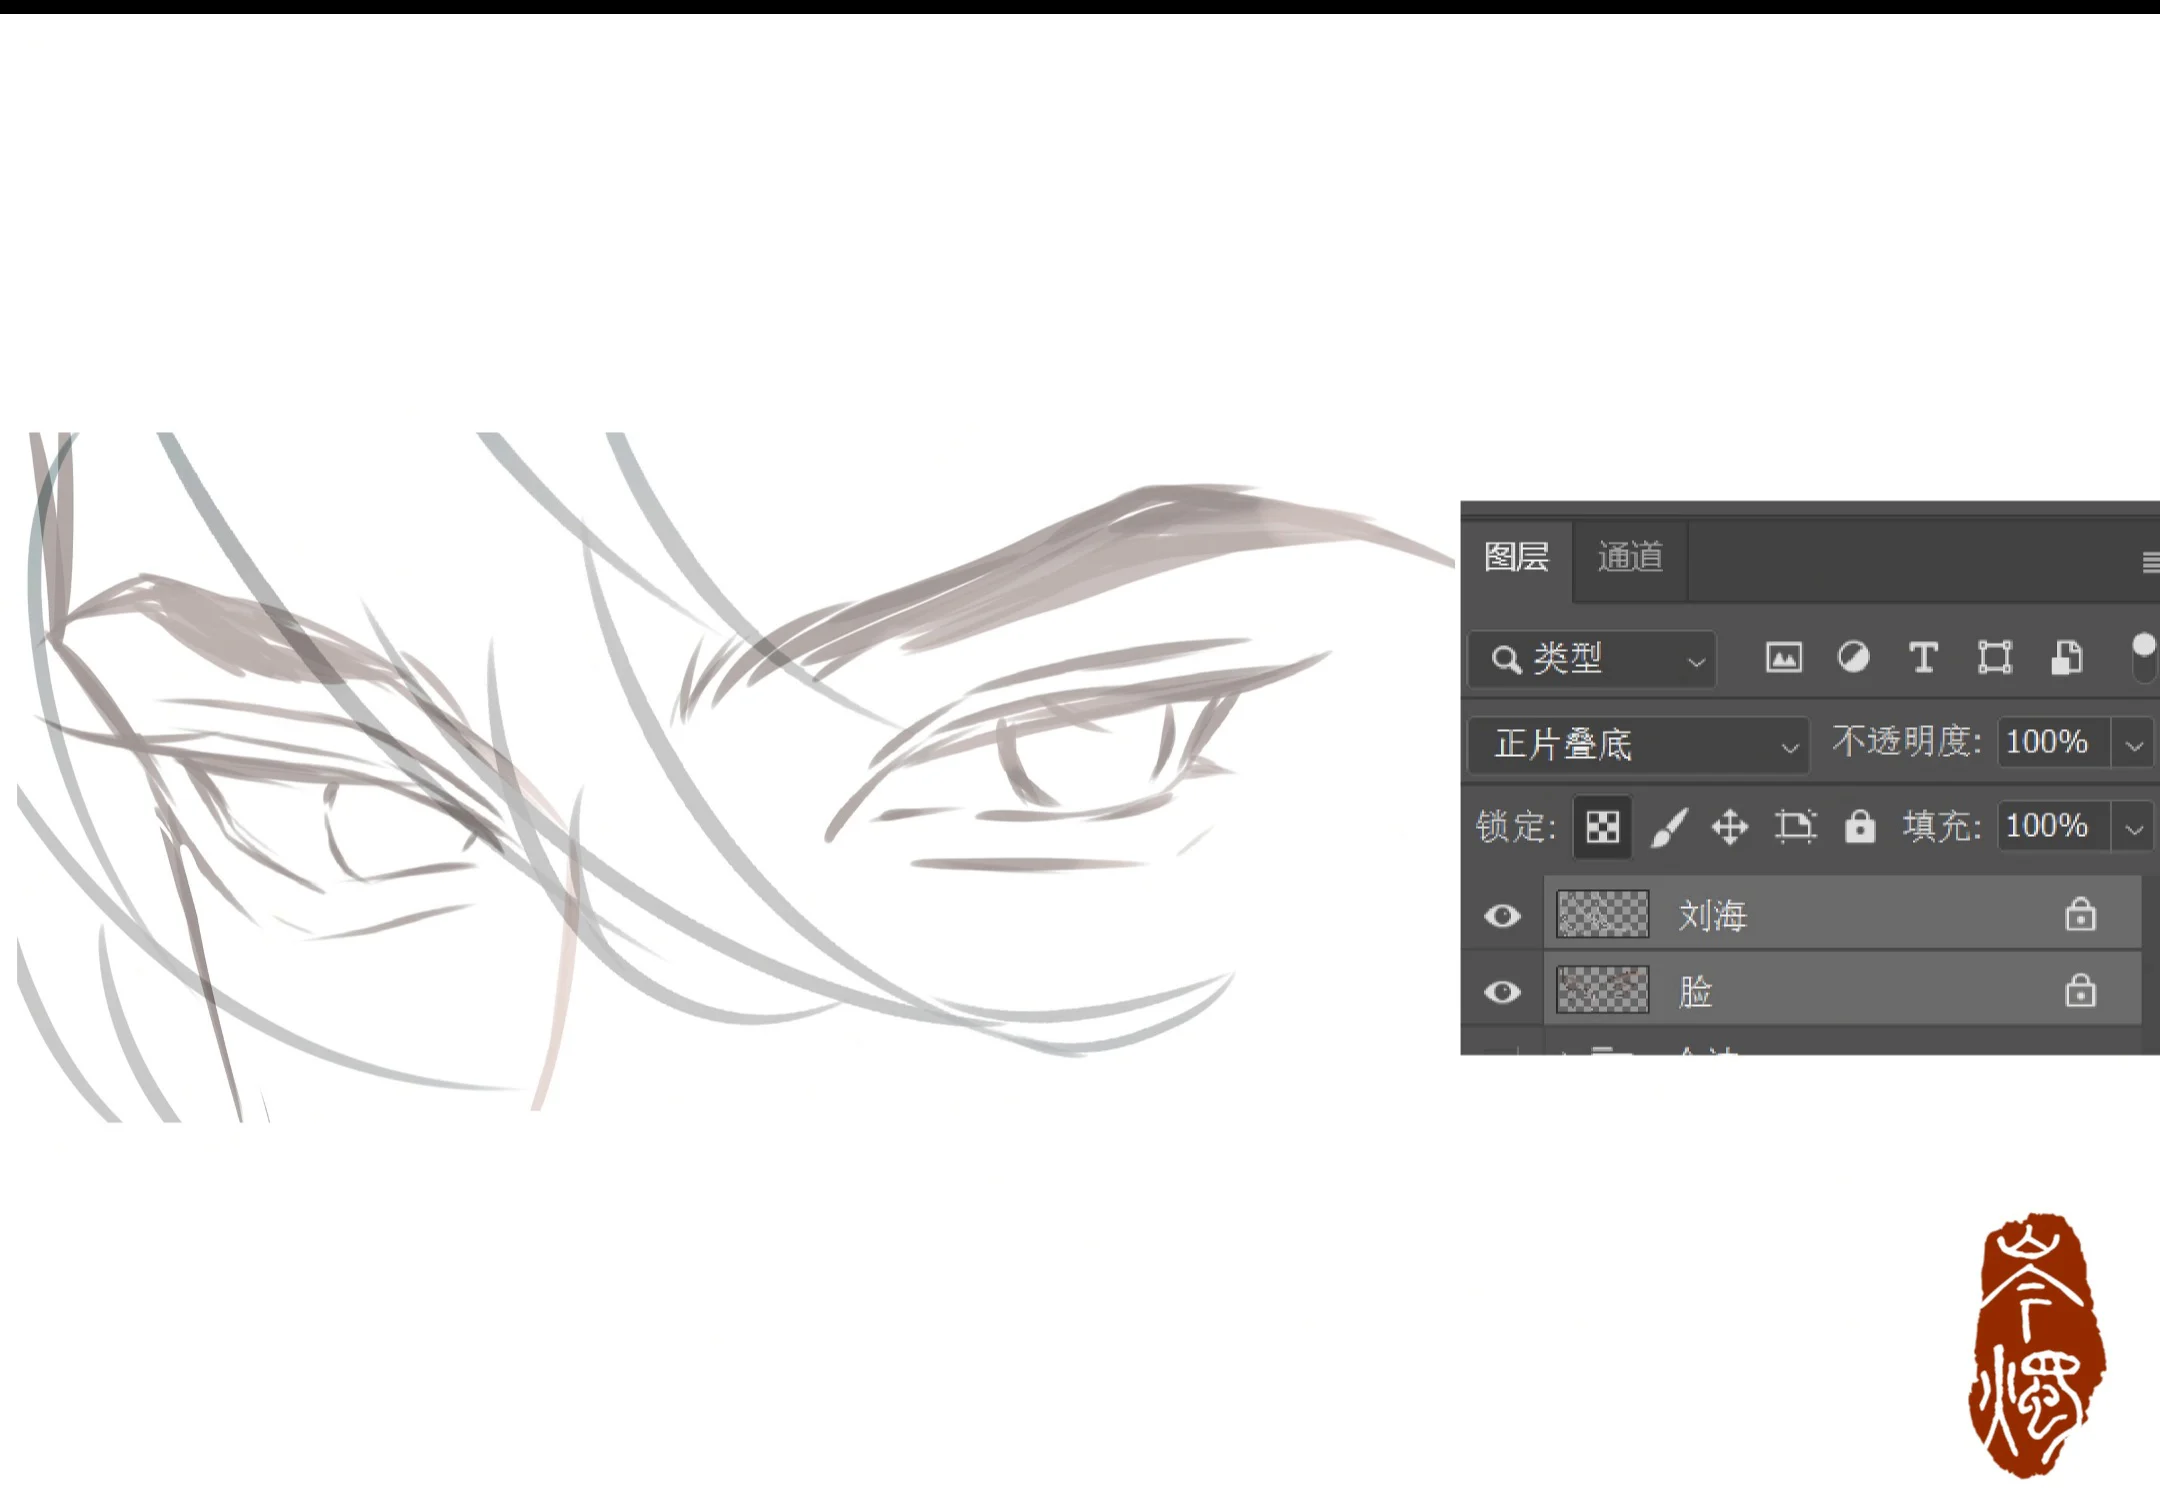
Start with a simple eye frame. Determine three main lines: the upper lash line, the lower lash line, and the eyelid crease. For a semi-realistic anime eye like in the video, the upper lash line is thicker from the middle to the outer corner, while the inner corner is thin and soft.
The eyelid crease should not run perfectly parallel to the upper lash line. It is usually closer to the lash line at the inner corner, widens slightly in the middle, then narrows again toward the outer corner. This method helps the eyelid feel like it wraps around the spherical shape of the eyeball.
At the sketching stage, don't draw the eyelashes too early. First, check:
- Whether both eyes are looking in the same direction.
- Whether the iris is positioned correctly under the upper eyelid.
- Whether the eyebrow height matches the expression.
- Whether there is enough space between the eyelid crease and the eyebrow to create shading transitions.
Step 2: Change the lineart color using lock transparency
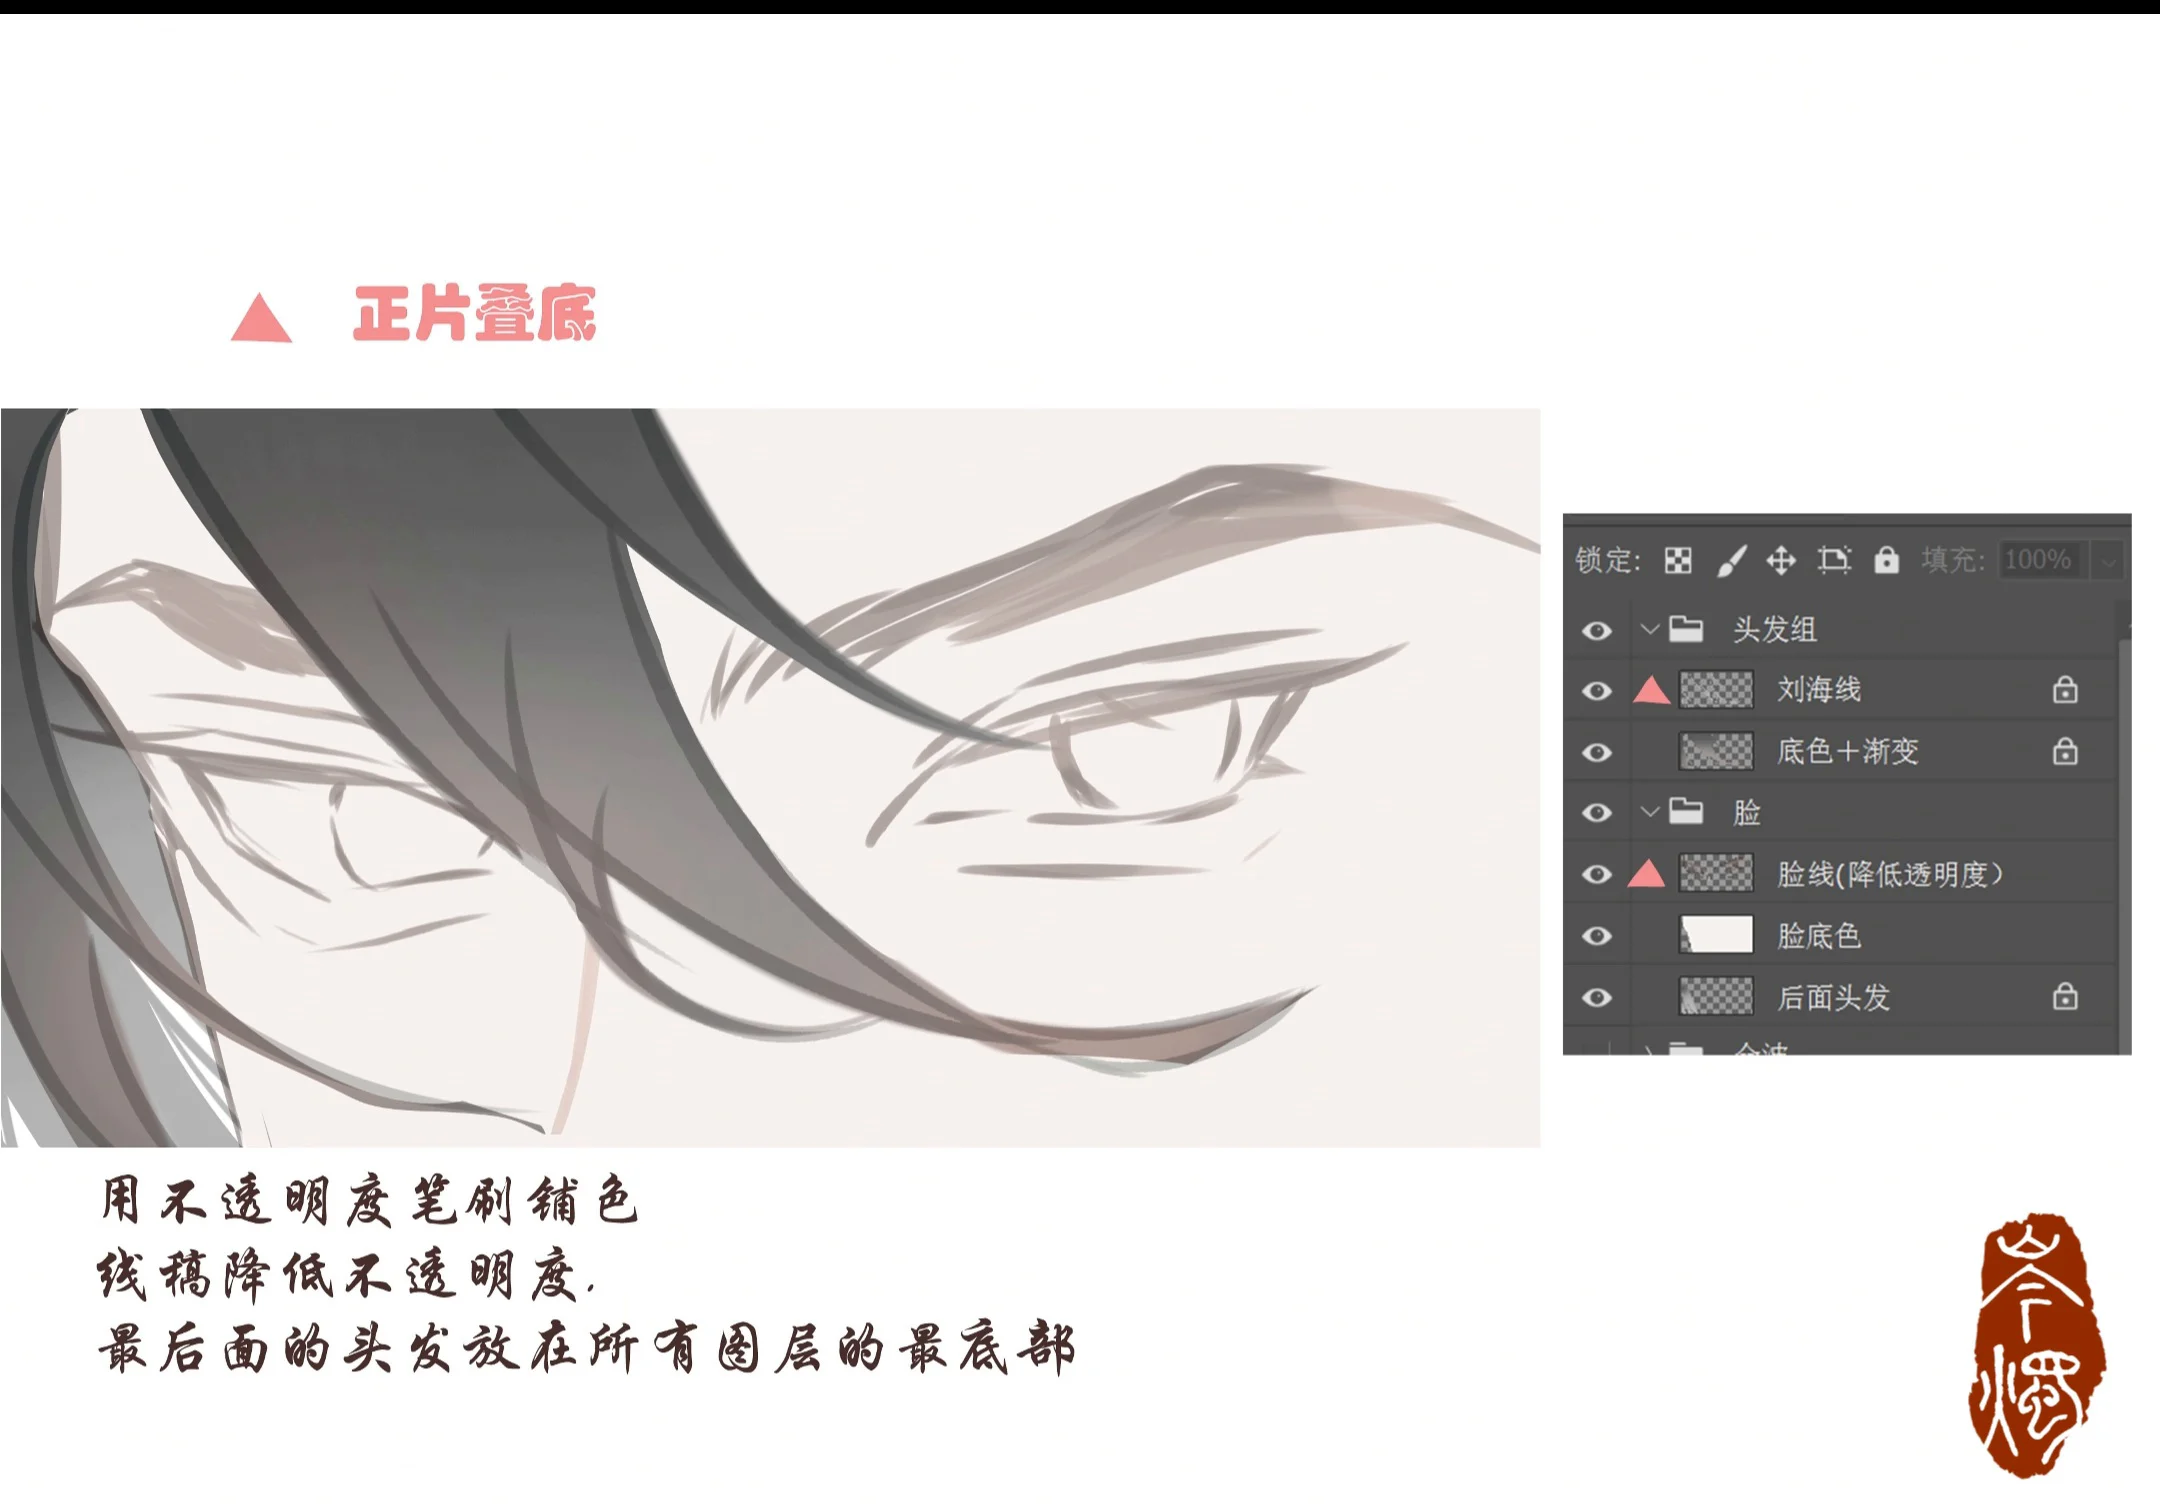
Once the lines are stable, enable Alpha Lock, lock transparent pixels, or a clipping mask on the lineart layer. Use a color like grayish brown, purplish brown, or a shade a few levels darker than the skin to recolor the lines.
You shouldn't use the same color for the entire eye. You can divide it as follows:
- Eyebrow: grayish brown or a color close to the hair.
- Upper lash line: darker brown than the eyebrow to maintain focus.
- Lower lash line: lighter and more reddish to avoid a heavy rimmed look.
- Eyelid crease: a medium color, less saturated than the upper lash line.
In the video, the artist also lowers the opacity of some secondary lines. This is a simple way to create depth without having to erase lines.
Step 3: Set the base color and build Multiply shading around the eyelid
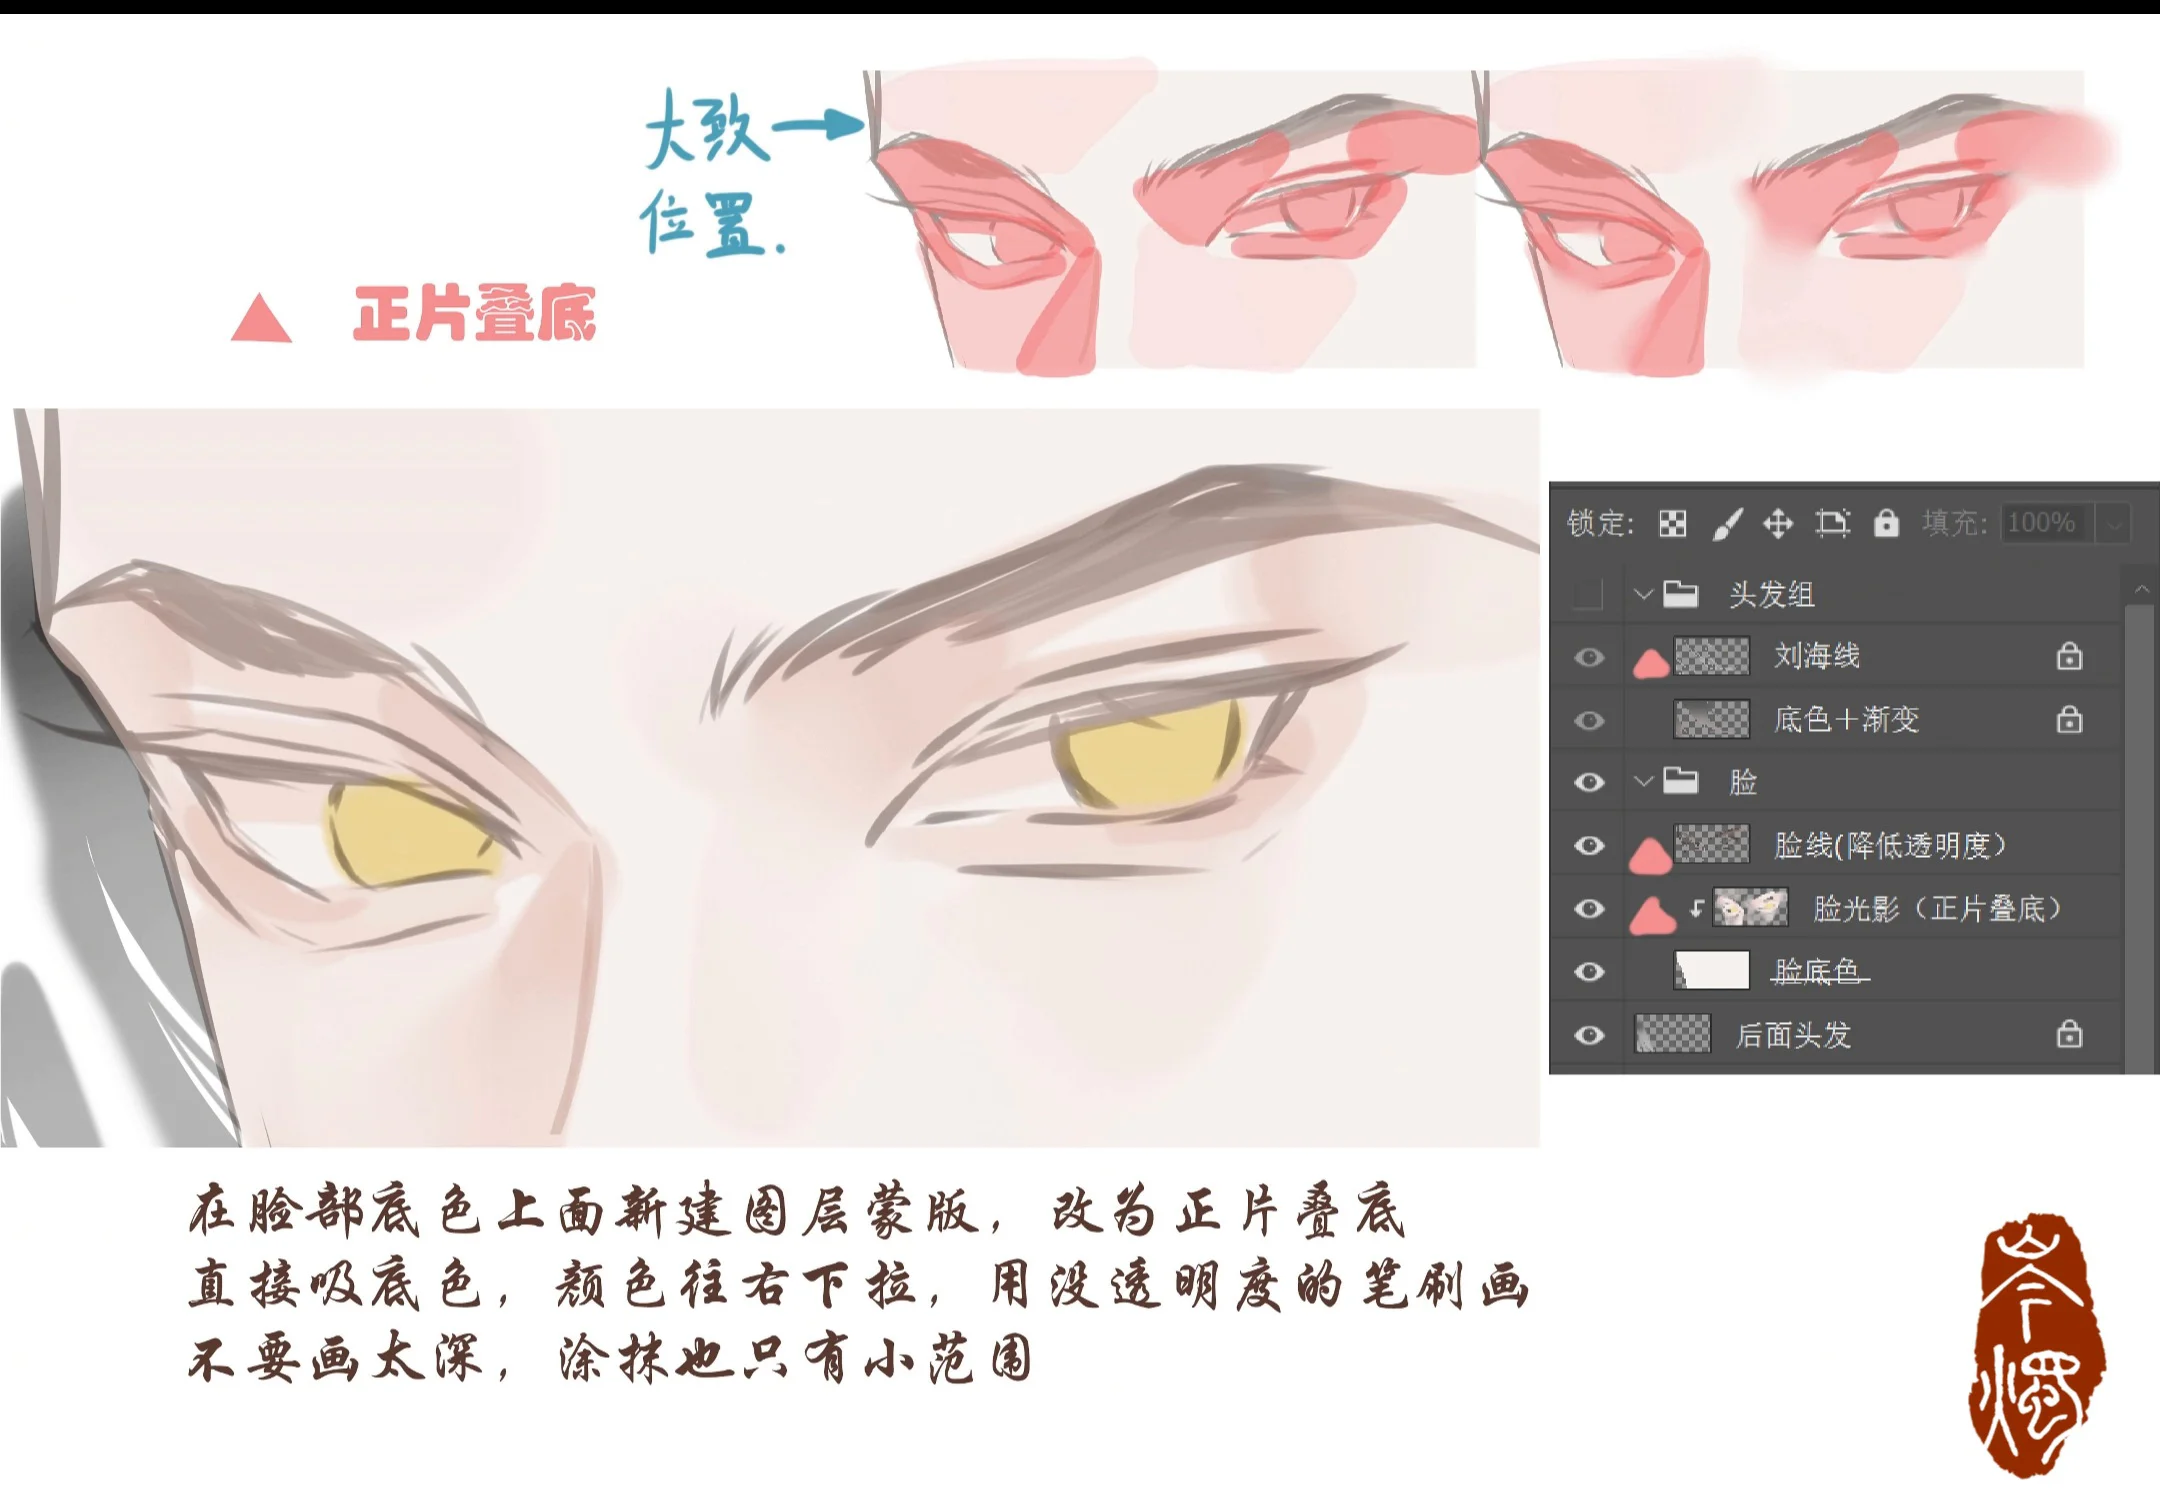
Color the iris base first. The video uses a warm yellow tone, but you can replace it with blue, purple, brown, or red depending on the character. The white of the eye shouldn't be pure white; use an off-white or very pale pinkish gray.
Create a new layer above the skin color, set to Multiply mode. Choose a low-saturation pinkish brown or purplish gray, then place shadows in the following areas:
- Under the eyebrow and near the eye socket.
- Above the lash line, especially on the outer half of the eye.
- The outer corner of the eye and the area connecting to the temple.
- The inner corner of the eye, the side of the nose bridge, and part of the under-eye bags.
Don't apply the shadow in an even band. Keep the center of the eye socket area brighter, with the inner and outer corners darker. This contrast is what makes the eyelid look curved and volumetric.
The artist in the video illustrates the shadow range with red patches in the upper corner. Think of this as a diagram: shadows lie around the rim of the eye socket, not covering the entire eye socket area.
--- ---Step 4: Soften the transitions while preserving the eyelid structure
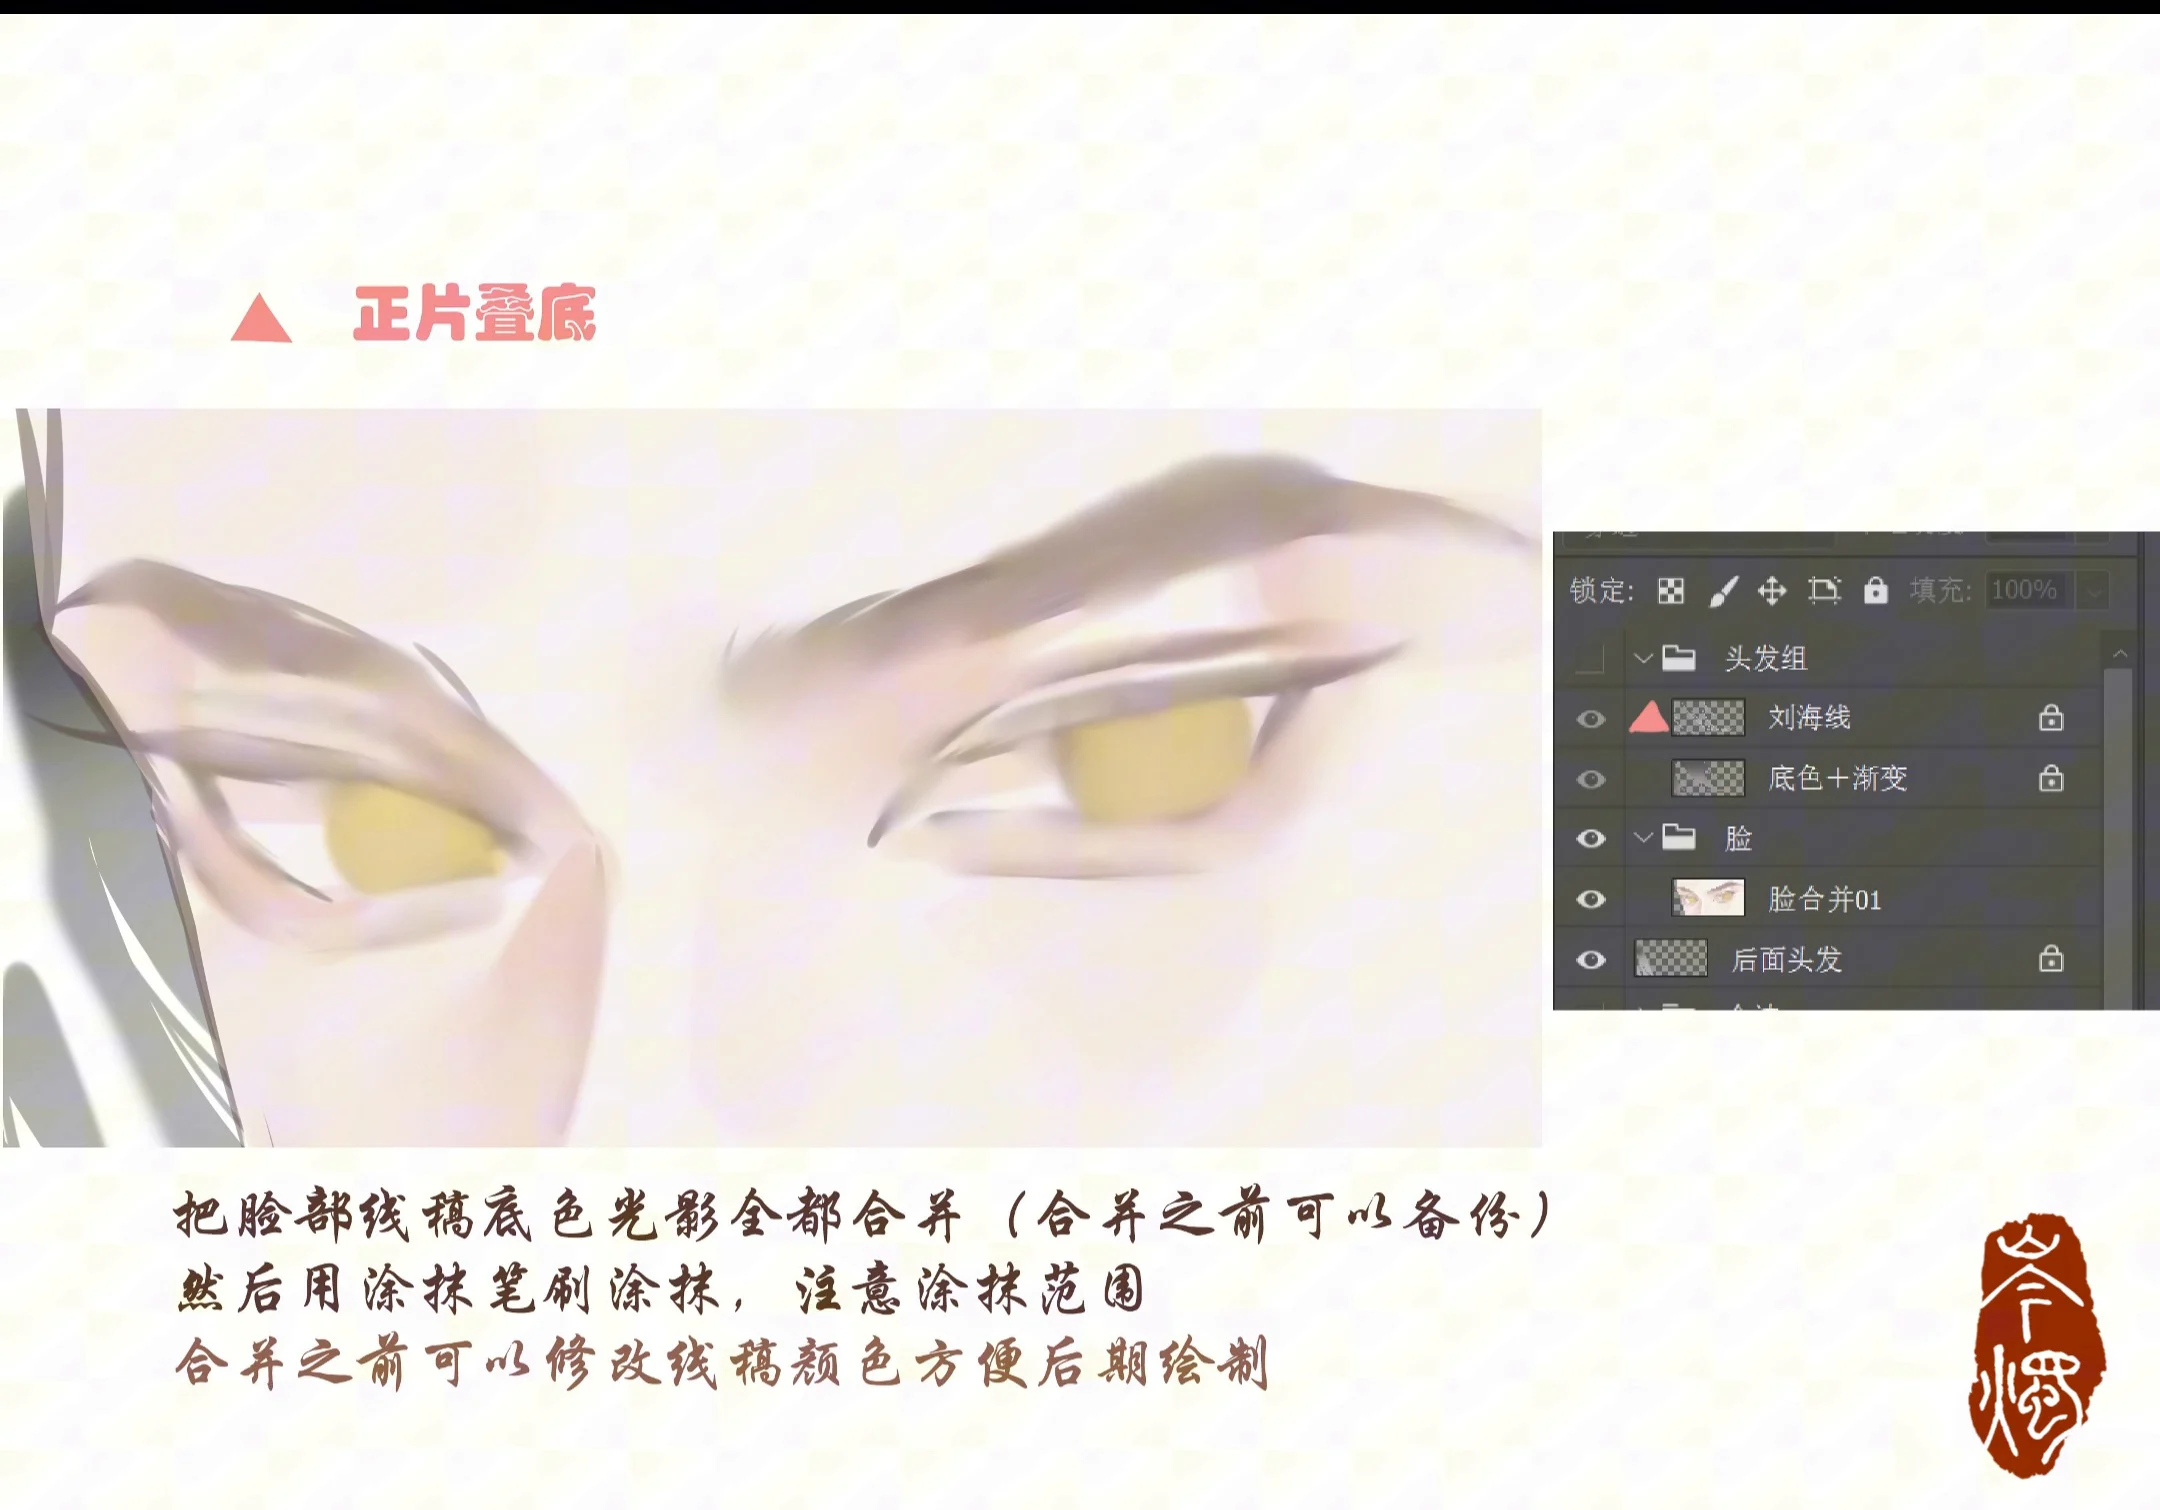
After creating the highlight area, the artist merges the skin color layers and then uses Smudge to soften it. This is the step most likely to go wrong.
Pull the color in the direction of the surface:
- From the eyelid crease up toward the eyebrow in an arc.
- From the outer corner of the eye, spread gently toward the temple.
- From the lower lash line down toward the cheekbone with very light pressure.
Don't use too large a Smudge brush and don't sweep across the entire eye. Only soften the outer edge of the highlight area. The area close to the lash line, the deep crease, and the corners of the eye must remain clear enough to maintain structure.
A quick check: zoom out on the image. If you can still make out the lash line and the eye socket position, the blending level is reasonable. If the eye has turned into a blurry gray-pink patch, you've over-blended.
Step 5: Redraw the eyelid line, eyebrows, and eyelashes
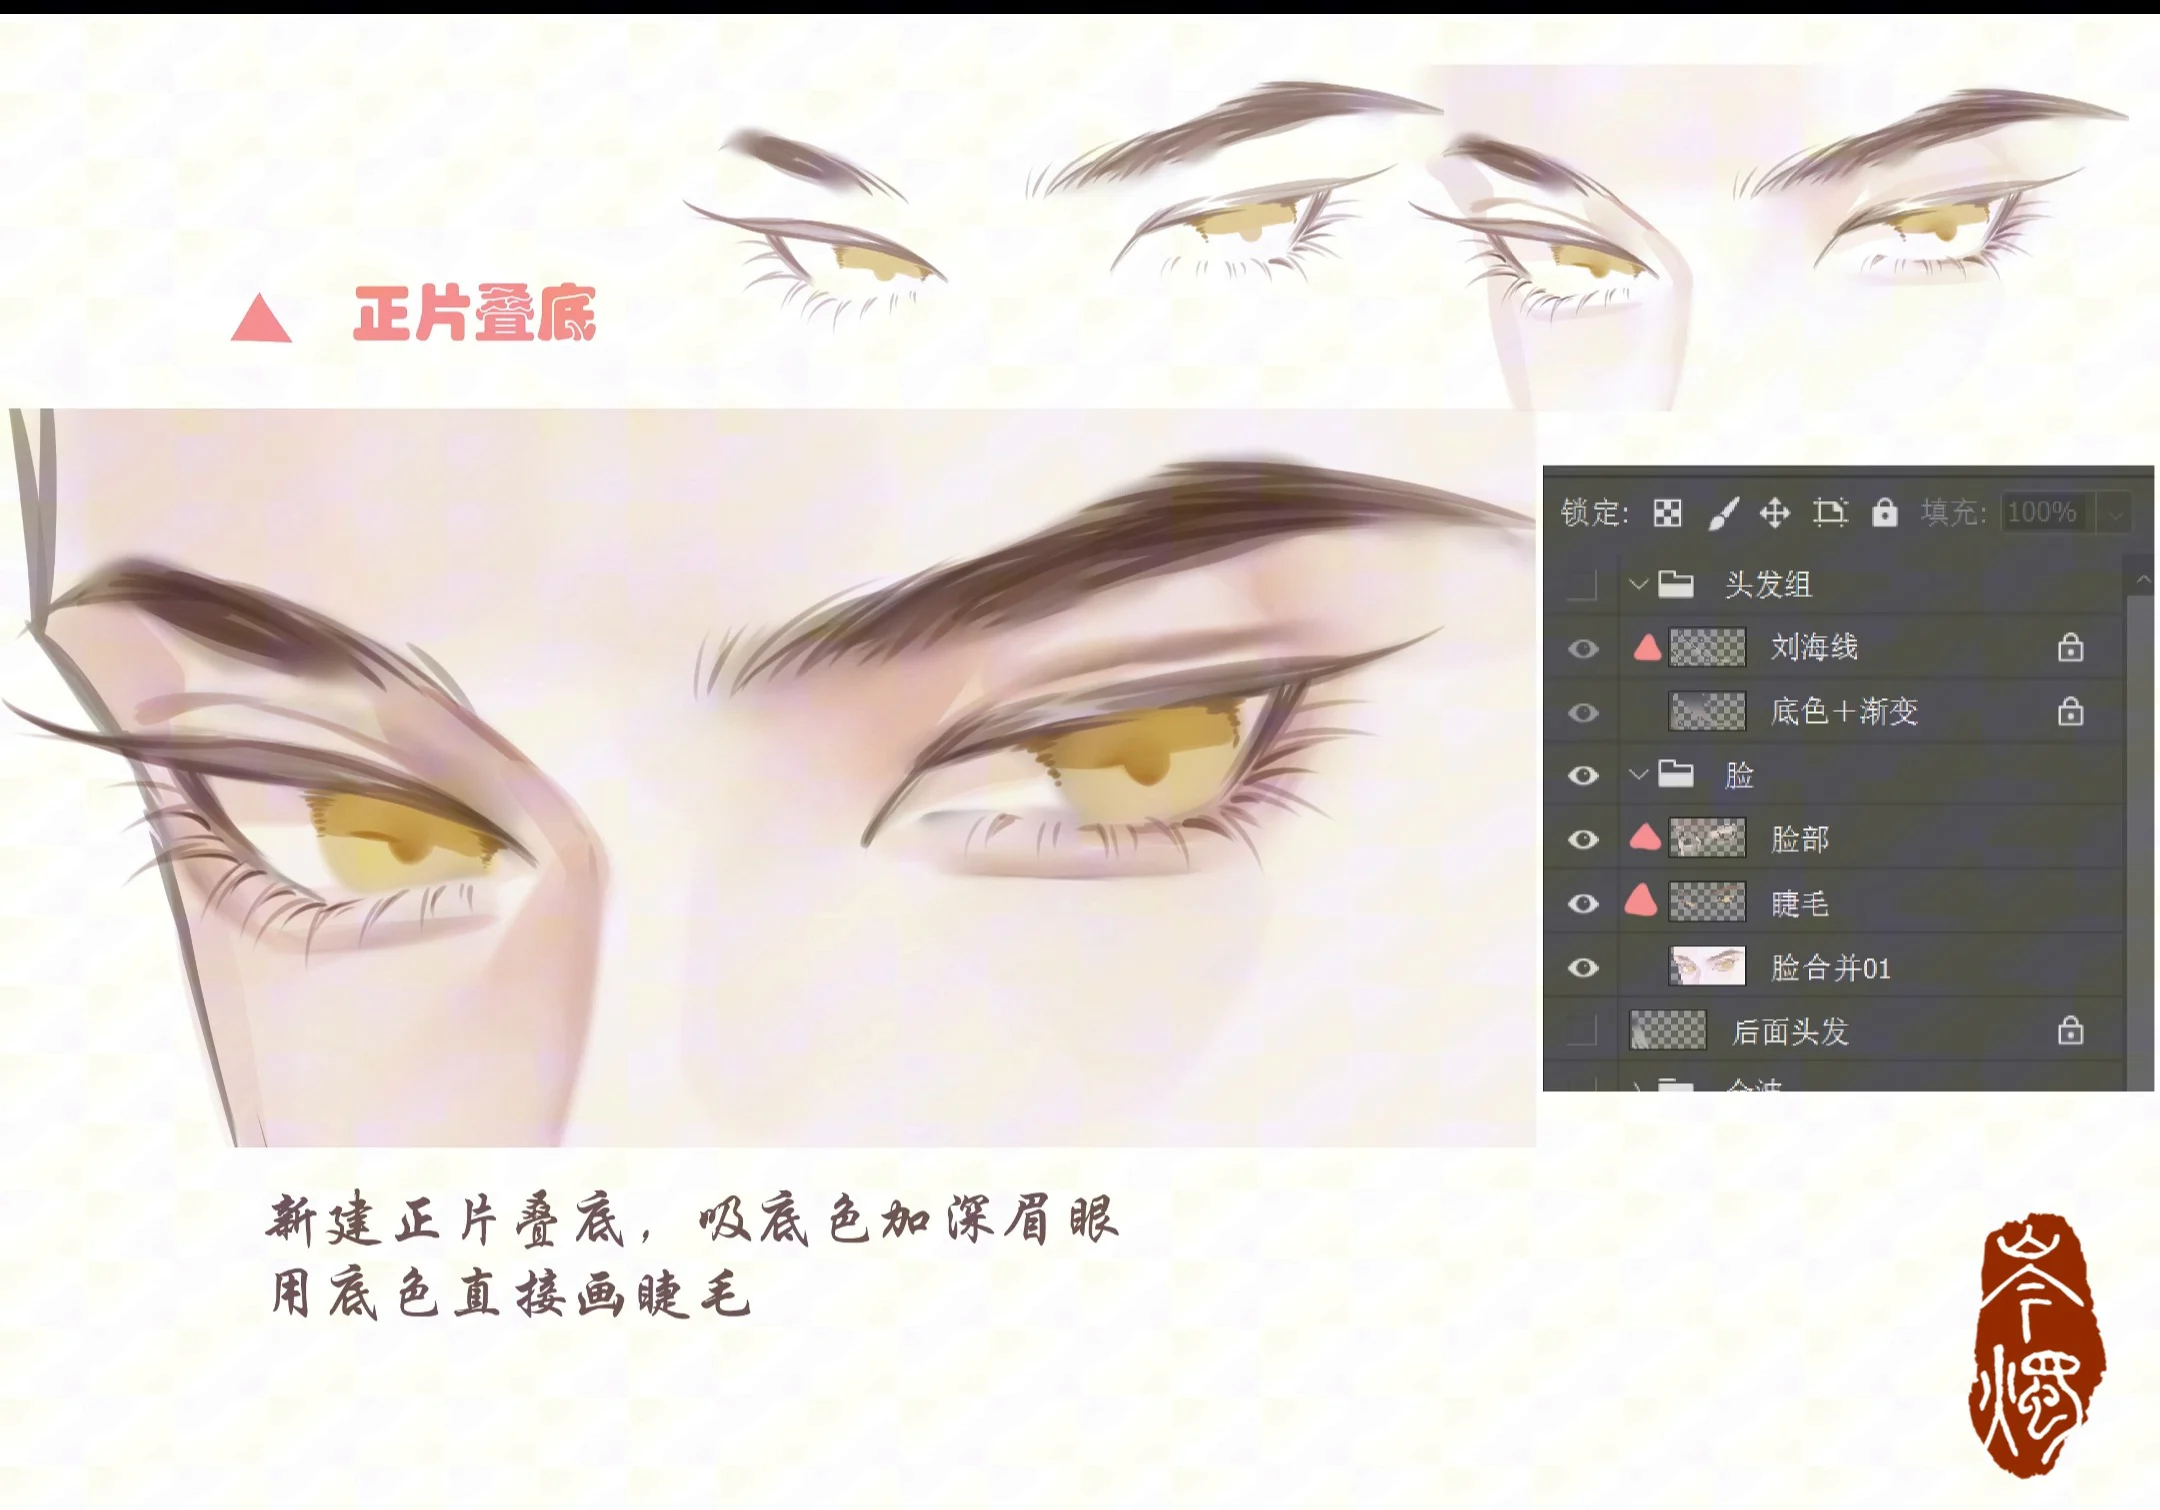
After blending, create a new Normal layer to restore sharp edges. The video increases the intensity of the eyebrows and eye contour, while also drawing lashes directly with a dark color.
For the upper lashes:
- Thickest around the outer third of the eye.
- The start of the stroke is firm, the end tapers off finely.
- Don't draw all lashes pointing in the same direction; a few strands should fan out slightly for a natural look.
For the lower lashes, only a few short, sparse strokes are needed. Lower lashes that are too long or too dark will make the eye look heavily made up rather than naturally sparkling.
The eyelid crease should be redrawn with a broken line or a gradually decreasing intensity. A continuous, uniform line often feels stiff.
Step 6: Merge layers a second time and clean up smudges
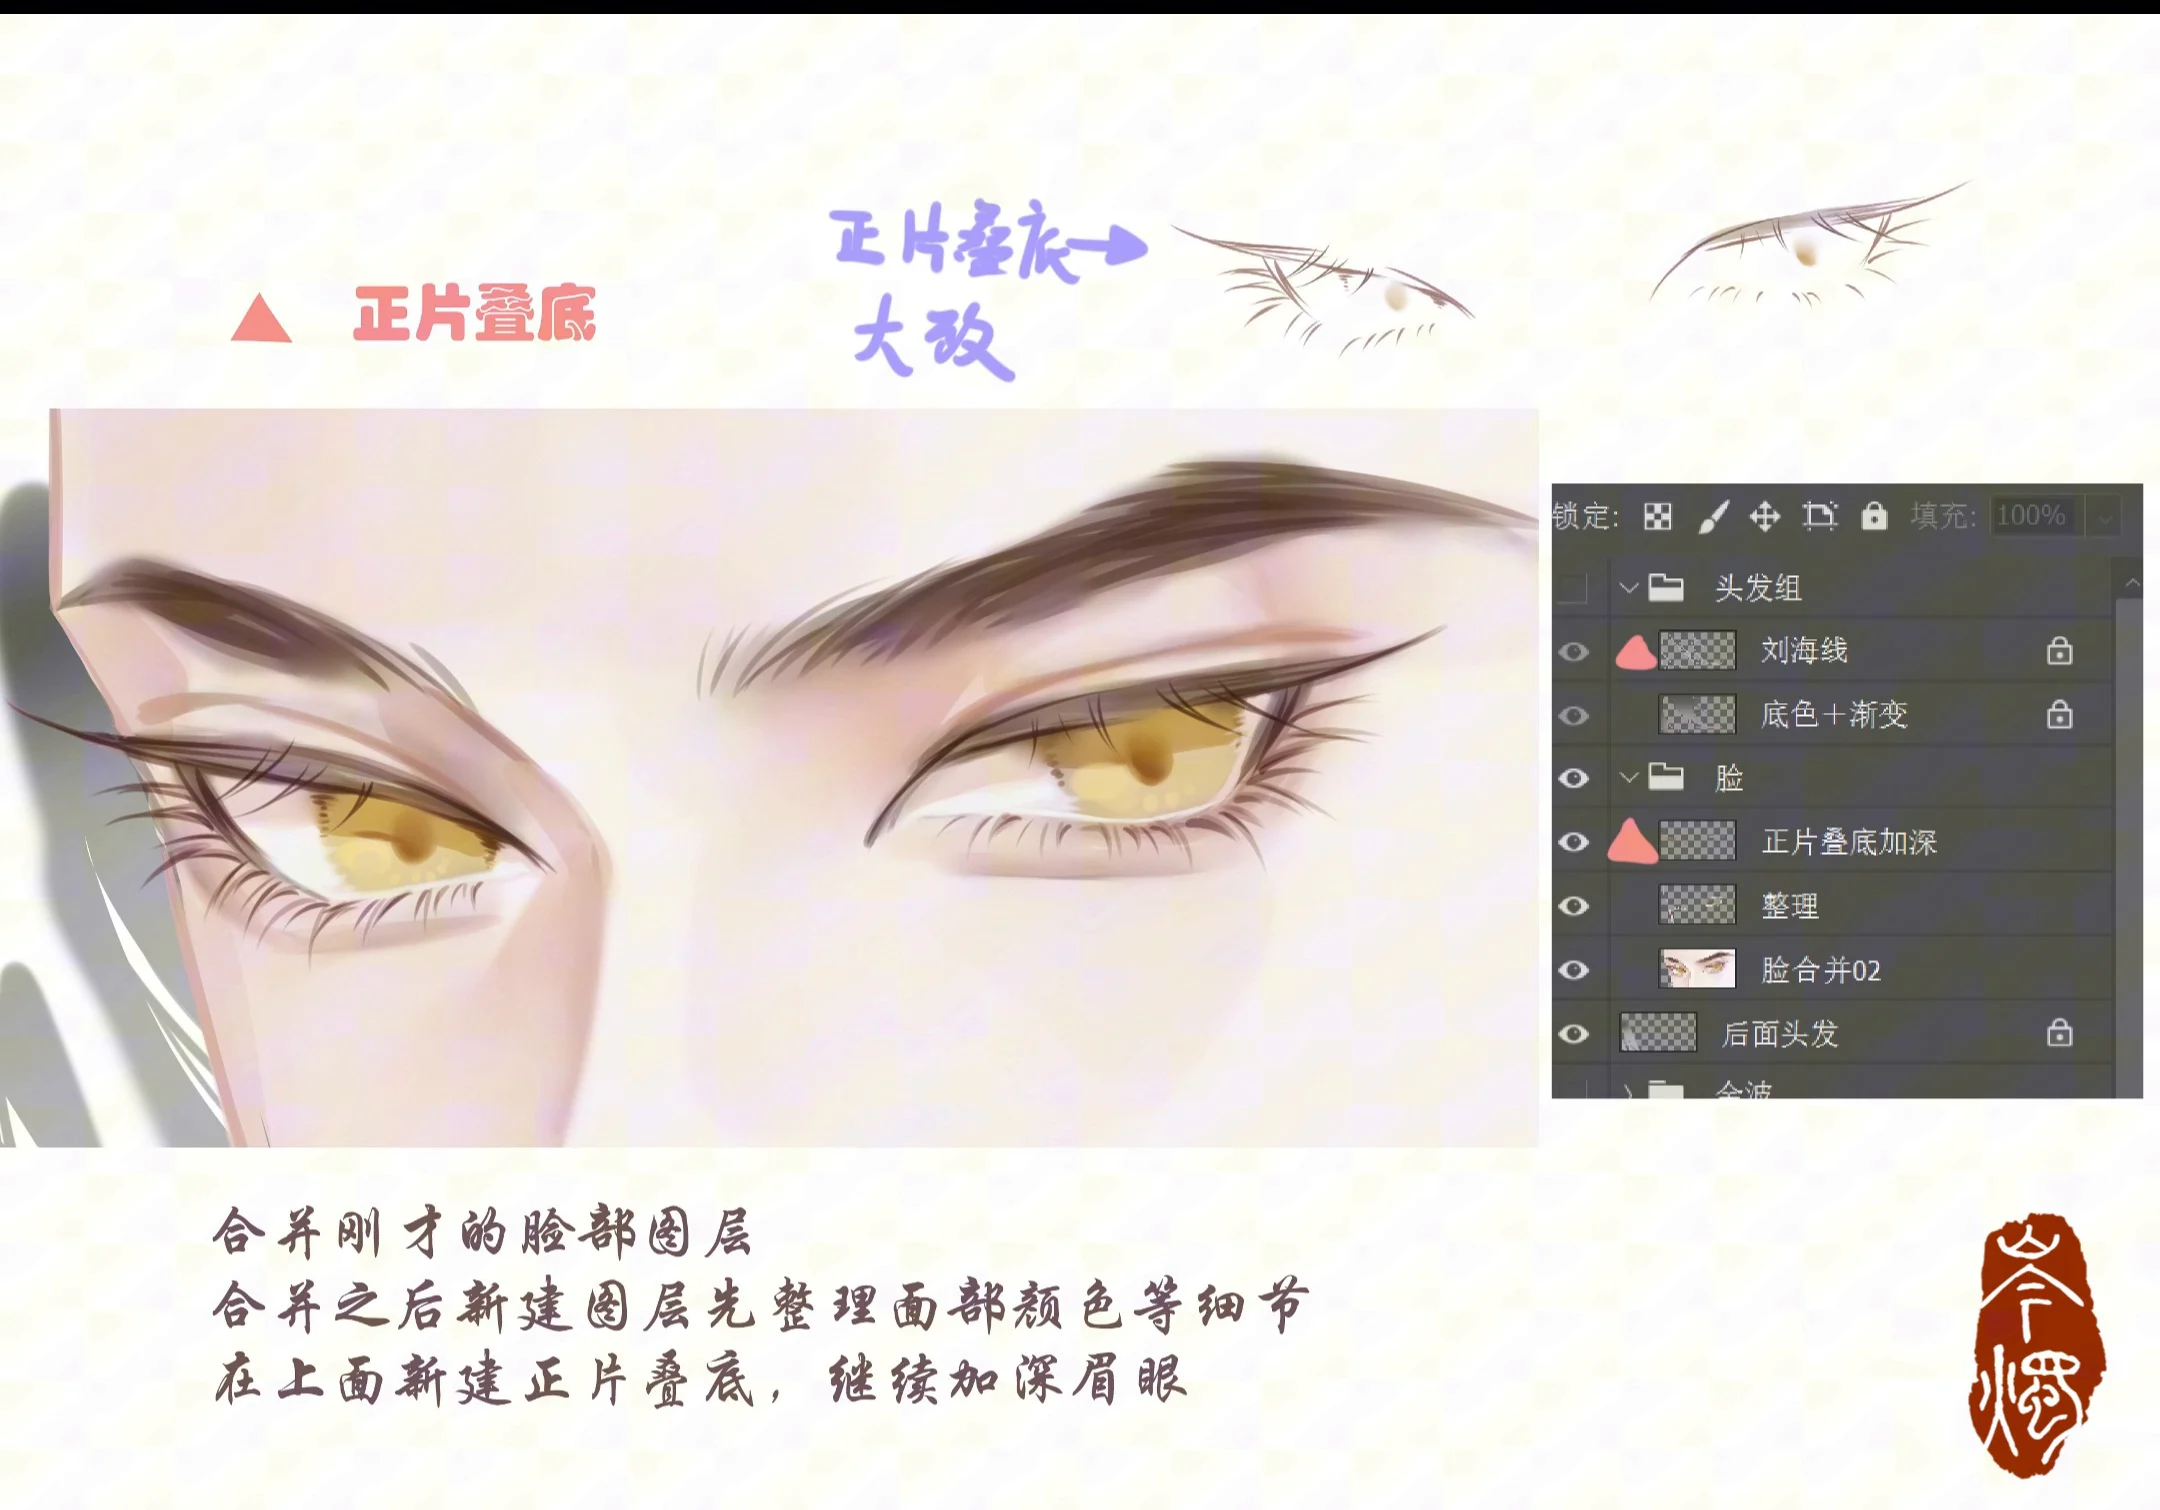
The artist continues merging layers after finishing the lashes. This is the time to clean up areas where Smudge spread too far, fix the skin color around the eyes, and adjust the balance between the two eyes.
You can use a soft eraser or a skin-colored brush to:
- Clean the bright area between the eyelid and the brow bone.
- Reduce shadows that are too dark under the eyebrow.
- Refine the ends of the lashes.
- Separate lashes that are clumping together into a single mass.
When merging layers, always check at both large and small zoom levels. At close-up, you easily get lost in details; at a reduced size, you can see if the eye stands out enough against the hair and face.
Step 7: Add highlights to make the eyelids and irises sparkle
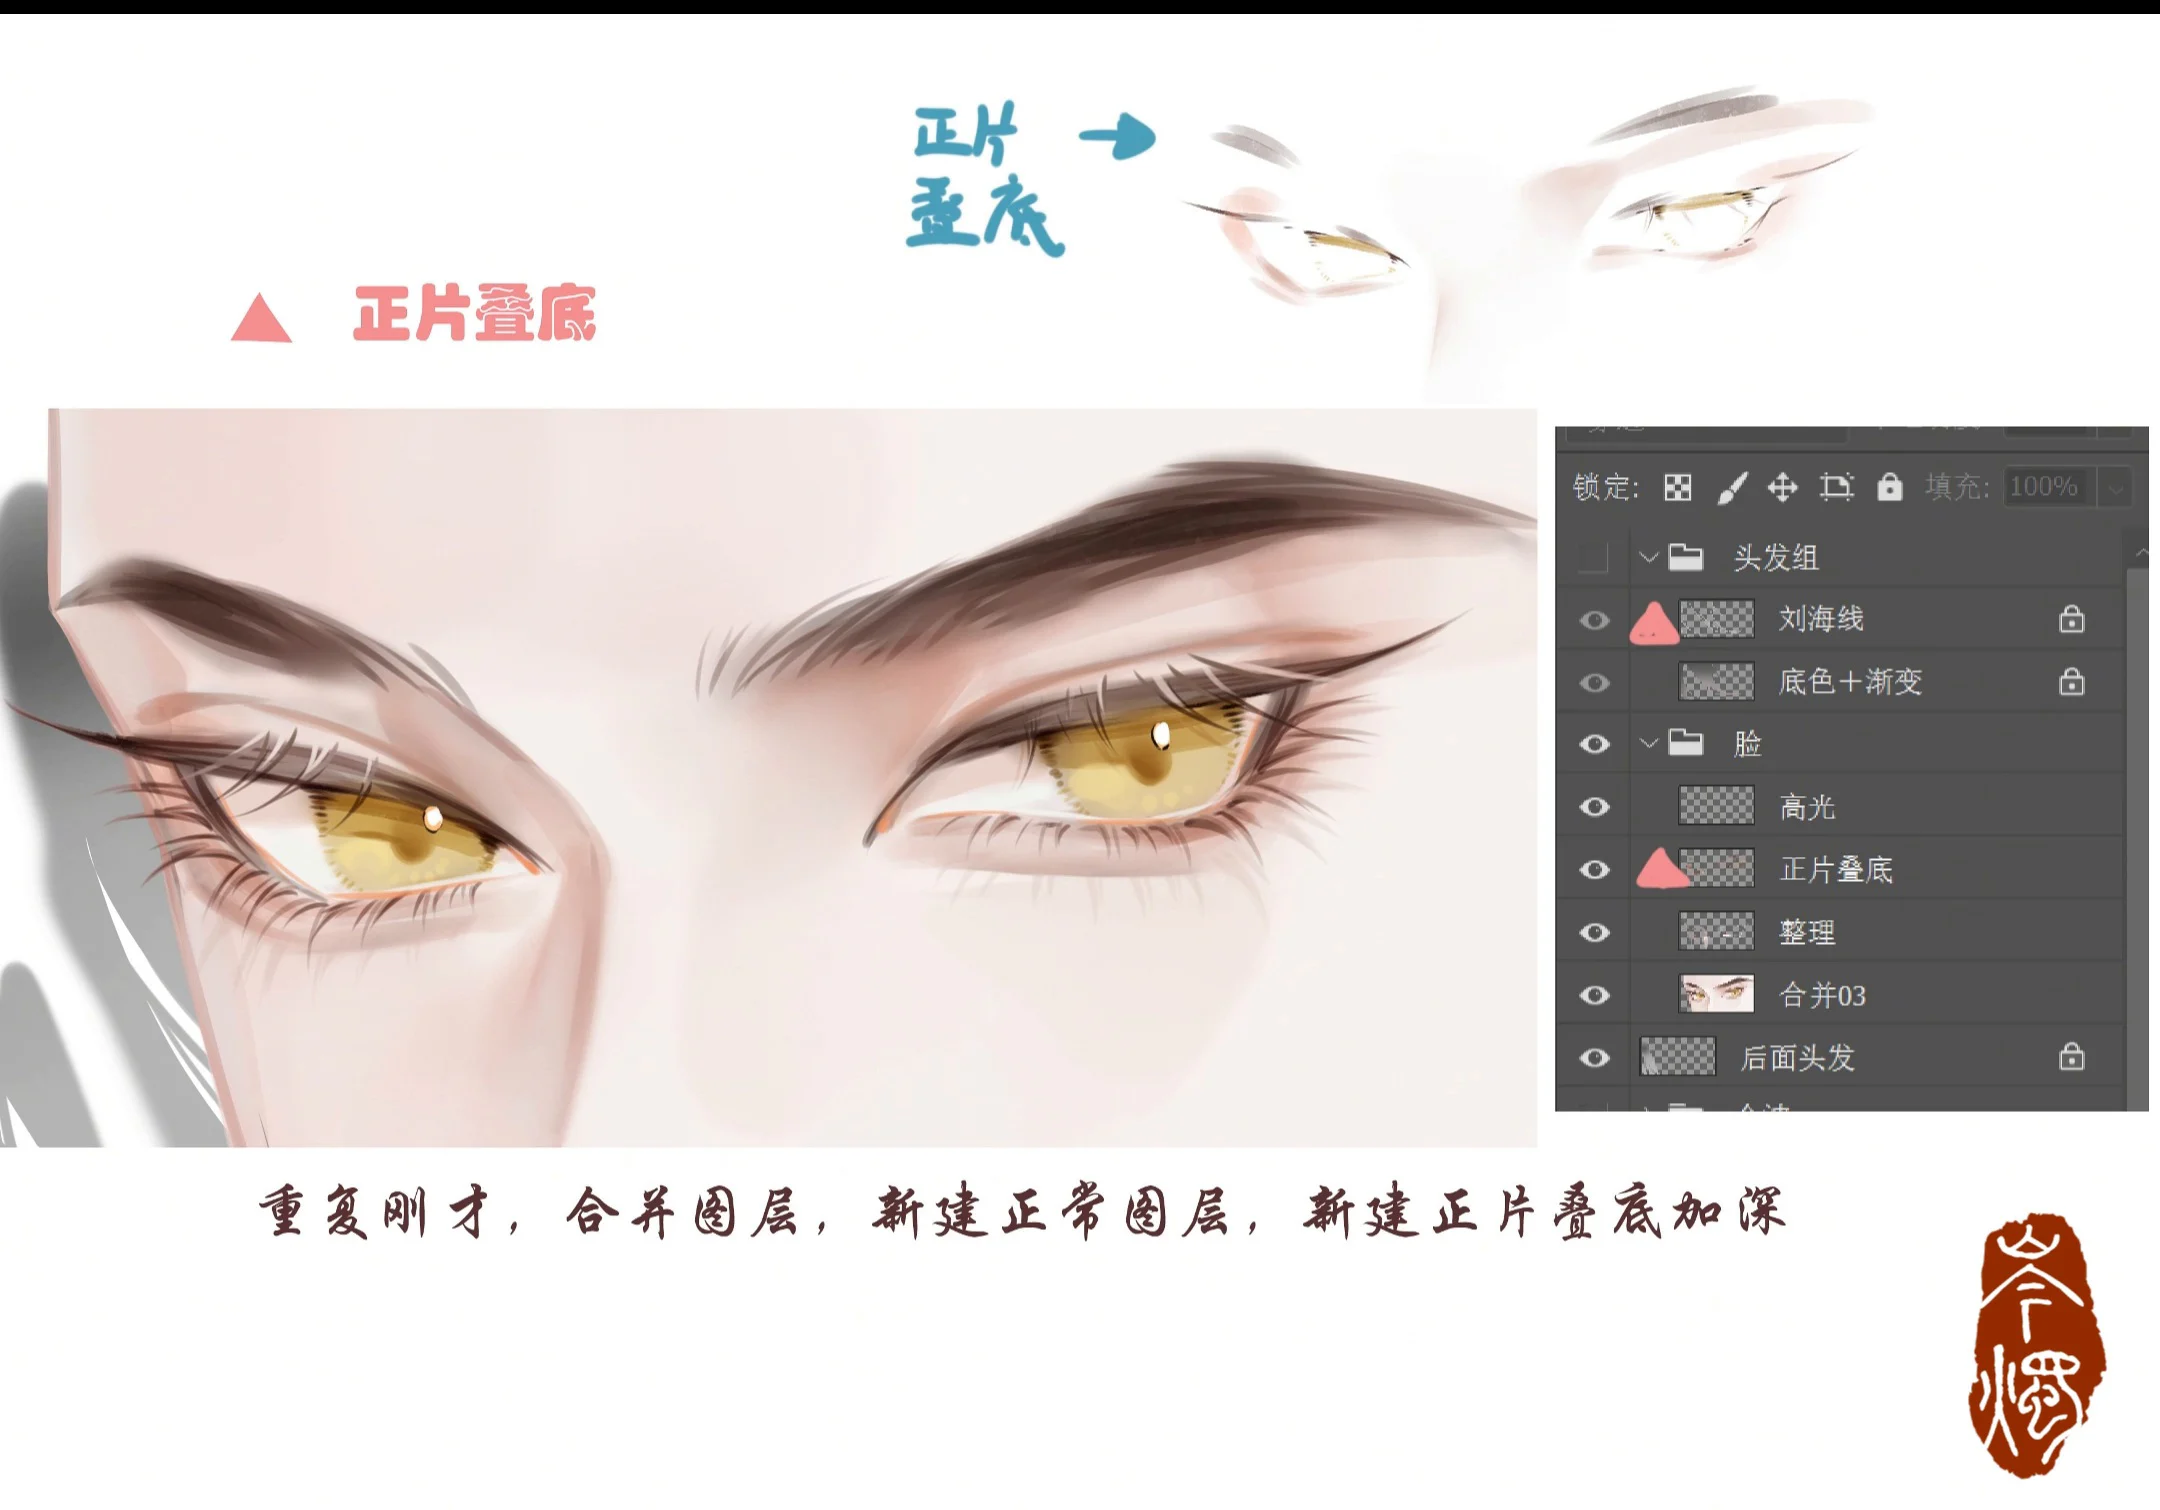
The sparkling effect is most noticeable in the final stage. Create a Normal or Add/Screen layer with low opacity. Choose a warm white or a bright color close to the iris color.
Place the highlights in three levels:
- Main highlight: one small, sharp dot on the iris. Both eyes should receive light from the same direction.
- Secondary highlight streak: a very fine stroke near the lower edge of the iris or along the tear duct.
- Light on the eyelid: a dot or light sweep on the eyelid, not covering the entire lid evenly.
To make the light look like a sparkle rather than a patch of white paint, keep most highlights small and leave gaps between them. One sharp highlight placed next to a soft transition area will stand out more than many dots of equal size.
You can also add a layer of pale yellow or peachy light in the middle of the eyelid. The brightness only needs to be enough to separate it from the Multiply area; it doesn't need to be pure white.
Step 8: Finalize the hair and shadows around the eyes
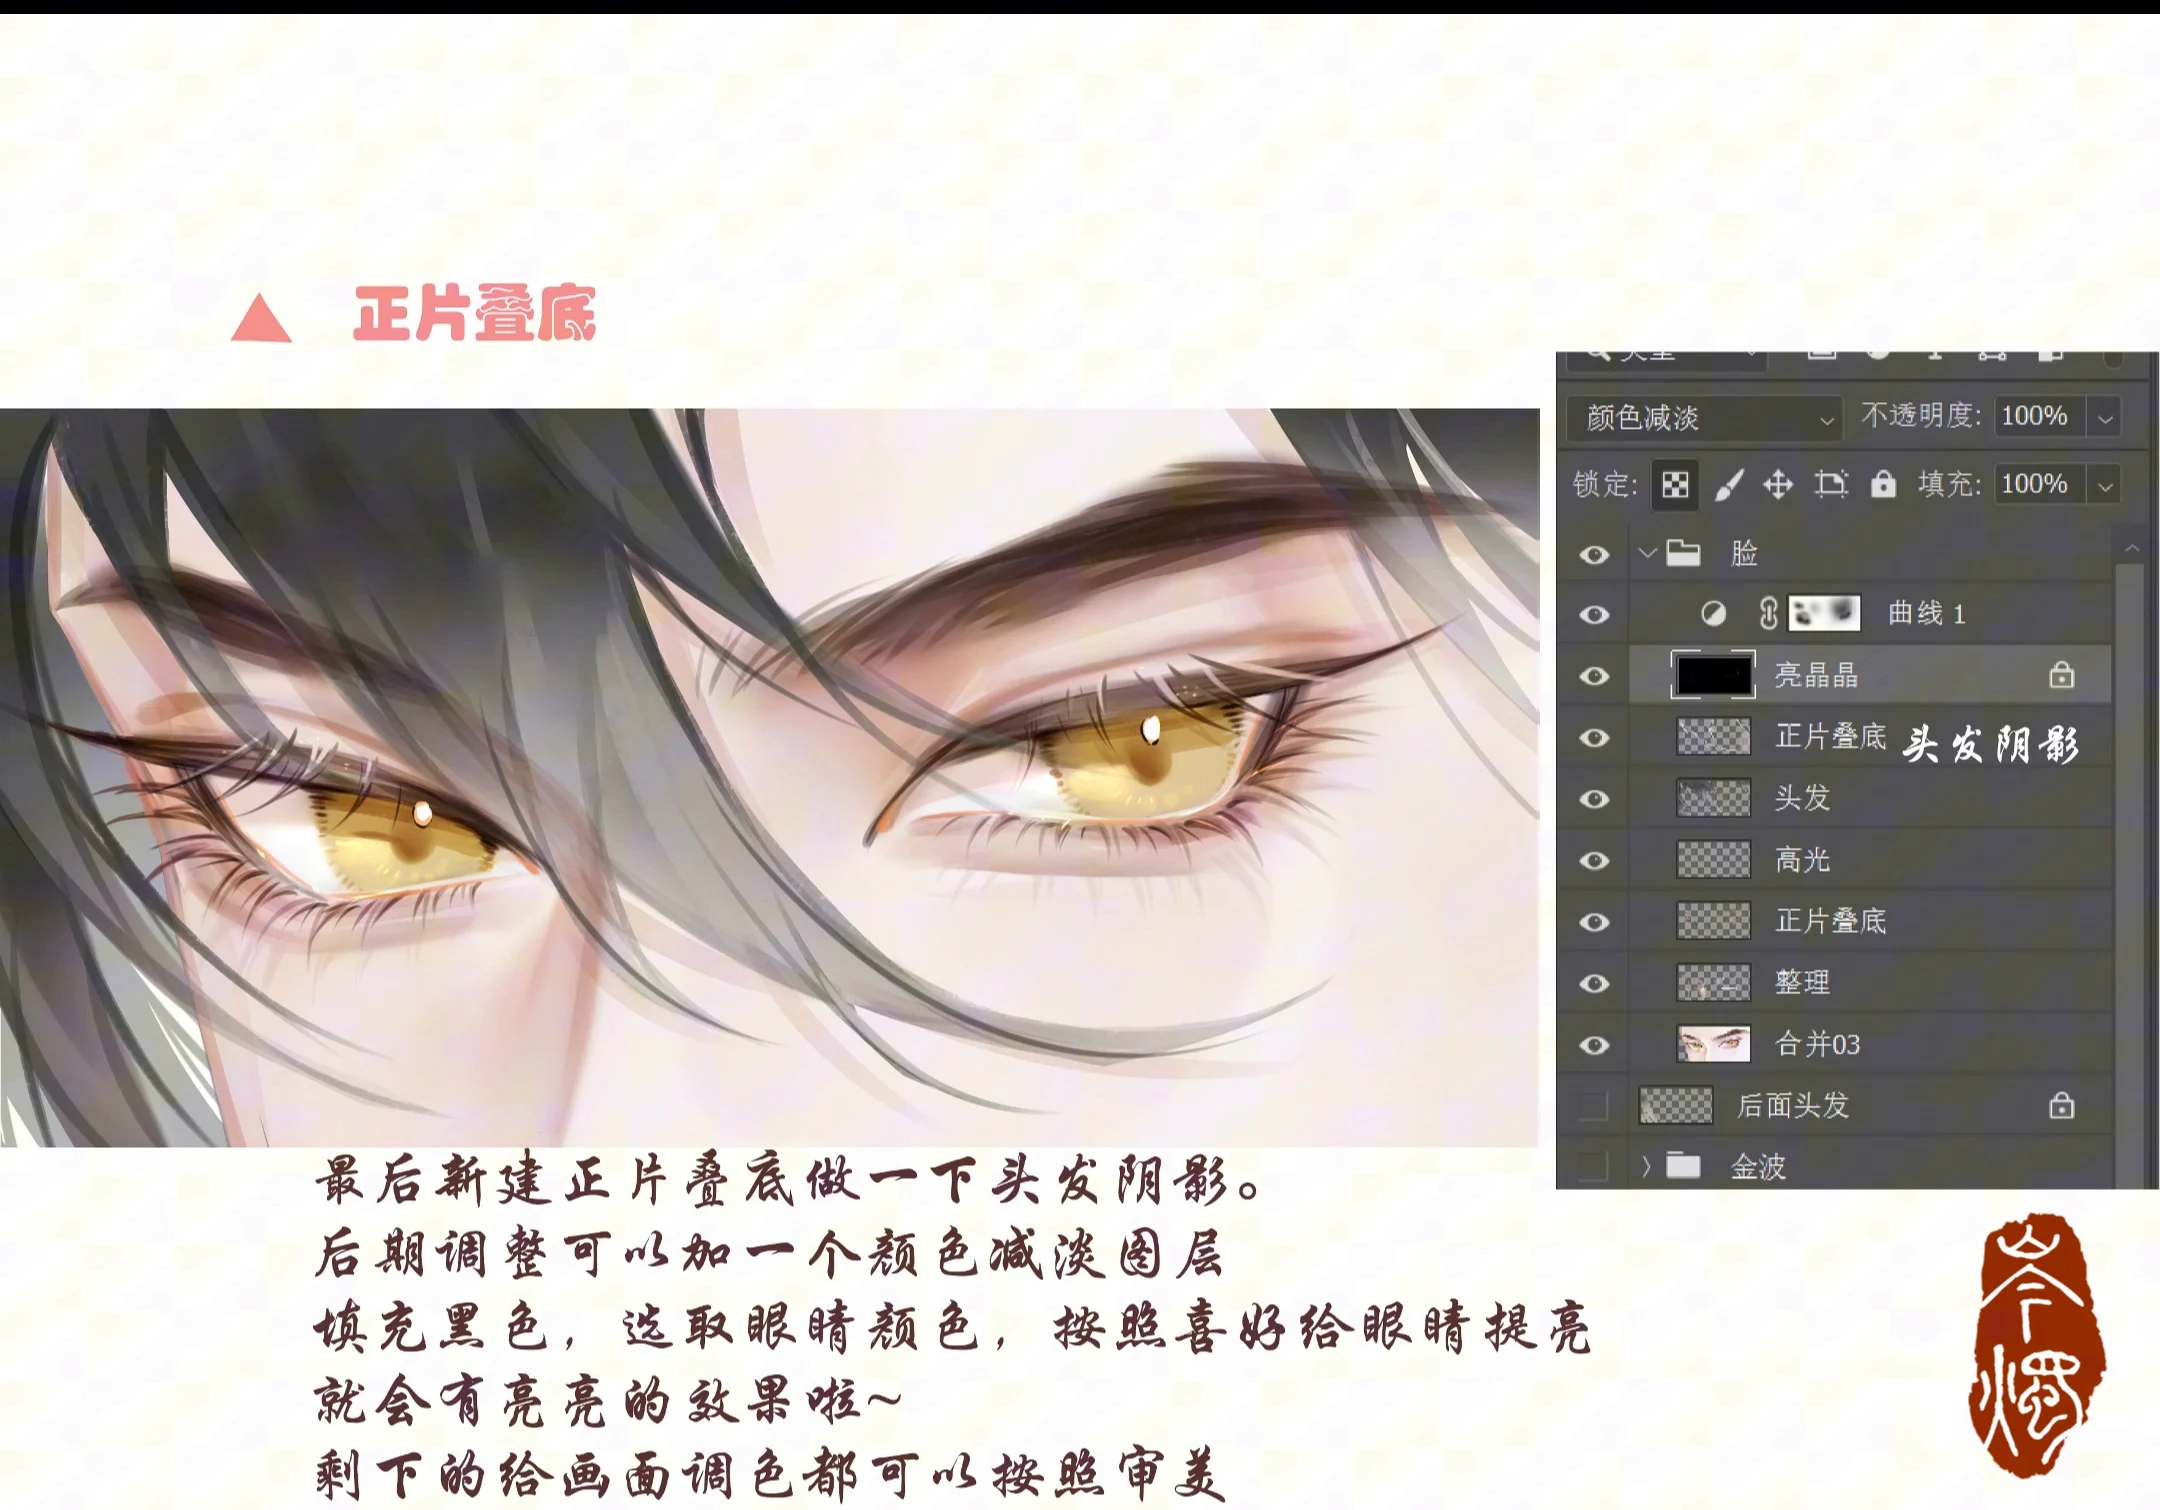
The final part of the video deals with bangs sweeping across the face. Although not the main focus of drawing the eye, hair directly affects how prominent the eyelid appears. The artist merges the base color and lineart of the hair, uses an eraser to soften the hair tips, then adds hair shadows using Multiply.
When hair falls over the eye:
- The hair shadow should be slightly darker at the contact point but must not cover the main highlight.
- The hair tips need to be transparent and soft so the eye structure behind them is still visible.
- You can use a little skin color at the hair tips to create a feeling of the hair blending into the facial light.
The video also adds a color adjustment layer at the end. You can use Curves, Color Balance, or a Gradient Map at low opacity to unify the colors of the hair, skin, and eyes.
Step 9: Check the final result
Before finishing, check five points:
- Are the two main highlights facing the same light direction?
- Are the upper lashes clearer than the lower lashes?
- Is the eyelid crease still visible after blending?
- Is the middle area of the eyelid brighter than the inner and outer corners?
- Does the iris have enough contrast with the white of the eye without having an overly heavy black outline?
If the eyes still don't have a sparkling feel, don't rush to add more white dots. Gently increase the contrast between the dark area near the lash line and the bright area on the eyelid, then reposition one sharp reflective point. Usually, the problem lies in the light and shadow structure, not a lack of effects.
Common mistakes when drawing sparkling eyelids
Blending too wide, making the eye look cloudy
Reduce the Smudge brush size, only blend the edge of the highlight area, and redraw the crease after blending.
Using black for all the lineart
Change the eyelid crease and lower lashes to reddish-brown or purplish-brown; keep the darkest color for the upper lash line and the pupil.
Highlights too large
Reduce the size of the main highlight, add one thin secondary streak, and leave plenty of dark space around it.
The two eyes' highlights not facing the same direction
Determine a single light source before placing highlights. Their relative position on the two irises must be consistent.
Merging layers too early
Duplicate the layer group before merging. Beginners should keep a backup copy to be able to adjust color and intensity.
Simplified formula for beginners
You can remember the process with this formula:
Sketch the shape → change lineart color → Multiply large blocks → blend the edges → redraw the crease and lashes → clean up details → add small highlights → balance colors.
Just follow this order correctly, and you can create bright, clear eyes with a sparkling look without needing special brushes.
---Conclusion
The great thing about the process in the video is that the artist does not rely on complex effects. The sparkling eyelids are created from very basic painting fundamentals: correct light and shadow values, harmonious lineart colors, reasonable hard and soft edges, and deliberately placed highlights.
When practicing, prioritize drawing one eye really well first, then apply it to the whole face. After a few times, you will realize that just a small change in the thickness of the eyelid crease or the position of the highlight can noticeably alter the character's expression.
Illustration source: frames extracted from a tutorial video provided by the user. The original video uses a Photoshop interface and Chinese content.








Bình luận
0 bình luận
Đăng nhập để tham gia thảo luận cùng cộng đồng!
Đăng nhập ngayĐang tải bình luận...