

How to draw breasts resting on a table in digital art: understanding compression force, lateral spread, and planar transitions
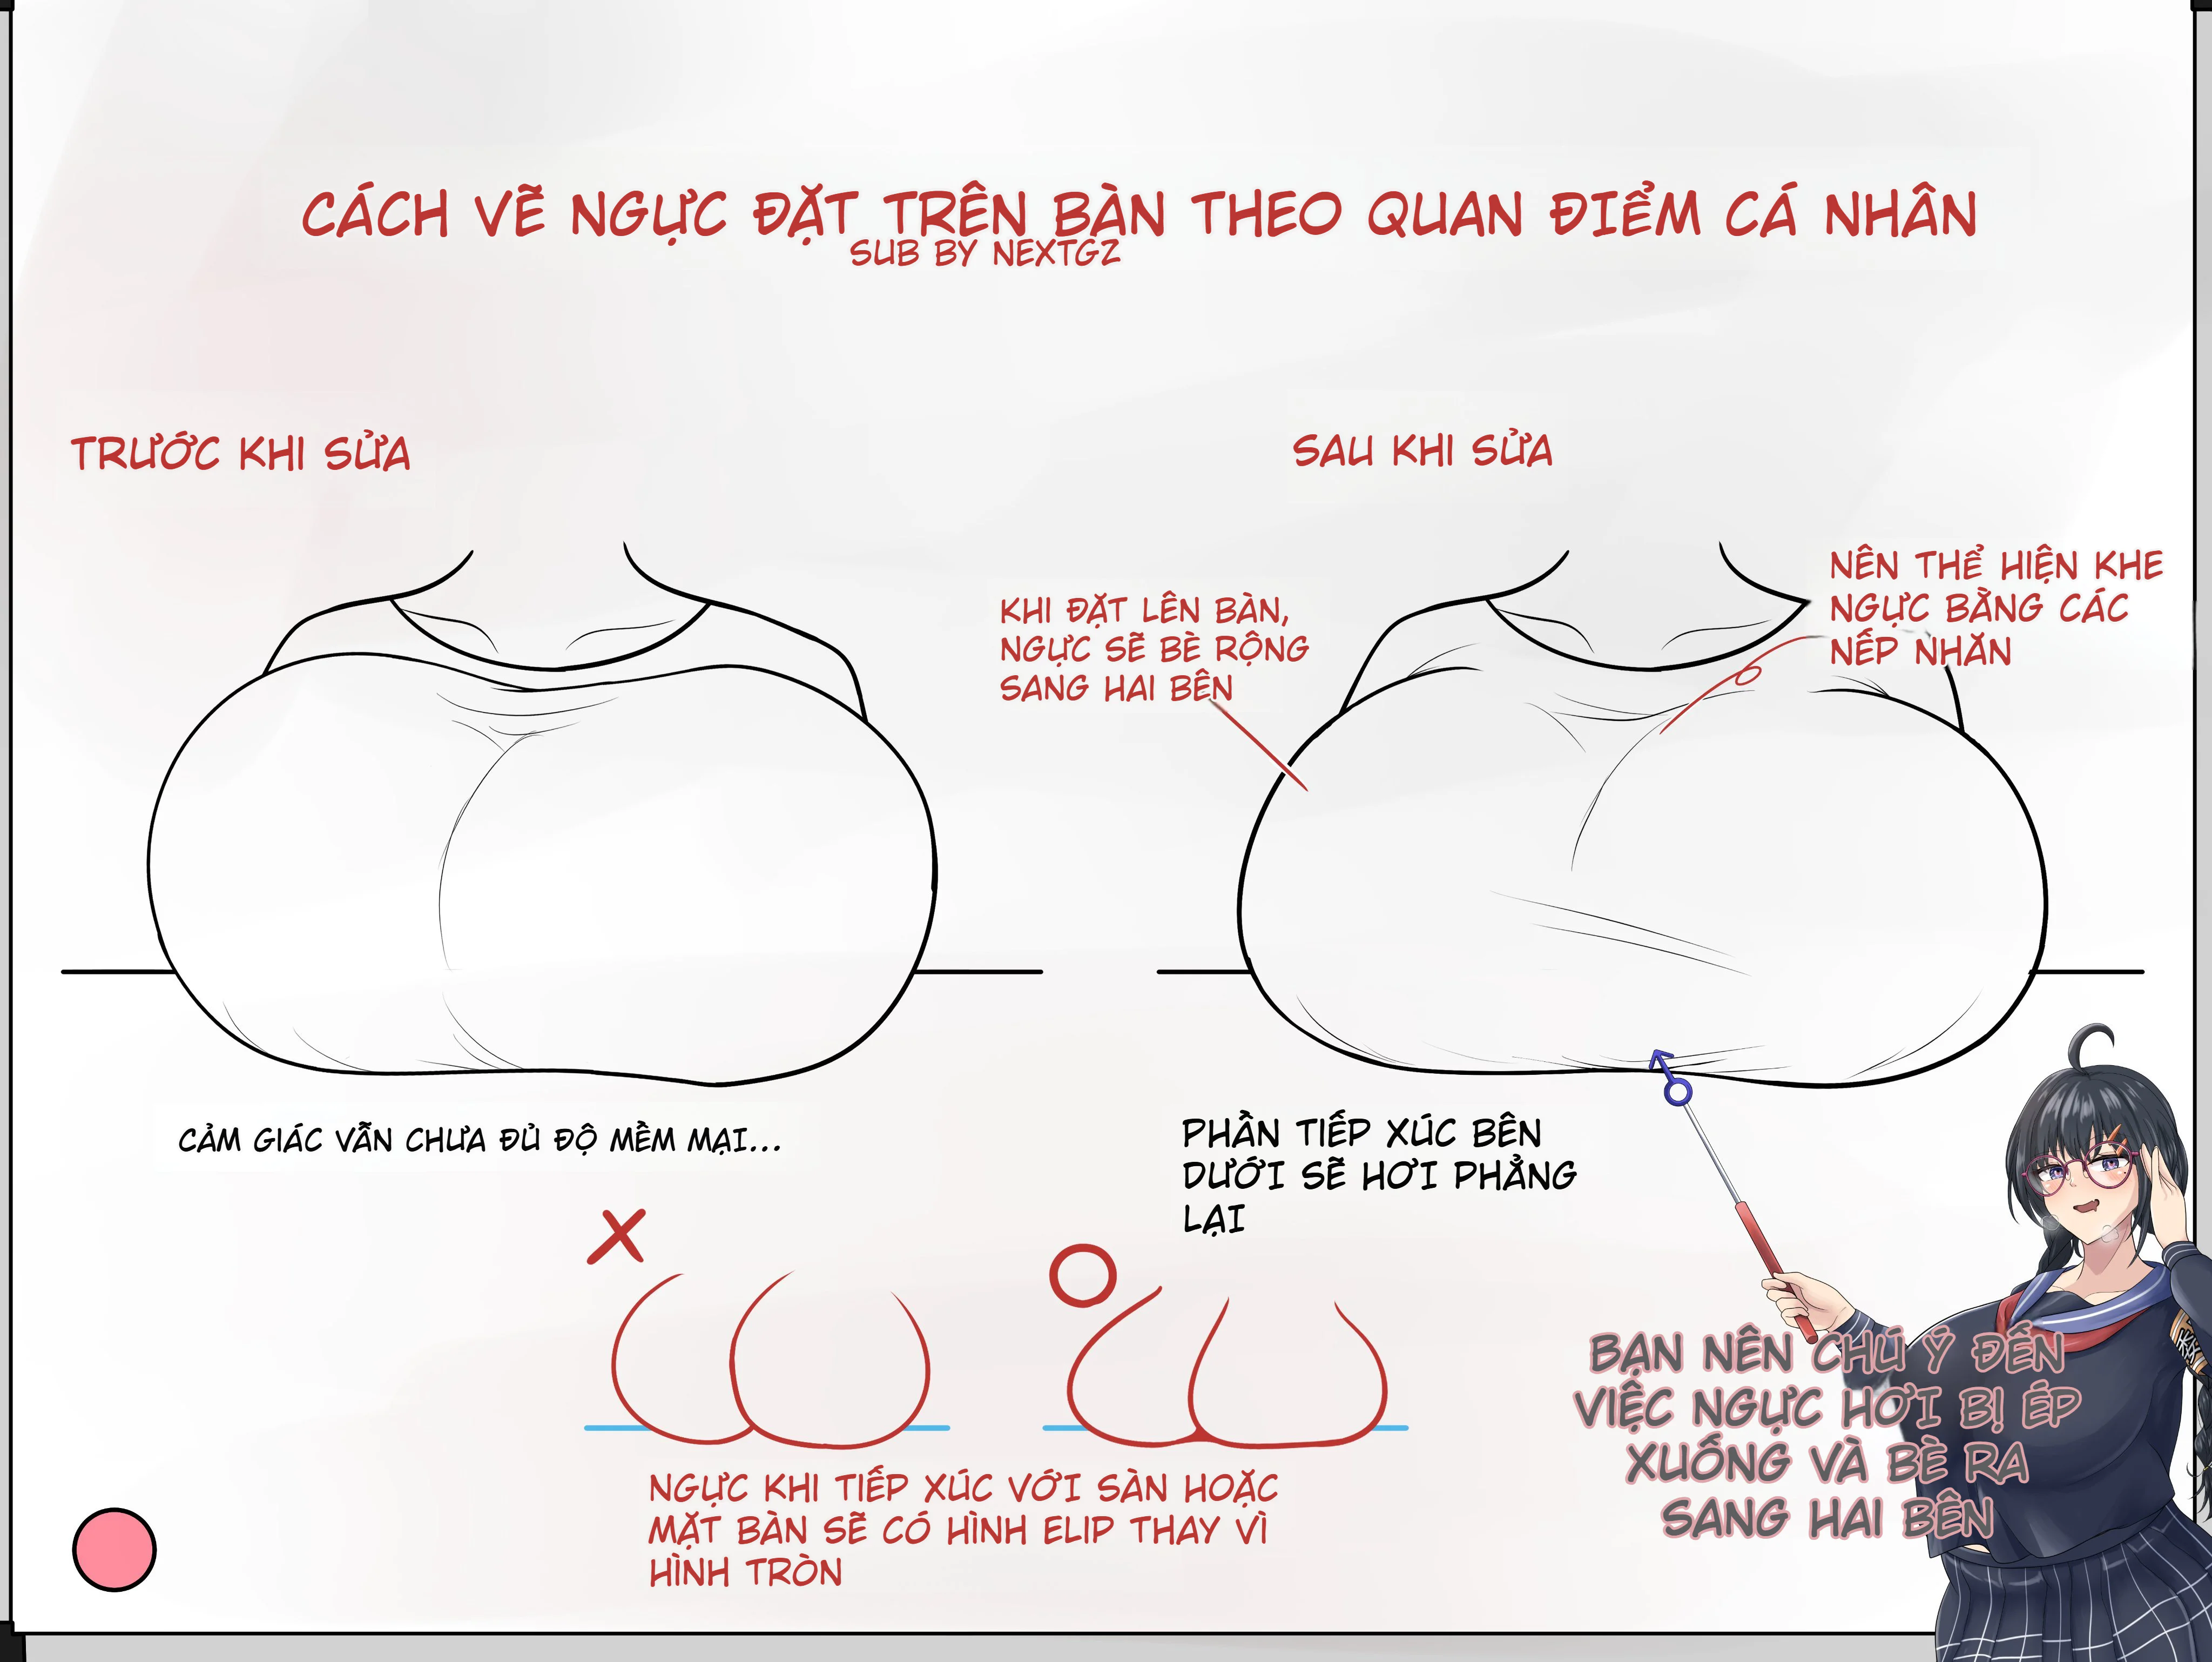
A very common mistake when drawing breasts resting on a table surface is that the artist keeps the forms as two circles or two teardrops hanging in mid-air, only adding a horizontal line underneath to pretend it's the table. This makes the drawing look stiff, weightless, and lacks the feeling of "soft tissue actually bearing weight". To fix this, the first thing to remember is that breasts are not a solid, rigid mass. Anatomically, breast tissue is composed of glandular tissue, fibrous tissue, and adipose tissue, with fat making up a significant portion of the surface shape; simultaneously, the breast is supported by Cooper's ligaments and connects to the chest wall in a way that allows it to move naturally over the chest.
Precisely because of its softness, mobility, and susceptibility to gravity and compression, the surface shape will change noticeably when the body presses against a flat plane. From an illustration perspective, this means that when breasts are pressed against a table, the artist should prioritize the feeling of lateral spread, slight flattening at the contact base, and planar transition folds instead of trying to maintain a symmetrical, round, and taut form as in an upright posture. This is a logical visual deduction from the structure of soft tissue and the support-mobility mechanism of breast tissue.
1. Don't start with two perfect round masses
When initially blocking in the form, many artists often draw each breast as a separate round mass, then try to "press" it down onto the table surface. This method locks you into an incorrect form from the very beginning. If soft tissue is being compressed, the contact surface will no longer be a continuous circular arc. Instead, it will be compressed, transforming the mass from a spherical feeling to a softer elliptical shape or one that is "fuller on top, flatter on the bottom". In other words, the mistake isn't in the small details, but in the large form itself. Because breast tissue contains a significant amount of fat and connective tissue, the surface mass always has the potential for considerable deformation under compression.
In this illustration, the "after correction" part is correct in that it reduces the feeling of two independent masses. The two sides begin to relate to each other through the cleavage area, through the table surface below, and through the downward compression force. This is very important: to make the drawing look real, you must first see the entire cluster as a system of soft tissue under force, not two separate objects placed side by side.
2. The contact base area must be slightly flatter
One of the most important points to remember is that the contact area underneath will flatten out a bit. This is where the tutorial is correct regarding material feel. When a mass of soft tissue rests on a table surface, the part touching the surface will be compressed first. Because breasts are not a hard mass like a plastic ball, that base area cannot maintain a perfect arc. It needs to have a slightly flattened section or at least a clearly reduced curvature. This is a very natural consequence of soft tissue's ability to shift shape under force, supported by the ligament-connective tissue system but not rigidly locked to the chest wall.
In figure drawing, just a small change at the base like this makes the mass feel much heavier. If the bottom line remains evenly curved as when the body is standing, the viewer won't believe the character is actually pressing down on the table. But when the base is slightly flattened, the compression force is immediately "read".
3. The mass will spread sideways, not just fall downward
A common misunderstanding is thinking that soft tissue only "flows down" due to gravity. In reality, when a table blocks it from below, the tissue cannot continue to fall freely vertically, so it will shift to the sides. This is exactly what the guide illustration emphasizes with the phrase "when placed on a table, breasts will spread wider to the sides". Anatomically, because breast tissue has variable fat and connective tissue components, and is supported by Cooper's ligaments while still having mobility, the surface shape can change significantly according to posture and applied force.
For the artist, this means don't just compress the mass "downward". Widen the silhouette a bit on both sides, especially the outer area of the mass and the part near the table surface. If you only pull it down without lateral spread, the character will still look like they're wearing two hanging water bags, not like soft tissue being compressed.
4. The cleavage should not be drawn as a deep, hard groove
A very good detail in the illustration is the suggestion to represent the cleavage with folds or planar transitions, not with a straight, plunging groove. This is a very smart choice in illustration. When two masses of soft tissue are pressed close together and simultaneously pressed down, the area between them is usually not best read with a hard line, but with:
a soft break in the plane
a fold or a few light folds
a subtle light-dark transition
The reason is that breasts are anchored by the ligament and connective tissue system to the skin and chest wall, so the surface shape is influenced by both support and mobility, not a straight cut dividing the mass in two.
In practice, if you draw the cleavage too deep, too sharp, and too uniform from top to bottom, the overall result easily looks fake. But if you make it an area of planar transition, add a few light folds, and let shading handle the rest, the mass will feel much softer.
5. The upper part must still maintain rhythm connecting to the chest – shoulders – neck
Although the lower part is compressed, the upper part shouldn't turn into a collapsed lump unrelated to the torso. This new illustration is quite correct in that the upper area still connects to the collarbone, neck, and shoulders with a reasonable anatomical rhythm. Standard breast anatomy shows that breast tissue lies on the anterior chest wall, primarily covering the pectoralis major muscle and extending from the upper rib area to the inframammary fold; meaning even though the surface is soft and deforms, it still originates from a clear anatomical foundation on the ribcage.
When drawing, always check these three rhythms:
neck – collarbone
shoulder – upper chest
lower chest – table surface
If these three lines communicate with each other, the mass will be much more stable. If you only focus on the fullness below, you risk losing the overall structure of the torso.
6. An ellipse is often more convincing than a circle
The note below the illustration is very correct: when in contact with a floor or table surface, the mass is often read better as an ellipse rather than a circle. This isn't a rigid mathematical formula, but a very effective visual trick. A circle suggests an object not under force. An ellipse or a mass compressed along one axis suggests pressure acting on the surface. For a soft structure with fat tissue, connective tissue, and supportive yet mobile ligaments like the breast, shifting from "circular" to "slightly elliptical" is a very correct way for the viewer to perceive compression force.
That's also why in the "after correction" illustration, the soft feeling increases immediately even though the changes aren't many. What changed is the logic of the mass, not decorative details.
7. To draw convincingly, think in terms of force, not symbols
Many artists draw anatomy symbolically: breasts = two masses drawn from habit. That's enough for quick sketching, but it breaks down immediately in situations with applied force like lying down, leaning, pressing, or twisting. To move beyond that level, you must change the question from "what do breasts look like" to "in what direction is force acting on this tissue mass". In the situation in the illustration, there are at least three forces:
gravity pulling the mass down
the table surface blocking the downward force
soft tissue gathering and spreading sideways
Because breast tissue is supported but still has mobility on the chest wall, reasoning based on force like this aligns with the real structure.
When you draw with force, the silhouette will change naturally. When you draw with symbols, you'll always have to "fix things" at the end.
8. Practical workflow for quickly blocking in a pose like this
If you need a concise process to apply immediately, proceed as follows.
Step 1: Block in the ribcage and table surface first
Don't block in the soft tissue before the hard framework. Determine:
how much the torso is leaning
where the shoulders and neck are
at what level the table surface cuts through the form
Step 2: Draw the breast masses as two soft forms attached to the torso
Don't draw two separate circles. Let them originate from the upper chest and logically adhere to the body.
Step 3: Compress the base of the mass
Make the base flatter, reduce the curvature at the part pressing onto the table.
Step 4: Widen the silhouette sideways
Make the mass spread more on both sides to give the soft tissue a feeling of being pushed together.
Step 5: Handle the middle area with folds and planar transitions
Avoid a deep, hard, and straight groove.
Step 6: Finish with light and shadow
Use shading to emphasize the compressed part, the part pressing on the table, and the transitional area in the middle.
9. Common mistakes that make the drawing look fake
The first mistake is keeping a uniformly round form at the base.
The second mistake is not allowing the silhouette to spread sideways.
The third mistake is the cleavage being too deep and too straight.
The fourth mistake is forgetting the upper torso structure, making the mass look detached from the body.
The final mistake is drawing both sides perfectly symmetrical, while compression force rarely makes a surface perfectly symmetrical.
Just correcting these few mistakes makes the drawing much more convincing.
Conclusion
To draw breasts resting on a table softer and more realistically, the important thing isn't adding more curved lines, but understanding the material you're drawing. Breast tissue consists of glandular tissue, fibrous tissue, and adipose tissue, held by Cooper's ligaments but still having natural mobility on the chest wall; therefore, when bearing weight on a surface, the mass will become flatter at the base, spread to the sides, and change the middle area with folds/planar transitions instead of maintaining the original round shape. Just constructing with that correct logic will make the artwork softer, have weight, and be much more convincing.
FAQ
Where should you start when drawing breasts resting on a table?
Start from the torso and the table surface, then block in the soft tissue mass. If you block in the breasts first without the hard framework, it's easy to get the force and compression direction wrong.
Why should the base be flatter when resting on a table?
Because breast tissue is soft tissue composed of fat, glandular, and connective tissue; when compressed against a surface, the contact area will be compressed and its curvature reduced.
Why does the mass spread sideways?
Because when the table surface blocks vertical movement, soft tissue tends to shift sideways; this aligns with the natural mobility of breast tissue on the chest wall.
How should the cleavage be drawn to look more natural?
It should be represented with light folds, planar transitions, and light-dark values, instead of a hard, deep groove running straight from top to bottom. This is a reasonable visual choice when soft tissue is pressed close together.
What is the significance of Cooper's ligaments for the artist?
Cooper's ligaments are connective tissue bands that help support and shape the breast, but they do not make breast tissue a rigid mass; on the contrary, the breast still has natural mobility on the chest wall.
Suggested tags to insert at the end of the post
how to draw breasts on a table, anatomy for artists, drawing soft tissue, breast anatomy drawing, figure drawing tutorial, soft tissue compression, digital art tutorial, character illustration, drawing soft breast masses


Bình luận
0 bình luận
Đăng nhập để tham gia thảo luận cùng cộng đồng!
Đăng nhập ngayĐang tải bình luận...