 Thiết kế nhân vật







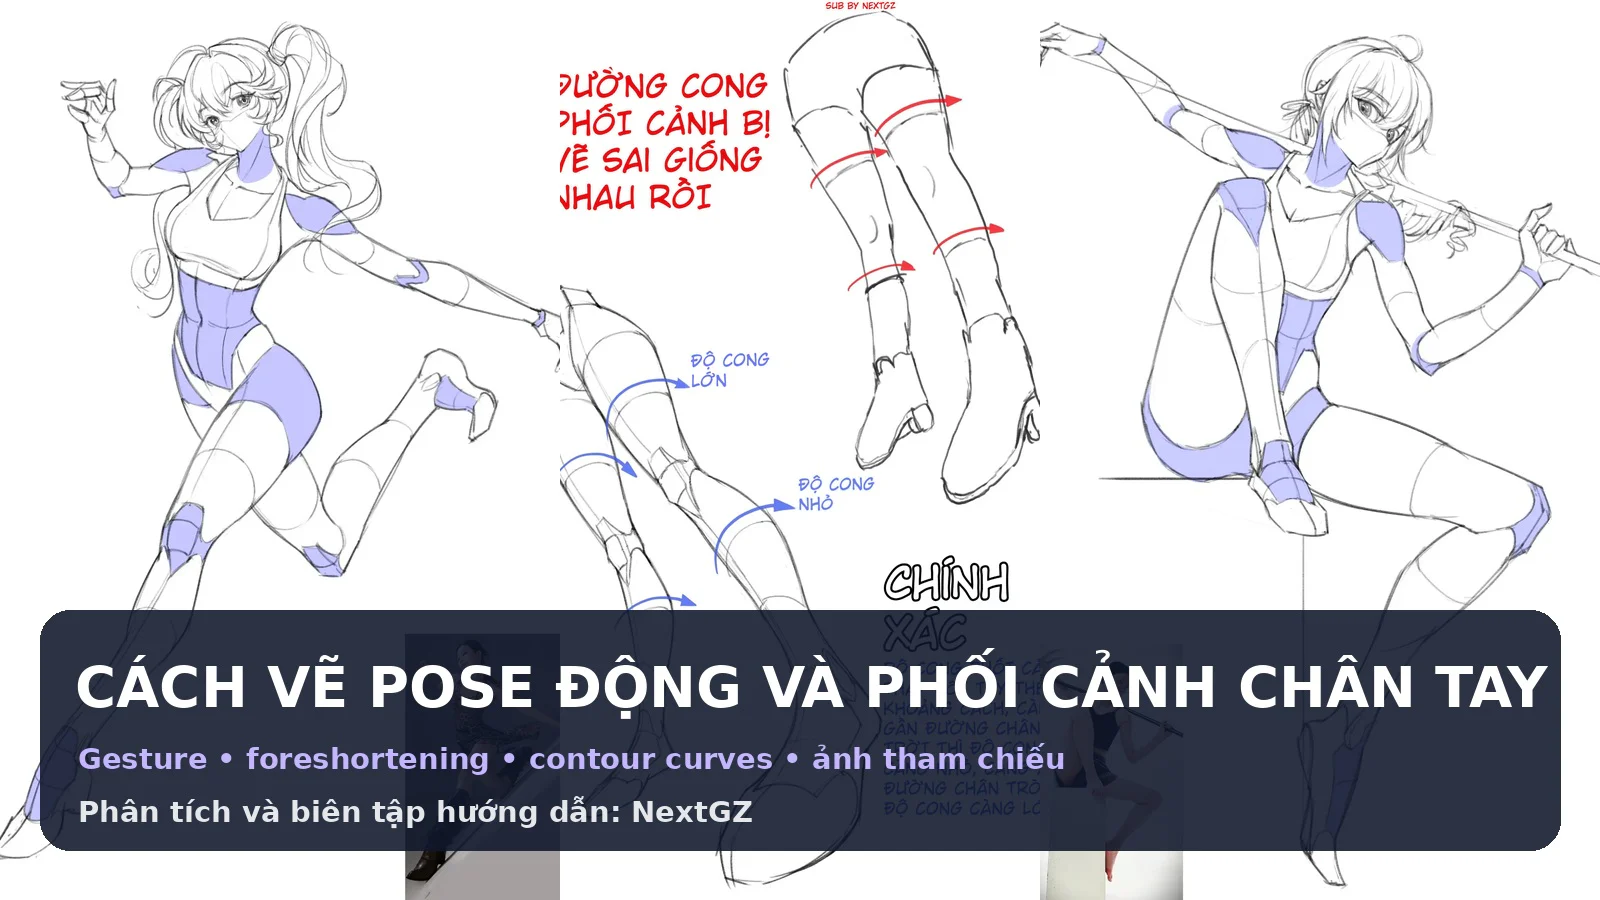
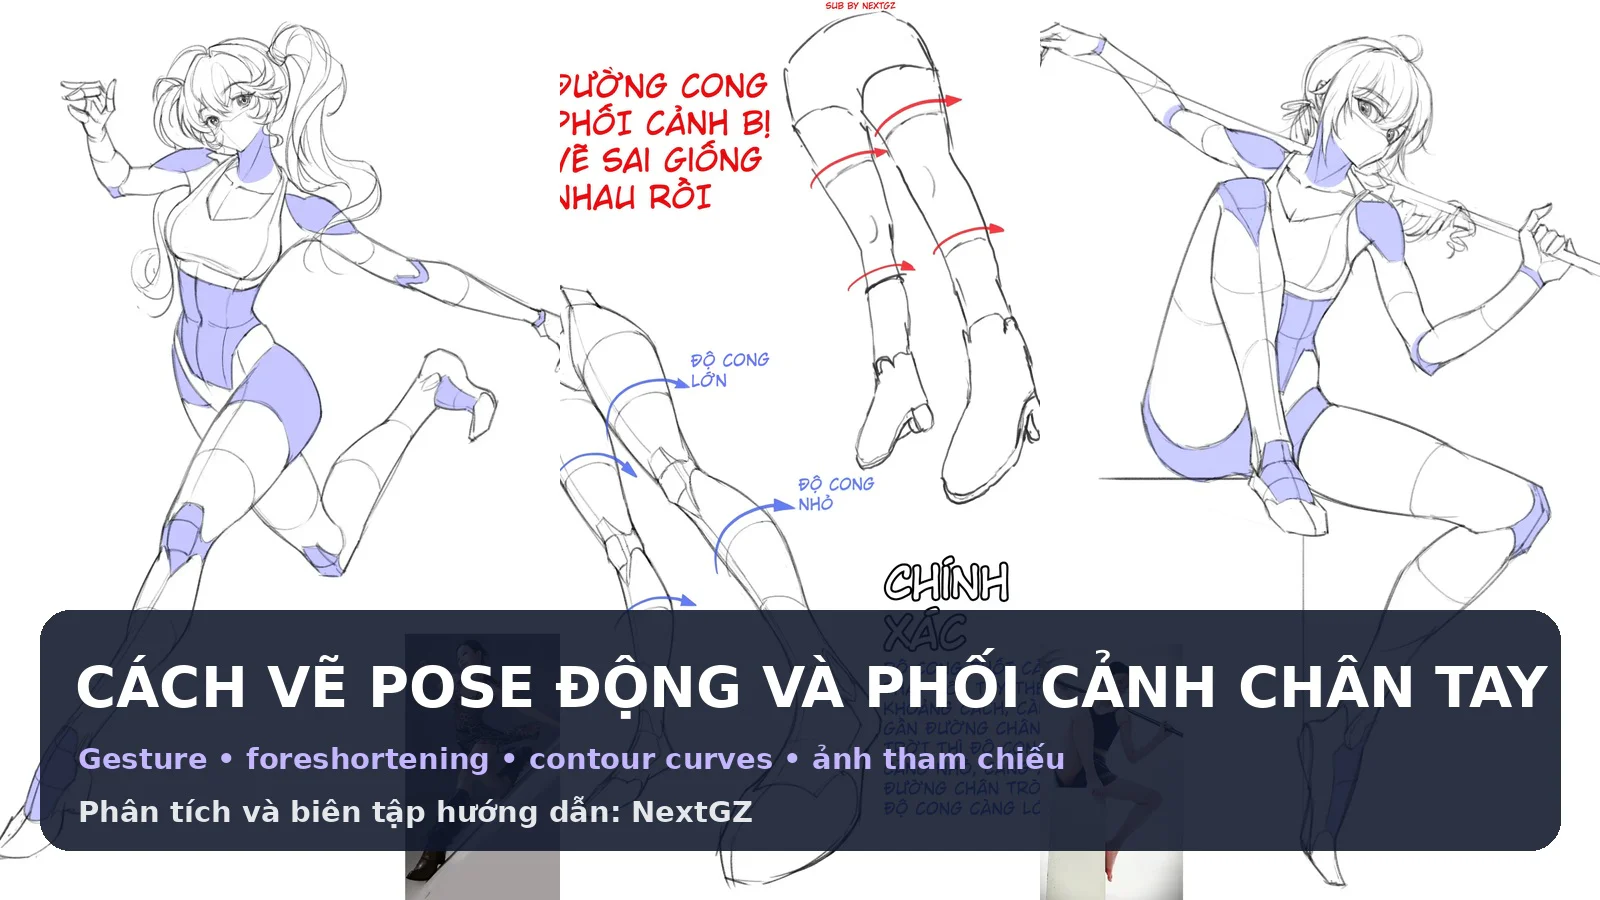
A dynamic pose truly has depth only when the artist simultaneously controls three elements: the line of action, the overlapping of volumes, and the degree of perspective distortion in the limbs. The three illustrations in this article show two examples of anime characters built from real model photos, along with a very important explanatory chart about contour curves on the legs. The core content lies not in copying the model's outline, but in how to transform a real photo into a system of volumes with direction, depth, and weight.
In the first drawing, the character is jumping with one leg thrust toward the viewer, the other leg pulled back, arms spread wide, and a ponytail trailing in the direction of movement. The second drawing is a dynamic seated pose with one leg bent close to the camera, the other extended downward, both hands interacting with a long weapon. The chart in the middle explains why the contour curves on the legs should not be drawn with the same curvature: the curvature must change according to the direction of the volume and the position of each segment relative to the horizon line.
The tutorial below analyzes all three images, then expands into a workflow usable in Procreate, Clip Studio Paint, Photoshop, IbisPaint, or any drawing software with layers. The observations about volume, gesture, and perspective are professional interpretations based on the visual data in the images; the image set does not provide brush settings, drawing duration, or original layer structure.
1. What are the three images teaching?
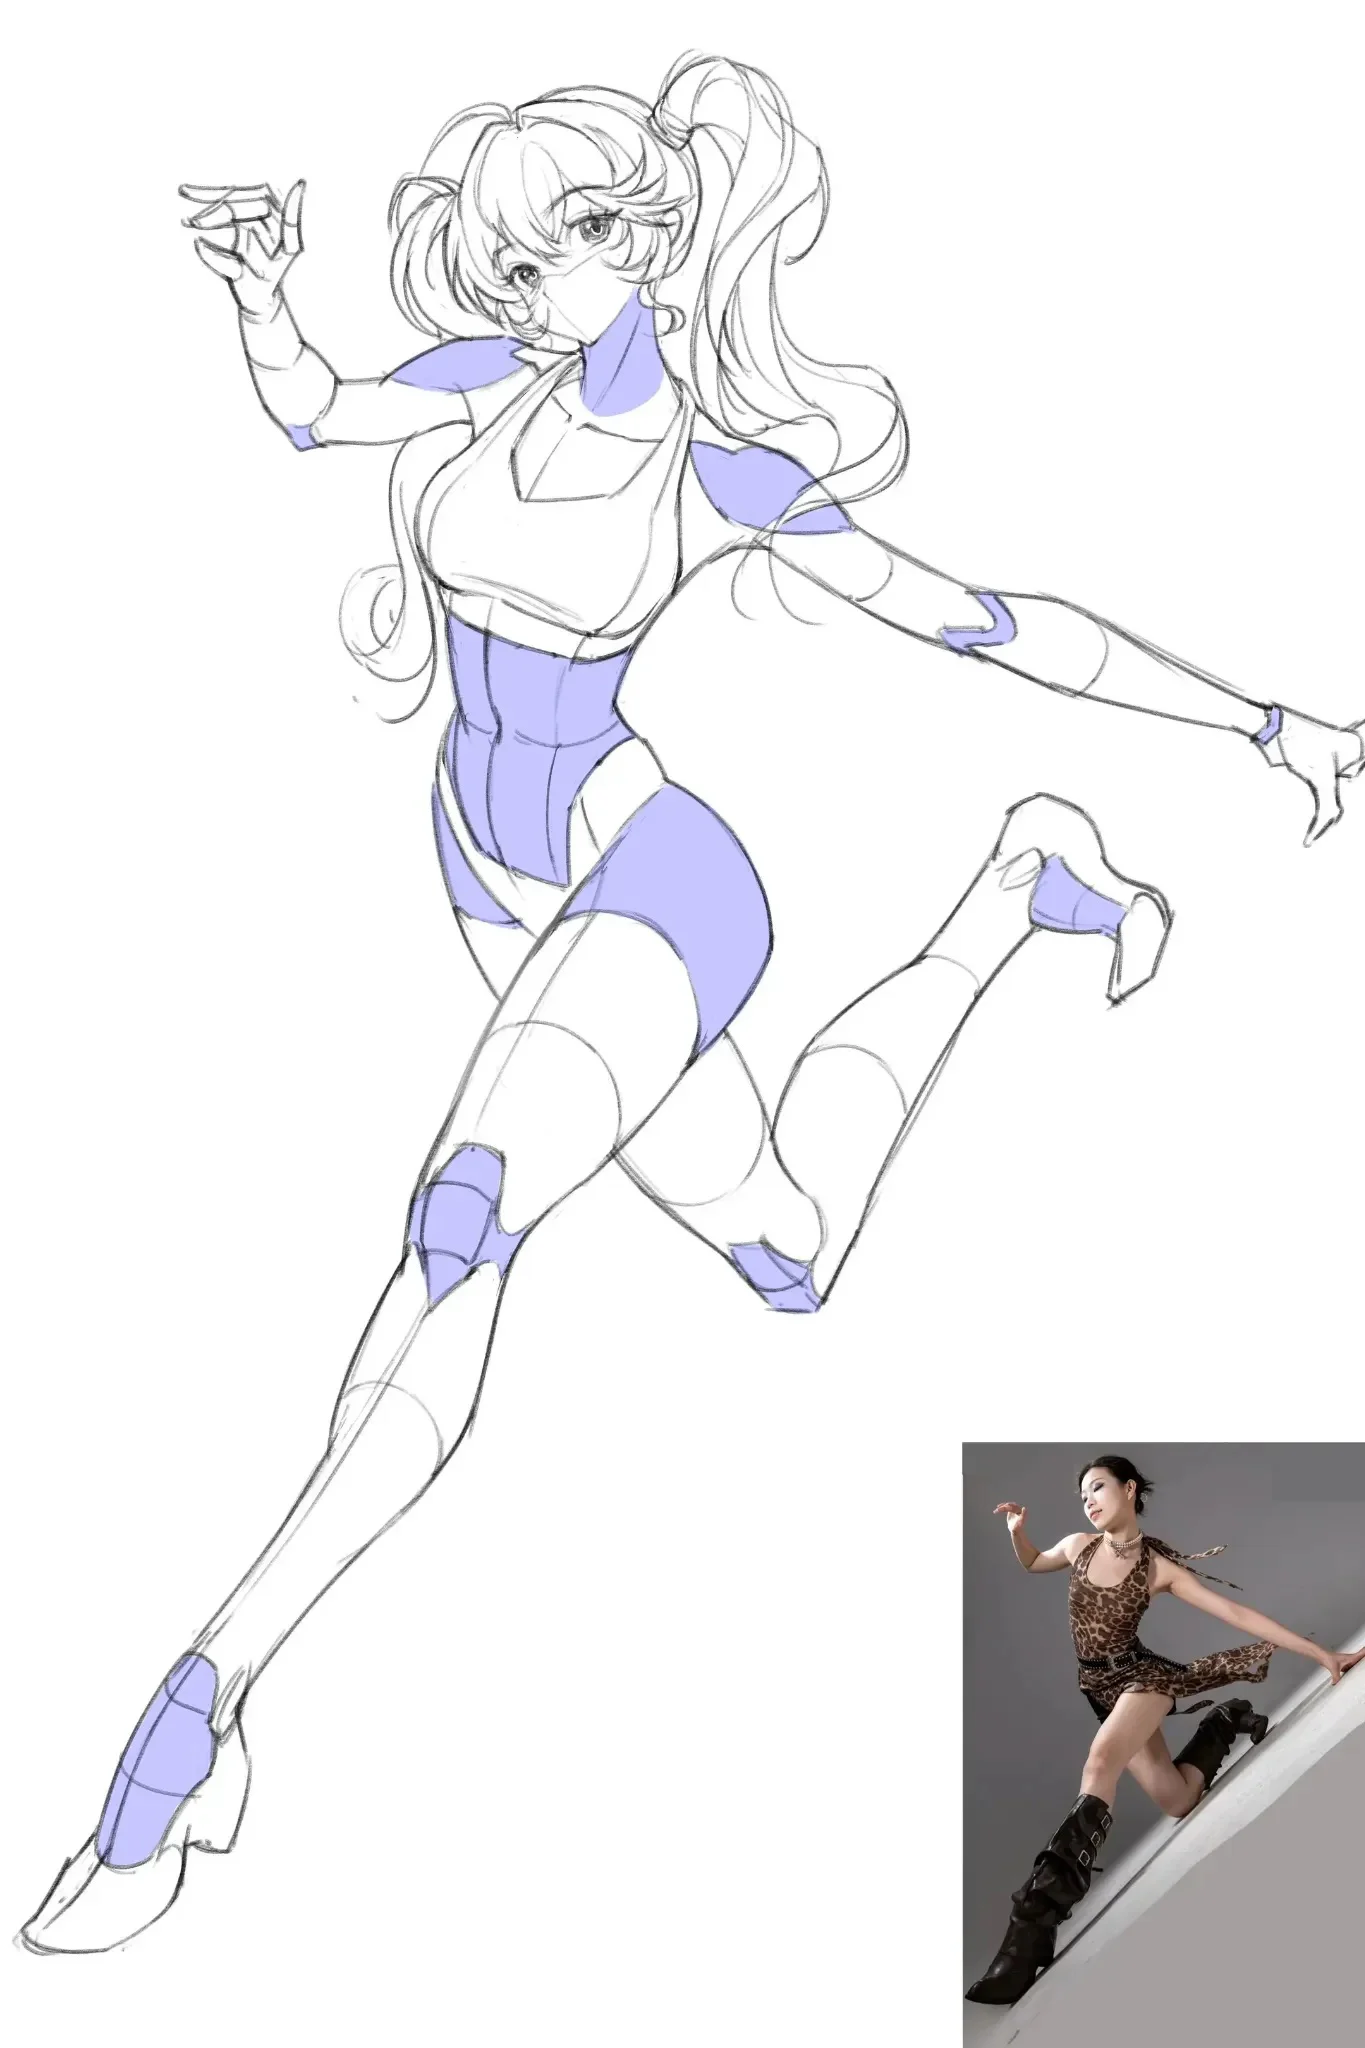
The first image is a pose translation exercise from a model photo to an anime character. The artist retains the main rhythm of the photo: a tilted torso, left arm raised, right arm pulled horizontally, one leg thrust down near the camera, and the other leg folded back. The purple areas in the drawing can be read as plane accents or costume divisions, helping the viewer recognize which surfaces face away from the light or where volume separation is needed.
The second image focuses entirely on the legs. The upper part warns that drawing every contour curve with the same curvature makes the legs look like paper tubes pasted onto a flat surface. The lower part shows that curvature needs to change: segments near the horizon line have flatter contour curves, while segments farther from the horizon line have more open curvature. This is the principle of "ellipse openness" in perspective, simplified into a visual tip for figure drawing learners.
The third image is a more complex seated pose. The character holds a long weapon, one leg bent very close to the body, the other leg extending far away, with the hands and prop creating multiple overlapping layers. This exercise demonstrates that perspective is not just about enlarging the foreground. It also lies in axis direction, contour curvature, occlusion order, and how the joints rotate within the same spatial context.
2. The first principle: find the gesture line before finding anatomy
Gesture is the major flow line running through the pose. It is not an exact bone line, nor is it an outline. In the jumping pose, you can feel a curve going from the head through the ribcage, the hip, and then thrusting down into the near leg. A secondary line runs through both shoulders and arms, creating an open posture. In the seated pose, the main line goes from the head down the torso, curves through the hip, and transitions into the extended leg; the weapon adds a long horizontal line that locks the composition.
If you start with details like eyes, hair, fingers, or shoes, the pose easily loses its rhythm. A better workflow is:
- Mark the head with a small block.
- Draw the spine line or line of action.
- Place the shoulder axis and hip axis.
- Mark the hands, knees, and feet with points.
- Connect the points with simple curves.
- Only build volume after the large silhouette is correct.
A good gesture is often highly simple. If the gesture sketch already requires many fragmented lines, the artist may be describing the outline instead of describing movement.
3. Jumping pose: organizing the upper body and arms
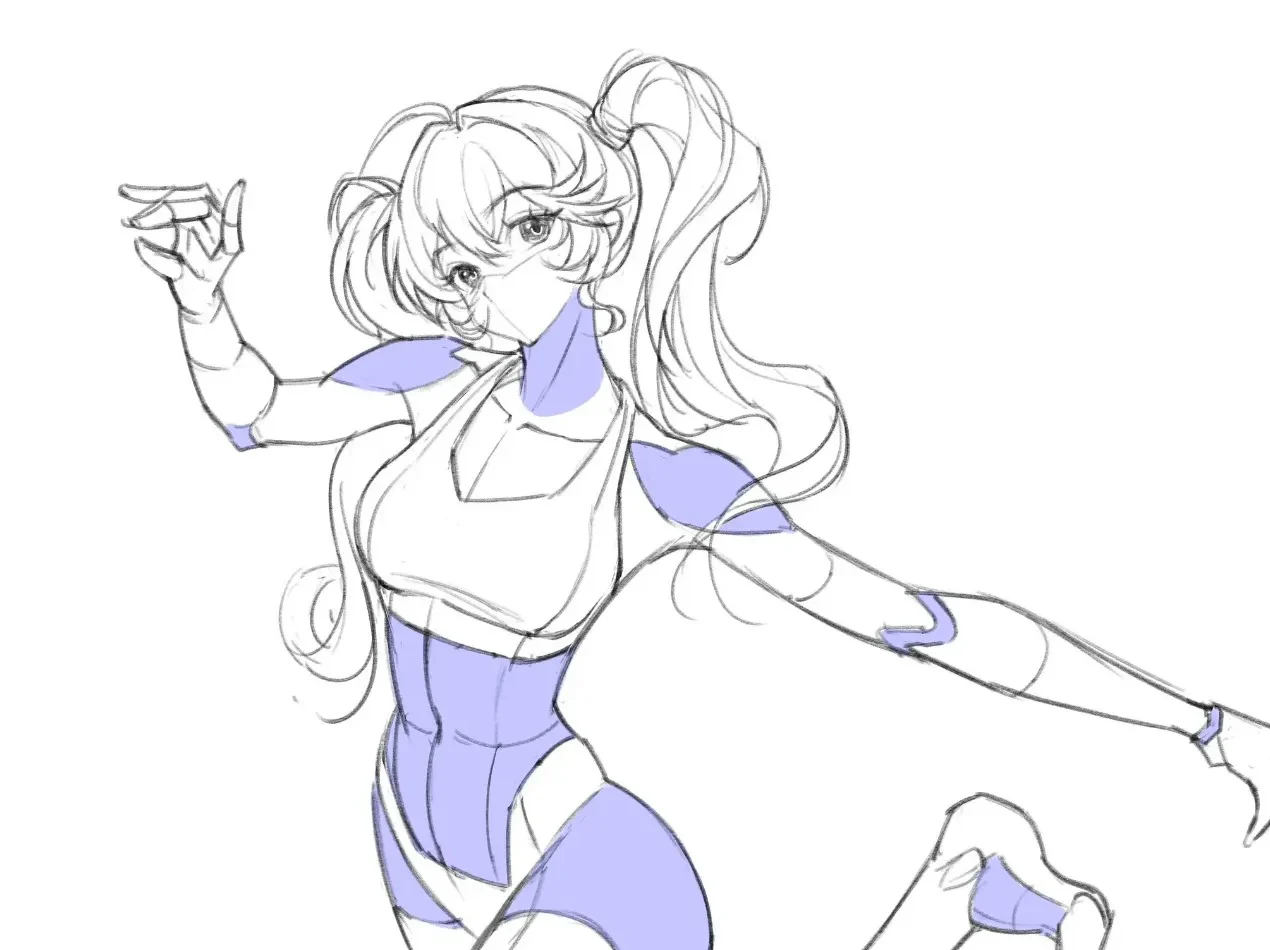
The upper body of the jumping pose is not upright. The head is tilted, the neck is angled, the shoulder axis is rotated, and the ribcage faces a different direction from the hip. This misalignment between the shoulders and hips creates torsion — a twisting feeling that makes the pose more alive. If these two axes are parallel, the character will look like they are posing for a static photo rather than actually jumping.
The two arms function to balance the leg mass. The left arm is raised and bent at the elbow, creating a slight zigzag line; the other arm extends horizontally, creating a pulling force opposite to the near leg thrusting down. When constructing the arms, don't just measure length. Check three relationships:
- The angle between the upper arm and forearm.
- The rotation of the elbow relative to the shoulder plane.
- The size of the near hand versus the far hand.
An arm pointing toward the camera may appear shorter but thicker due to foreshortening. An arm moving across the picture plane may appear clearer in length but with less change in thickness. Therefore, "long on paper" does not mean "long in space."
4. Reading reference photos without being dependent on outlines
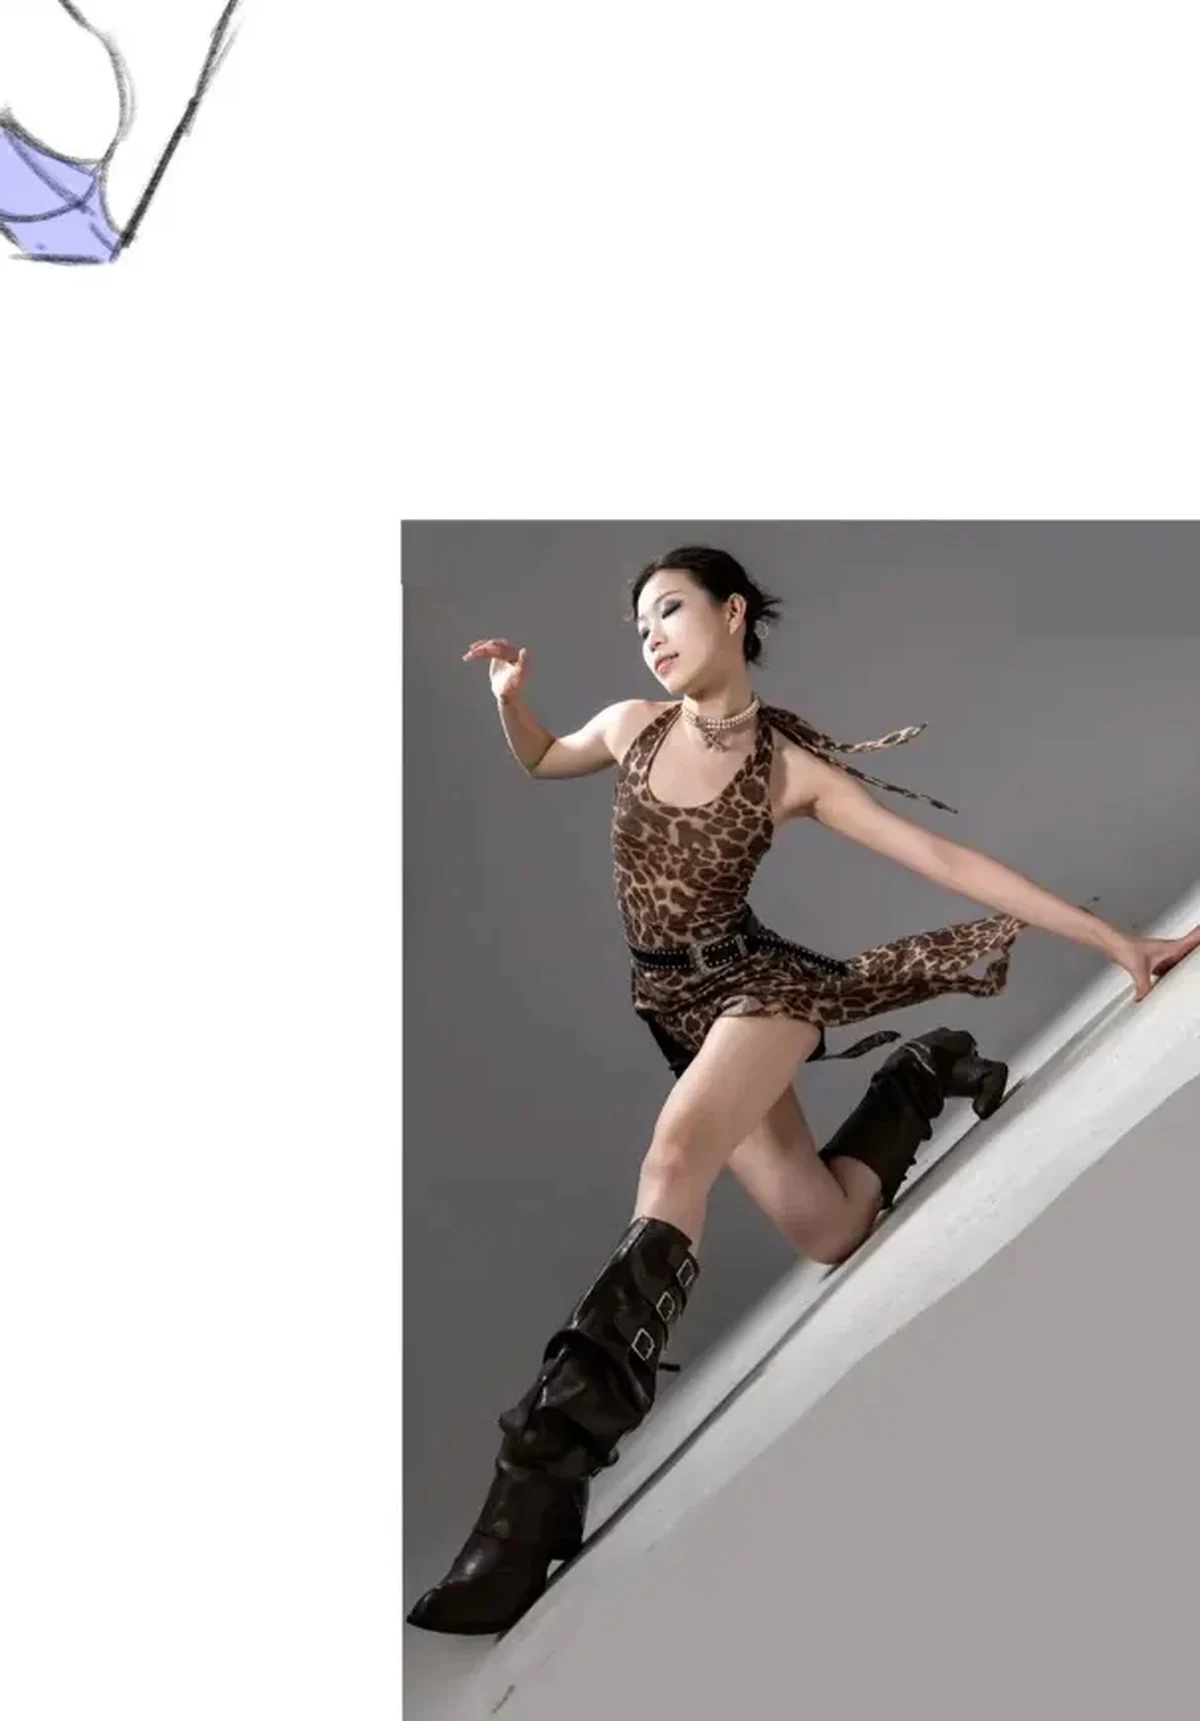
A reference photo provides data about gravity, joints, and distance — not a template to trace every line. When translating into anime, the artist can lengthen legs, shrink the head, narrow the waist, or simplify muscles; but they must still maintain the foundational relationships:
- Which points are bearing weight or generating force.
- Which volume is closest to the camera.
- Which part occludes which part.
- How the shoulder line and hip line are tilted.
- Whether the direction of the feet and knees is consistent.
An effective method is to shrink the reference photo and draw a black silhouette in 30–60 seconds. Then build a version consisting only of the head, ribcage, hip, arms, and legs using simple volumes. Only when the block-in reads the correct pose should you move on to anime proportions.
5. Foreshortening in the legs: the near leg is not just "bigger"
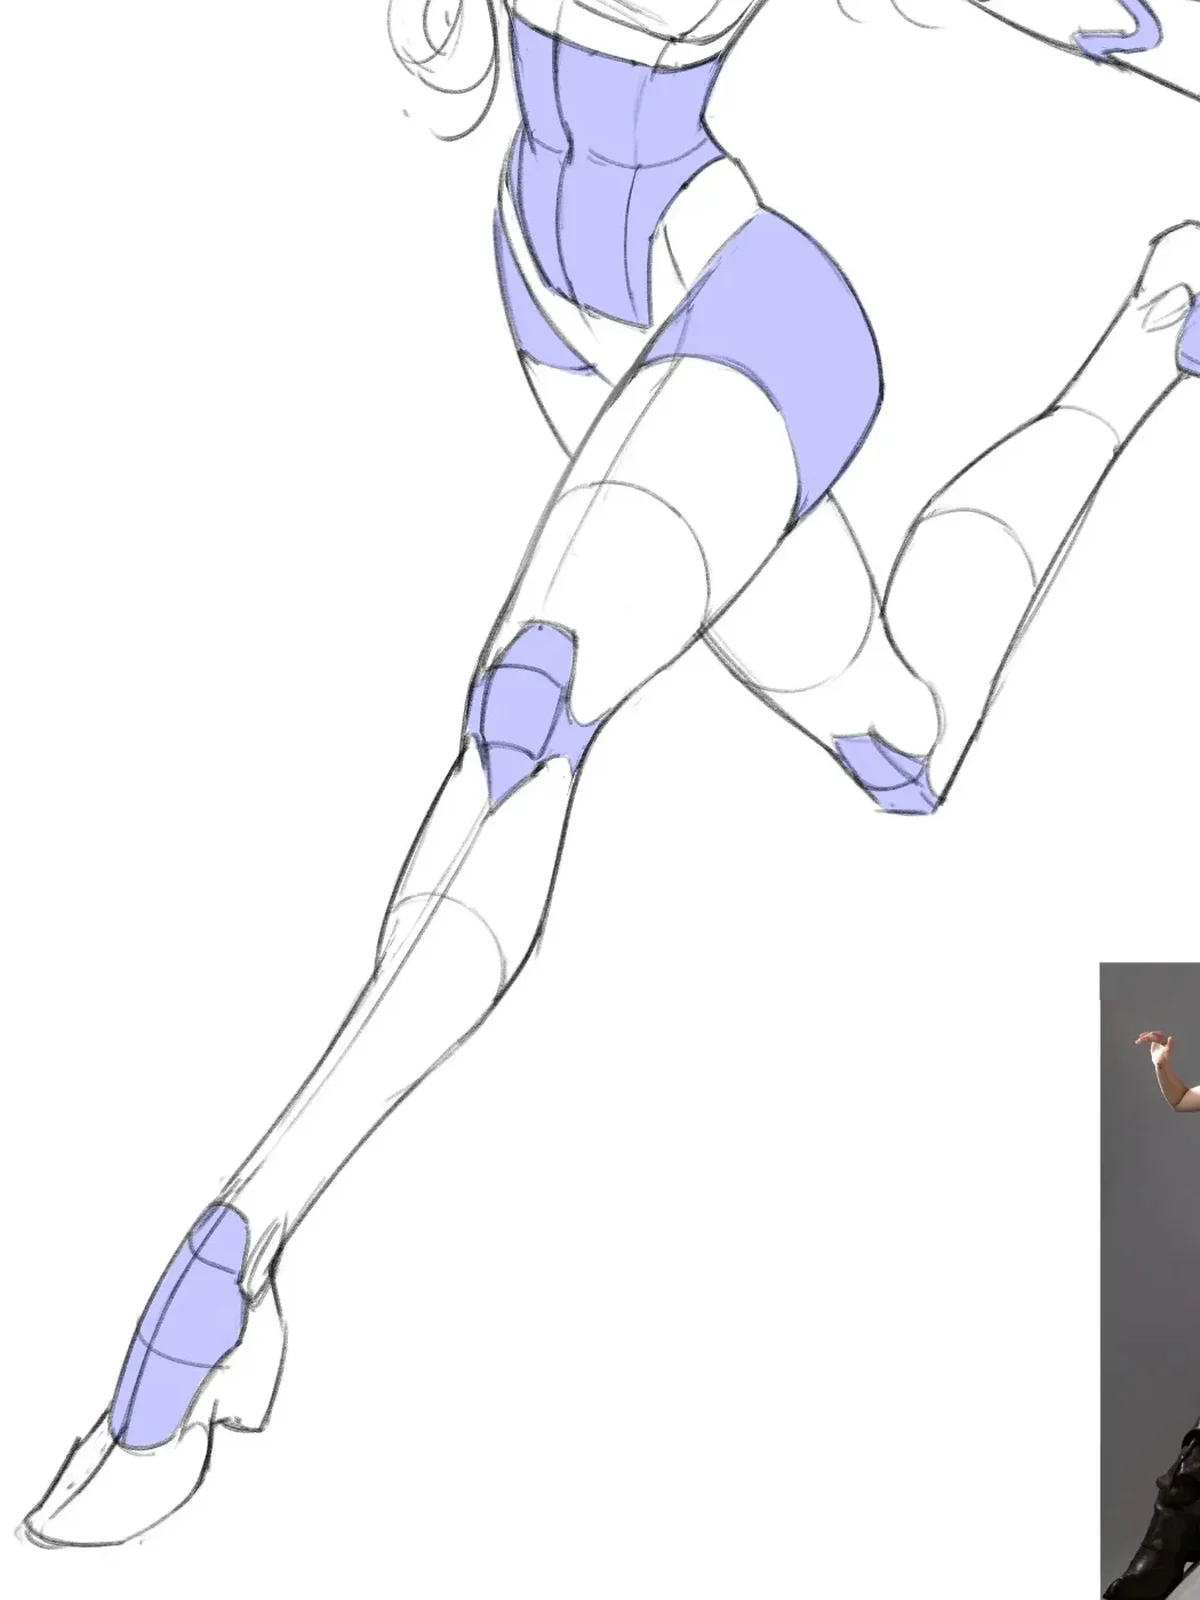
In the jumping pose, the near leg extends downward and toward the viewer. The far leg is folded back. The difference must be shown through multiple cues simultaneously:
- The near thigh or shin occupies a larger area.
- The visible distance between joints may be shorter due to the axis pointing toward the camera.
- The near joint partially occludes the volume behind it.
- The near foot may be larger and more defined.
- The contour curves on armor, pants, or socks change curvature.
If you simply enlarge the foot while keeping the entire shin the same width and length, the perspective will look like a local distortion effect. Foreshortening needs to be distributed from the hip, thigh, knee, shin, all the way to the foot.
6. Why should contour curves not be identical?
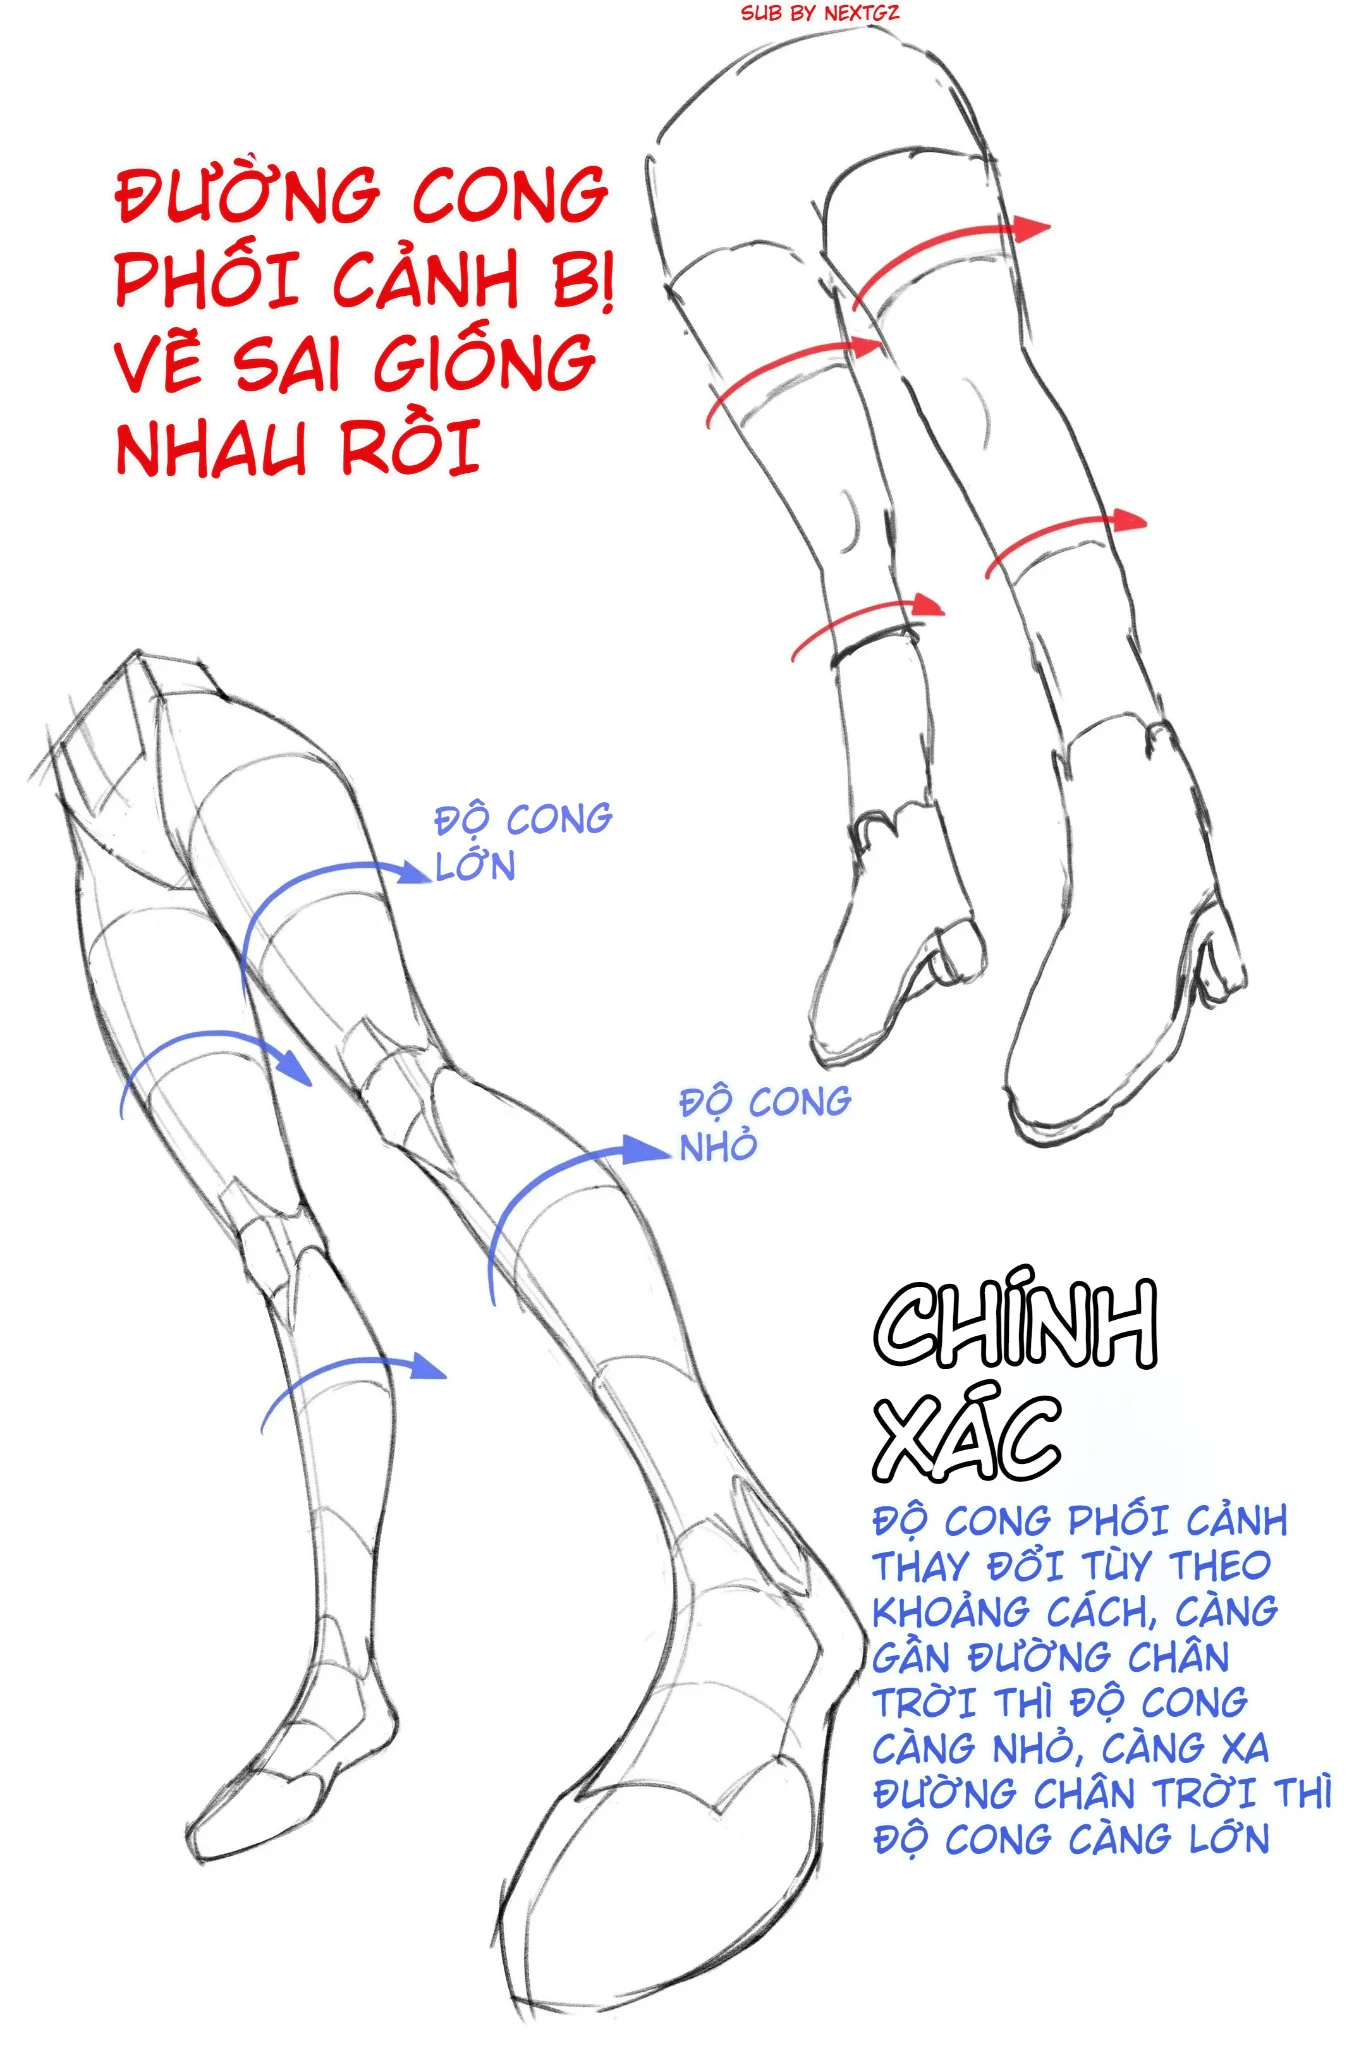
An arm or leg can be simplified into a series of tapered cylinders. When drawing a contour curve around the cylinder, you are describing the plane of the cross-section. The degree of curvature indicates whether the viewer is seeing the top, bottom, or merely the side edge of the volume.
When a cross-section approaches the horizon line, the ellipse appears flatter. When a cross-section lies far from the horizon line, the viewer sees more of its surface, so the ellipse opens wider. In figure drawing, we don't usually draw a full closed ellipse; we only use a short curve on armor, pants, socks, or joints. However, that curve must still obey the logic of the ellipse.
Besides the distance to the horizon line, curvature also depends on the specific orientation of each segment. A shin may rotate differently from the thigh; a foot may rotate differently from the shin. Therefore, contour curves not only change in openness but also change in tilt direction.
7. Common mistake: every contour curve has the same curvature
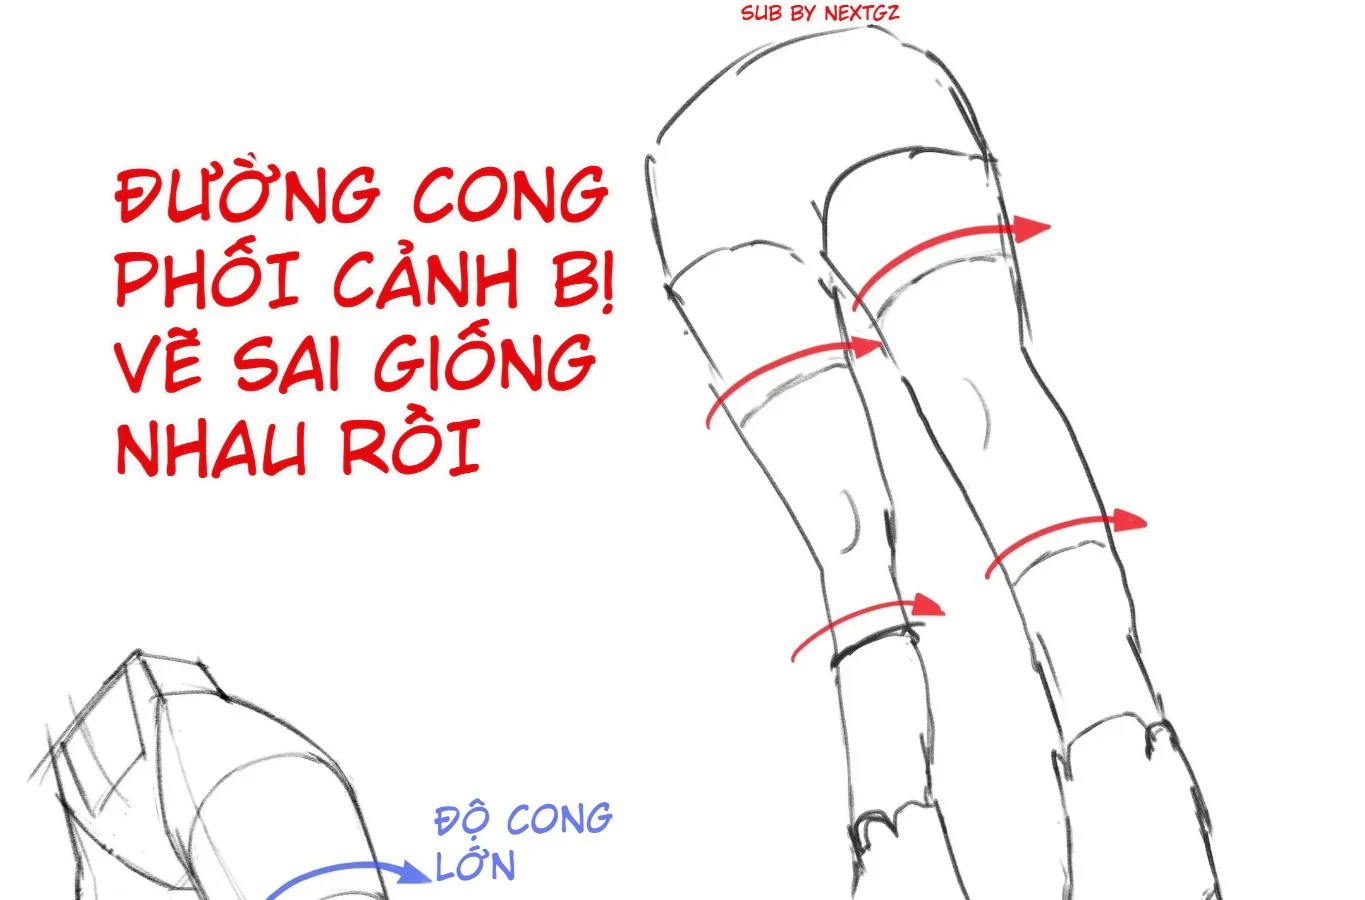
The upper part of the illustrated chart shows many curves copied almost identically onto both legs. When this happens, the viewer receives the signal that all cross-sections tilt at the same angle, regardless of which leg is closer or which segment is rotated differently. The result is a loss of spatial depth.
This error often occurs when the artist uses decorative lines on socks, armor, or boots without checking the underlying volume. The fix is to construct a central axis for each segment, imagine the cross-section perpendicular to that axis, and then place the curve accordingly.
--- ---8. How to fix: change the curvature according to the horizon line and axis direction
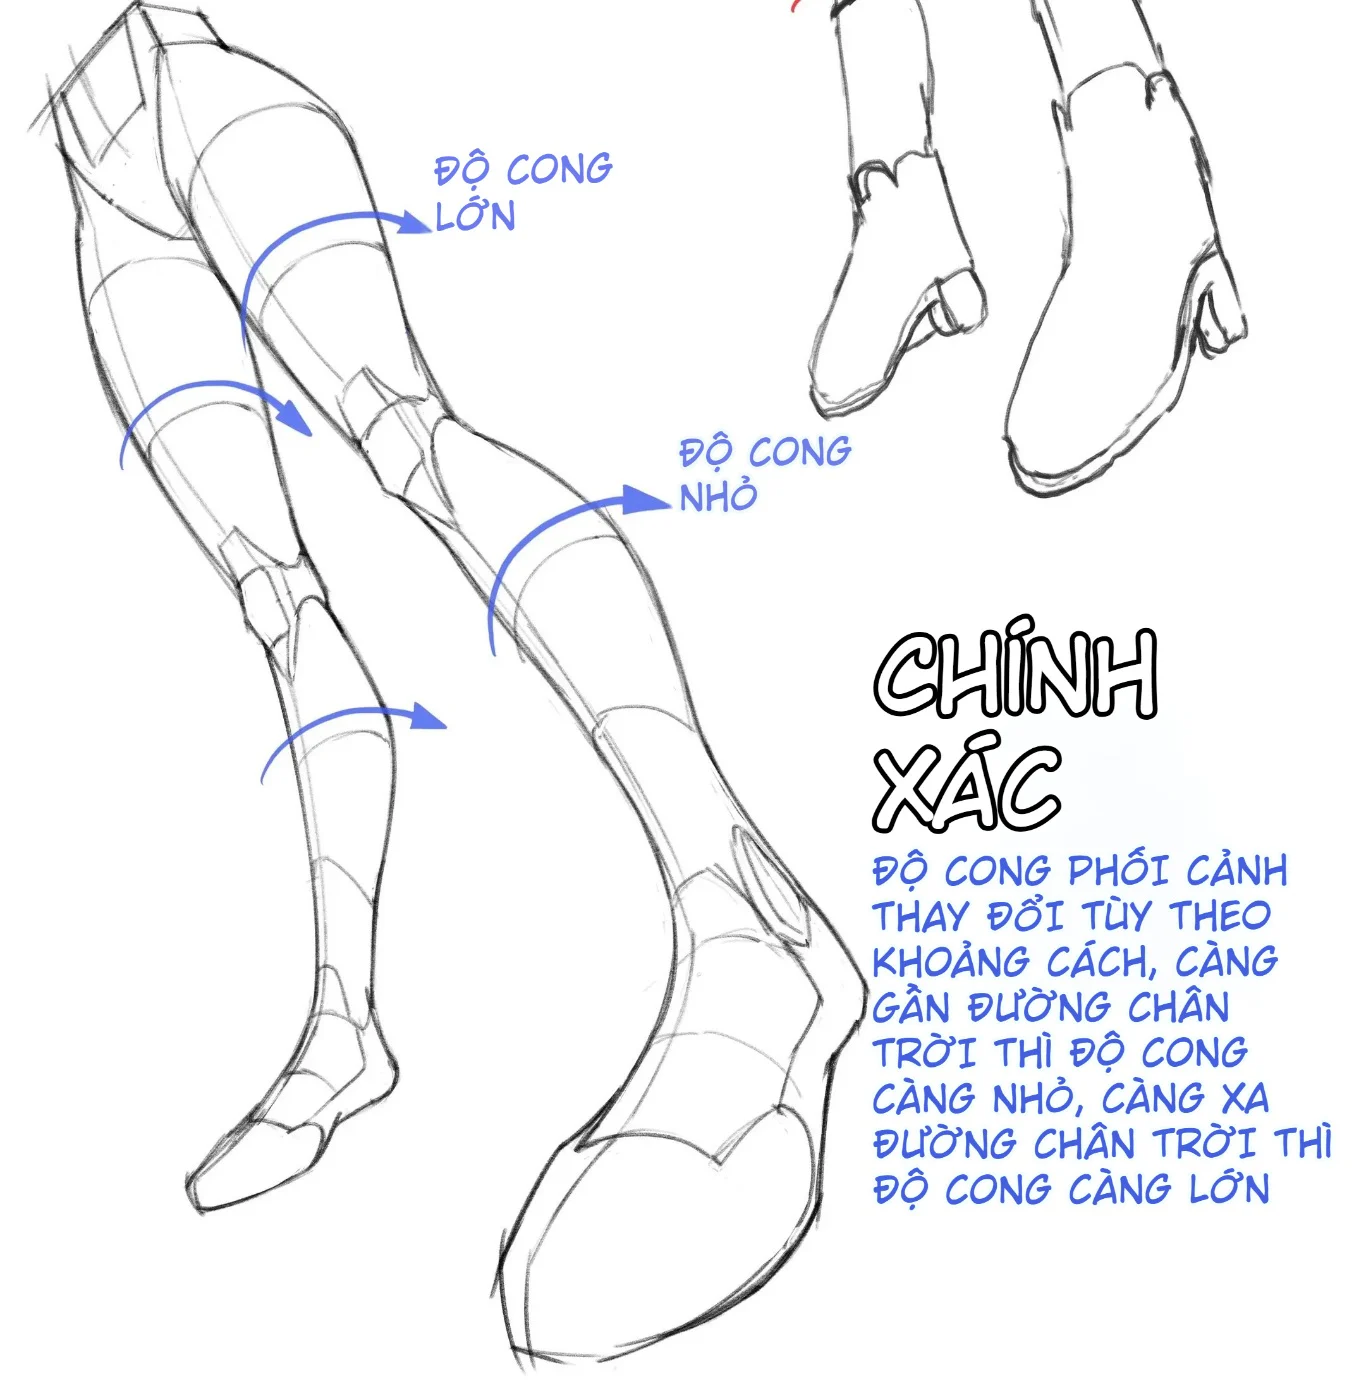
Imagine the horizon line running horizontally across the frame. For each leg segment:
- Identify the segment's long axis.
- Mark the plane perpendicular to the axis.
- Compare the segment's position to the horizon line.
- Draw a flatter contour curve if close to the horizon line.
- Open the curve wider if far from the horizon line.
- Reverse the curve direction if you are viewing the underside instead of the top side.
No need to calculate exact degrees. Just maintain a logical sequence of variation. If the contour at the thigh is nearly flat, the contour at the lower knee can be more pronounced, and the contour at the ankle, even lower, can open further. However, when the leg rotates, this sequence may reverse direction; therefore, always check the cylindrical axis first.
9. Seated weapon-holding pose: organizing multiple overlapping layers
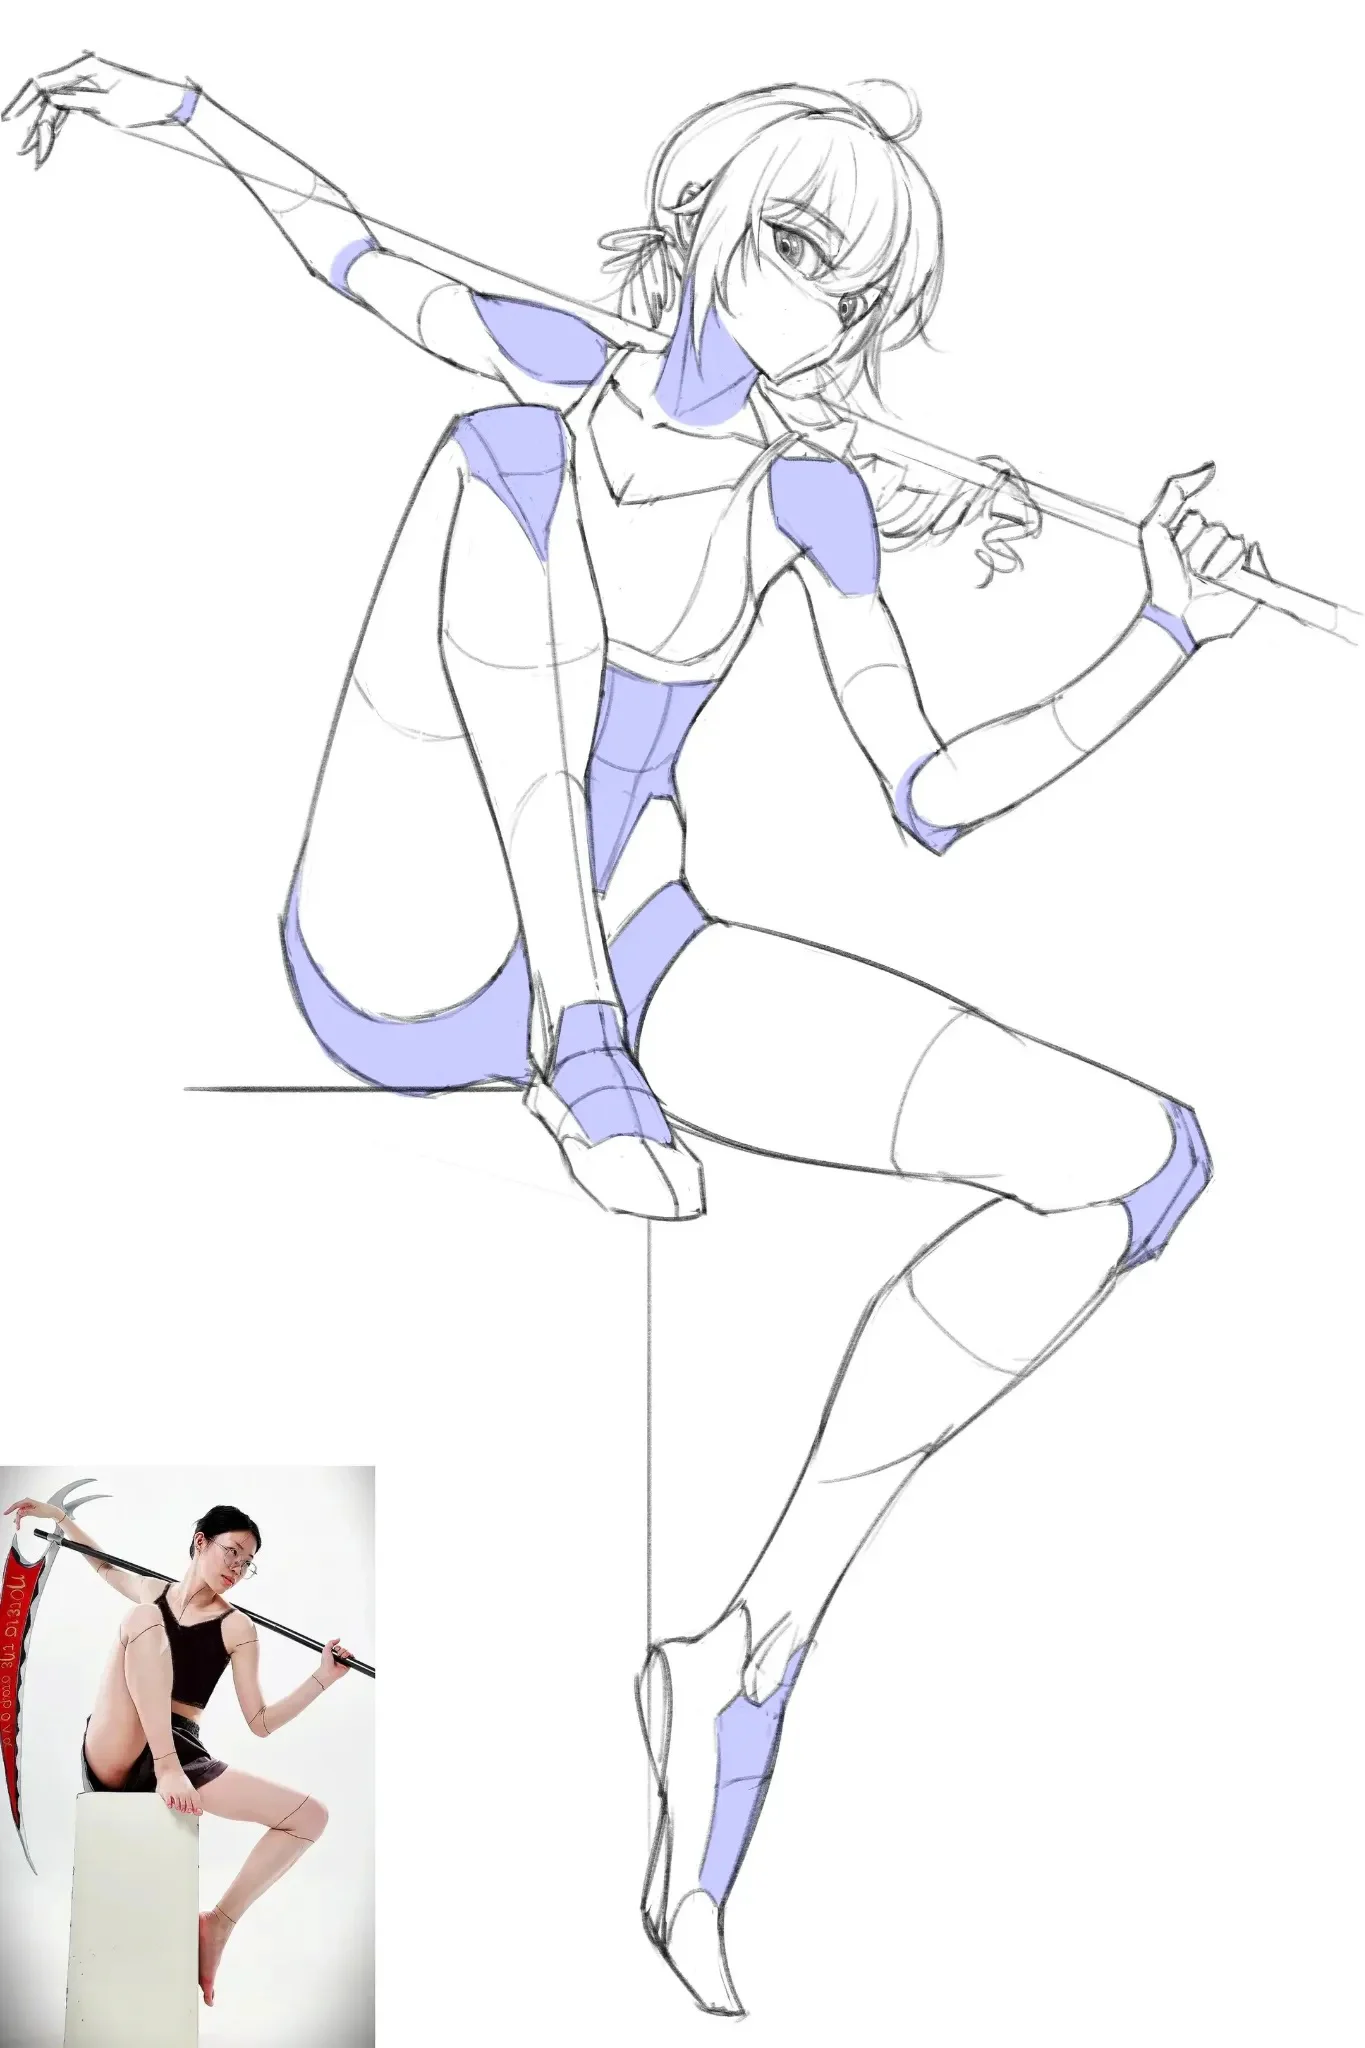
A seated pose is complex because the body is folded, many parts overlap, and weight rests on a single support point. In the image, one leg is pulled up close to the body, while the other extends downward. The left arm pulls the weapon back, and the right arm holds the nearer part. The prop creates a diagonal line that helps the viewer understand the shoulder direction and torso twist.
To construct this pose, divide it into three depth layers:
- Near layer: the bent knee, the hand or weapon part closest to the camera.
- Middle layer: the ribcage, hips, and main arm.
- Far layer: the extended leg, the rear hand, and the prop part receding into space.
If all lines have the same thickness and all masses are the same size, the depth layers will be lost. You can use line weight, overlap, and detail level to assist: the near parts are clearer, the far parts are simplified.
10. The weapon is a second gesture line
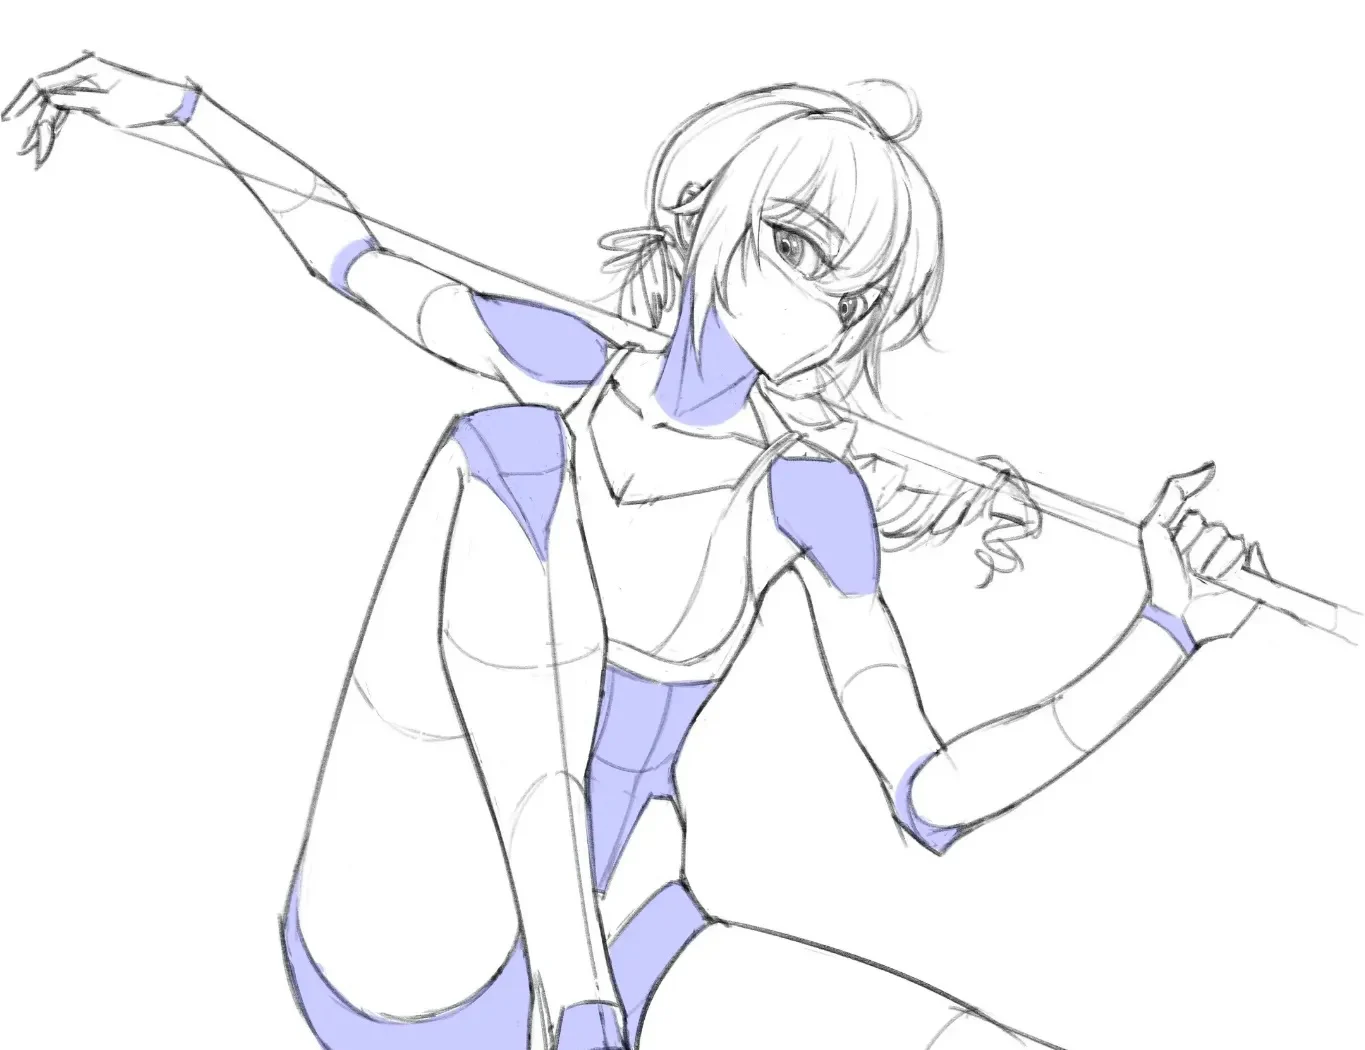
When a character holds a staff, spear, long sword, or bow, the prop becomes a strong perspective axis. Both hands must lie on the same axis as the object. The elbows and shoulders adjust so the hands can reach the correct positions. If you draw the hands first and then stuff the weapon in, the fingers and wrists often break.
A better workflow:
- Draw the weapon's axis line.
- Mark the two hand positions on that axis.
- Construct the wrists according to the contact angle.
- Place the elbows so the forearms connect naturally to the wrists.
- Position the shoulders and ribcage according to the established joint system.
- Only then add muscle and clothing wrapping.
The thickness of the prop must also change with perspective if the axis points toward the camera. If it is nearly parallel to the picture plane, the thickness can remain relatively consistent.
11. Bent leg and extended leg in a seated pose
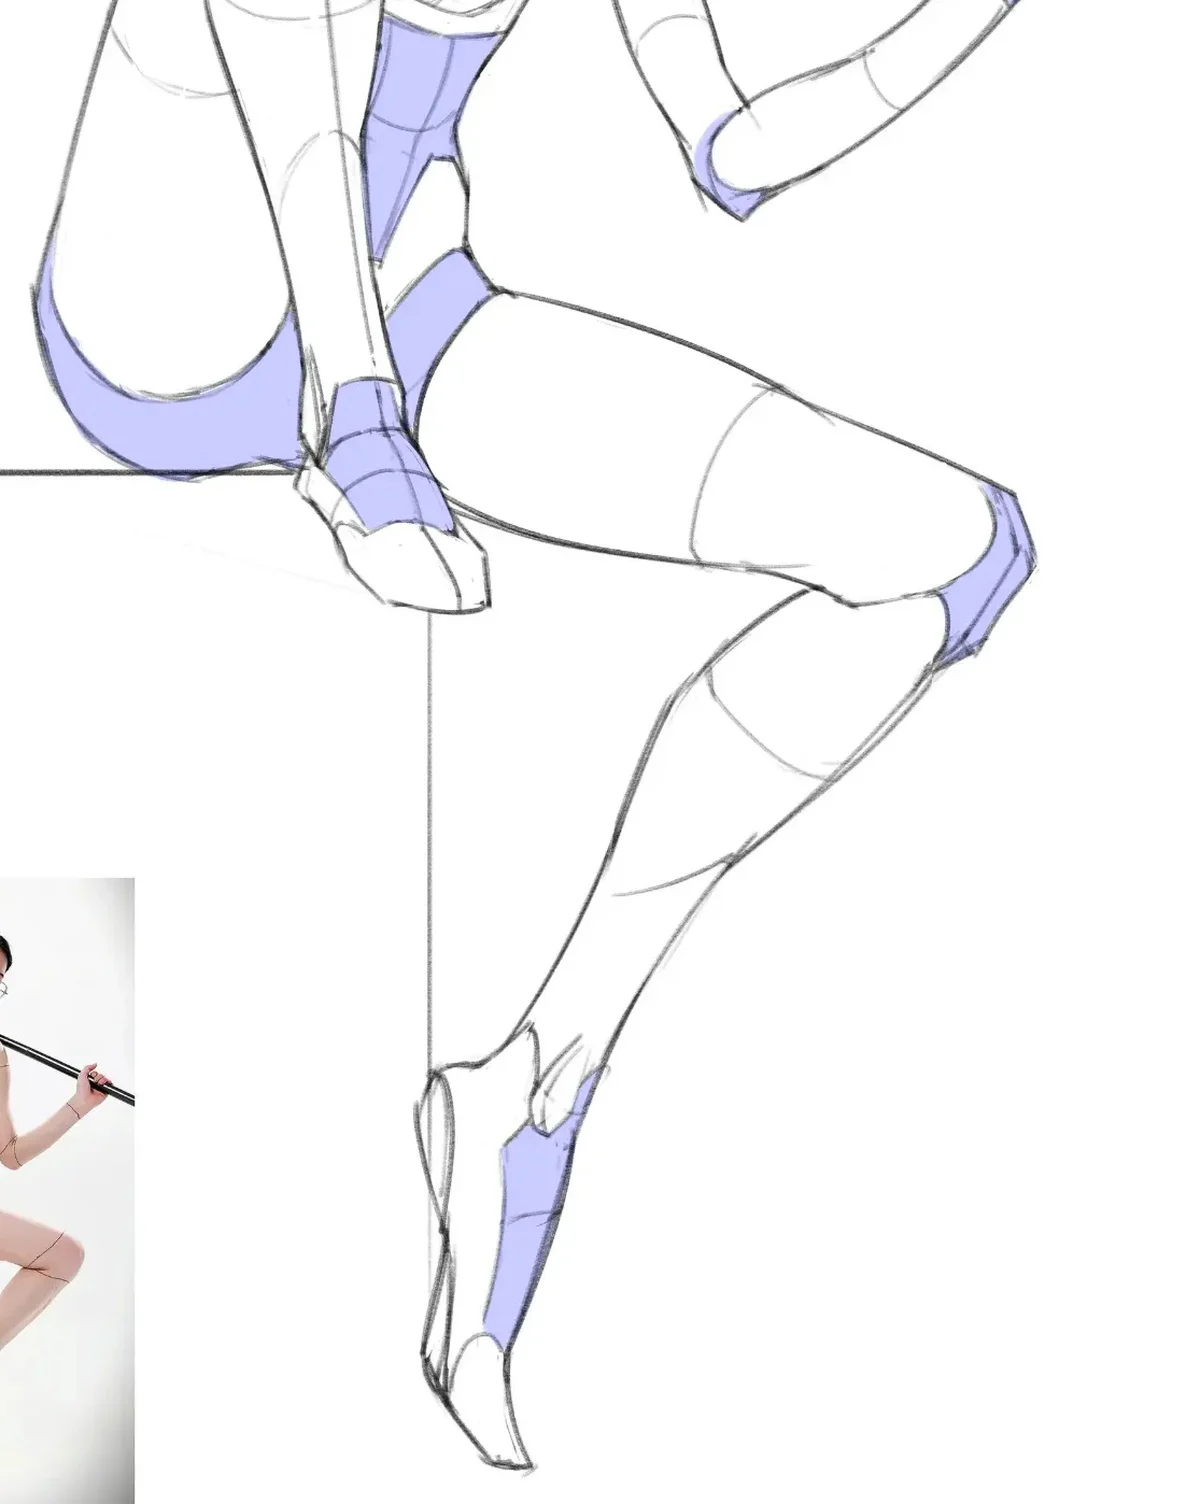
The leg bent close to the body has a large knee, and the thigh forms a short, compressed mass. The extended leg going far away has a longer axis but its width decreases. This is a good example to understand that foreshortening doesn't always make everything "shorter." A segment can look long if it goes across space, but it still gets smaller due to distance from the camera.
In the knee area, contour curves must follow the cylindrical surface direction. The edges of the knee, socks, or boots should not be drawn as fixed horizontal lines. They must wrap around the mass, indicating where the knee is pointing.
12. Comparing reference photos of the seated pose
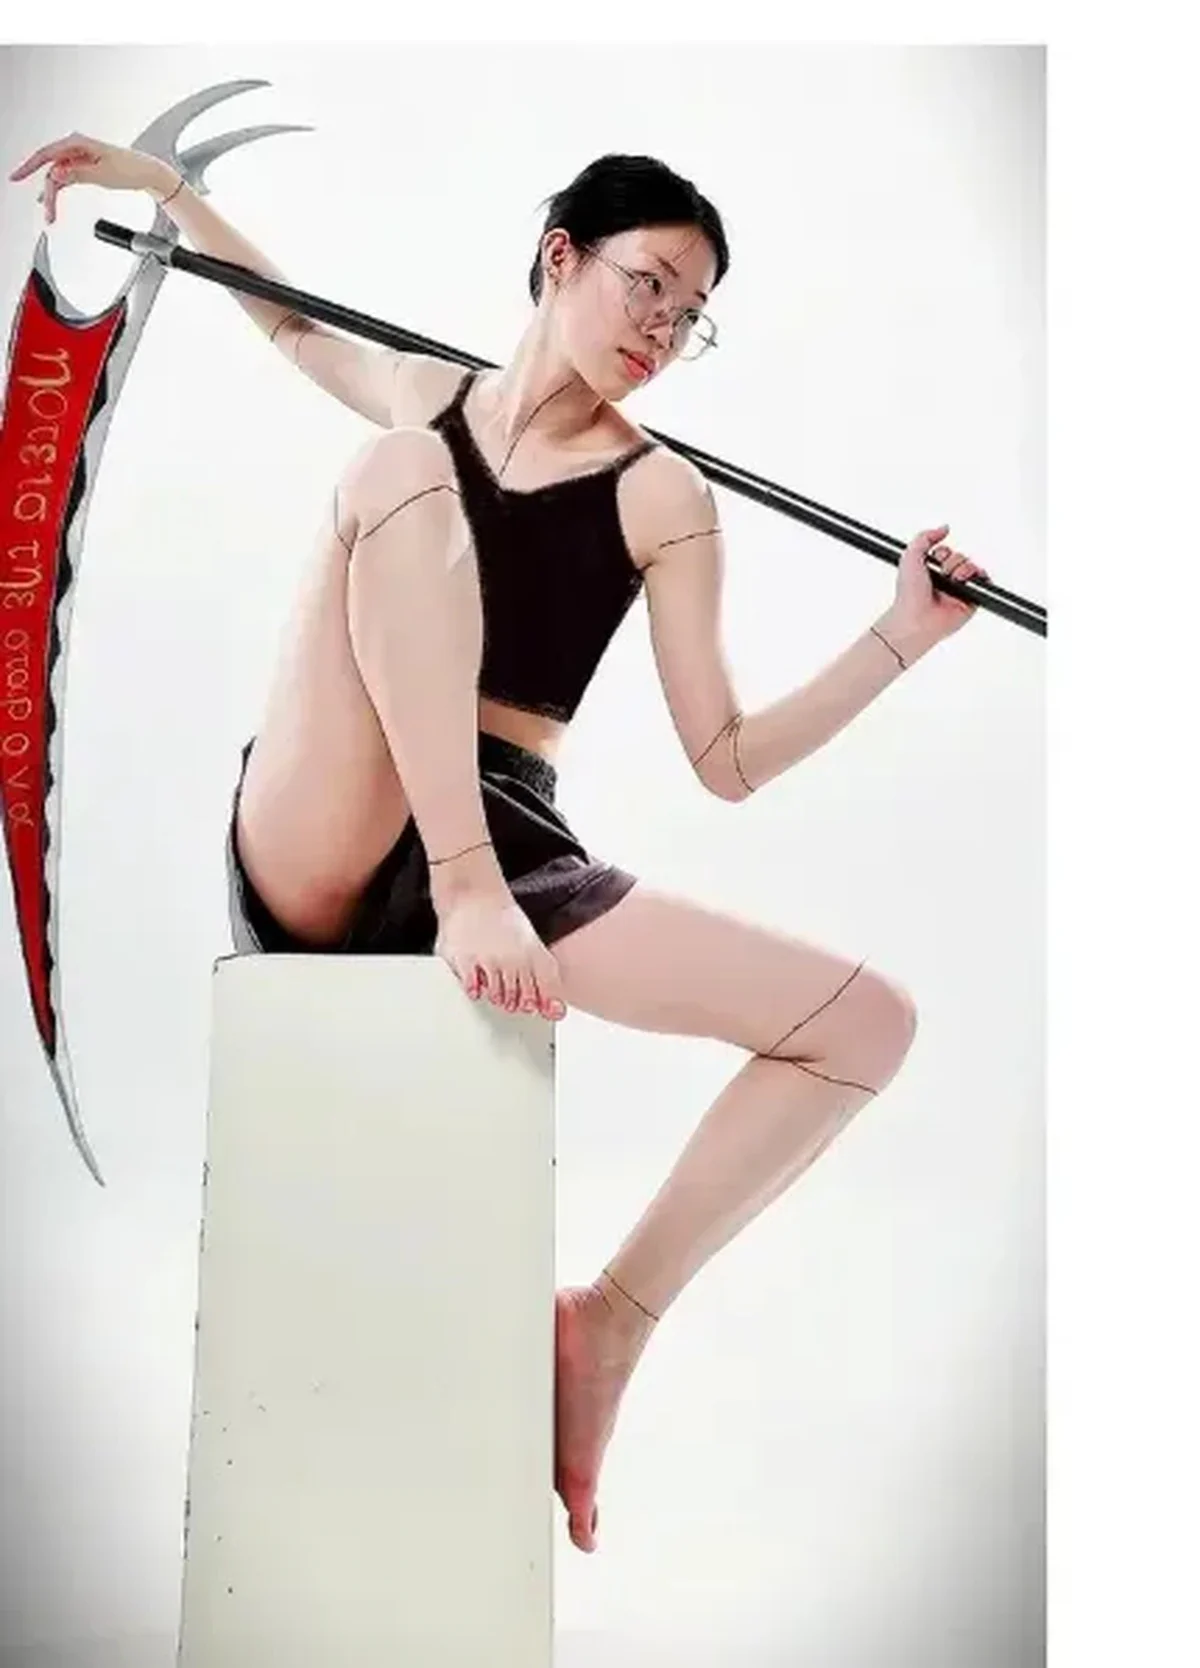
The reference photo shows a real model bearing weight at the sitting point, with a tilted torso and hands holding a prop. When adapting to anime, the artist changed proportions, lengthened the legs, and made the torso slimmer, but preserved the shoulder axis, hand direction, leg bend, and support point.
This is an effective way to use reference: keep the physical logic, change the stylistic language. If you abandon the physical logic, the anime pose may look good in parts but won't hold up as a real action.
13. Process for constructing a dynamic pose from a reference photo
Step 1: Write one sentence describing the action
Before drawing, describe the pose in one sentence: "character jumps up, one leg lunging forward" or "character sits on an edge, holding a weapon at shoulder height." This sentence helps eliminate details that don't serve the action.
Step 2: Draw the line of action
Use one to two large curves. Don't build detailed bones at this stage.
Step 3: Place the head, ribcage, and hips
Use a ball for the head, an egg box for the ribcage, and a wedge shape for the hips. Check the rotation angle between the three masses.
Step 4: Place joint points
Mark the shoulders, elbows, wrists, hips, knees, and ankles. Compare the size of near and far points.
Step 5: Connect with tapered cylinders
Limbs are not straight lines. Each segment has an axis and cross-section. Add contour curves to check direction.
Step 6: Check overlap
The near mass must cover the far mass. Without layering, the pose will look flat even if proportions are correct.
Step 7: Transition to anime proportions
Lengthen the legs, shrink the head, or change the waist after the mass system is stable. Don't stylize before understanding the real mass.
Step 8: Design clothing based on masses
The edges of socks, armor, gloves, and boots must wrap around the body. Use them as contour curves to support perspective.
Step 9: Draw hair and accessories according to motion
Hair is not just decoration. It helps indicate wind direction, acceleration, and the pose's rhythm.
Step 10: Shrink and flip the canvas
Check the silhouette in thumbnail, then flip the canvas to detect axis misalignment and unusual length.
14. How to use the purple patches in the image to understand planes
The purple patches appear on the neck, shoulders, waist, hips, wrists, knees, and boots. Although the image set does not explain them in text, they can be used as a system to emphasize planes. These areas are typically where the mass changes direction, where clothing hugs the body, or where design separation is needed.
When studying, you can create a temporary color layer and fill:
- The side of the neck.
- The top or side of the shoulder.
- The side of the ribcage and waist.
- The front-side of the thigh.
- The angled surface of the knee, wrist, and ankle.
If these patches don't change shape when the limbs rotate, the construction might be off. The color patches should wrap around the mass like a piece of armor or a real fabric layer.
15. Line art for dynamic poses
Dynamic poses require clearer line variation than static poses. An easy-to-use system:
- Thick lines for silhouettes close to the camera.
- Thin lines for far parts or areas receiving light.
- Clear lines at overlaps to explain layer order.
- Light lines for internal details.
- Reduce detail in fast-moving or distant parts.
You don't need to draw every muscle line and fabric fold. Too much uniform detail kills the gesture. Keep the face area, hands, or near legs as places for higher detail; reduce detail in secondary parts.
--- ---16. Common Mistakes
Copying the silhouette without constructing volume
The photo may look good, but the drawing is only correct from one angle. Build the axis and contour curves to understand the volume.
The near leg only enlarges the foot
Foreshortening must affect the entire chain from the hip to the foot.
All contour curves have the same curvature
Vary the openness according to the horizon line and each segment's own direction.
No overlap
Place the near block over the far block, especially at the knees, elbows, hands, and hair.
Shoulders and hips are parallel
Create torsion by offsetting the two axes according to the action.
Prop doesn't align with both hands
Draw the prop's axis first, place the hands on the axis, then construct the arms.
Hair doesn't react to movement
Let the hair mass lag slightly or follow the direction of acceleration; avoid strands falling straight as in a static pose.
Uniform line art
Use line thickness to support depth and focal points.
17. Suggested Layer Structure
- Reference photo.
- Gesture line.
- Head – chest – hip blocks.
- Joints and limb axes.
- Contour curves for perspective check.
- Clean sketch.
- Clothing and accessories.
- Line art.
- Plane analysis areas.
- Flat color or test shading.
In Procreate or IbisPaint, you can use different colors for gesture, construction, and clean sketch. This helps avoid confusing structural lines with finished lines.
18. 7-Day Dynamic Pose Practice
- Day 1: 20 thirty-second gestures from sports or dance photos.
- Day 2: Construct head, chest, hips for 10 poses; don't draw detailed limbs.
- Day 3: Practice limb cylinders and contour curves from various angles.
- Day 4: Draw 10 near–far legs with strong foreshortening.
- Day 5: Construct 5 poses with long props, placing hands on the prop's axis.
- Day 6: Choose one jumping pose, convert from a real photo to anime proportions.
- Day 7: Choose one sitting pose, complete a clean sketch and self-check using the checklist.
19. Pre-Finalization Checklist
- Is the line of action readable in 2 seconds?
- Do the shoulder axis and hip axis create reasonable torsion?
- Is the near block larger and overlapping the far block?
- Do the knees, elbows, and wrists rotate in the same space?
- Do the contour curves change curvature according to the block's direction?
- Are contours nearer the horizon line flatter?
- Is the near leg adjusted from hip to foot?
- Does the prop pass correctly through both hand positions?
- Do the hair and accessories support the direction of movement?
- Is the silhouette still clear when scaled down?
- Does the line art have near–far hierarchy and focus?
- Does the anime version maintain the gravity logic of the reference photo?
20. Further Related Skills
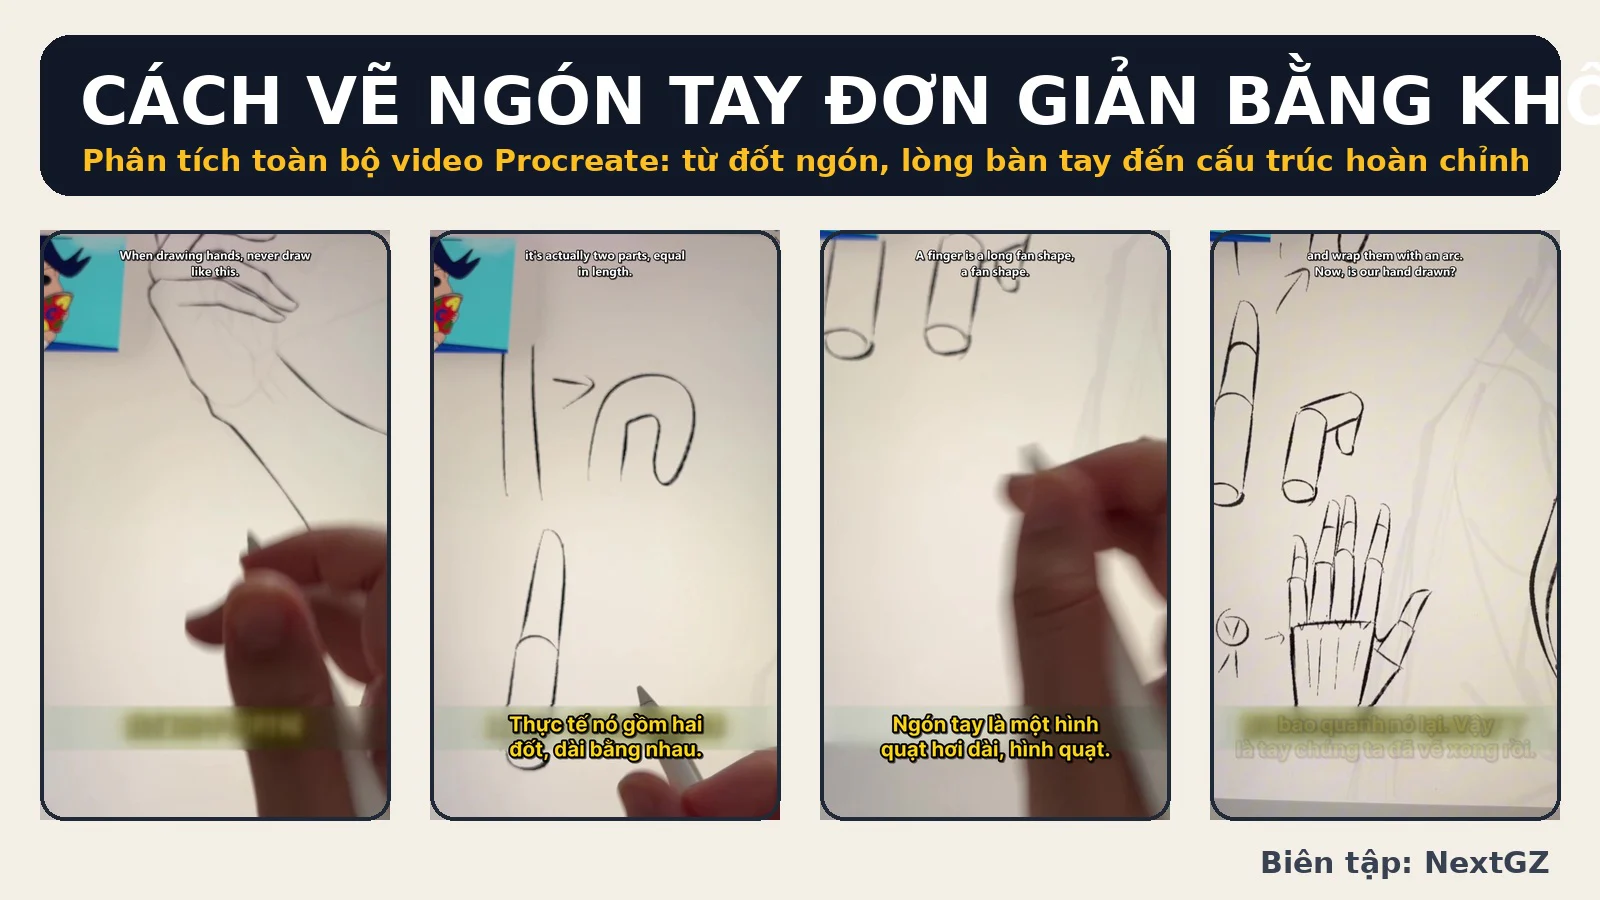
Once you've mastered dynamic poses, you should practice hands separately, as they often interact directly with props. Refer to the article guide to drawing 7 anime hand poses from reference photos and the article how to draw hands holding small objects, gripping a staff, and conveying contact force.
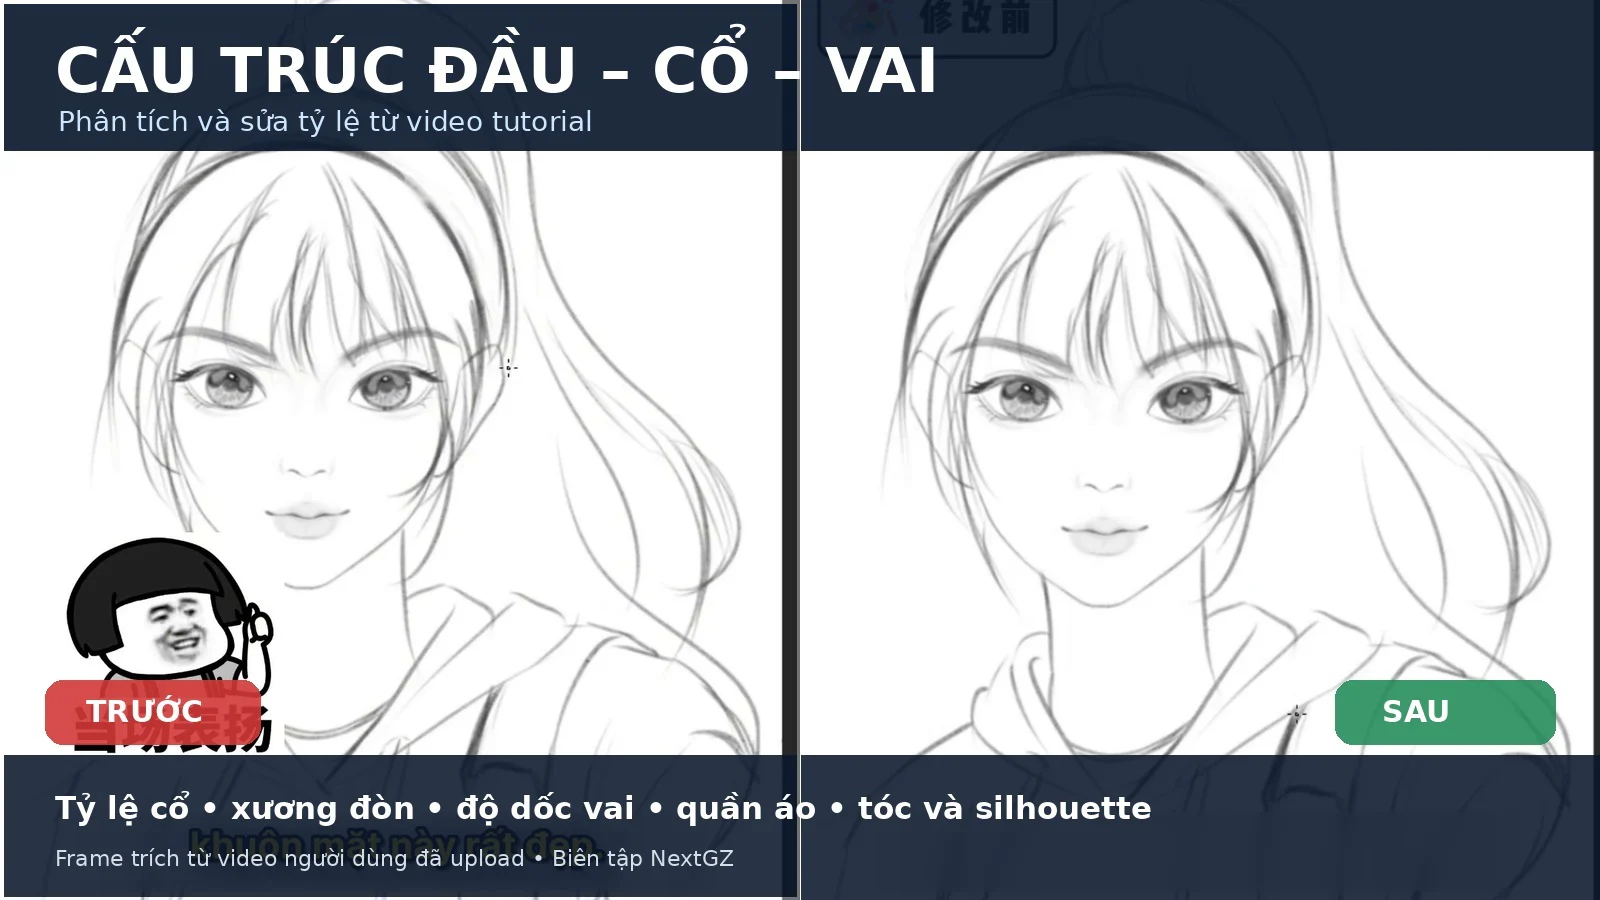
To keep the upper body from feeling disjointed in strongly rotated poses, you can also study the article guide to drawing the head–neck–shoulder structure correctly.
Conclusion
The three illustrations show that a convincing dynamic pose doesn't come from drawing many details, but from a chain of correct decisions: a clear gesture, large blocks with direction, sufficient overlap, contour curves that change with perspective, and near–far proportions controlled throughout.
When converting a real photo to anime, maintain gravity, contact points, and joint relationships; only change proportions and design language after the construction is stable. For limbs, don't treat the lines on clothing as flat patterns. They are tools describing planes and must change curvature according to the horizon line and the block's direction.
If you can train yourself to see an arm or leg as a chain of cylinders with contours, the pose will quickly become less flat. From there, even poses like jumping, sitting, holding a weapon, or facing straight into the camera become easier to analyze.









Bình luận
0 bình luận
Đăng nhập để tham gia thảo luận cùng cộng đồng!
Đăng nhập ngayĐang tải bình luận...