 Digital Painting







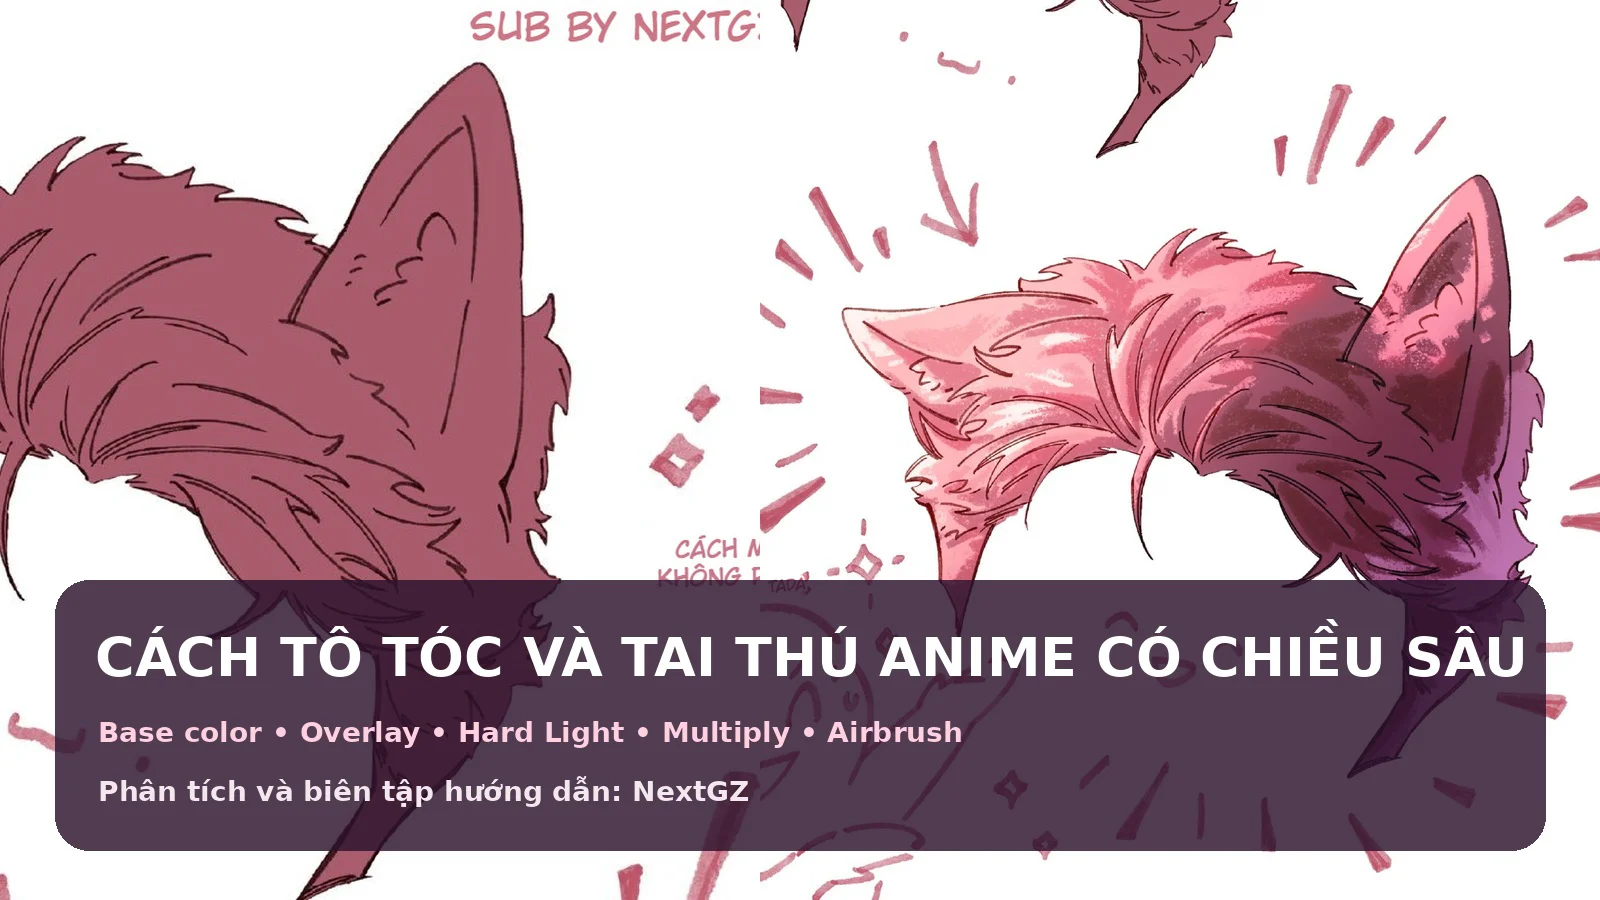
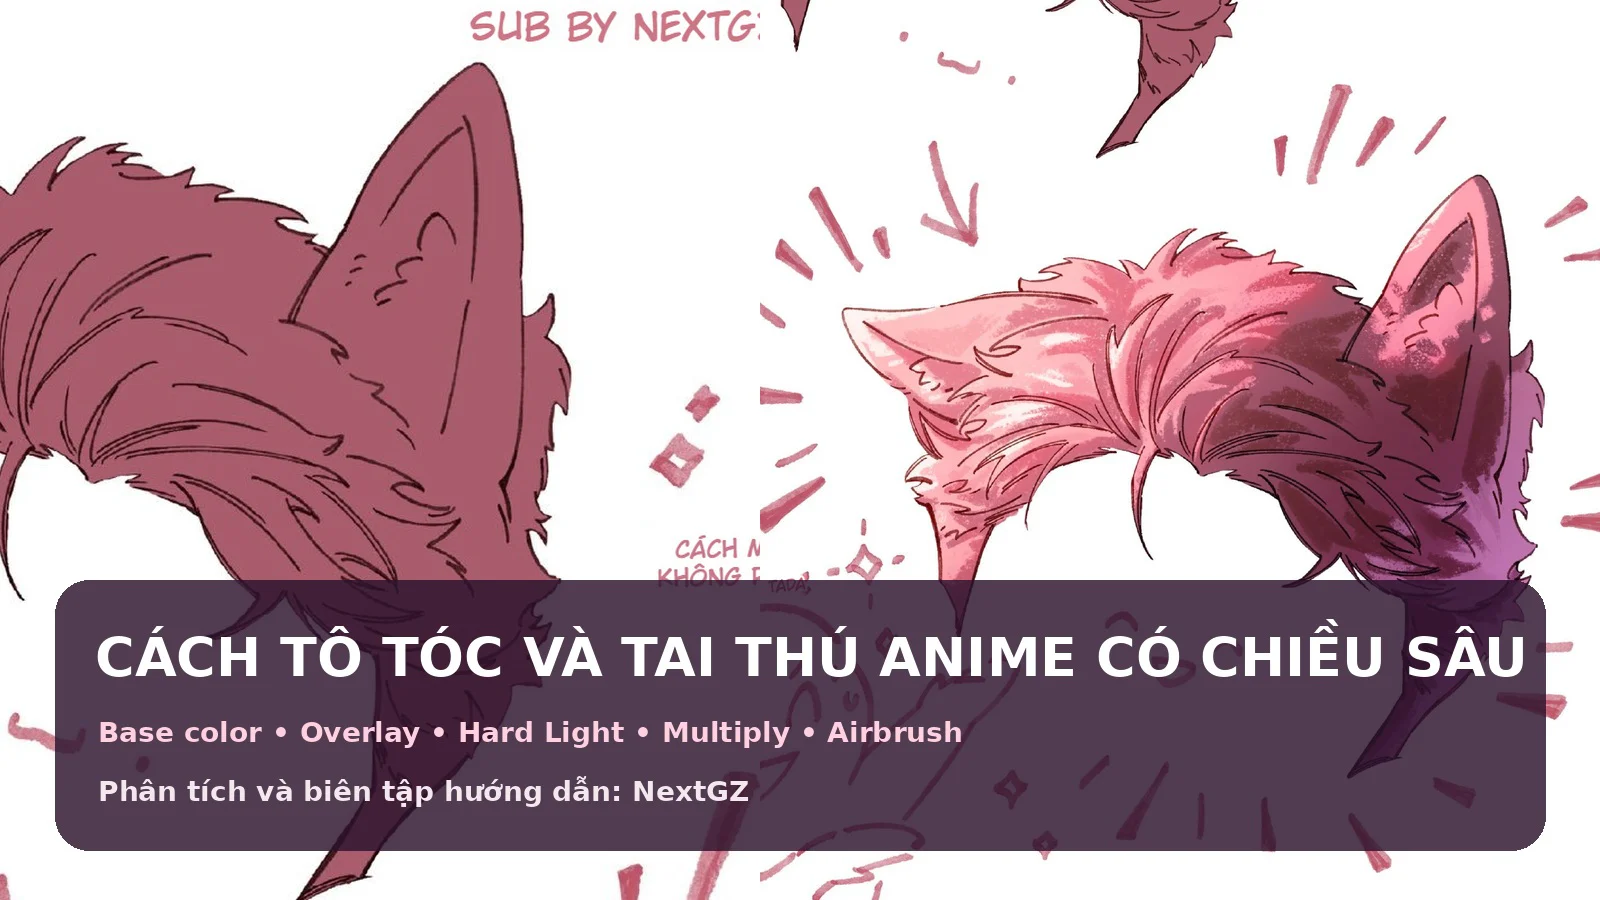
Anime hair with animal ears easily falls into two extremes: either it becomes just a flat colored silhouette with lots of tiny strokes, or it gets buried under so many highlights, glows, and blend modes that it loses its form. The two source images by @OIOOZZZ show a fairly short process with clear logic: lock in the base color, apply warm-cool tones with Airbrush, define strong light areas, build shadows in the opposite direction, add edge glow, and finally bring back intermediate tones to connect the whole light-and-shadow system.
The valuable lesson here is not that you must use exactly all the blend modes shown in the image. What matters is that each layer has a job: Linear Burn or a brown line color helps merge the line art into the base; Overlay boosts color and contrast where needed; Hard Light creates strong light patches with clear edges; Multiply builds shadows and restores depth; and Airbrush only handles broad color transitions or glow halos, not the form itself.
The source also notes that this is how the author colors hair, but not a "full render" process. Therefore, the article keeps the six steps shown in the image, then expands them into a practical workflow applicable to human hair, cat ears, fox ears, wolf ears, or other kemonomimi designs. The image does not provide software names, color codes, opacity, or specific brush presets; the settings described below are NextGZ's suggestions, not the author's original parameters.
1. Read the whole process before drawing
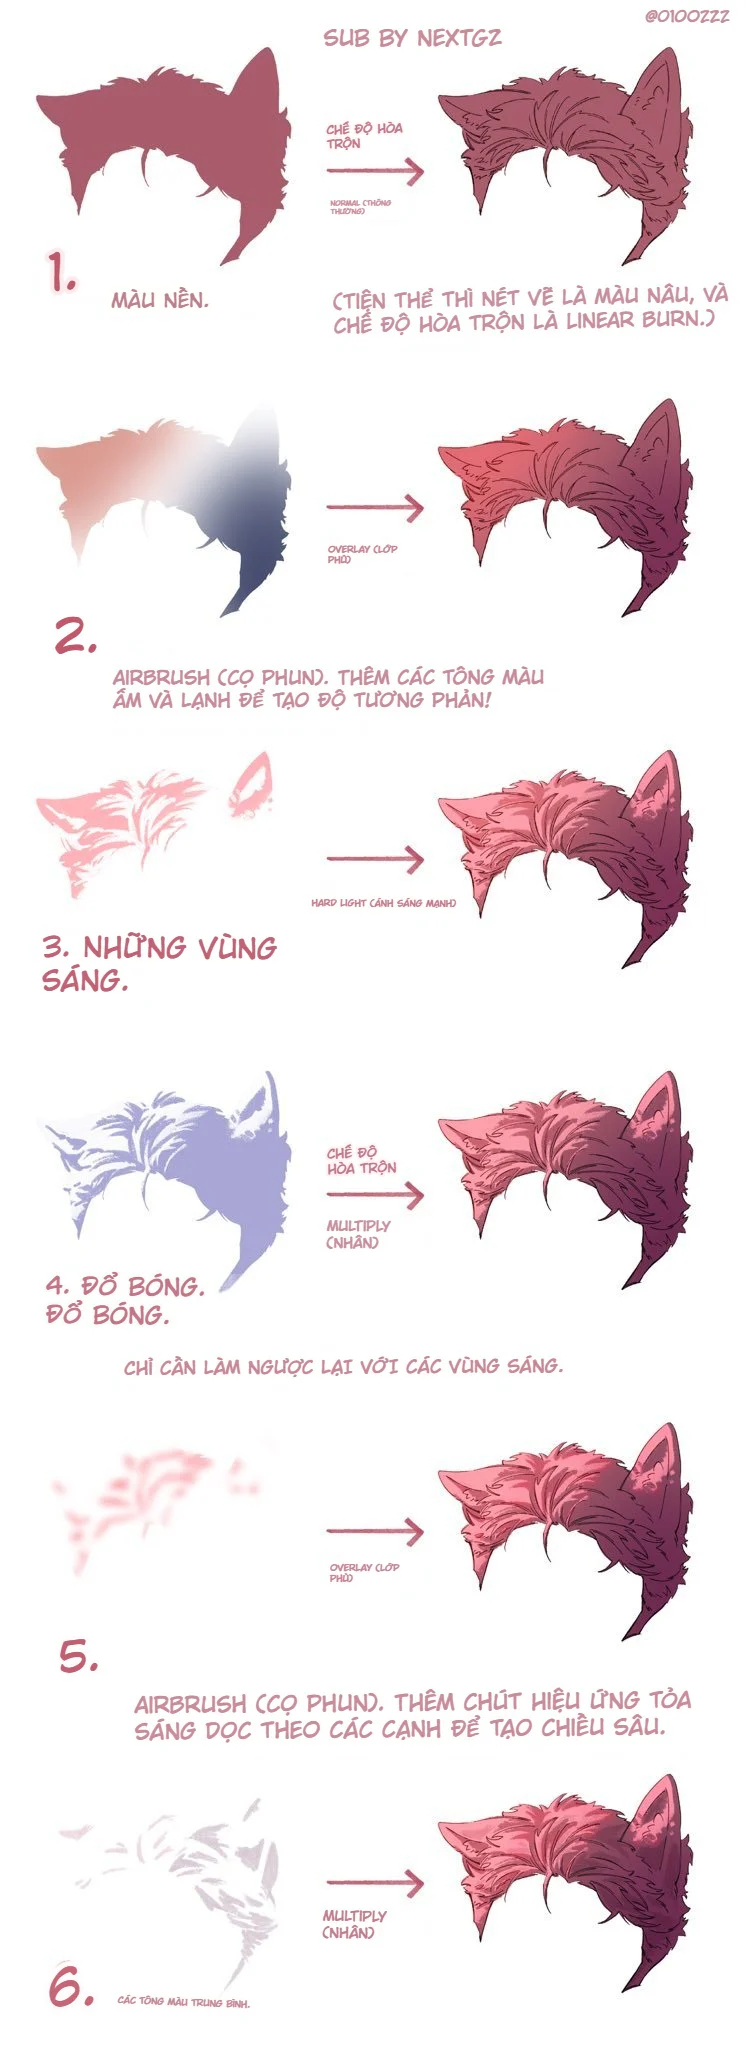
The six steps in the image can be divided into three major stages:
- Build the basic color: steps 1 and 2, including base color, colored line art, warm-cool tones, and color variation.
- Build light and shadow forms: steps 3 and 4, including strong highlight areas and Multiply shadows in the opposite direction.
- Blend and finish: steps 5 and 6, including edge glow, ambient light, and intermediate tones connecting the areas.
This order is very important. If you use Hard Light before having a silhouette and hair clumps, the light will just create scattered streaks. If you add glow before block shadows, the hair will look like a flat glowing object. If light and shadow are too strongly separated but there is no midtone, the material will be cut into two disconnected halves.
Before starting, build the hair into large blocks: the bangs block, the top-of-head block, the two temple-side blocks, the back hair, and the two ears. Animal ears are not accessories stuck onto the head; the ear base needs to sit into the skull, with an outer side, inner side, and transitional fur blending into the hair.
2. Step 1: lock in base color and blend line art with color
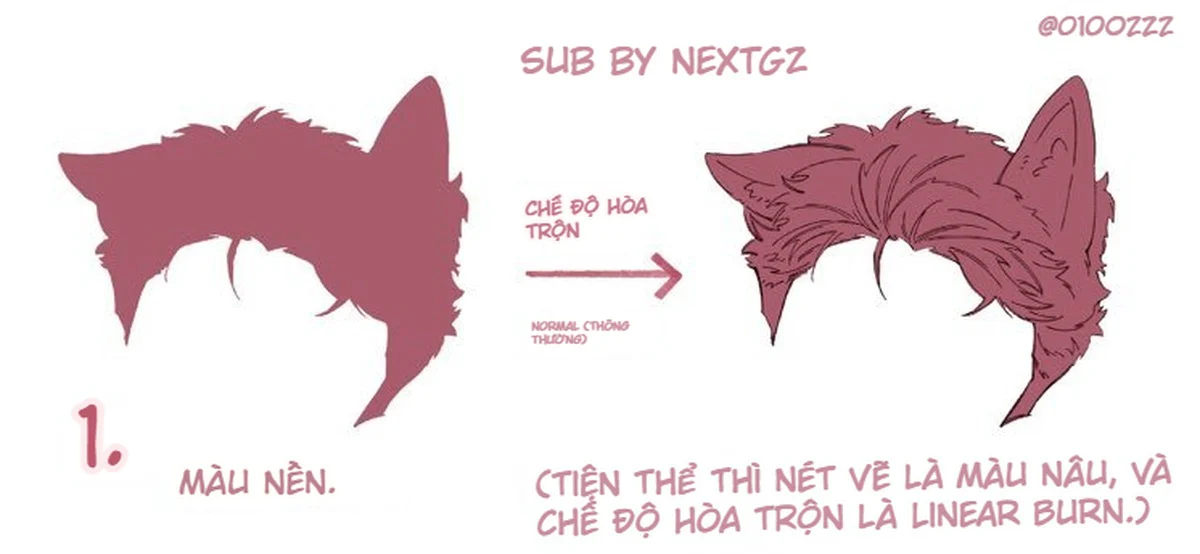
The first step in the source is a fairly uniform red-pink silhouette. The goal is not to create depth right away, but to lock in the hair and ear shapes, making sure every area has a clean base color. In the right-hand version, the line art is kept in a dark reddish-brown color that blends into the base more than pure black would.
Why should the base color be simple?
The base color is the reference point for all subsequent layers. If the base already has too many gradients or textures from the start, it's hard to tell which changes come from Overlay, Hard Light, or Multiply. A relatively flat base helps you evaluate light and shadow areas clearly.
How to choose the base color?
Pick a color that represents the final hair hue but has medium brightness. Don't choose it too dark because Multiply will quickly destroy detail. Don't choose it too light because Hard Light and highlights will have no value range left. For the red-pink hair in the image, the base sits in a medium pinkish-brown range, light enough for purple shadows to still work and dark enough for pink-white highlights to stand out.
Brown line art and Linear Burn
The source notes that the line art can use brown and Linear Burn mode. Linear Burn usually makes lines darker, more saturated, and blends them strongly with the color underneath. This works when you want the line art to keep its presence but not separate from the hair color.
However, you are not required to use Linear Burn. There are three common choices:
- Normal: easiest to control; directly choose a line color darker than the base.
- Multiply: blends line color well and is less harsh than Linear Burn.
- Linear Burn: makes lines deeper and more vivid, suitable for high-contrast styles.
Keep the line darkest at the hair roots, gaps between hair clumps, ear bases, and the inner ear. In areas receiving light, you can switch the line to a lighter pinkish-brown or pale purple. Line color changing with the light helps reduce the sticker-like feel.
Check the hair and ear silhouette
Zoom out on the canvas. The two ears should read clearly but not detach from the hair. The hair mass needs a large-medium-small rhythm; not every strand should be equally pointed and long. The ear base should have small fur blending into the hair, while the ear tip keeps a sharper silhouette.
3. Step 2: use Airbrush and Overlay to create warm-cool contrast
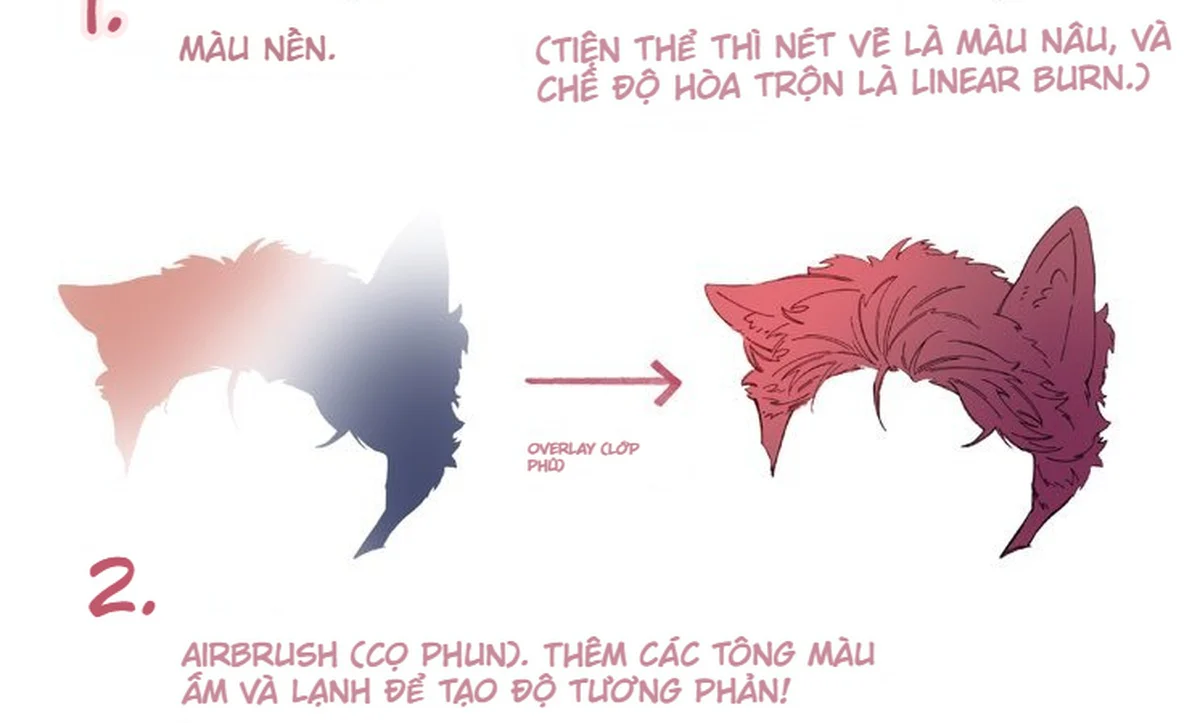
In step two, the source uses Airbrush to add warm and cool tones, creating contrast. The draft on the left shows a bright peachy-pink area on the left side and a cool blue-purple on the right. The applied version on the right still keeps the red-pink base but now has more subtle color variation.
Airbrush only handles broad color distribution
Airbrush easily gives a soft, nice-looking result quickly, but it also easily makes hair lose its clumps. In this step, use a large brush, low opacity, and paint in broad areas. Don't try to paint hair strands with Airbrush. The shape of the hair clumps has already been decided by the line art and the base.
Define the warm source and the cool source
You can choose one side of the hair to receive warm pink-orange light, and the other side to receive cool purple-blue light. This opposition creates depth even when values don't differ much. Cool colors tend to recede, warm colors tend to advance, but the effect also depends on the background and brightness.
Overlay and clipping
The source says "Overlay cặp/phối," which can be understood as using Overlay restricted to the hair shape via clipping. Overlay makes light areas lighter, dark areas deeper, and increases saturation. It suits pushing environmental color but should not be used as the main shadow.
Safe usage:
- Create a clipping layer over the hair base.
- Set the blend mode to Overlay.
- Use warm colors near the light source.
- Use cool colors on areas turned away from the light or receiving ambient light.
- Lower the opacity until the base still reads.
- Use a mask to erase areas around line art and details that risk looking neon.
If Overlay makes colors too vivid, switch to Soft Light or Normal with low opacity. Blend mode is not the goal; the goal is controlled color variation.
4. Step 3: define strong highlight areas with Hard Light
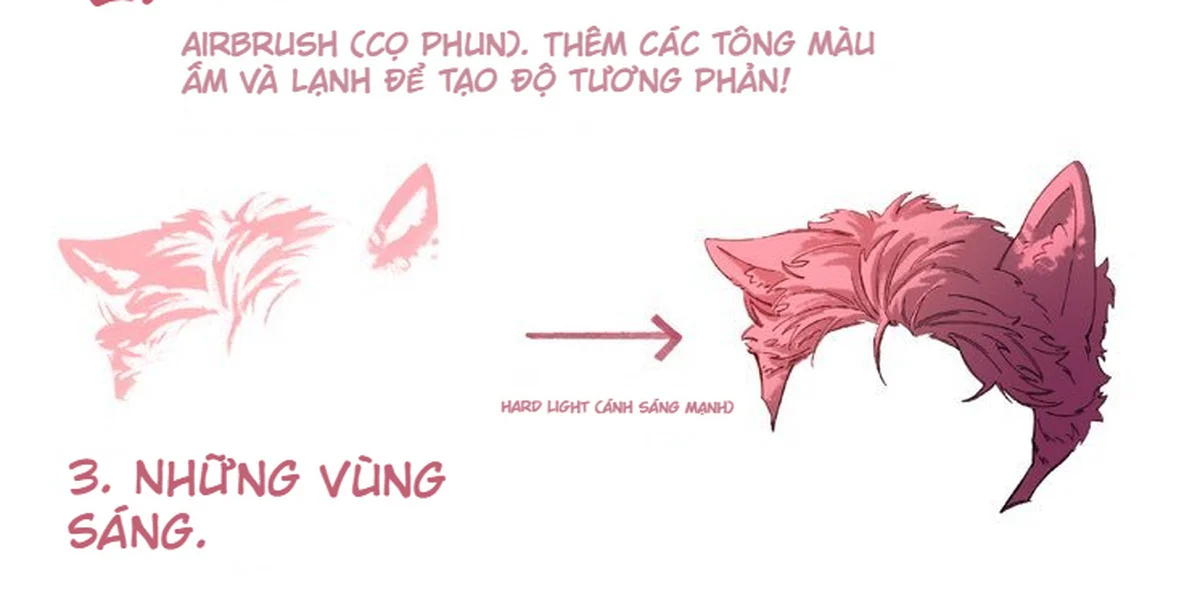
Step three keeps only the highlight areas. The mask version on the left is nearly pink-white, concentrated on the left-side hair, the top of the head, and the ear edges. The right-hand version shows bright pink highlights appearing on the surfaces facing the light source.
How is Hard Light different from Overlay?
Hard Light tends to be stronger and harsher than Overlay. Light colors can produce an effect close to Screen, dark colors close to Multiply. Therefore, it works well for clear highlight areas, but it can easily blow out details or increase saturation sharply.
Place highlights by planes, not by individual strands
First, identify the upper surface of each hair clump. A curved hair clump has a broad highlight where it faces the lamp, narrowing as it turns away. Animal ears have an ear edge, an inner side, and surrounding fur; each part receives light differently.
In the image, the left ear receives strong light on its outer edge and upper surface. The right ear is darker, with only a few small highlights on the edge. This asymmetry helps define the light source direction.
Three levels of highlight
- Large light patch: high value but still colored, describing the lit plane.
- Small light streak: brighter, following a few important hair clumps.
- Brightest point: very small, nearly white, appearing only on ear edges or strands closest to the source.
Don't use Hard Light on the entire hair. If highlights take up too much area, the base and shadows lose their effect. Keep strong highlights concentrated on the light-source side and the focal point.
5. Step 4: build shadows with Multiply in the opposite direction
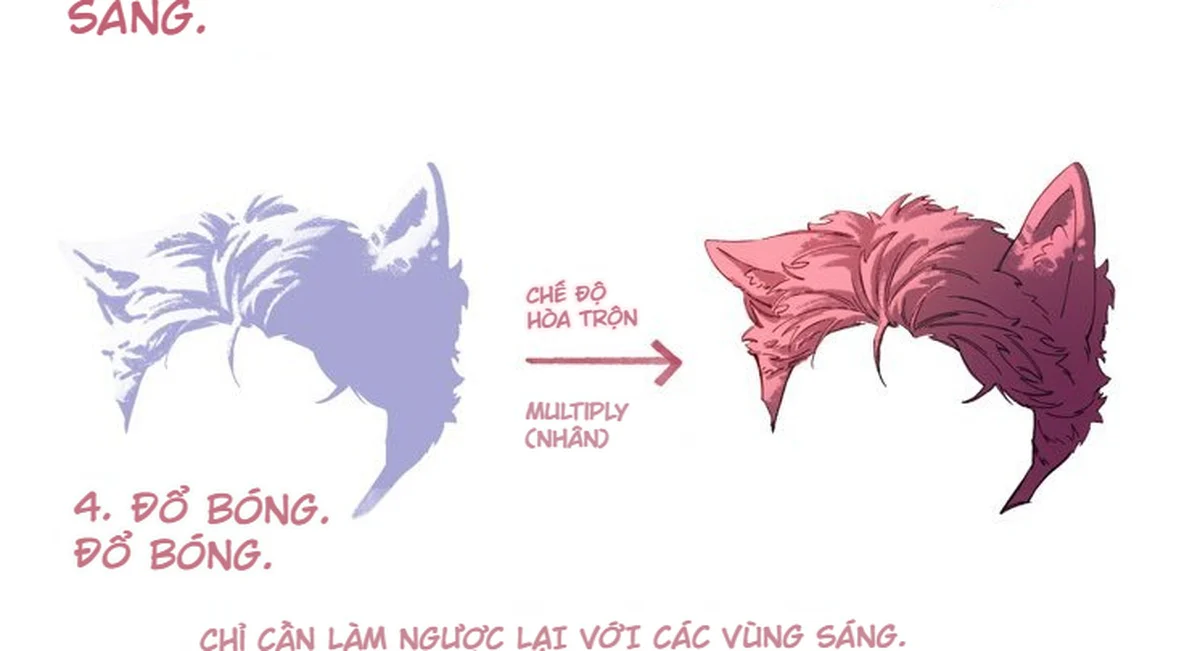
The source says "just do the opposite of the highlight areas." This is a concise way of saying: hair areas turned away from the light source, blocked by other clumps, or deep inside the ear belong in shadow. The mask version on the left uses cool blue-purple, showing that shadows are not gray-black.
Three types of shadows on hair and ears
- Form shadow: the underside of a hair clump or the side turned away from the light.
- Cast shadow: an upper clump casting onto a lower one, bangs casting onto the forehead or ears.
- Contact shadow: deep crevices between strands, ear bases, and the area where the ear implants into the hair.
Multiply works well for overall shadows because it preserves the base color relatively well. However, if you use gray or black, the hair can easily look dirty. With a red-pink base, blue-purple shadows create temperature contrast and depth.
Shadow edges need variation
Contact shadows have hard edges and are darkest. Cast shadows are clear near the object casting them, then soften as they move away. Form shadows are usually broad with softer transitions. If every shadow has the same edge, the hair will look like simple cel shading no matter how many colors you use.
The inner ear
The inner ear is usually darker than the outer edge, but it can pick up warm bounce light from the skin or environment. Keep the ear base and the deep area near the top of the ear dark; add a little bright pink on thin-skin areas if the light source is strong.
Don't lose the line art or hair clumps
Lower the Multiply opacity when the shadow starts covering internal lines. You can use a mask to preserve a few light strokes or hair gaps. After adding shadows, zoom out and check whether each clump still reads clearly.
6. Step 5: add edge glow along the edges with Airbrush
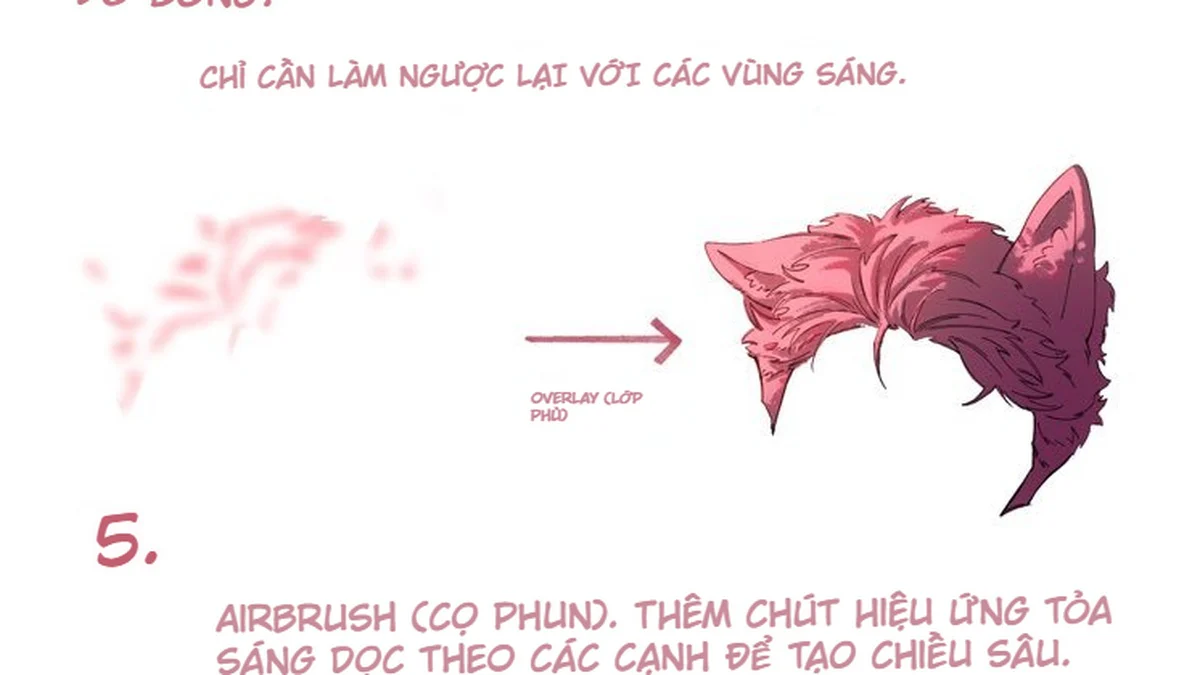
Step five continues to use Airbrush, but its job is different from step two. Here Airbrush is no longer for creating overall color variation, but for adding glow halos along certain edges. The source calls this a glow effect that helps create depth.
Edge glow is not a stroke running around the silhouette
Don't light up the entire outline of the hair and both ears. Only edges facing the light source or with a bright background behind them should receive rim light. Let the light fade in and out, and vary its width and intensity.
Three-layer edge glow process
- Use a small hard brush to paint a bright core
7. Step 6: Bring back the midtones to connect highlights and shadows
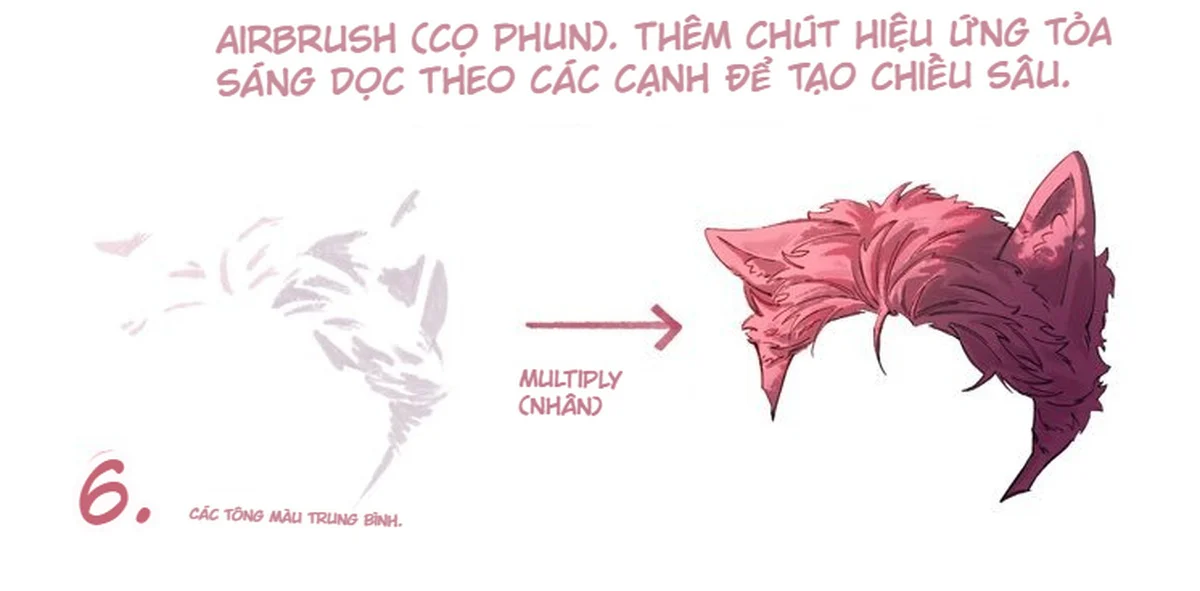
Step 6: add midtones and a light Multiply to bridge light–dark areas, avoiding the hair splitting into two separate blocks. In this final step, the source emphasizes "midtones." This is the part often skipped. After Hard Light and Multiply, the image may have very pink highlights and very purple shadows, but lacks a bridge. Midtones make the material seamless and help planes transition naturally.
Midtones are not just a color in between in terms of brightness
Midtones can also be a hue transition. Between a warm pink highlight and a cool purple shadow, a medium red-violet or mauve will connect the two sides. On the ears, the midtone could be pinkish brown; on the hair, it could be red-violet or pinkish purple.
How to add midtones
- Use a medium-edged brush on Normal to paint over the transition areas.
- Use a very light Multiply in areas that need reduced brightness but not deep shadow.
- Pick an intermediate color from the artwork with the Eyedropper, then adjust the hue slightly.
- Use smudge in the direction of the hair tufts, not random horizontal strokes.
- Keep some Hard Light and Multiply edges sharp; don't blend everything.
Midtones are especially important in the large locks at the front of the forehead, the transition from ears to hair, and the hair at the back. If these areas are only light–dark, the volume can easily resemble cut paper.
8. Analyzing the before and after versions
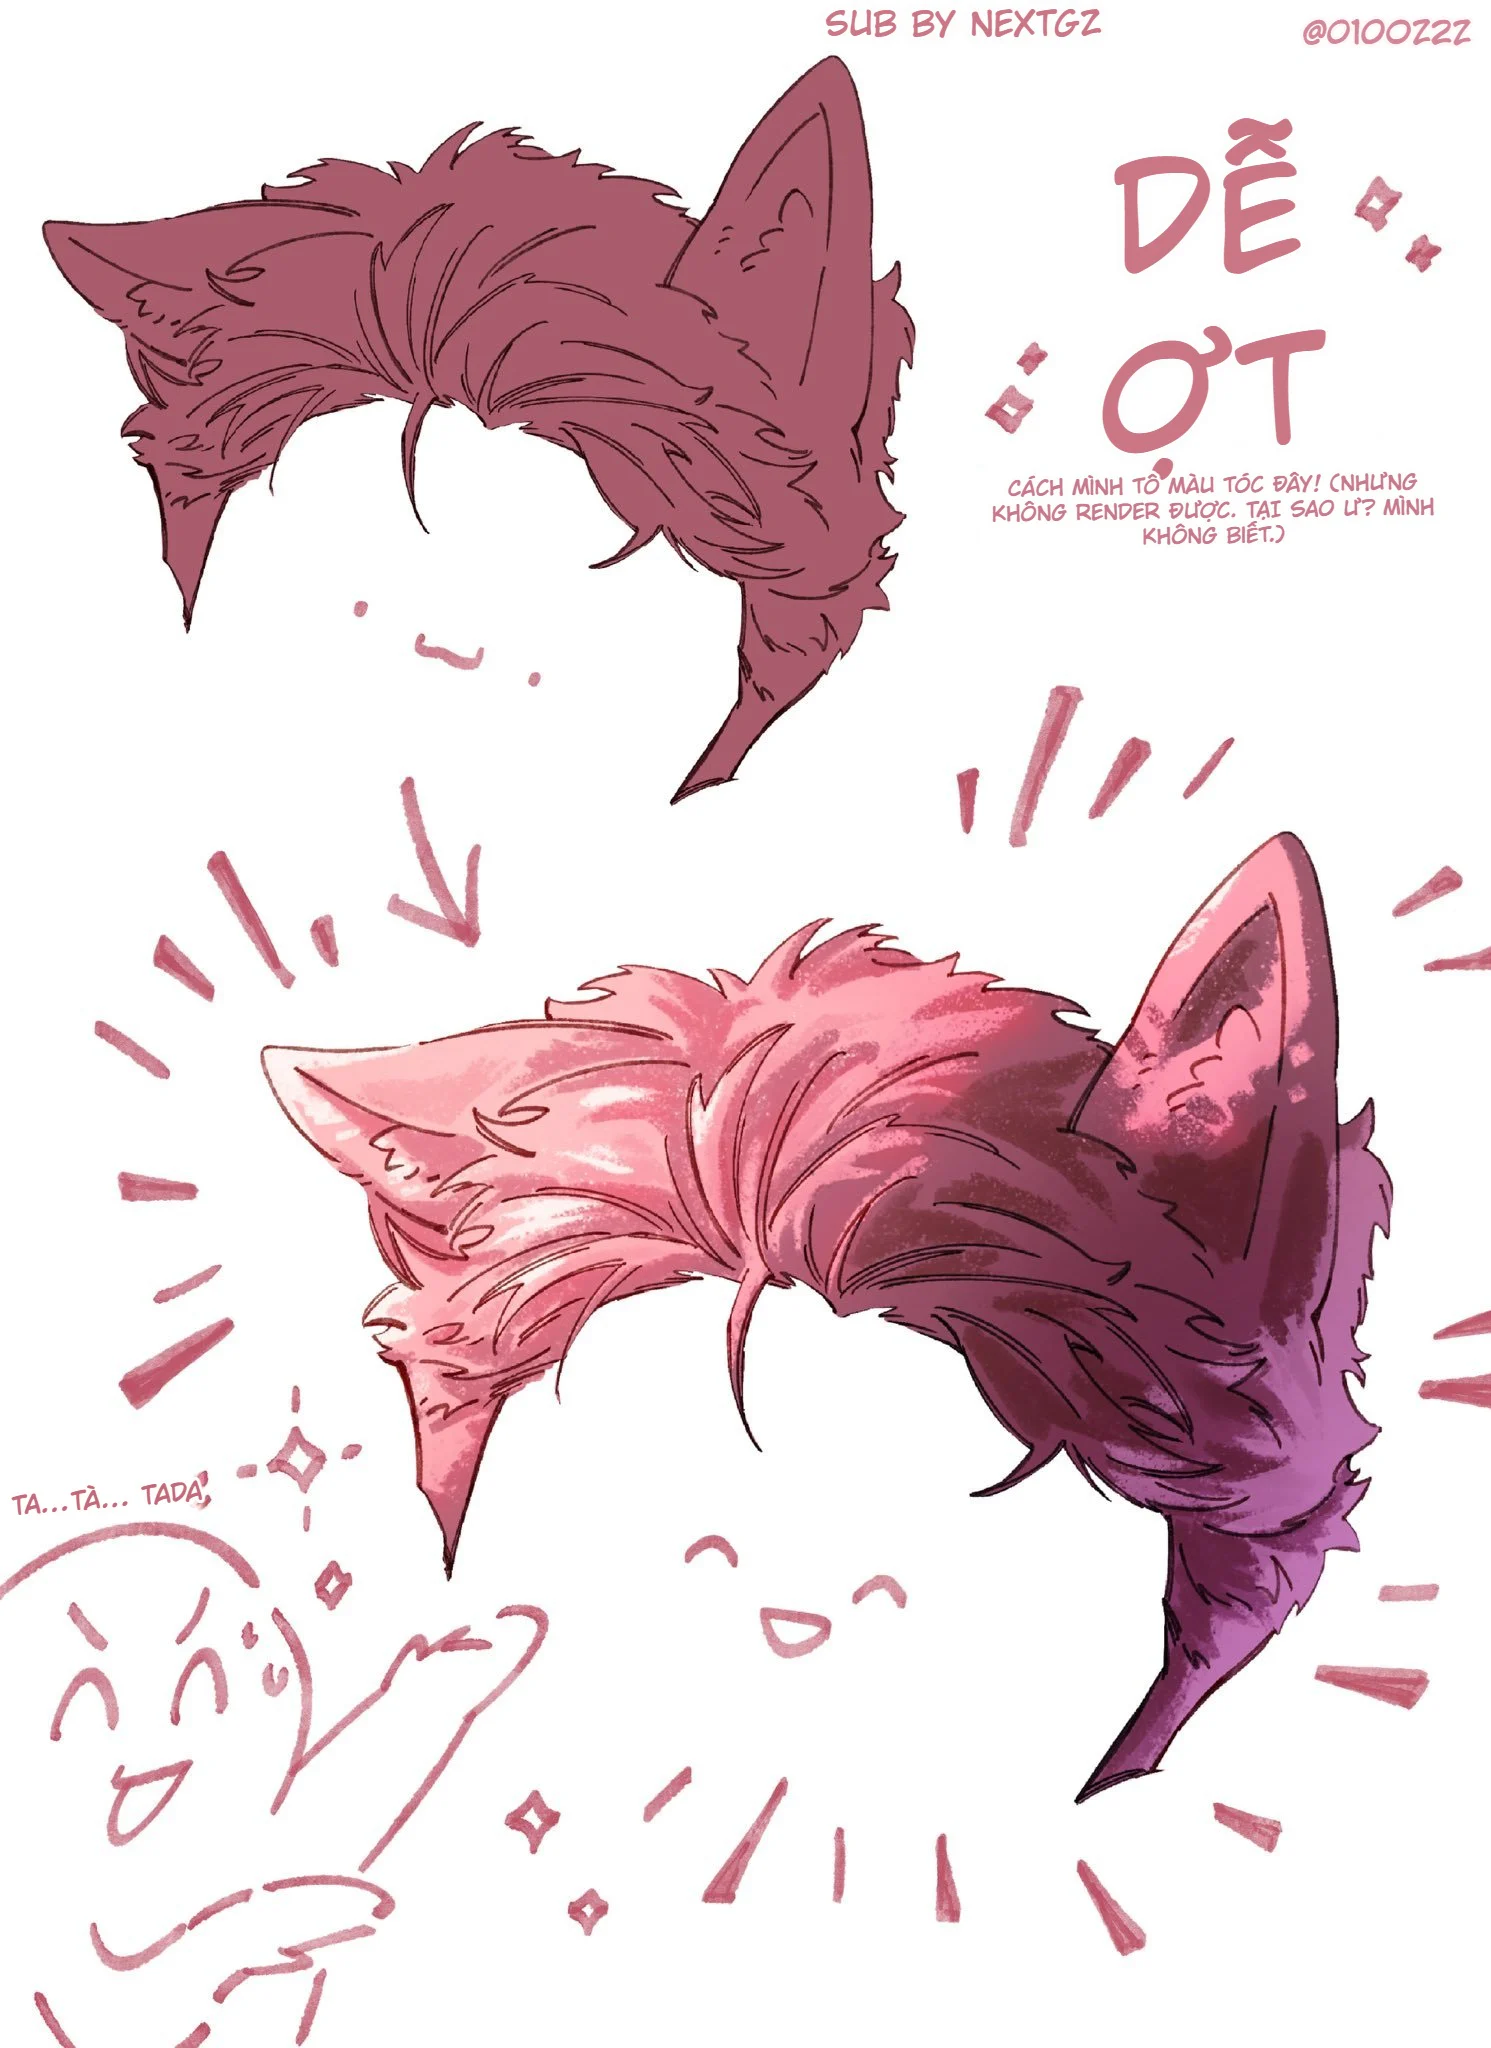
Before–after comparison shows that the difference comes from separating highlights, shadows, midtones, and environmental colors, not just from adding highlights. The top version only has base color and line art. The hair tufts are already clear, but the material is flat; the two ears and hair are close in value, so depth is limited. The bottom version has strong pink light on the left, dark purple shadows on the right, the inner ear has its own color, line art shifts color according to the environment, and the hair tufts are separated by highlight – shadow – midtone.
The difference does not come from adding lots of details. The final version keeps the same basic silhouette. The quality improves thanks to five changes:
- Warm–cool contrast between the two sides.
- Strong light areas designed according to the hair tufts.
- Deep shadows concentrated at the roots and the farther ear.
- Rim light brings some edges forward.
- Midtones connect the blocks, keeping the hair from being split in half.
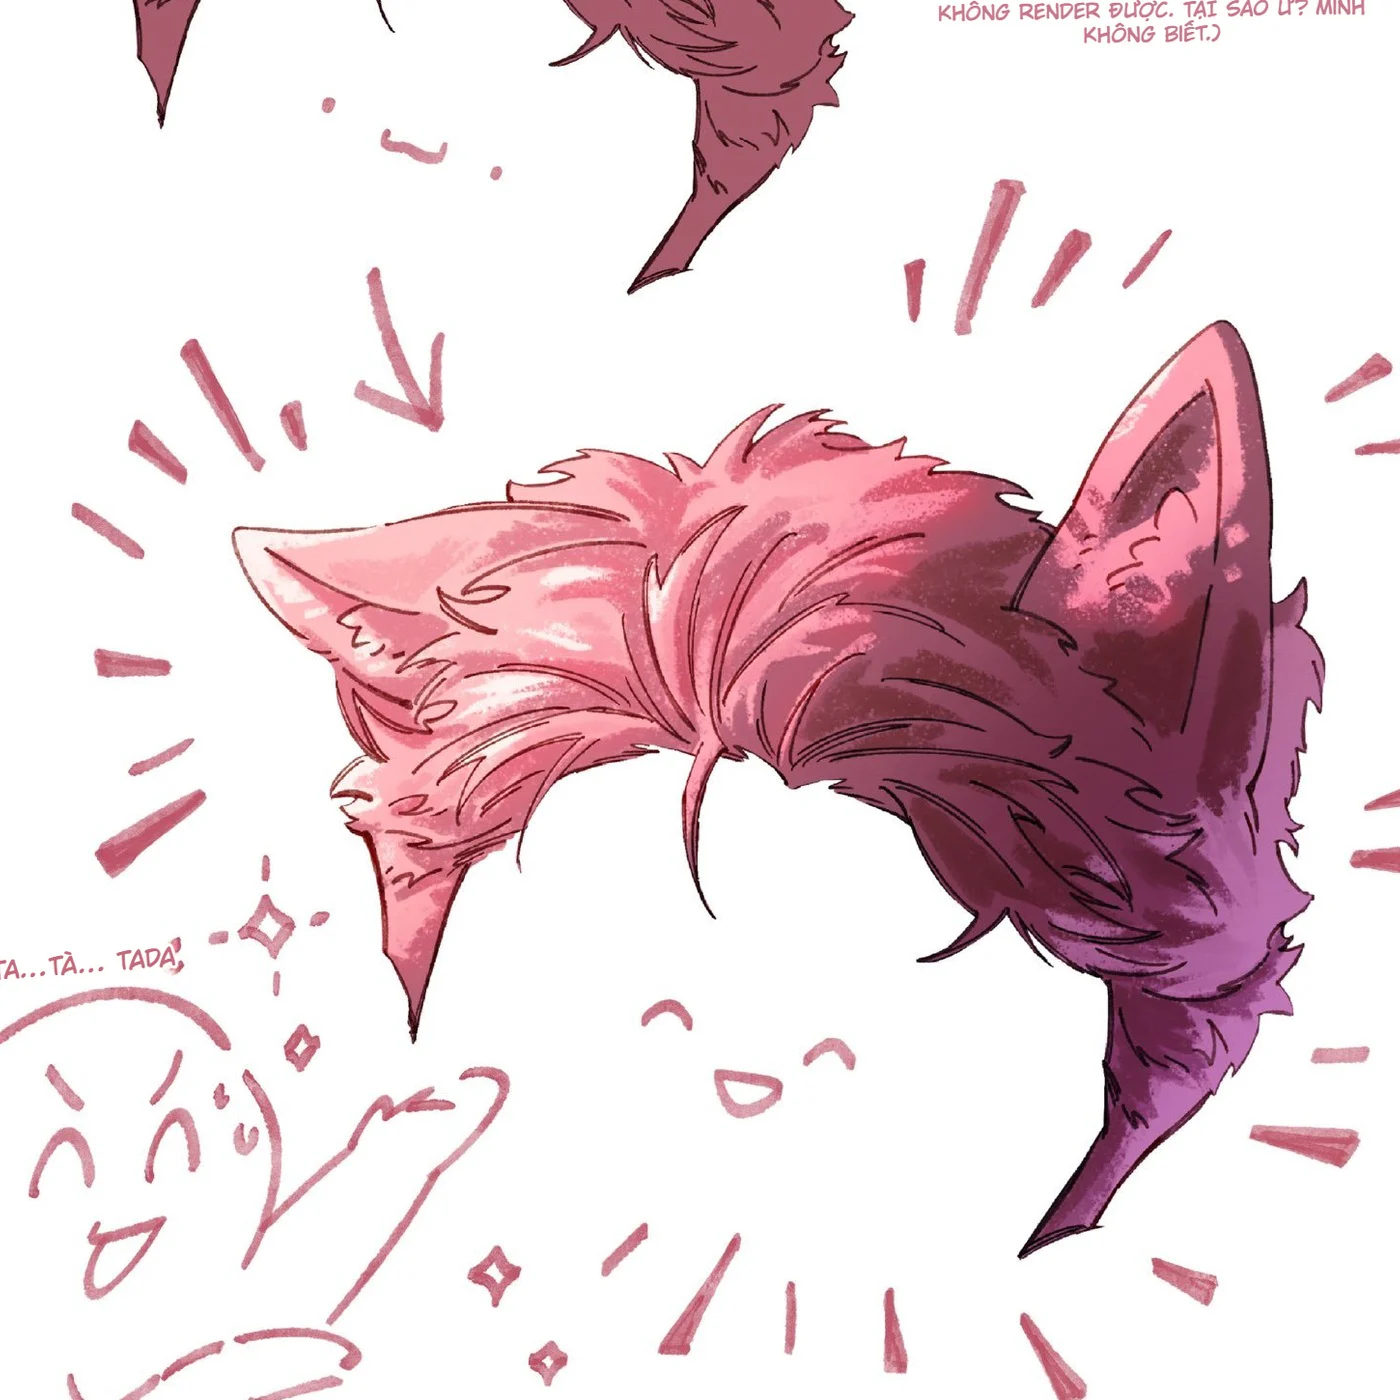
Final result after combining base color, Overlay, Hard Light, Multiply, edge glow, and midtones. 9. Suggested layer structure
- Sketch or line art.
- Base hair + ears: clean base color shapes.
- Line color: Normal, Multiply, or Linear Burn.
- Warm/cool variation: Airbrush on Overlay/Soft Light, clipped.
- Large shadow: Multiply or Normal with cool purple.
- Contact shadow: Multiply/Linear Burn at the roots and ear crevices.
- Strong light: Hard Light or Normal for the main light areas.
- Sharp highlight: Normal/Add in a few small spots.
- Edge glow: Overlay/Screen or light Add.
- Midtone paint-over: Normal and light Multiply.
- Texture accents: a few fur strokes, not evenly spread.
- Color correction: Curves, Hue/Saturation, or a light Gradient Map.
You don't have to use every blend mode. An artist can reproduce the entire effect using Normal. Blend modes only help shorten the workflow. Every layer must have a clear purpose and be explainable when toggled on and off.
10. How to render animal ears separately
Ear base
The ear base connects to the skull and is partially covered by hair. Add a deep contact shadow at the root, then let a few small fur strands blend into the silhouette. If you draw the ear floating entirely on top of the hair without a shadow, it looks like a hair accessory.
Outer surface
The outer surface is usually the same color as the hair or close to it, but with a slight material transition. Highlights follow the edge and the large planes, not running evenly around the whole ear.
Inner surface
The inner surface can be warmer because the skin is thin and light passes through. Use pink, red-violet, or light orange. Keep the deep hollow darker, and add a few small light fur tufts at the edge.
Ear tip
The ear tip is a clear silhouette point, but it shouldn't be needle-sharp unless the design requires it. A small highlight can be placed on the light-facing edge; deep shadows on the farther ear help establish perspective.
Fur inside the ear
Draw it in large–small clusters, directed from the inside outward. Don't spread evenly spaced strokes like a comb. One light tuft, one dark tuft, and negative space are usually enough.
11. Choosing colors for different hair and ear types
Black hair, black ears
Base: blue-black or purple-black; shadows: navy; highlights: grayish purple or cyan. Keep the dark areas broad so the hair doesn't turn gray.
White hair, white ears
Base: warm gray or very light blue-gray; shadows: blue-purple; highlights: near white on only a small area. The shadow value determines the volume because highlights have little room.
Blonde hair, blonde ears
Base: yellow-orange; shadows: reddish brown or gray-purple; light: creamy yellow. Orange Overlay can easily oversaturate, so use it lightly.
Blue or purple fantasy hair
Choose a tone opposite to the environment: pink light on blue hair, cyan light on purple hair. Midtones need to bridge the two hues to avoid splitting into separate blocks.
Ears a different color from the hair
Keep a connecting color at the ear base or in the line art. For example, black hair–red ears can still share a common purple shadow or the same environmental reflection, making both materials belong to one character.
12. Common mistakes
Using Airbrush for every step
The hair looks soft but has no tufts. Use a hard brush to place light and shadow shapes first; Airbrush only helps with color transitions.
Hard Light covering too large an area
The hair gets blown out and saturation becomes too strong. Shrink the light area, lower the opacity, or switch part of it to Normal/Screen.
Multiply using dark gray
The hair color gets dirty. Use shadows with a hue related to the environment.
Overlay turning the whole hair into neon
Reduce the brush color's saturation, lower the opacity, and limit it with a mask.
No midtones
Highlights and shadows look like two glued-on layers. Paint over the transition area with an intermediate color.
Rim light running evenly around the ear
The ear looks like a sticker. Make the light appear and disappear, and only show it on the edge facing the light source.
Both ears having the same light and dark pattern
There's no perspective or light direction. The ear closer to the light source must differ from the farther one.
Line art with the same color and weight everywhere
Change the line with the lighting: darker at the roots, lighter at light-facing edges.
Drawing too many individual strands
The silhouette gets messy. Use large clusters, and only add fine strands at the edges and focal points.
13. 90-minute practice exercise
- 10 minutes: build the hair silhouette with two ears, dividing large tufts.
- 10 minutes: apply base color and brown/purple line art.
- 10 minutes: create warm–cool variation with a light Airbrush.
- 15 minutes: place large light areas following the hair tufts.
- 15 minutes: build form shadows, cast shadows, and contact shadows.
- 10 minutes: render the inner ear and ear base.
- 8 minutes: add edge glow with a core and halo.
- 7 minutes: paint over midtones and fix edges.
- 5 minutes: check the thumbnail, grayscale, and saturation.
Save snapshots after steps 2, 4, 6, and 8. Compare them to see which step creates real depth and which step only makes colors more vivid.
14. Final Checklist
- Is the hair silhouette and both ears clearly readable in the thumbnail?
- Are the ear roots attached to the skull and do they have contact shadows?
- Is there enough room in the base color for highlights and shadows?
- Does the line art blend in with the colors, or is it still uniformly black?
- Does the warm–cool tone explain the light source?
- Is the Hard Light placed on the surfaces facing the light?
- Does the Multiply layer distinguish form shadows, cast shadows, and contact shadows?
- Do the near ear and the far ear differ in value?
- Does the edge glow fade in and out instead of running around the entire silhouette?
- Do the midtones connect the light and shadow areas?
- Are the hair clumps clear before adding fine strands?
- Is the inside of the ear separated from the hair material?
- When turning off the effect layers, does the basic form still hold up?
- When converted to grayscale, do the light – midtone – dark areas show clear separation?
15. Continue Learning Related Skills
To better control hair shape and highlight rhythm, see the article How to draw natural anime hair highlights. That article explains why highlights that are too even, too bright, or too stiff make the hair look like a pattern.
If you need a deeper understanding of how to use Multiply, Linear Burn, Overlay, Hard Light, Screen, and Color Dodge, refer to A guide to layer blend modes in digital painting.
Conclusion
@OIOOZZZ's process can be summarized in six tasks: lock in the base color, create warm–cool variation, place strong highlights, build opposing shadows, add edge glow, and rebalance the midtones. Each step affects a different layer of information. When the tasks are clearly separated, blend modes become supporting tools; when all of them are used at once without a clear goal, the colors easily get out of control.
The most important point is to keep the hair and ear forms intact before applying effects. Highlights must follow the clumps, shadows must explain the layering, the ear must have an inner and outer surface, and the ear root must connect to the skull. The airbrush only creates atmosphere, Hard Light is only for strong highlights, Multiply only builds shadows, and the midtones must tie the whole system together.
Illustration source and process: @OIOOZZZ. Images provided by the user, with the watermark "Sub by NextGZ". Analysis, expanded tutorial, and SEO: NextGZ. This post does not use AI-generated images and does not speculate on parameters that do not appear in the source.






Bình luận
0 bình luận
Đăng nhập để tham gia thảo luận cùng cộng đồng!
Đăng nhập ngayĐang tải bình luận...