 Thiết kế nhân vật







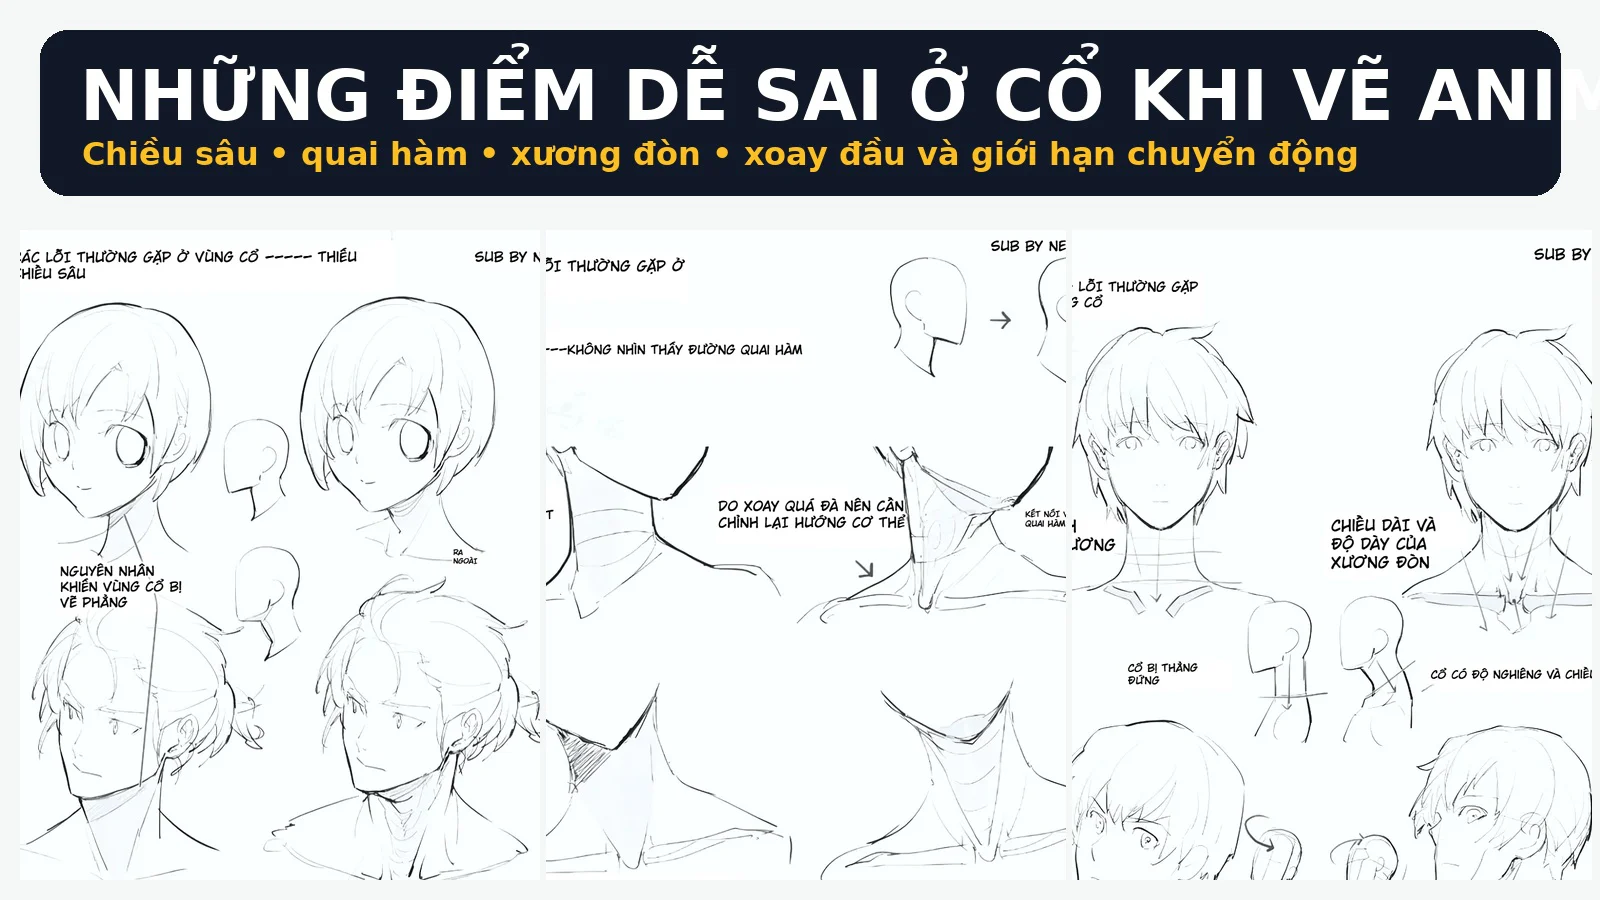
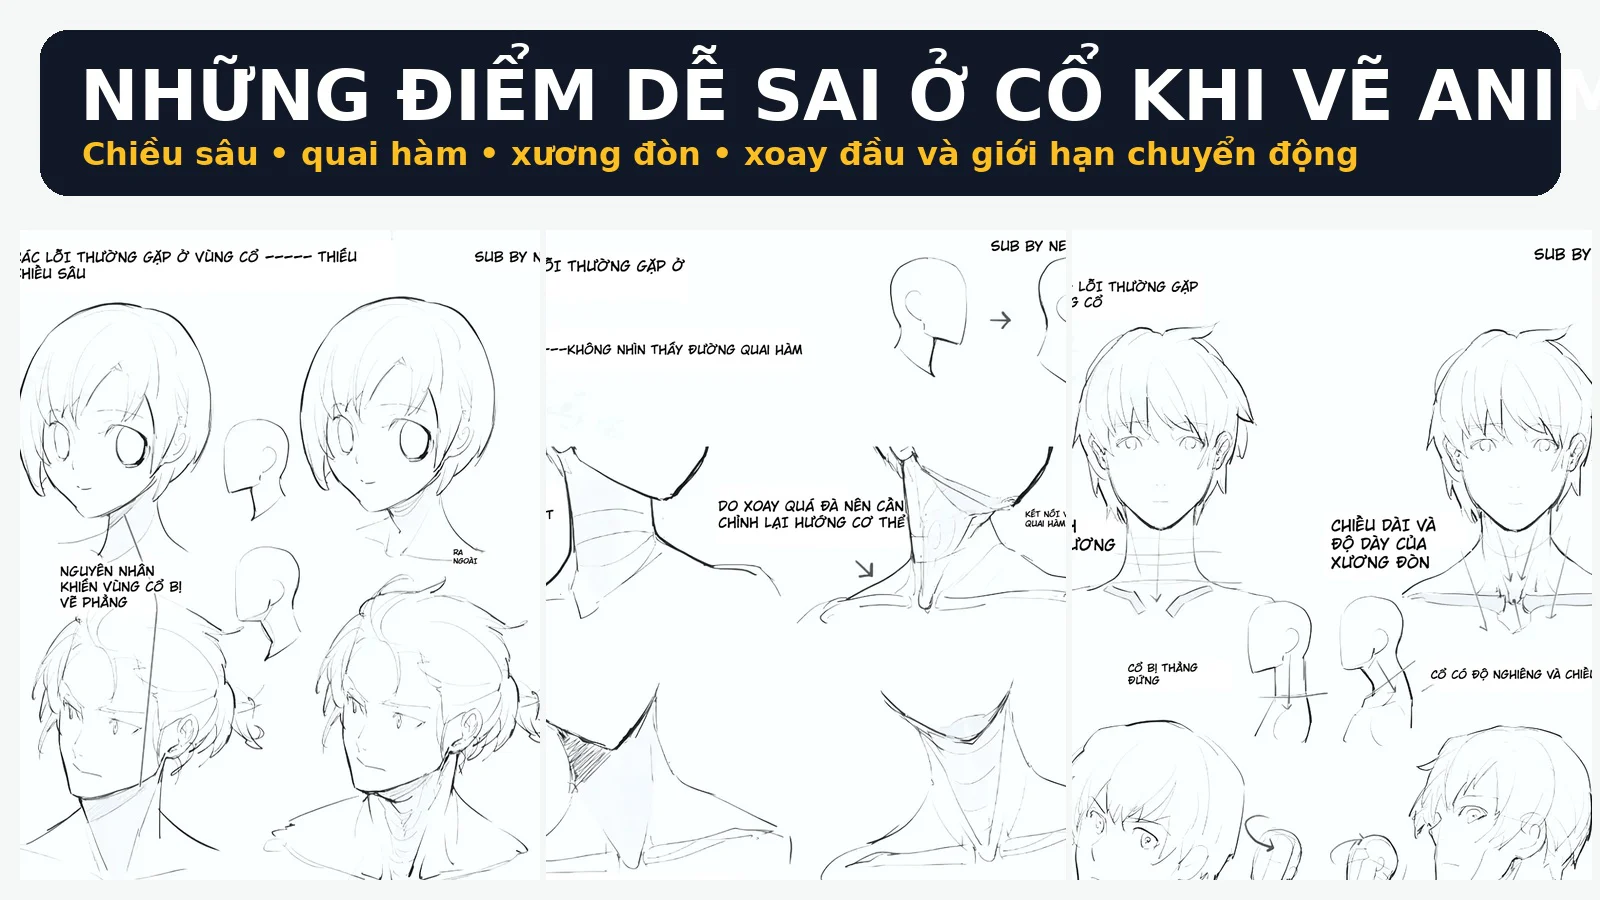
The neck area often takes up only a small part of a character drawing, but it is the connecting point that determines whether the head really "sits" on the body or not. A face may be drawn beautifully, hair may be very neat, and shoulders and clothing can have many details, but if the neck is drawn like two parallel straight lines, unconnected to the jawline, collarbone, and the rotation of the ribcage, the whole character can still feel flat, stiff, or as if they have a "broken neck."
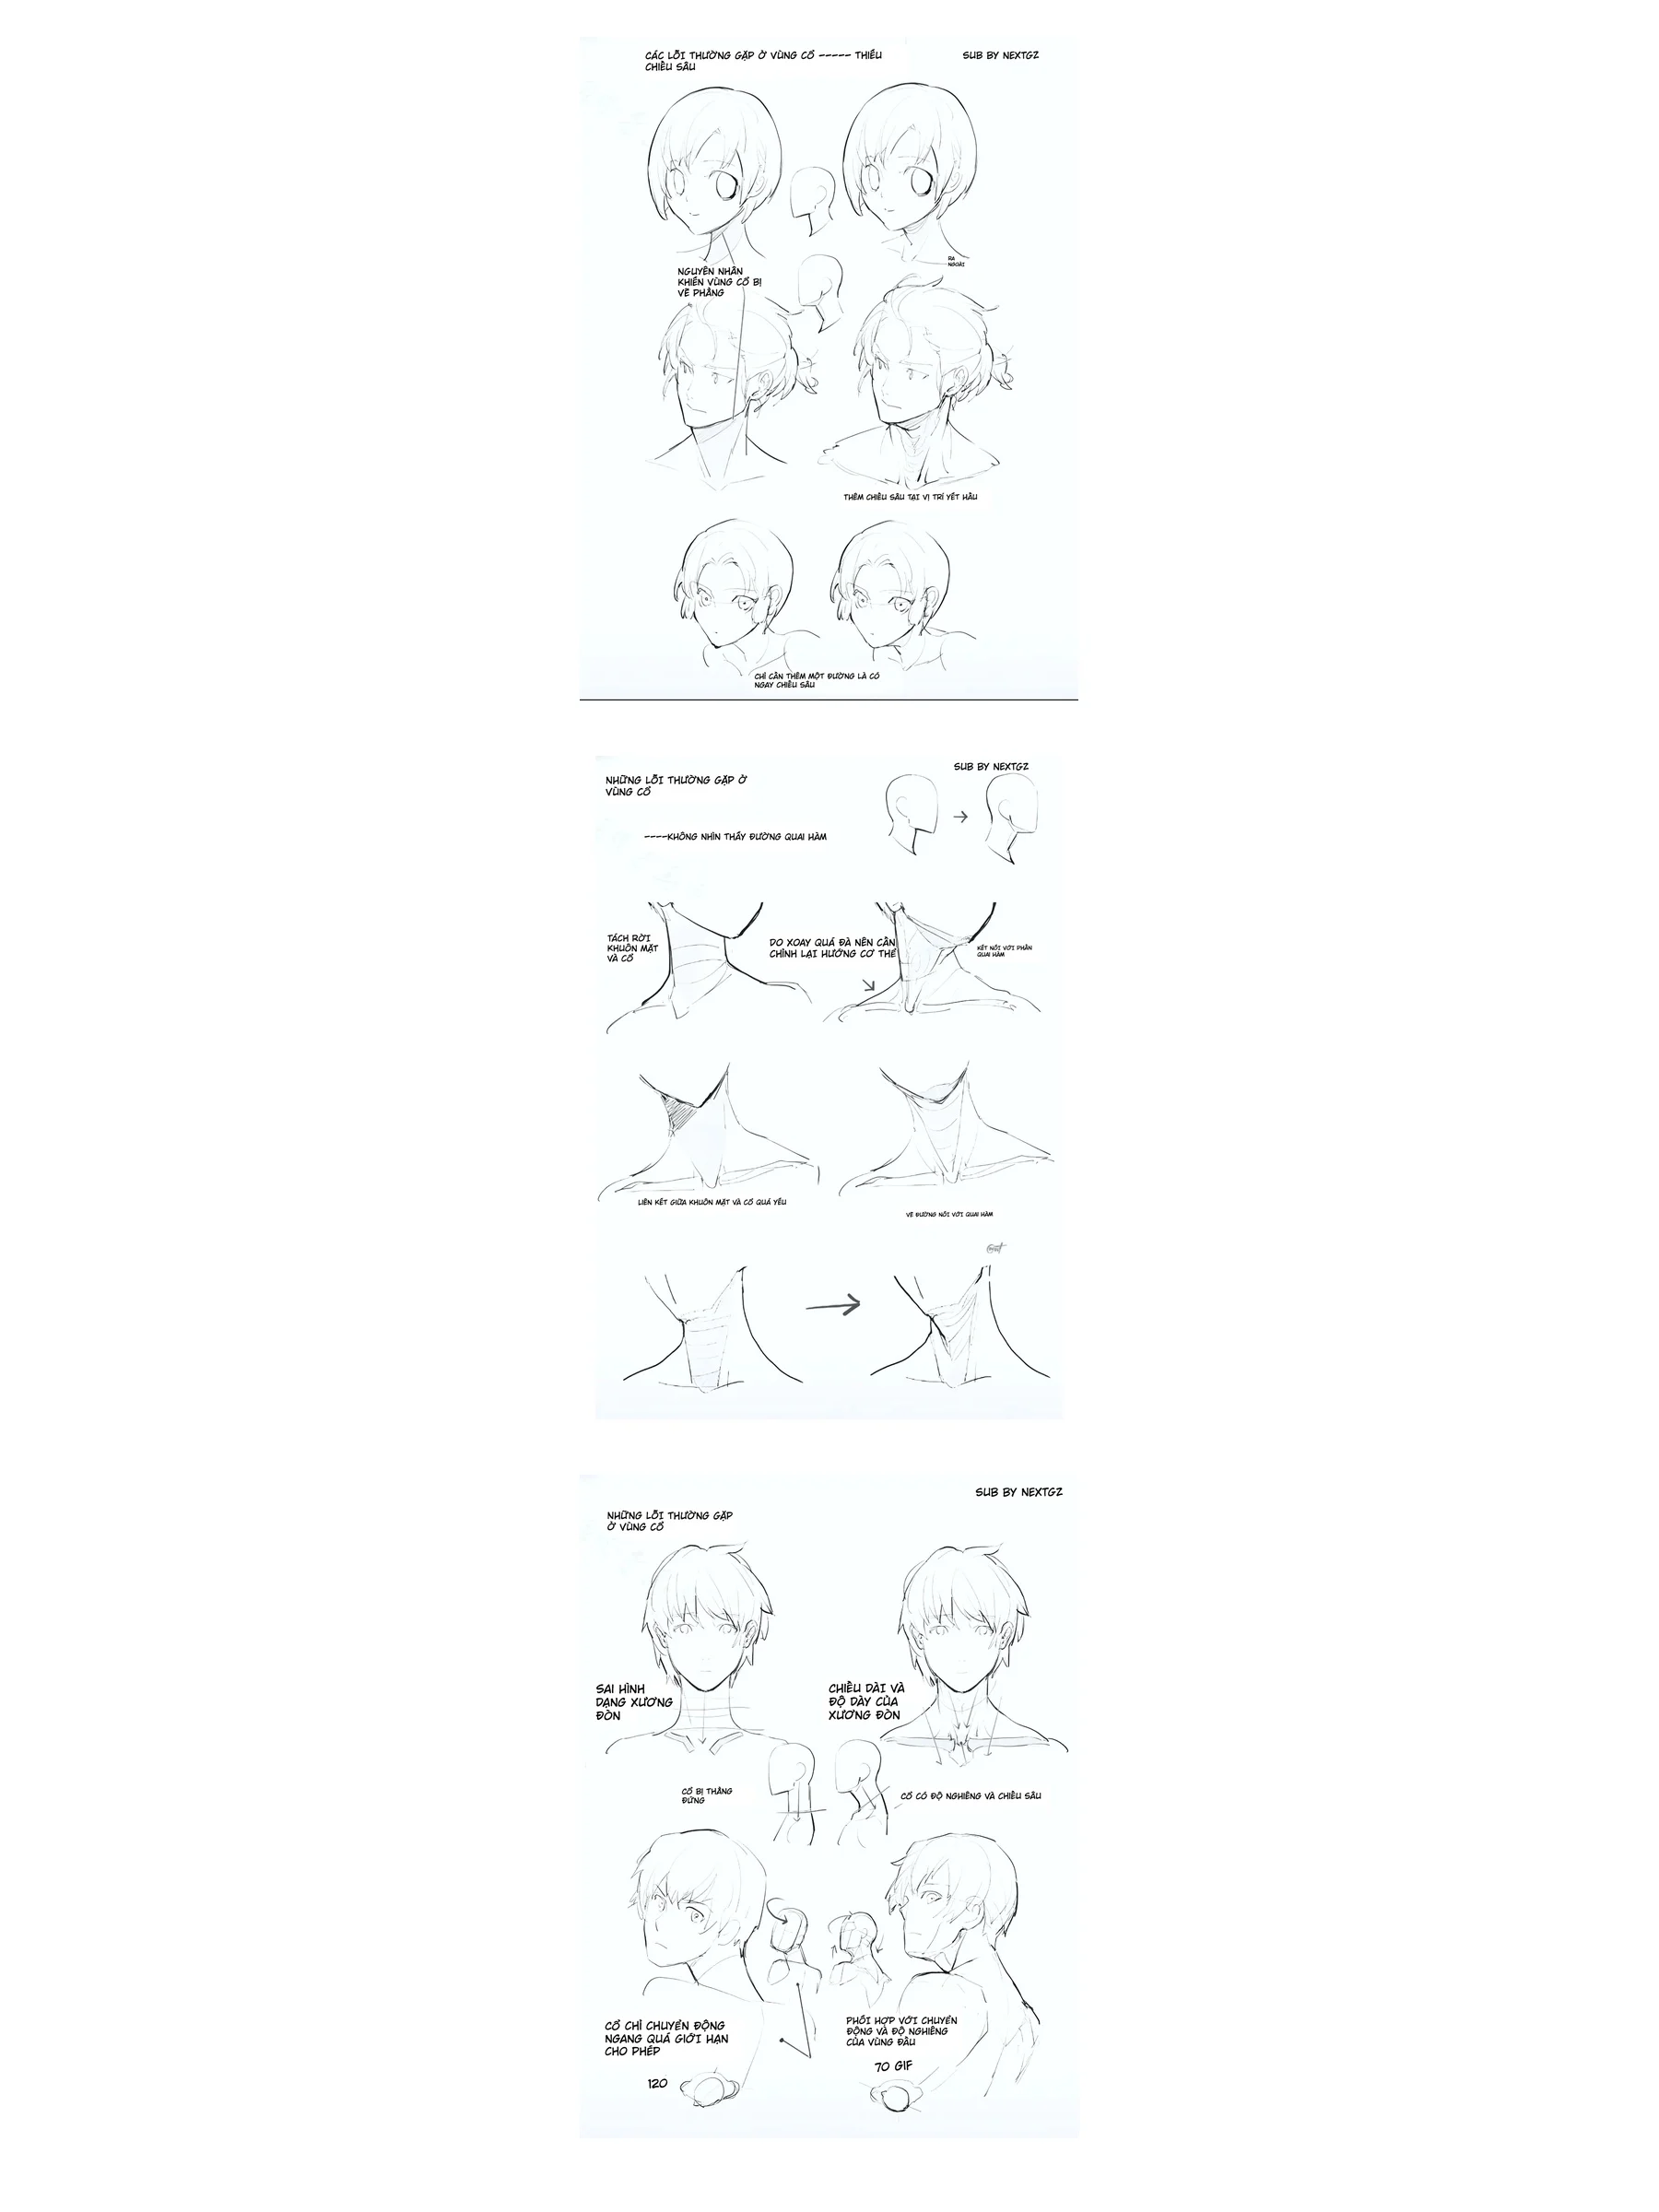
The three illustration panels in this post focus on very typical mistakes: neck lacking depth; jawline not visible; face and neck separated; neck drawn straight regardless of head rotation; collarbone reduced to a V-shaped symbol; and head rotating too far while shoulders and ribcage do not participate. What is great about the source is that many mistakes only need a few lines added or moved to the right place to create a clear difference.
This article analyzes all the information appearing in the three images, then organizes it into a practical process usable for anime, manga, manhwa, donghua style, concept art, and semi-realistic character illustration. Content taken directly from the images is kept according to the source's framing; explanations about volume, planes, layers, and exercises are expanded interpretations by NextGZ. The two numbers "120" and "70 GIF" appearing in the movement chart have no units or full captions, so the article does not treat them as exact anatomical angle limits.
1. Core mindset: the neck is not a cylinder attached under the chin
The underlying mistake in many drawings is treating the neck as a straight tube connected to the middle of the chin. When doing this, artists often draw two nearly parallel lines down to the shoulders, add a few horizontal strokes to suggest neck folds, and stop. This approach may be acceptable for extremely simplified chibi, but for characters with a relatively natural head-to-body ratio, it destroys three important relationships:
- Relationship with the skull: the neck comes out from the underside and back of the skull, near the area below the ears and behind the jaw corner, not from the exact middle of the chin.
- Relationship with the ribcage: the neck opens down into the sternal notch, collarbone, trapezius muscle, and both shoulders; it does not stop at an independent horizontal line.
- Relationship with movement: tilting, lifting, or rotating the head makes the two edges of the neck, muscle lines, and collarbone change according to perspective.
To draw more correctly, imagine the head-neck-chest area as three continuous volumes. The skull is the large mass above. The neck is a slightly tapered cylindrical mass, but it is cut by the jaw angle, the sternocleidomastoid muscle, the Adam's apple, and the front and side planes. The ribcage is the large mass below, with the sternal notch and two collarbones creating anchor points.
In anime, you can omit most anatomical details. However, these anchor points still need to exist in your mind. Just placing a few lines correctly gives the neck volume without drawing many muscles.
2. First mistake: neck lacking depth because both edges are drawn straight down
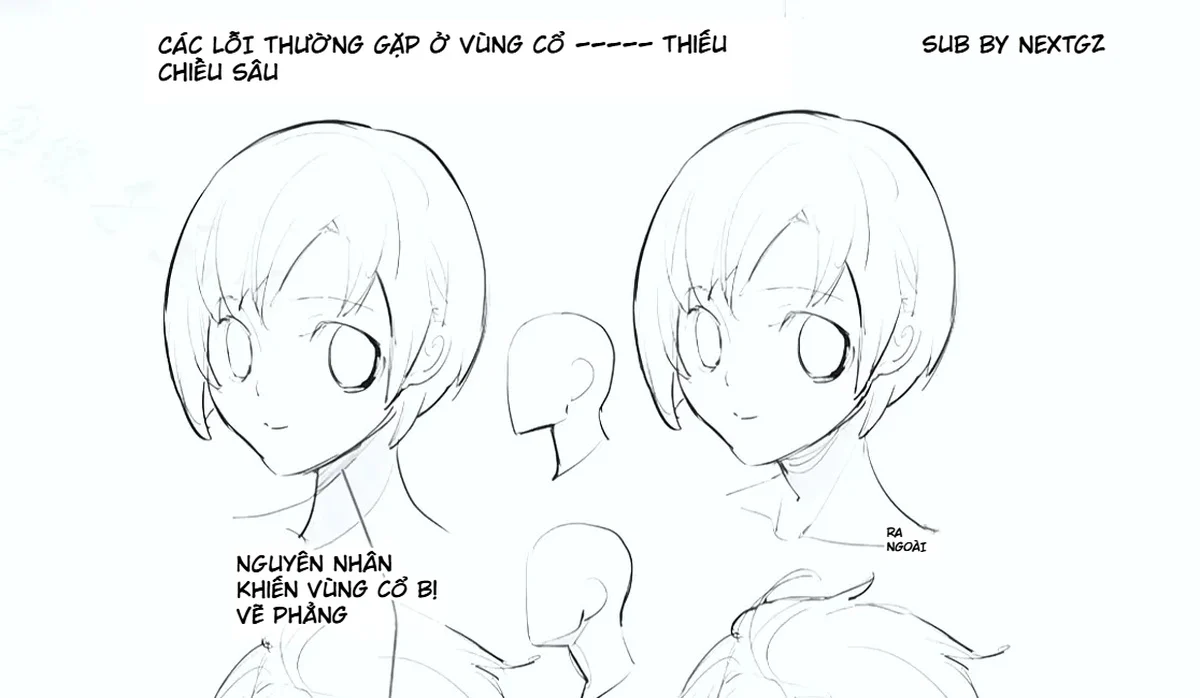
In the example above, the left version has a cute face and relatively stable proportions, but the neck area looks flat. The two neck edges simply connect the jaw down to the shoulders without explaining the underside of the jaw, the tilt of the neck, or the relationship with the ribcage. The right version adds very few lines, but they are effective:
- The neck lines are no longer completely symmetrical.
- One side of the neck opens outward according to the rotation of the head.
- The area under the jaw has a transition plane, showing that the chin sits in front of the neck.
- The base of the neck is placed lower and wider, connecting to the shoulders.
Depth does not necessarily come from shading. Even in line art, depth is created by overlapping layers and changing line direction. The chin must be in front. The neck starts behind the chin. The shoulders are behind and wider than the neck. If these three layers are placed correctly, the image already has space before coloring.
How to self-check
- Hide the hair and collar in your mind.
- Mark the jaw corners on both sides.
- Place the two points where the neck begins below the ears or behind the jaw corners.
- Extend the neck edges downward but let them open slightly into the ribcage.
- Draw a very light line under the chin to describe the transition plane.
- Shrink the drawing. If the head still looks like it is placed on a stick, the base of the neck or shoulders is not wide enough.
3. Even one line under the jaw can create depth
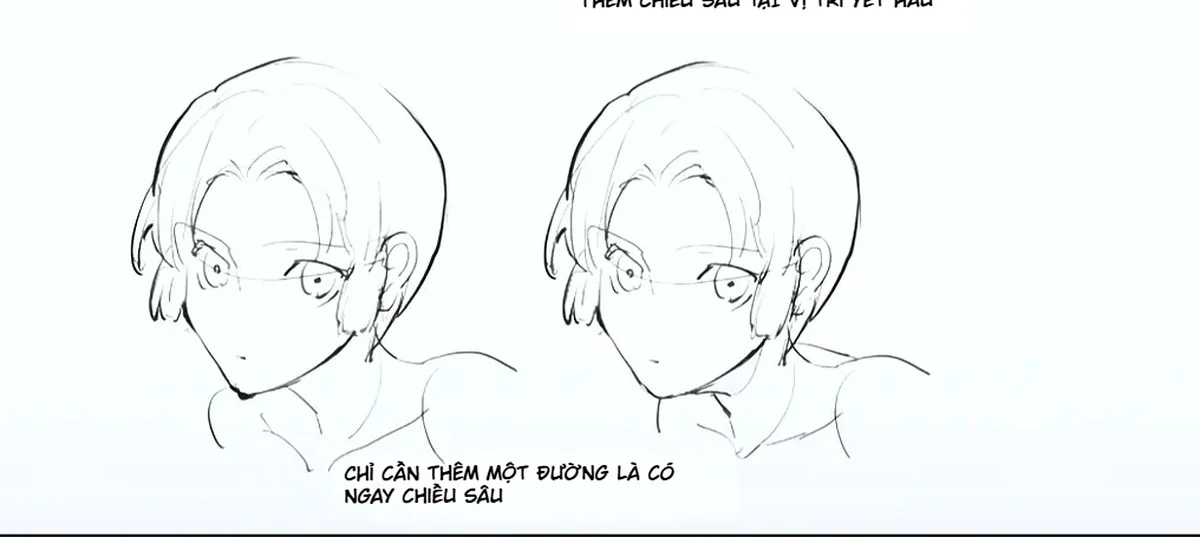
The example at the end of the first panel shows a drawing with almost no major silhouette change. The author simply added a short curved line in the area under the jaw and the base of the neck, but the head immediately feels like it sits in front of the neck instead of being merged into it.
This line can represent:
- The underside of the jaw transitioning into the neck.
- A slight shadow or skin fold under the chin.
- The muscle line or side plane of the neck when the head rotates.
- The boundary between the lit area and the shadowed area.
The important thing is not to turn it into a necklace line running horizontally. The line should be short, change its curve according to the head's direction, and usually fade out at both ends. In a front-facing view, it can be very faint or unnecessary. In a three-quarter view or when the head is tilted down, it is more useful.
If the character is young, feminine, or chibi, just one thin stroke is enough. For adult males, muscular necks, or strong lighting, you can use stronger shadows and clearer planes.
4. The missing jawline mistake: why do the head and neck appear separated?
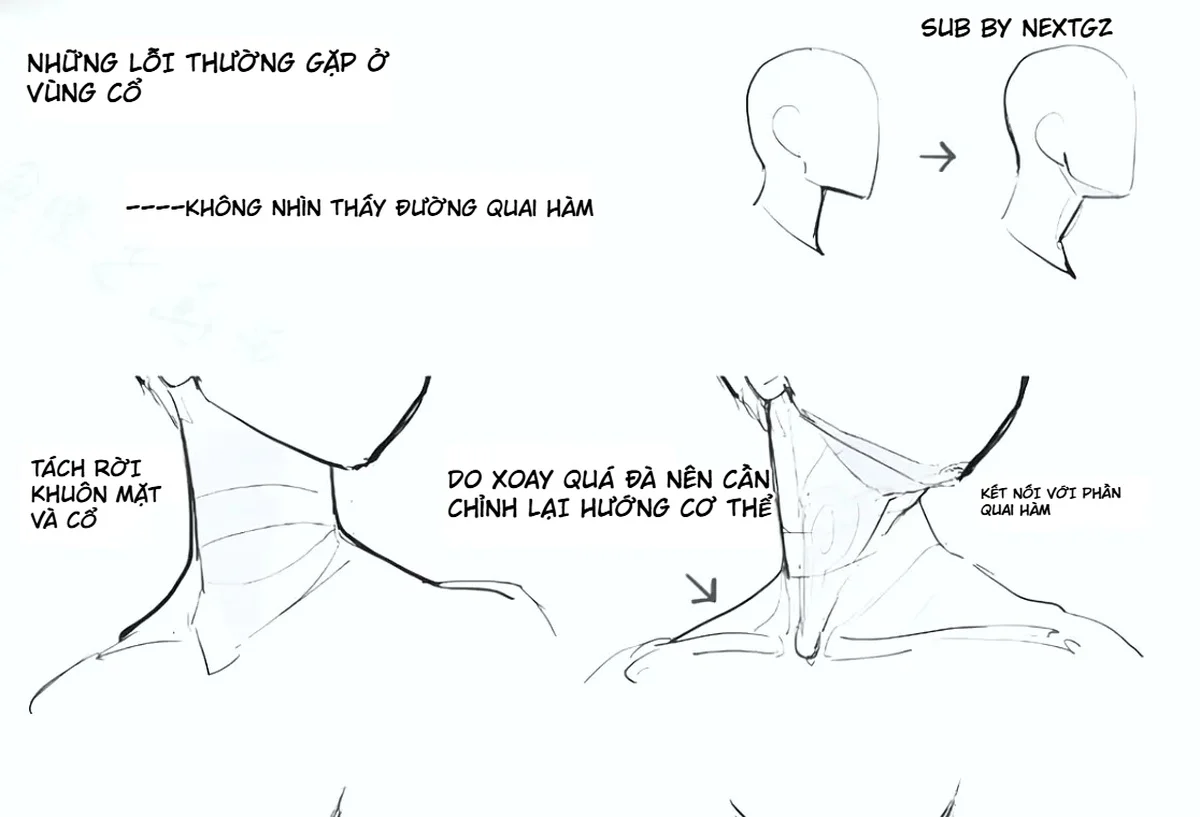
The second panel emphasizes the mistake of "not seeing the jawline." In a tilted or three-quarter view, the jaw line does not end abruptly at the chin. It goes from the chin to the jaw corner, then transitions into the area below the ear and the neck. When an artist skips this transition, the face looks like a mask stuck onto the front of an independent neck.
Three landmarks to connect
- Chin: the most forward point of the lower jaw.
- Jaw corner: the position where the jaw line changes direction upward.
- Base of the neck: begins behind and below the jaw corner, near the ear.
In anime, the jaw corner is often softened or reduced. However, that does not mean completely removing the three-dimensional relationship. You can use just a short segment or a very slight change in the silhouette to suggest the jaw corner.
Near jawline and far jawline
In a three-quarter view, the near jawline is usually longer and clearer. The far side is foreshortened and may be only a small segment before entering the neck. If both sides look the same, the head will face forward. If the far side is erased entirely without a reason for being hidden, the neck may appear to slide to one side.
5. Connecting the face, neck, Adam's apple, and neck muscles
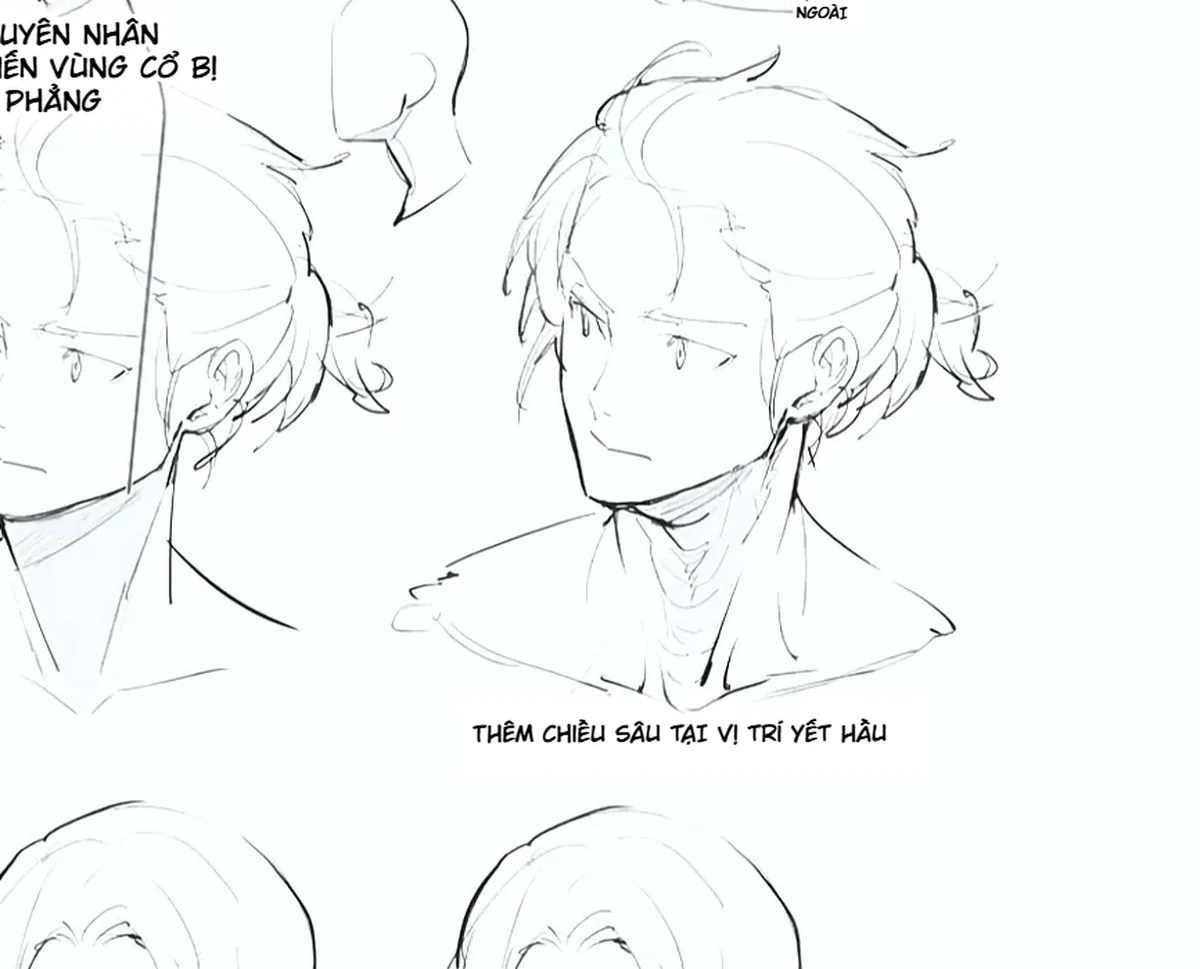
The male example in the first panel shows the neck on the left being flat even though its length is not necessarily wrong. The right version adds the Adam's apple, front neck folds, muscles running from behind the ear down to the base of the neck, and shadow under the jaw. As a result, the neck is read as a volume rotating in space.
The Adam's apple is not a triangle pasted in the middle of the neck
The Adam's apple sits on the front axis of the neck and changes in clarity according to gender, age, viewing angle, and style. In anime, it can be suggested with only a slight change in silhouette or a small line. If drawn too sharp, the neck looks like it has a spike. If placed too low or too high, the proportions will look off.
The sternocleidomastoid as a directional connecting band
One of the most useful lines when constructing the neck is the muscle line running from behind the ear down to the inner area of the collarbone and sternal notch. There is no need to draw detailed anatomy; just imagine it as a twisted band that helps explain where the head is turning.
When the head turns to the left, the muscle on one side may be tenser and clearer; the other side is softer or hidden. If you draw both muscle lines symmetrically, the neck loses its sense of rotation.
Neck folds have direction, not evenly spaced horizontal lines
Skin folds appear when the neck bends, lifts, or rotates. They usually curve along the volume, concentrate on the compressed side, and fade on the stretched side. Spreading even horizontal lines across the neck makes it look like an accordion tube.
6. The neck does not work independently: it must connect to the ribcage and shoulders
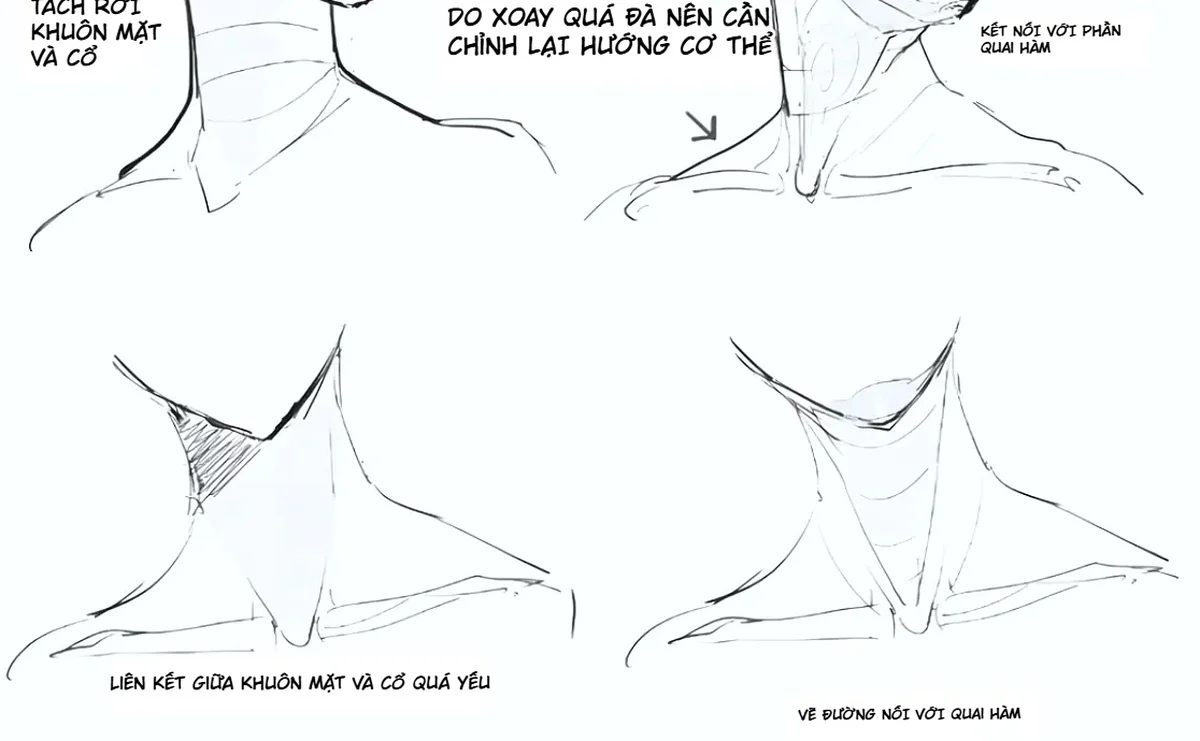
The left version in the second panel shows the face, neck, and shoulders appearing to belong to three different shapes. The jaw line does not lead into the neck; the neck has no rotation axis; the shoulders and collarbone do not react to the head's direction. The fixed version on the right adds muscle lines, the sternal notch, collarbone, and adjusts the direction of the torso.
A convincing pose requires a relationship between three axes:
- The face axis or the midline of the head.
- The neck axis.
- The ribcage axis and shoulder line.
The three axes do not need to align. In fact, a slight offset creates a natural pose. But they must relate. If the head turns a lot while the ribcage faces forward, the neck must show the twist. If the neck remains symmetrical and straight, the head looks like it was rotated independently in software.
When the head rotates too far
The source notes "because the rotation is too extreme, the body direction needs to be adjusted." This is a very important principle: when the gaze exceeds the comfortable rotation range of the neck, the shoulders and ribcage must participate. Instead of trying to twist the neck further, rotate the near shoulder backward, bring the far shoulder forward, or change the torso axis.
7. Handling the under-chin area: folds, shadows, and transition lines must have logic
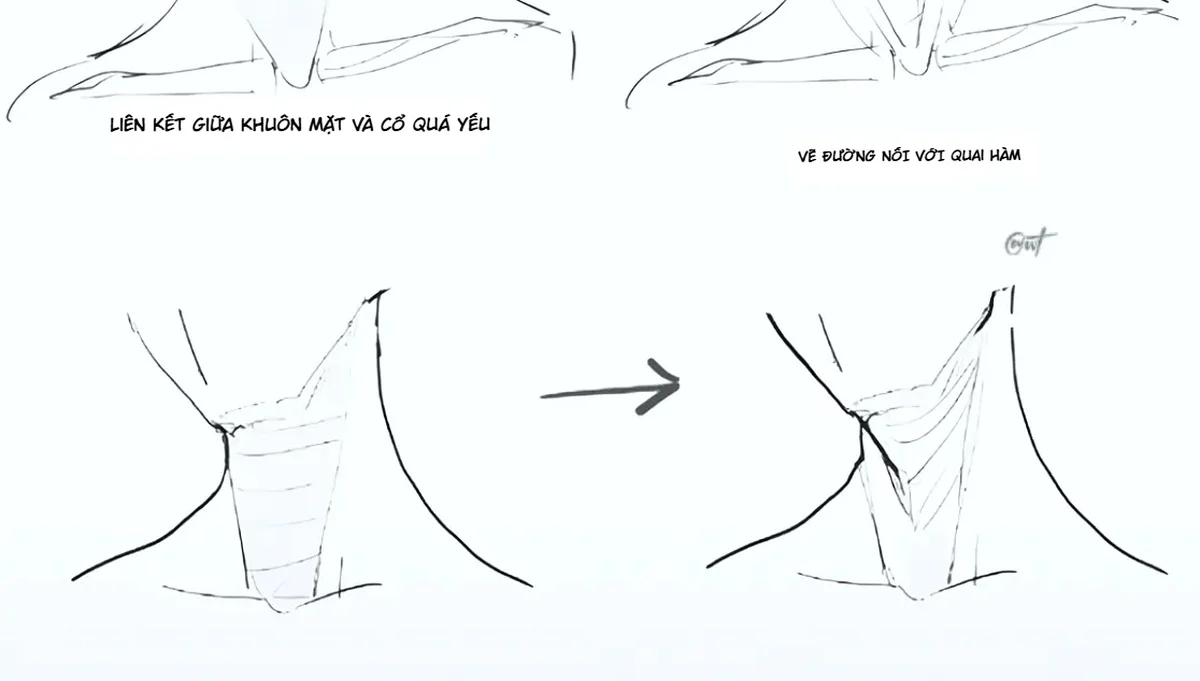
The last example in the second table zooms in on the under-chin area. The previous version has horizontal folds and a straight neck edge; the revised version creates a submandibular crease, a diagonal muscle line, and neck folds that converge with the movement.
The under-chin area usually consists of three layers:
- The underside of the jawbone and the soft tissue beneath the chin.
- The front of the neck, with the Adam's apple and the midline.
- The side of the neck, with muscles running diagonally down toward the collarbone.
When the head is tilted down, the under-chin area is compressed and skin folds may become more visible. When the head is tilted up, the front of the neck stretches, and the Adam's apple and muscles may become more prominent. When the head turns, one side is compressed while the other is stretched. Let folds reflect movement rather than using them as decorative texture.
8. Collarbone errors: V-shaped marks make the neck-chest area look flat
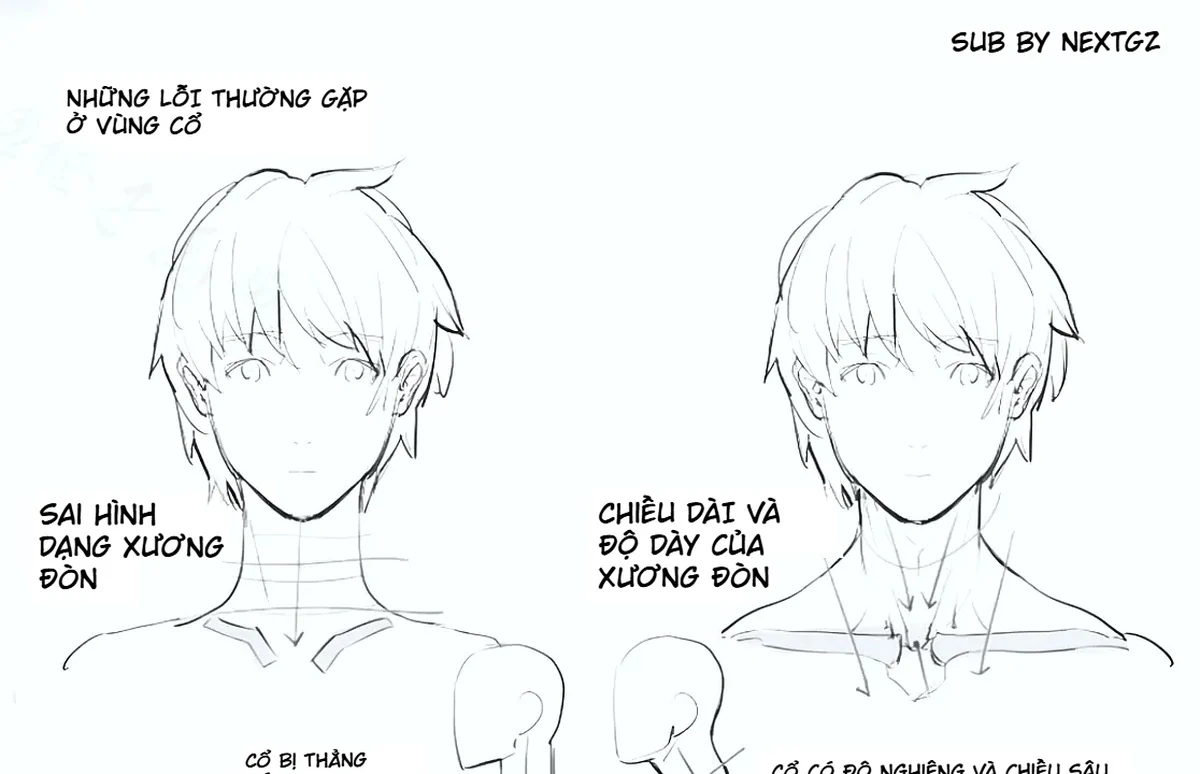
The third table compares collarbones drawn as two V-shaped marks with a corrected version that has clearer length, thickness, and direction. The collarbone is a bar connecting the sternal notch to the shoulder; it is not just a decorative motif under the neck.
Why are short V-shapes usually wrong?
- They make the ribcage look too narrow.
- They do not establish where the shoulders are.
- They do not explain whether the torso is rotating or tilting.
- They can easily be mistaken for a collar.
- They make the neck look like it grows directly out of a flat plane.
When viewed from the front, the two collarbones may form a very shallow V or an open curve. When the head and torso rotate, the near side is longer and clearer; the far side is foreshortened. Raising or lowering the shoulders also changes the angle of the collarbones.
Thickness in line art
There is no need to draw the collarbones as two fully rendered bone bars. You can simply use a lit edge, a shadow underneath, or two short interrupted lines. What matters is the direction and the distance from the sternal notch to the shoulder.
9. The neck has tilt and depth, it is not always upright
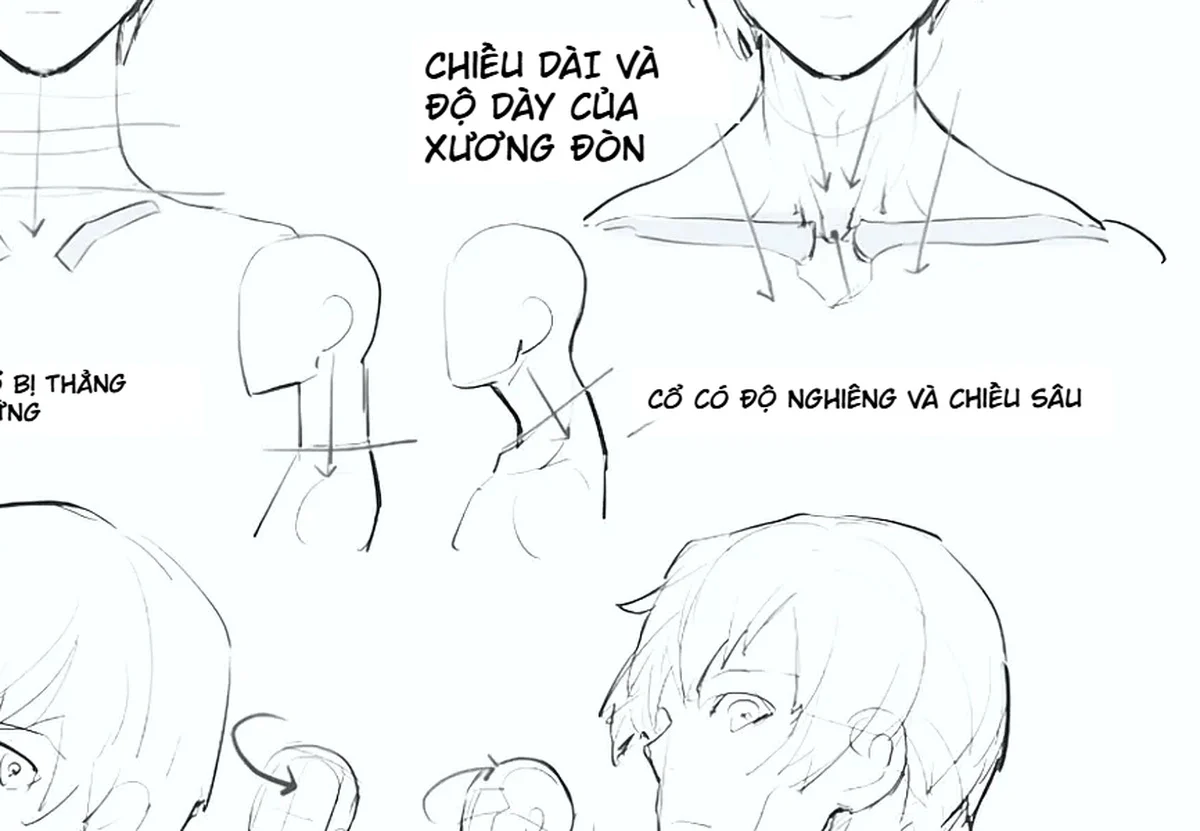
The small image in the middle of the third table contrasts a "vertical neck" with a "neck with tilt and depth." This is a very common mistake when an artist places the head at an angle but still pulls the neck straight down along the vertical axis of the canvas.
Think of the neck as an axis connecting the center of the skull to the sternal notch. When the head moves forward, the neck usually tilts with it, and the back of the neck becomes longer. When the head tilts up, the front of the neck becomes longer. When the head tilts to one side, one edge of the neck is compressed and the other is stretched.
The two edges of the neck are not parallel
In a three-quarter view, the near edge may be clearer and more curved; the far edge may be hidden or shorter. In a top-down view, the base of the neck may be covered by the shoulders and collar. In a bottom-up view, the front of the neck and the underside of the jaw are more exposed.
The tilt of the neck must relate to the shoulders
If the head tilts left, the shoulders may compensate slightly in the opposite direction to maintain balance. If the head turns strongly, one shoulder moves closer to the camera and the other moves away. Not every pose needs dramatic compensation, but the shoulders should not be completely unresponsive to head movement.
10. Range of motion: when must the shoulders and torso participate?
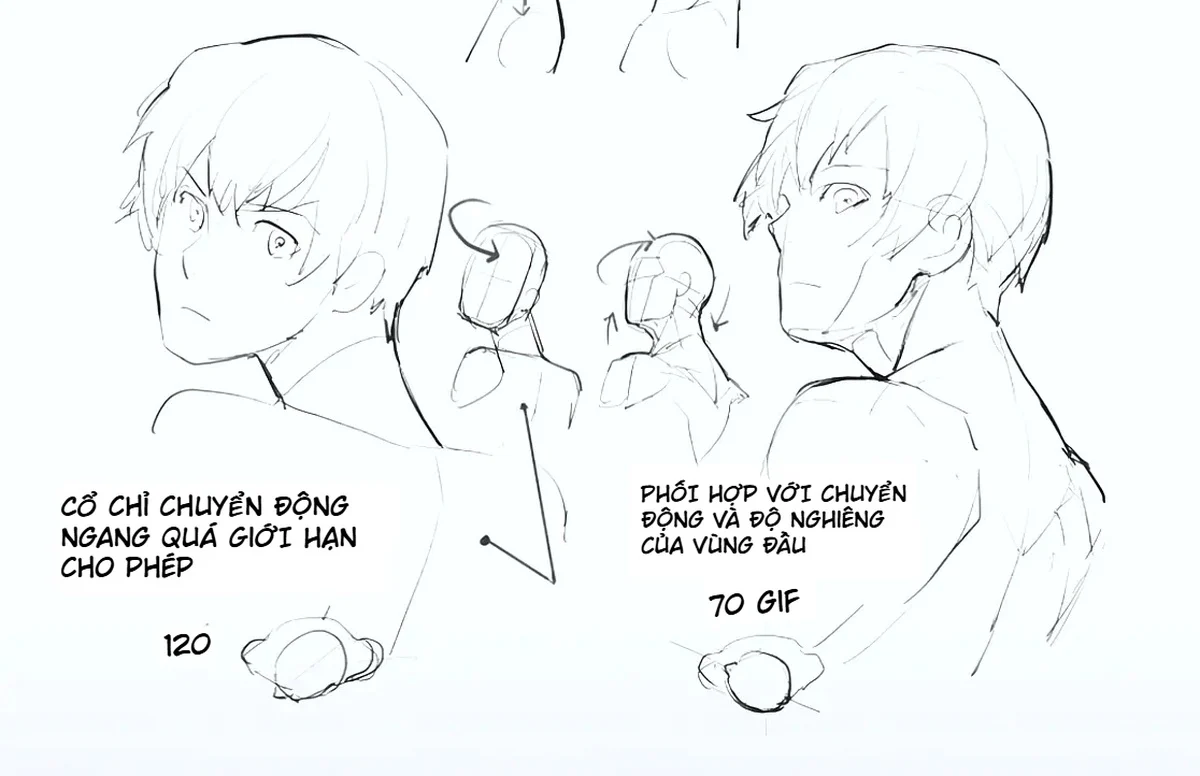
The source table places two poses turning to look backward and notes that the neck can only move horizontally within a limit, and it must coordinate with the tilt of the head. The two numbers in the image have no units and are not explained, so the valuable lesson is the principle of coordination, not memorizing a fixed angle.
Signs that a pose has rotated too far
- The face is almost looking backward while the shoulders remain fully frontal.
- The two edges of the neck are twisted into a sharp broken line.
- The jawline and ear no longer relate to the neck.
- The neck muscles are extremely diagonal but the ribcage does not rotate.
- The character looks like the head is being rotated independently on an axis.
How to fix it
- Reduce the head rotation angle if the pose does not need to be extreme.
- Rotate the ribcage partially toward the direction of the gaze.
- Let the near shoulder pull back or push forward depending on the direction of the turn.
- Change the neck from a straight axis into a twisted mass.
- Check that the ear, jawline, neck muscles, and collarbones all follow the same logic.
Looking backward is usually a combination of head rotation, neck rotation, ribcage rotation, and shoulder adjustment. As long as each part participates to some degree, the pose will look far more natural.
11. How to construct the neck from each angle
Front view
The two edges of the neck are roughly symmetrical but not necessarily completely parallel. Place the sternal notch, the two collarbones, and the trapezius muscles. Avoid drawing the neck from the middle of the chin. For female or young characters, simplify the Adam's apple and muscles; for male characters, they can be more defined.
Three-quarter view
This is the angle where mistakes show most easily. The near edge of the neck is clear and longer; the far edge may be covered by the jaw or hair. The muscle line on one side is usually more visible. The far collarbone is foreshortened. The base of the neck is not directly below the center of the face in projection.
Profile view
The relationship between the chin, jawline, ear, and nape must be clear. The neck emerges from below and behind the skull. The front of the neck is not completely straight; the Adam's apple, trachea, and muscles create subtle changes in the silhouette.
Top-down view
The shoulders and trapezius muscles are more visible; the front of the neck may be hidden by the chin. The base of the neck is compressed in perspective. The collarbone lines curve and appear shorter in projection.
Bottom-up view
The underside of the jaw and the front of the neck are clearly visible. The two muscle lines may form a V pointing down toward the sternal notch. Do not draw the chin as a straight line connecting directly to the neck.
12. Adjusting for anime style while preserving structure
Anime allows the neck to be longer, slimmer, or have many muscles simplified. However, stylization should be built on a purposeful structure.
Graceful female characters
The neck can be slender, with very light muscles and Adam's apple. Use the collarbones, sternal notch, and under-chin shadow to create volume instead of drawing many muscle lines. The shoulders can be soft but still wide enough to support the head.
Male or mature characters
The neck is thicker, and the sternocleidomastoid, Adam's apple, and trapezius are more defined. The collarbones have weight. Still, there is no need to outline every muscle bundle; use them only in tension areas and along the direction of movement.
Child characters
The neck is short, soft, and less detailed. The head is large compared to the shoulders. The jawline is rounder. Do not make the Adam's apple or neck tendons too prominent.
Chibi
The neck can be extremely short or almost hidden. But the head-body axis, shoulder direction, and layering order still need to be correct. A wrong line in chibi is even easier to notice because the drawing has very few details.
13. A 12-step process for constructing the head-neck-shoulder area
- Build the skull mass and the facial axis.
- Determine the chin, jawline, and ear position.
- Set the direction of the ribcage and the shoulder line.
- Connect the center of the skull to the sternal notch with the neck axis.
- Draw the two edges of the neck from below the ear or behind the jawline.
- Place the underside of the jaw and the transition line into the neck.
- Add the sternal notch and the two collarbones.
- Check the tilt and twist of the neck.
- Suggest the sternocleidomastoid or Adam's apple if needed.
- Draw the trapezius and the transition into the shoulders.
- Layer hair, collars, and accessories over the structure.
- Erase the construction lines, keep the necessary linework, and check the silhouette at thumbnail size.
Do not start with the collar, tie, armor, or hair. Build the neck underneath first. Clothing is only convincing when there is a body mass for it to cling to.
14. Suggested layer structure and brushes
Layer structure
- Reference or source image.
- Skull mass and facial axis.
- Jaw, ears, and underside of the chin.
- Neck axis and ribcage.
- Collarbones, shoulders, and trapezius.
- Selective neck muscles, Adam's apple, and skin folds.
- Clothing, hair, and accessories.
- Clean sketch.
- Line art.
- Structural shading and final color.
Construction brushes
Use a hard round brush or a pencil with pressure opacity. Construction lines should be light, easy to fix, and a different color from the final linework. You do not need fancy texture brushes; the goal is to see the forms clearly.
Line art brushes
Use a tapered brush to vary line thickness. Use heavier lines at the near jawline, hairline, under-chin shadow, and deep creases. Use lighter lines on the collarbones, neck folds, and lit edges.
Shading brushes
Use a hard-edged brush for the shadow under the jaw and contact shadows; a medium-edged brush for the transition between the front and side of the neck; and a very light airbrush for reflected light. Do not use an airbrush to hide incorrect construction.
15. Common mistakes and quick fixes
The neck starts from the middle of the chin
Bring both edges of the neck toward the ears or behind the jawline. Keep the chin in front of the neck.
The two edges of the neck are parallel
Add a twist, make one edge longer or clearer according to the viewing angle, open the base of the neck into the shoulders.
No jawline definition
Suggest the jaw angle and the plane transition under the jaw with a short segment, not necessarily a closed outline.
The neck looks like a smooth tube
Add one or two landmarks: Adam's apple, oblique muscle, compression folds, or shadow under the chin. Do not scatter many horizontal lines.
The collarbone is a short V shape
Extend them toward the shoulders, make the angle shallower, and vary it with perspective.
The head turns but the shoulders stay still
Rotate the ribcage partially or reduce the head angle. Let the shoulders participate in the movement.
Drawing too many neck tendons
Keep lines only on the stretched side or where light and shadow are clear. For young or feminine characters, reduce detail.
The neck looks long because hair or collar fools the eye
Hide the clothing, rebuild the sternal notch and collarbone. Measure the true neck length before covering it.
The shoulders grow directly from the neck
Add the trapezius muscle and transition planes. The outer shoulder point should be farther away than the base of the neck.
16. 7-day neck practice plan
Day 1: front-facing neck
Draw 20 simple heads, place the neck, sternal notch, and collarbone. Do not add hair or clothing.
Day 2: side angle
Practice chin – jawline – ear – nape – upper neck on 15 models. Focus on keeping the head in front of the neck.
Day 3: three-quarter view
Draw 15 slightly turned heads, varying the near and far edges of the neck. Add one oblique muscle line to explain the rotation.
Day 4: looking down and looking up
Draw 10 looking-down poses and 10 looking-up poses. Compare how the front and back of the neck change.
Day 5: collarbone and shoulders
Draw 20 neck – collarbone – shoulder clusters, varying shoulder slope and ribcage direction.
Day 6: looking behind
Draw 10 head-turn poses. For each pose, make one wrong version that only rotates the neck and one corrected version that involves the shoulders and torso.
Day 7: covering with clothing
Use the same construction to add shirt collars, hoodies, armor, and long hair. Check whether the material follows the underlying mass.
17. Checklist before finishing the neck area
- Does the neck start under the ears or behind the jawline?
- Is the chin clearly in front of the neck?
- Does the jawline transition naturally into the neck?
- Do the two edges of the neck reflect the viewing angle or are they parallel?
- Does the base of the neck open into the shoulders and ribcage?
- Is the sternal notch in the correct position below the neck?
- Are the collarbones long enough, shallow enough, and in correct perspective?
- Does the neck have an appropriate tilt relative to the head?
- When the head turns strongly, is it supported by the shoulders and torso?
- Are the Adam's apple and neck muscles used sparingly according to the character?
- Are the neck folds concentrated on the compressed side?
- Does the area under the chin have a plane transition or is it flat?
- Does the trapezius muscle connect the nape to the shoulders?
- Are the collar and hair placed after the construction?
- When scaled down, does the head look firmly attached to the body?
18. Continue learning related skills
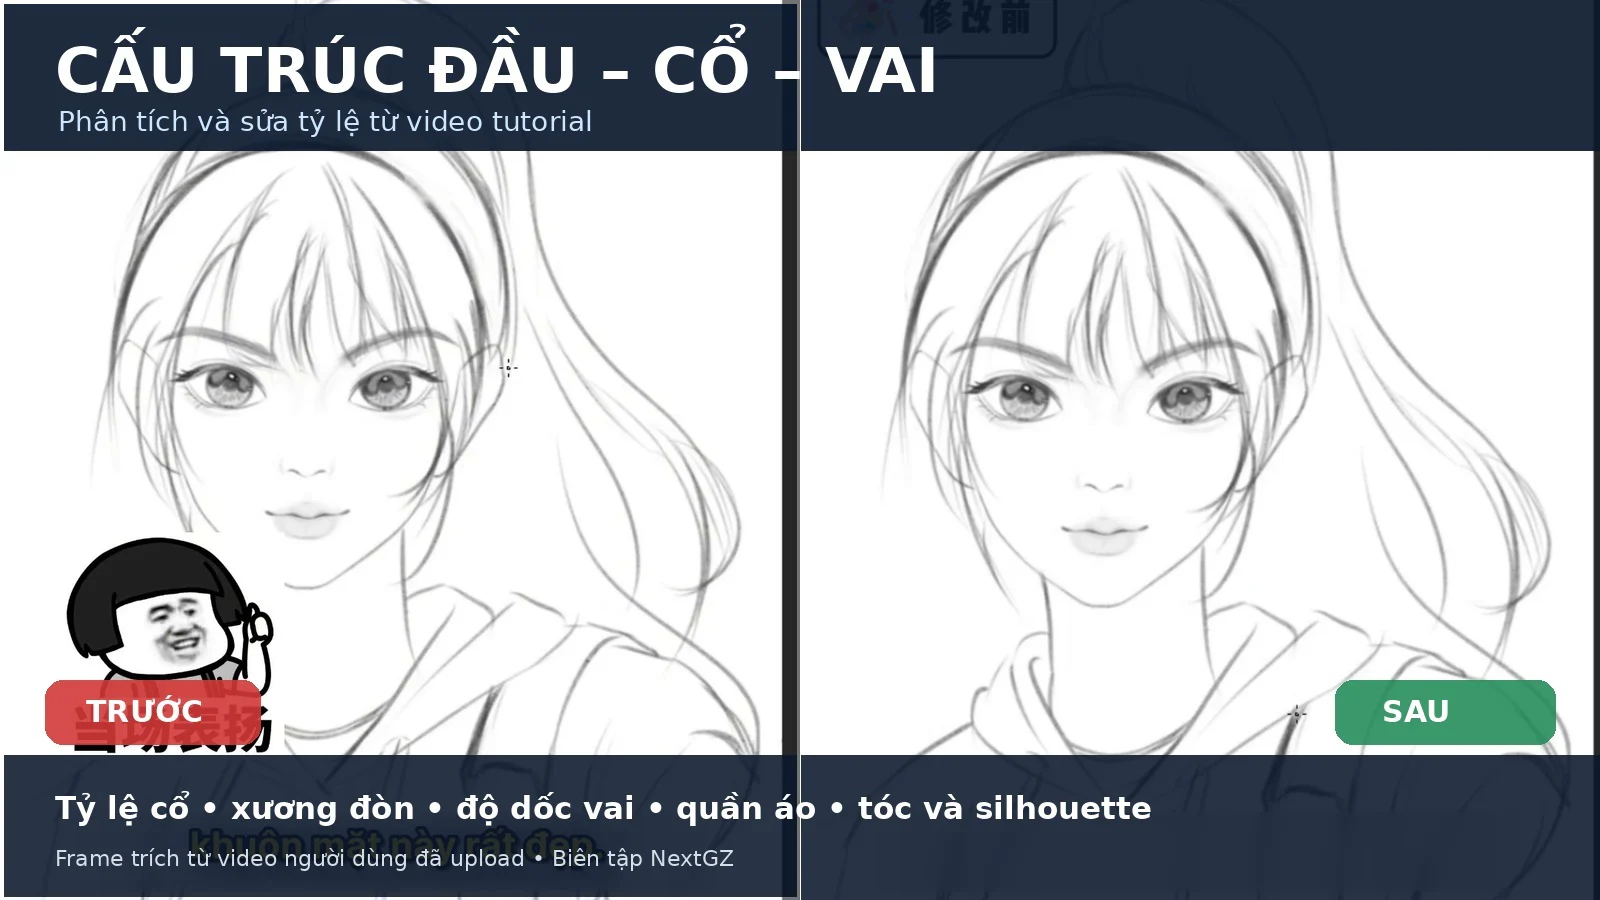
To learn the full relationship of head – neck – shoulders, collarbones, and shoulder slope, see the article Hướng dẫn vẽ đúng cấu trúc đầu – cổ – vai on NextGZ.
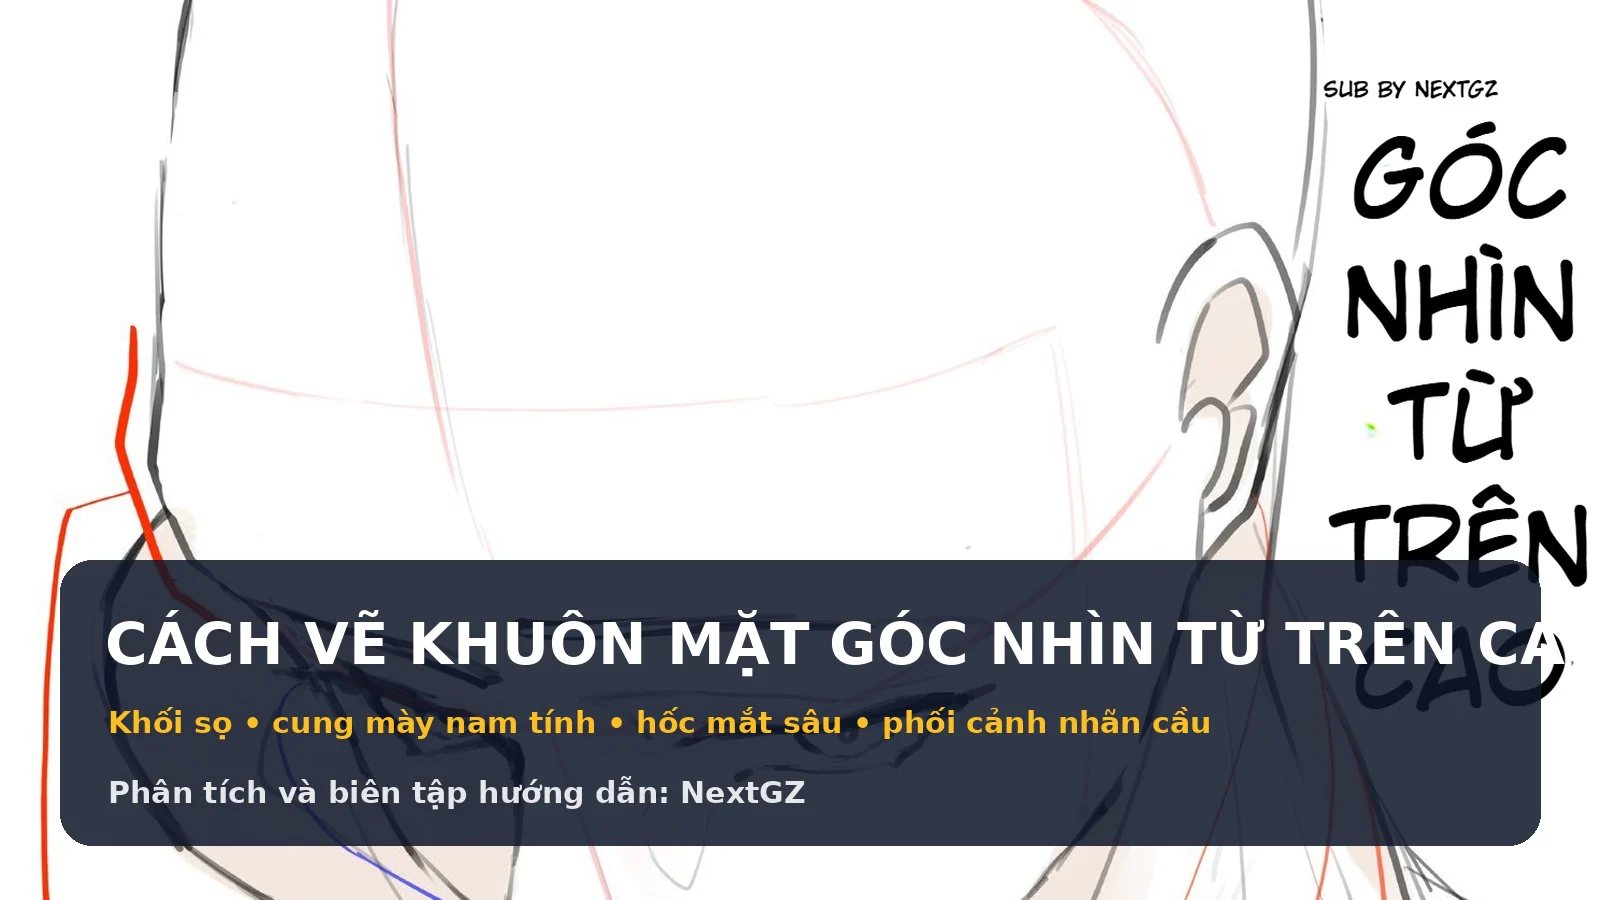
When you need to apply jawline, ear, and neck landmarks in difficult camera angles, you can refer to Cách vẽ khuôn mặt góc nhìn từ trên cao. The two articles complement each other: one focuses on the entire upper body, the other explains how the skull and jaw change with perspective.
Conclusion
These three source panels show that most neck mistakes do not need to be fixed with more detail. The problem is usually in a few connection points: chin with jawline, jawline with neck, neck with collarbone, collarbone with shoulders, and head movement with the ribcage. When these connections are correct, just a few lines create clear depth.
Remember four principles: the neck does not grow from the middle of the chin; the neck is not two parallel lines; the collarbone is not a short V symbol; and the head does not rotate independently from the shoulders – torso in extreme angles. Before adding hair, collars, or neck tendons, build the head – neck – chest mass using large landmarks.
The most important skill is not memorizing the name of each muscle, but seeing the front, side, underside, and the layering order. When you know which line is in front, which line is behind, and which mass is rotating, the neck will look more natural even in a minimalist anime style.
Illustration source: three images provided by users, with the watermark “Sub by NextGZ”. The article closely follows the content and terminology in the images, while expanding them into a practice routine; no AI images or external sources were used.







Bình luận
0 bình luận
Đăng nhập để tham gia thảo luận cùng cộng đồng!
Đăng nhập ngayĐang tải bình luận...