Bộ Sưu Tập 48 Brush Information Volume Tạo Chi Tiết Và Texture Cực Đỉnh Cho PS, Procreate, CSP
Tải bộ 48 brush Information Volume cho PS, Procreate và CSP, chuyên tạo hatching, tram, texture, chi tiết bề mặt, hiệu ứng khối, speedline và điểm nhấn minh họa digital art.
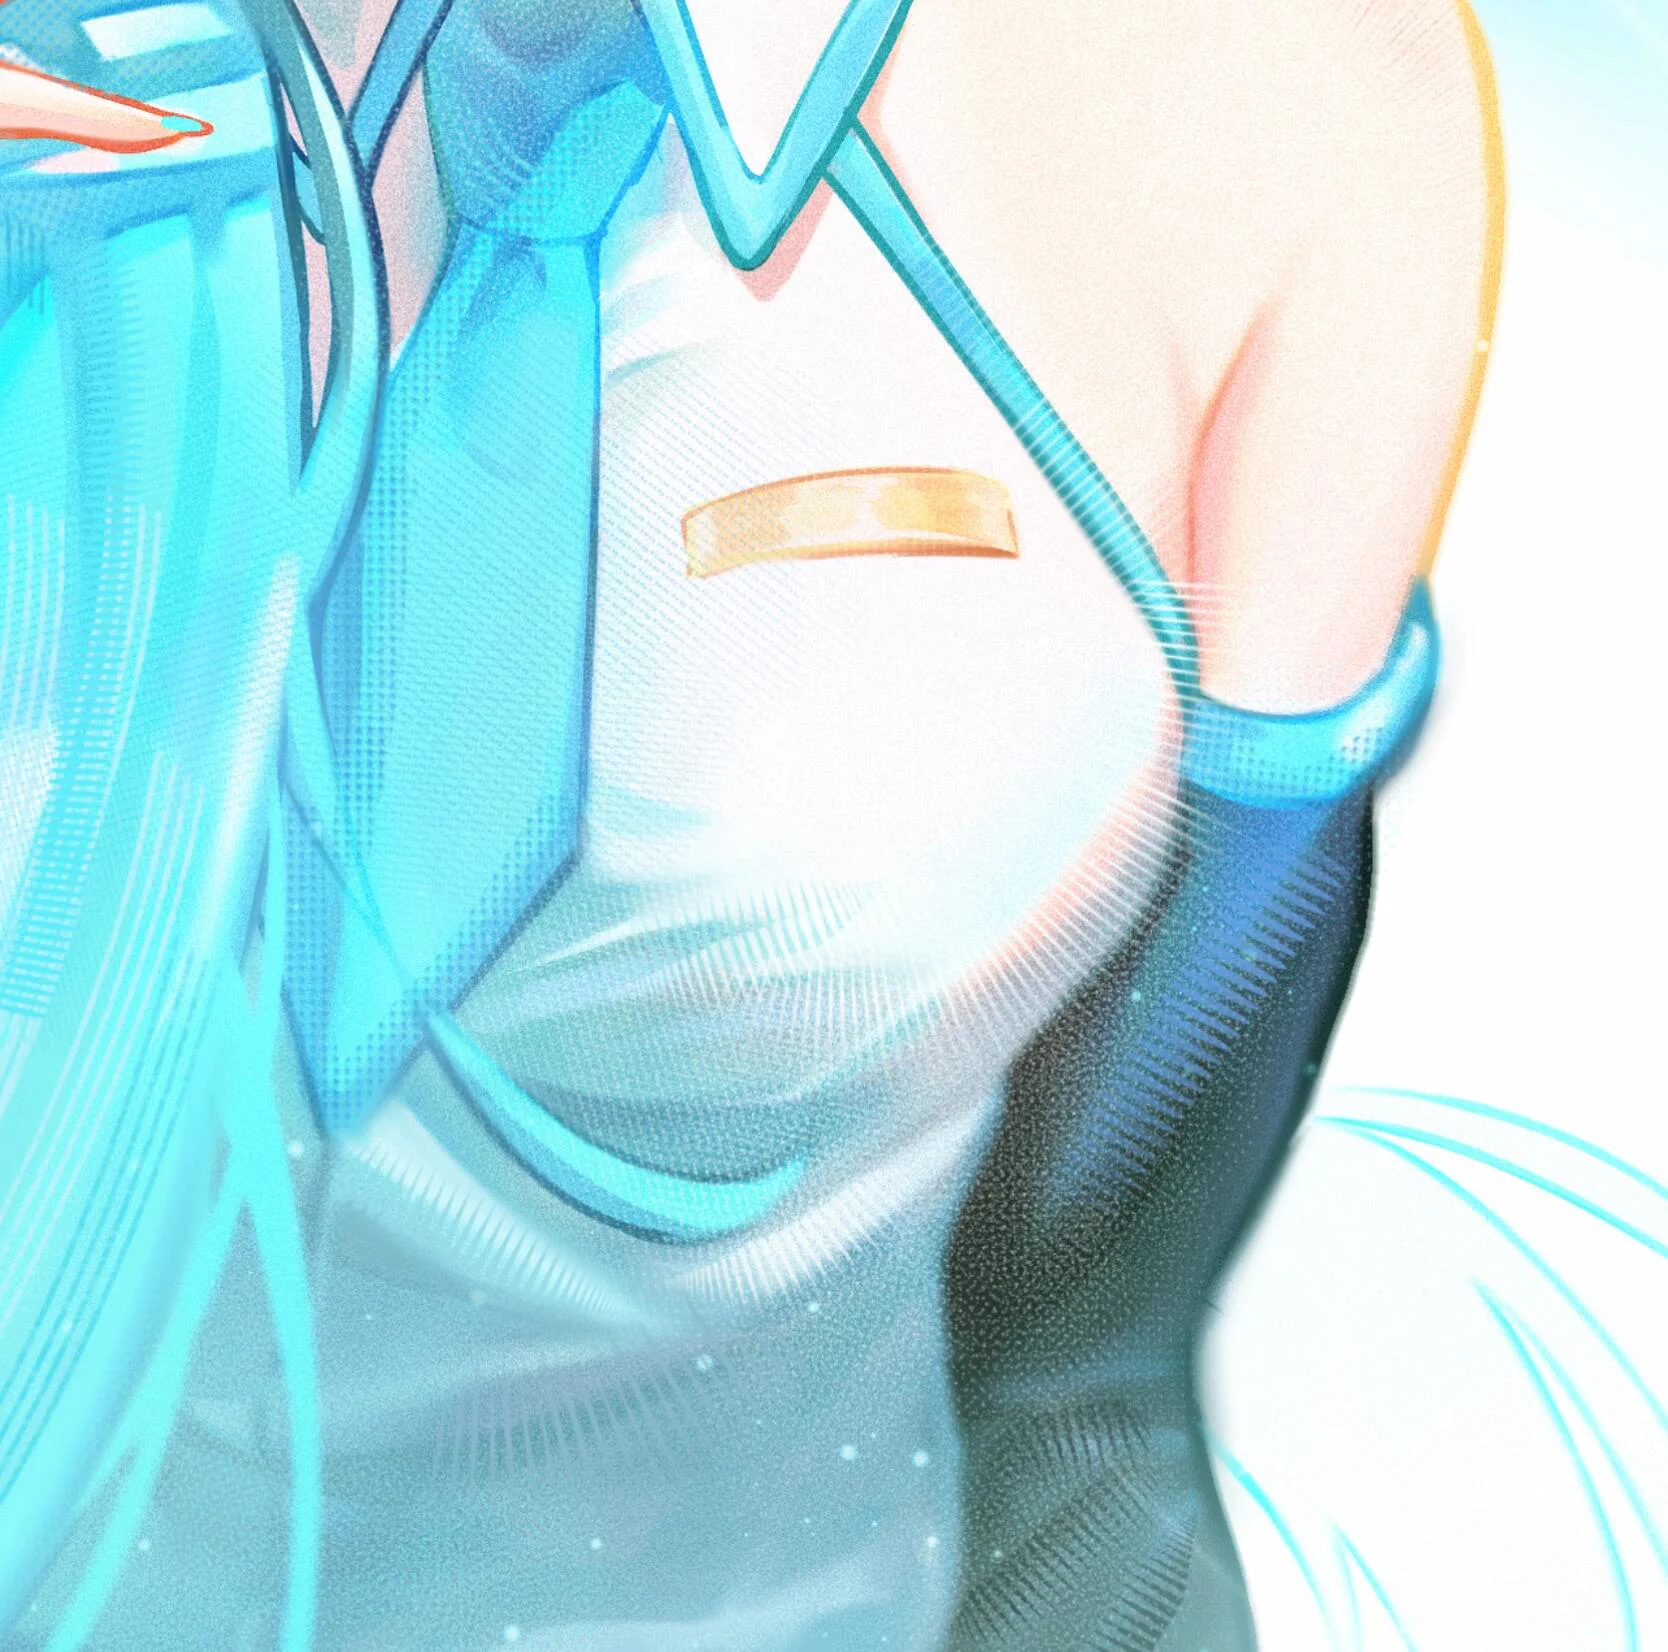
1:04 ước tính · Chưa có giọng vi-VN
Nếu tranh của bạn đã có màu, có khối cơ bản nhưng vẫn bị cảm giác phẳng, thiếu chi tiết và chưa đủ “đã mắt”, Bộ Sưu Tập 48 Brush Information Volume là một bộ cọ rất đáng thêm vào thư viện vẽ. Đây là set brush chuyên dùng để tăng mật độ thông tin thị giác cho tranh digital art, giúp bề mặt nhân vật, đồ vật, món ăn, trang phục, da, tóc, ánh sáng và background trở nên giàu texture hơn chỉ bằng vài nét cọ.
Điểm hay của bộ brush này nằm ở cách nó bổ sung chi tiết mà không bắt buộc artist phải ngồi vẽ thủ công từng đường gạch, từng hạt tram hay từng lớp texture nhỏ. Với 48 đầu cọ được thiết kế cho nhiều kiểu hiệu ứng khác nhau, bộ này phù hợp cho các bạn vẽ manga, comic, anime, semi-real, minh họa concept, tranh đồ ăn, tranh nhân vật và những tác phẩm cần cảm giác hoàn thiện hơn ở bước cuối.
Vì sao gọi là brush Information Volume?
Trong vẽ kỹ thuật số, một bức tranh không chỉ cần đúng màu và đúng khối. Điều khiến tranh nhìn có chiều sâu hơn thường nằm ở phần chi tiết bề mặt: các nét gạch mảnh, hạt tram, dot pattern, texture lưới, vệt sáng, đường nhấn, vùng nhiễu nhẹ, các lớp pattern phá mảng phẳng và những hiệu ứng nhỏ giúp mắt người xem cảm thấy hình ảnh “có nhiều thứ để nhìn” hơn. Đó chính là tinh thần của nhóm brush Information Volume.
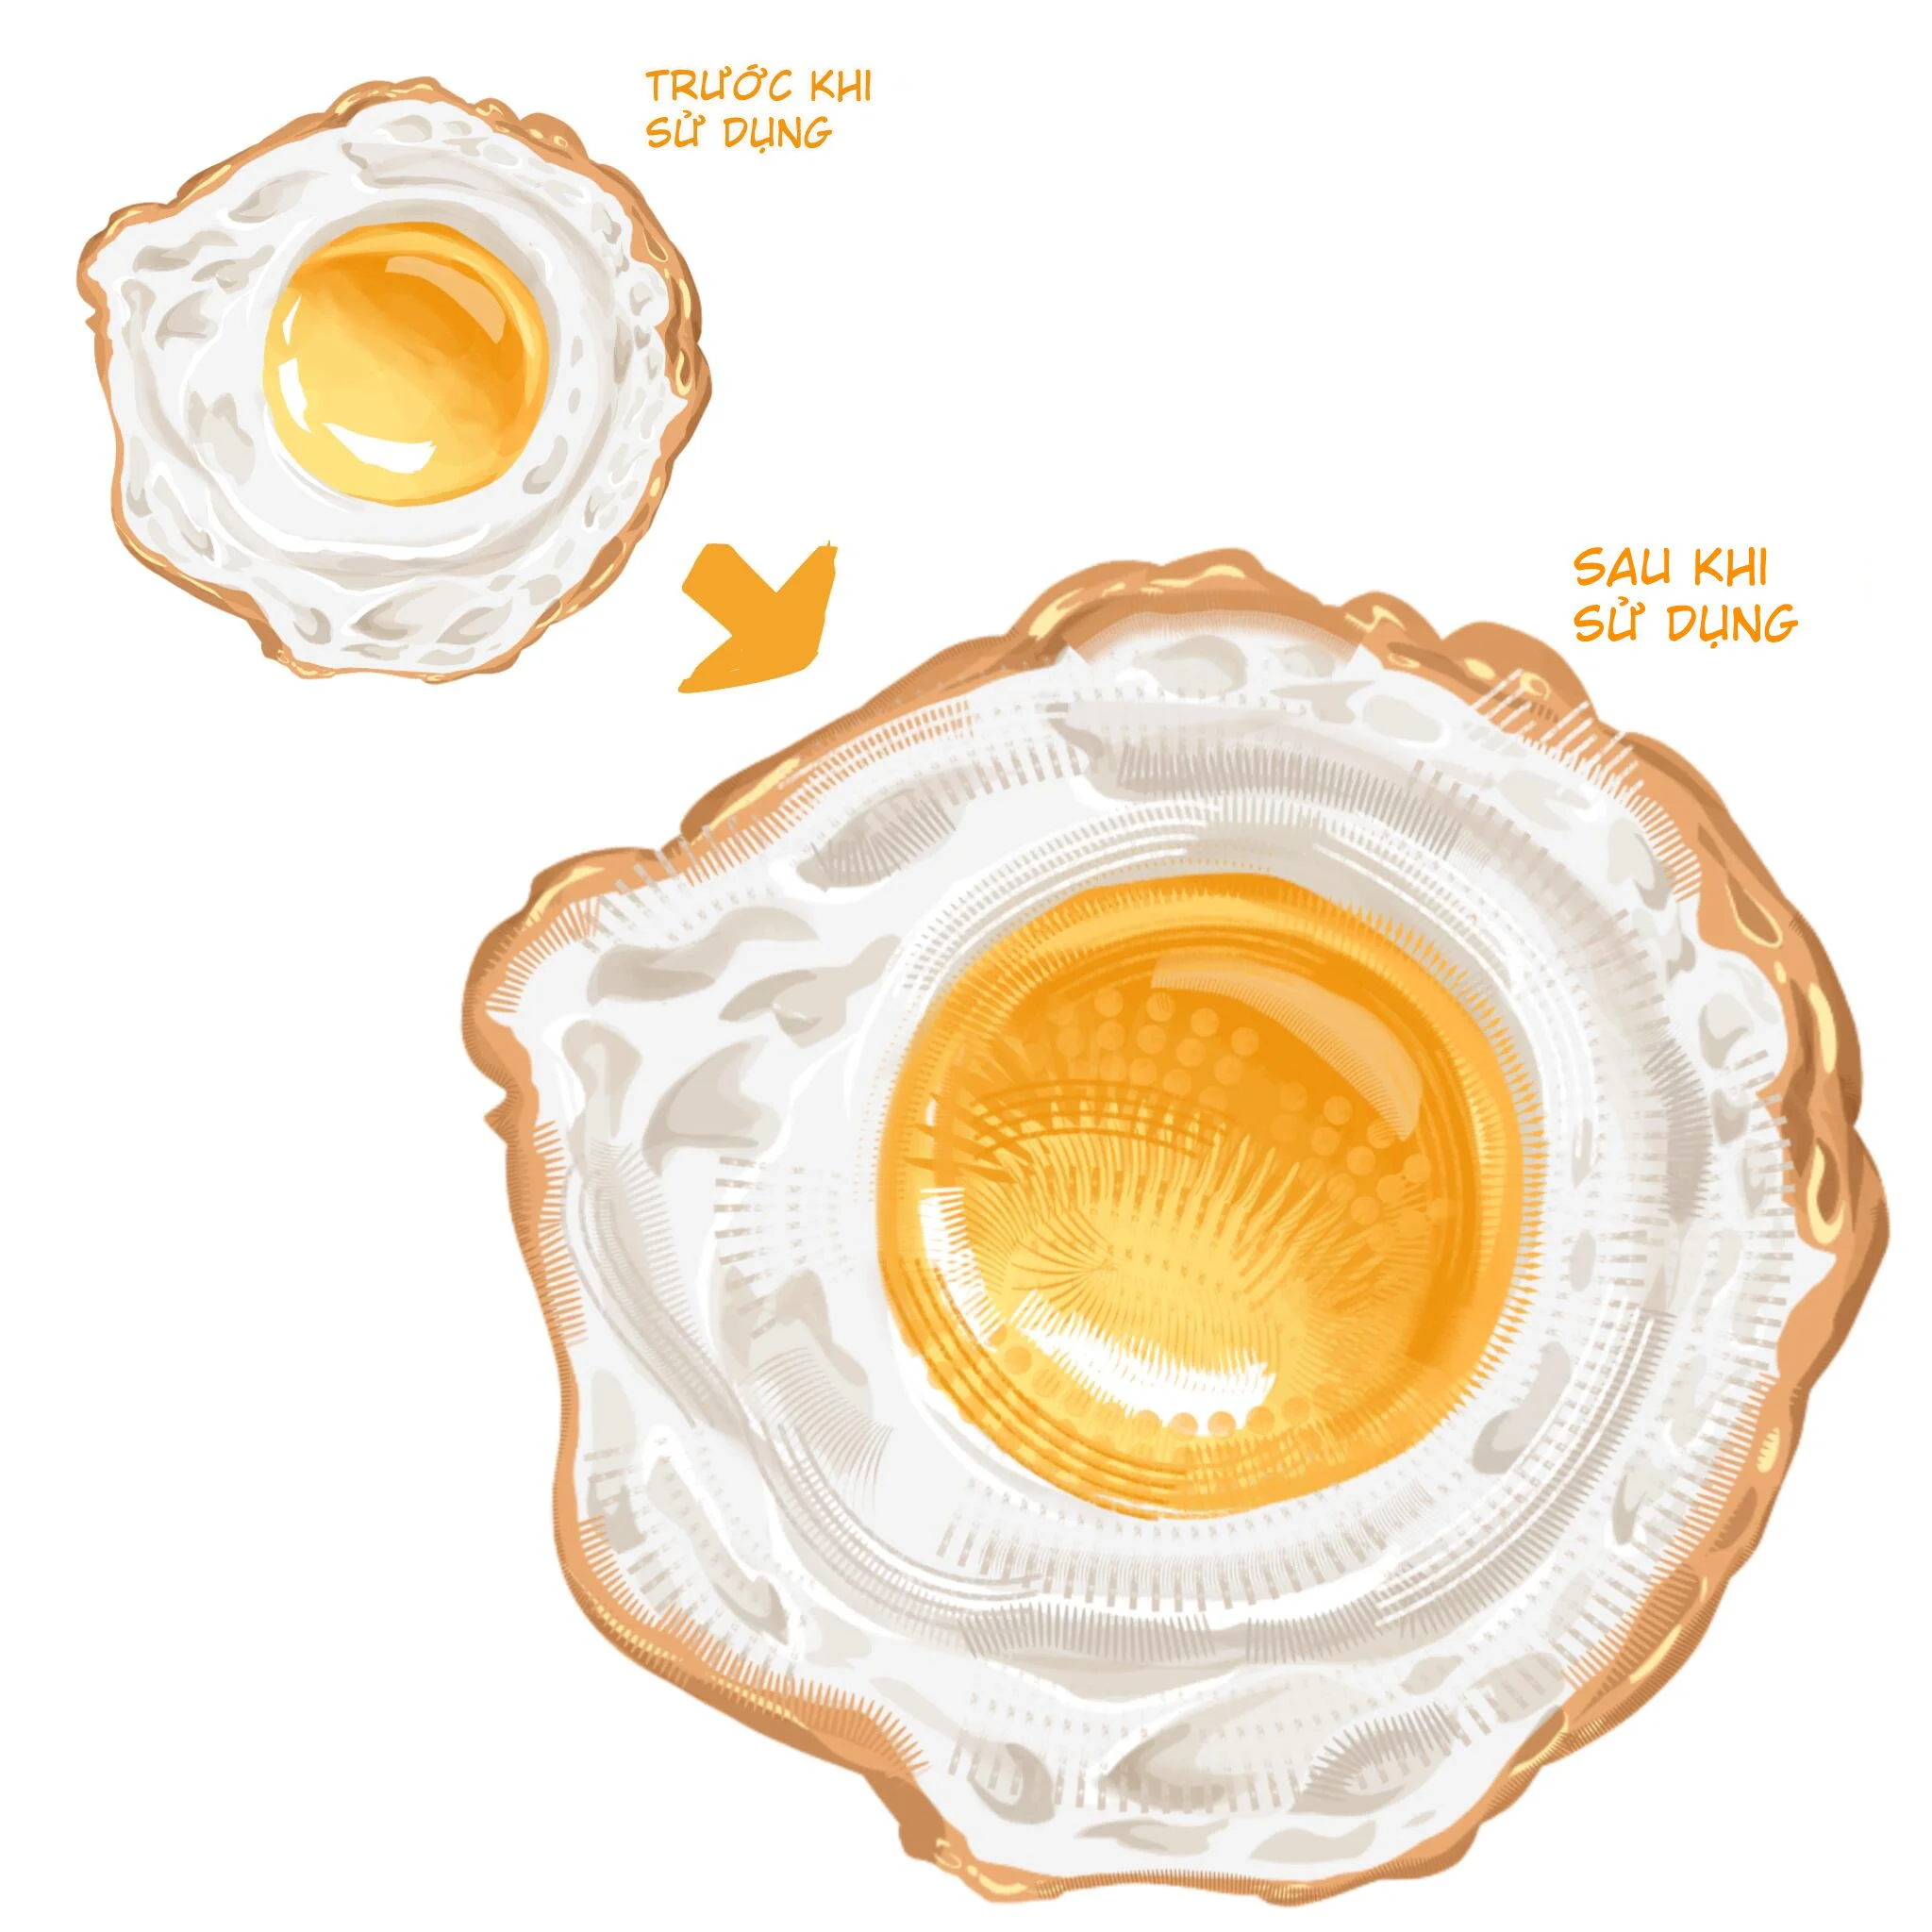
Bộ 48 brush này được tạo ra để làm đúng việc đó: tăng lượng chi tiết trên tranh một cách nhanh, có kiểm soát và dễ ứng dụng. Thay vì để bề mặt trơn lì, bạn có thể thêm hatching để tạo khối, thêm chấm hạt để tạo tram, thêm đường cong để dẫn mắt, thêm texture để phá độ phẳng hoặc dùng các brush hiệu ứng để tăng cảm giác chuyển động và độ hoàn thiện.
Phù hợp cho PS, Procreate và CSP
Bộ brush này phù hợp với nhiều workflow digital art phổ biến hiện nay, đặc biệt là Photoshop, Procreate và Clip Studio Paint. Với Photoshop, brush rất tiện cho artist làm minh họa, concept art, poster, chỉnh texture và xử lý layer hiệu ứng. Với Procreate, bộ cọ phù hợp cho người dùng iPad cần một set brush nhanh gọn để thêm texture và chi tiết trực tiếp trong quá trình vẽ. Với CSP, bộ này đặc biệt hợp với người vẽ manga, comic, webtoon hoặc tranh có nhiều nét gạch, hạt tram và hiệu ứng line.
Nếu bạn đang vẽ bằng nhiều phần mềm khác nhau, bộ brush này có thể trở thành một nhóm công cụ hỗ trợ ở bước hoàn thiện. Bạn có thể dựng hình, tô màu, blend và vẽ khối bằng bộ cọ quen thuộc, sau đó dùng Information Volume để thêm chi tiết, tăng nhịp thị giác và làm tranh bớt trống.
Ứng dụng thực tế trong tranh digital art
Bộ brush này có thể dùng cho rất nhiều loại tranh khác nhau. Với tranh nhân vật, bạn có thể dùng các brush nét gạch để tạo khối cho da, cổ, vai, tóc, trang phục và vùng shadow. Những đường gạch cong hoặc gạch hướng tâm giúp nhấn form cơ thể tốt hơn, đặc biệt ở các vùng cần cảm giác cong, tròn hoặc có chuyển động.
Với tranh đồ ăn, như ví dụ trứng ốp la và ớt chuông trong hình minh họa, brush giúp tăng cảm giác bề mặt rất rõ. Lòng đỏ trứng có thể được làm bóng hơn bằng các lớp chấm, đường cong, gạch sáng và texture mịn. Phần lòng trắng có thể thêm tram nhẹ để tránh bị phẳng. Với ớt chuông, các đường gạch và dot pattern giúp tạo cảm giác căng bóng, mọng nước và có chiều sâu hơn so với bản màu phẳng ban đầu.
Với tranh trang phục và phụ kiện, brush có thể dùng để tạo texture vải, đường lưới, nếp gấp, độ nhám, hoa văn nhỏ hoặc các vùng chuyển chất liệu. Với background, bạn có thể dùng brush pattern để tạo mảng trang trí, hiệu ứng khói bụi, đường tốc độ, lớp hạt mờ hoặc vùng nền giàu chi tiết hơn mà không cần vẽ từng phần thủ công.
Các nhóm brush nổi bật trong bộ 48 cọ
Bộ 48 brush có thể chia thành nhiều nhóm công năng chính. Nhóm đầu tiên là brush nét gạch, bao gồm các nét song song, nét cong, nét hướng tâm, nét đan và nét dạng speedline. Đây là nhóm cực kỳ hữu ích để tạo khối, nhấn hướng sáng, phá mảng màu lớn và làm tranh có cảm giác giống minh họa in ấn hoặc manga.
Nhóm thứ hai là brush tram và hạt, gồm các chấm dot pattern, hạt rải, vùng stipple và những texture dạng lấm tấm. Nhóm này phù hợp để thêm chi tiết cho da, đồ ăn, nền, kim loại, vùng sáng, vùng phản quang hoặc những bề mặt cần cảm giác có hạt. Khi dùng ở opacity thấp, tram giúp tranh có độ thở và bớt “mượt nhựa”.
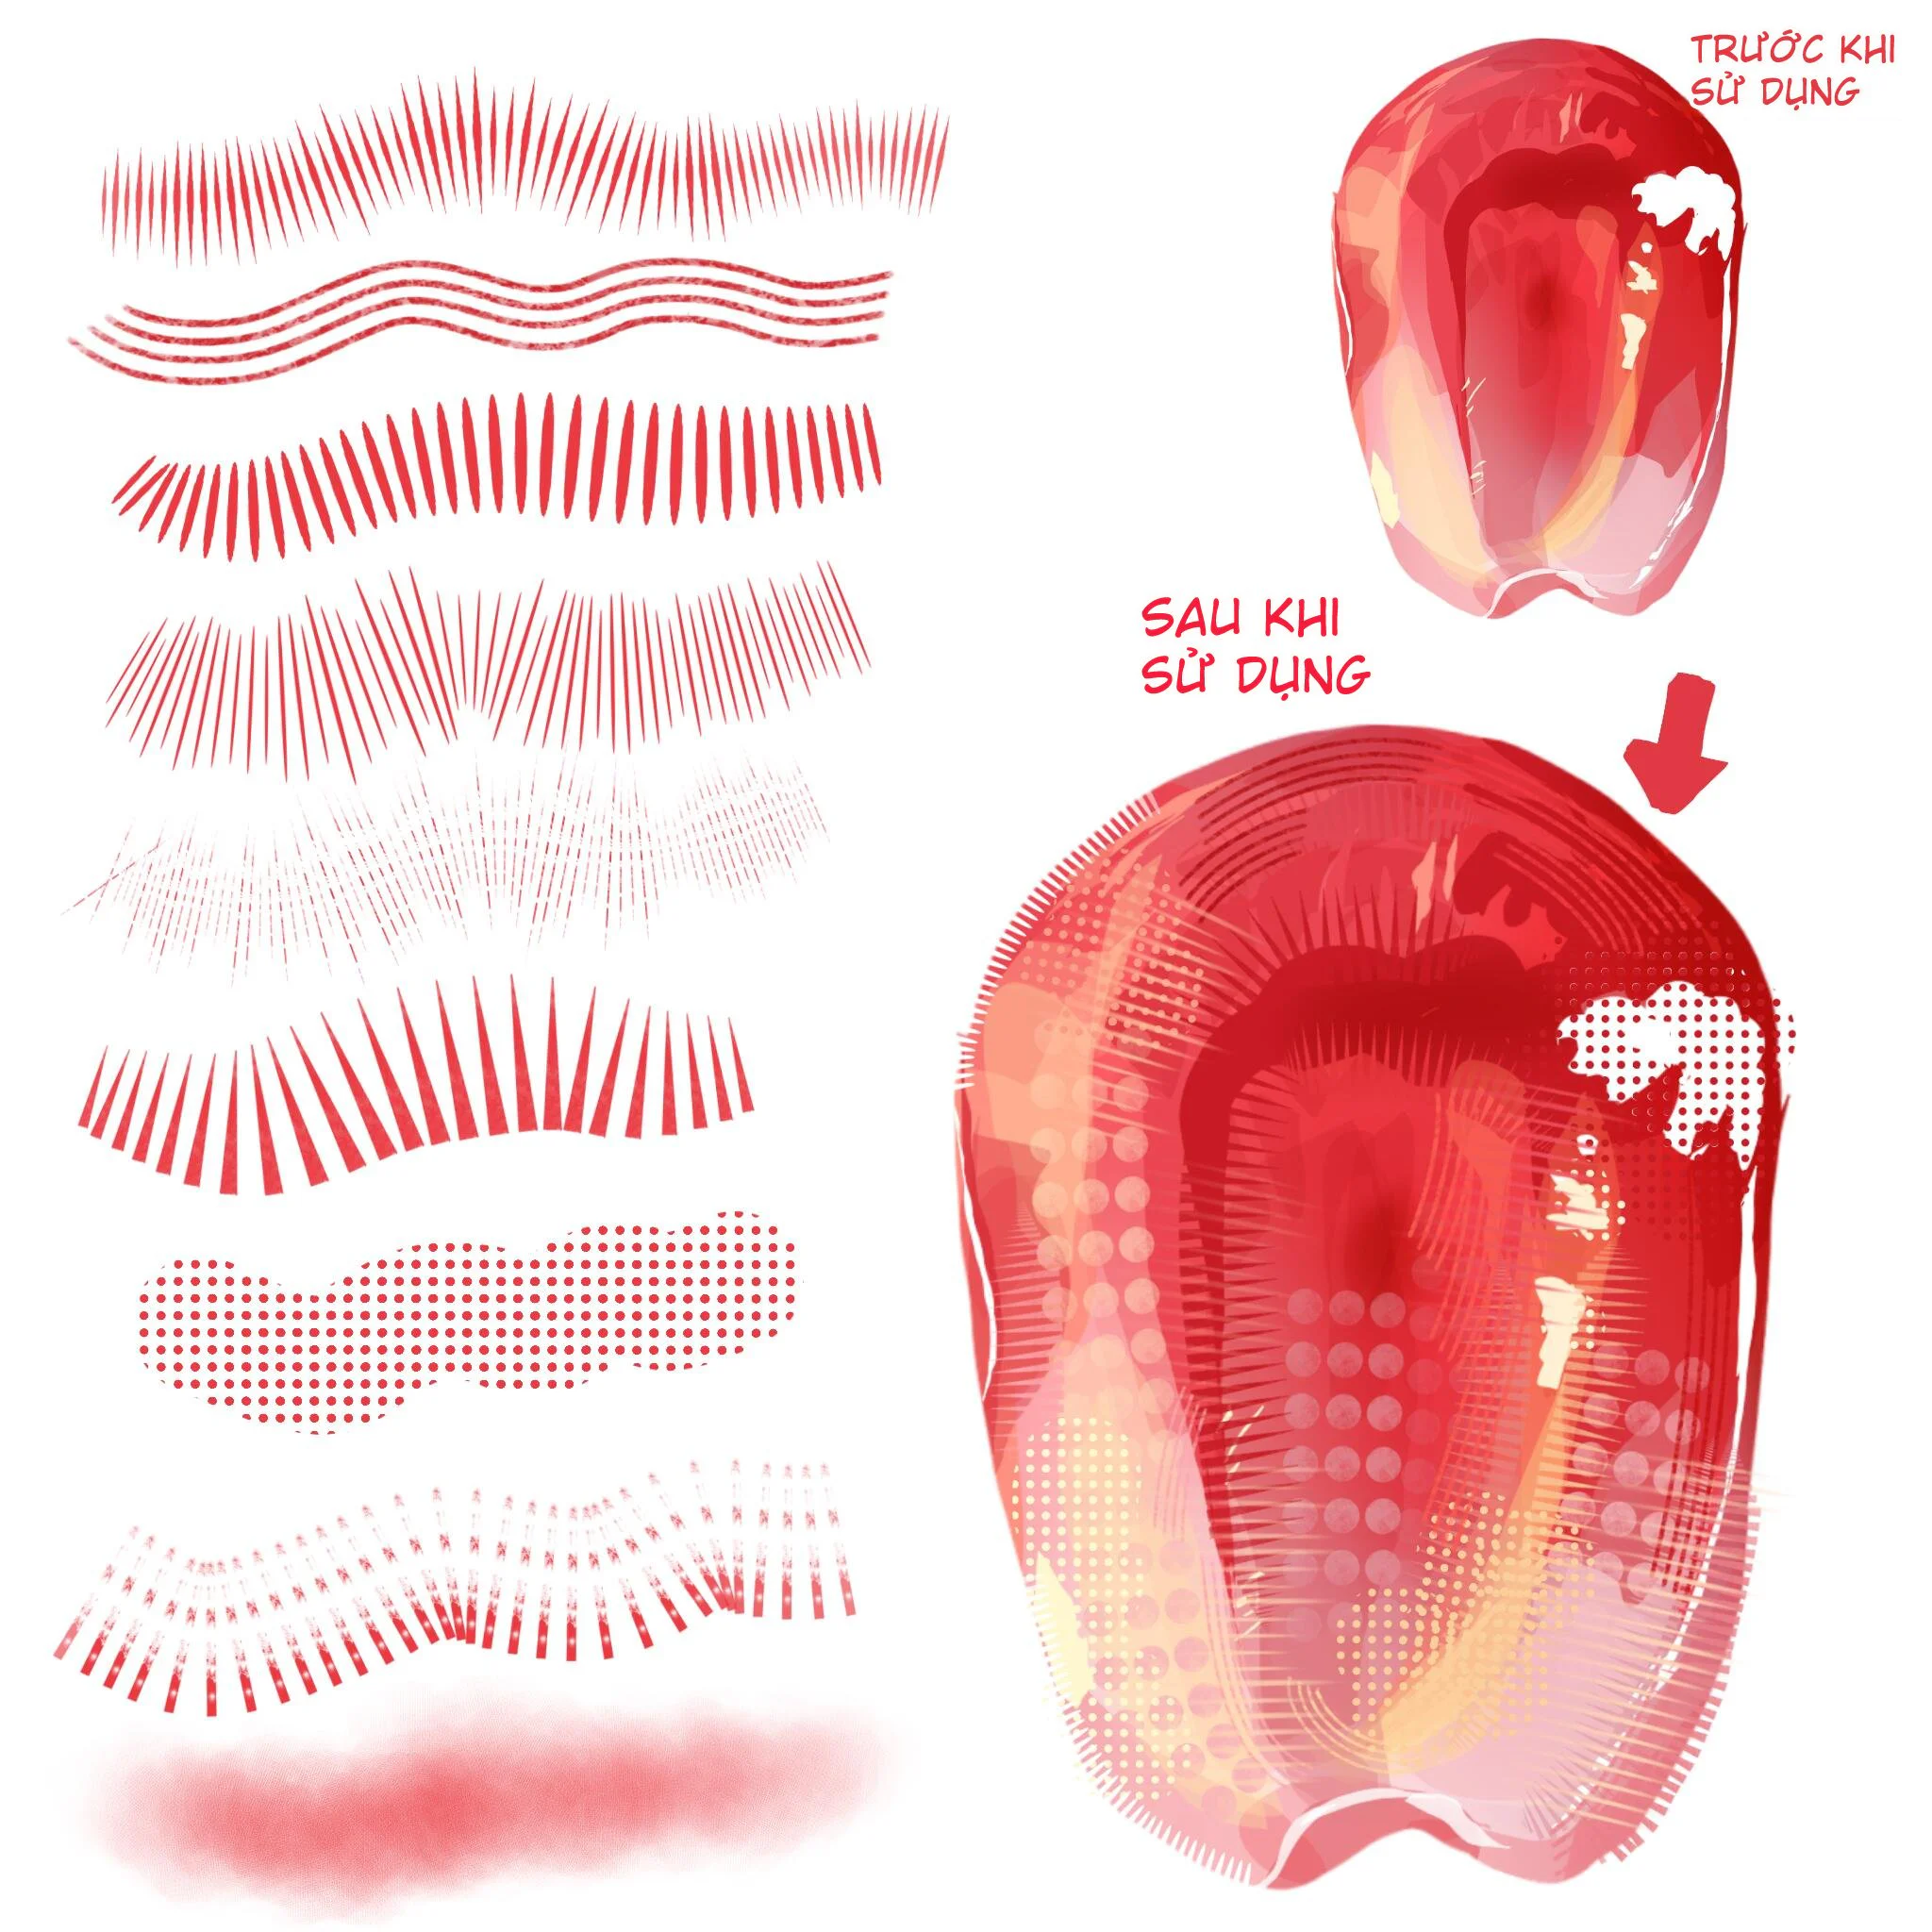
Nhóm thứ ba là brush đường cong và đường chuyển động. Những brush này hợp để dẫn mắt người xem theo form vật thể, tạo cảm giác chuyển động hoặc thêm nhịp thị giác cho bố cục. Khi đặt đúng theo khối, đường cong có thể giúp vật thể trông tròn hơn, sâu hơn và có hướng sáng rõ hơn.
Xem ngay bộ Bộ Sưu Tập 48 Brush "Information Volume" Tạo Chi Tiết & Texture Cực Đỉnh (PS/Procreate/CSP)
Nhóm thứ tư là brush texture và pattern trang trí. Đây là nhóm phù hợp để thêm chi tiết vào background, trang phục, phụ kiện, vùng tối hoặc các mảng cần chất liệu phụ. Nếu dùng khéo, pattern có thể giúp tranh trông phức tạp hơn mà không làm rối bố cục.
Tăng chi tiết mà không làm tranh bị rối
Một trong những vấn đề lớn khi thêm texture là tranh rất dễ bị rối nếu dùng quá nhiều. Bộ brush Information Volume phát huy tốt nhất khi được dùng có chọn lọc. Bạn không cần phủ brush lên toàn bộ tranh. Thay vào đó, hãy đặt chi tiết ở những vùng cần thu hút mắt, vùng đang bị trống hoặc vùng cần làm rõ chất liệu.
Ví dụ, khi vẽ khuôn mặt hoặc cơ thể, chỉ nên thêm hatching nhẹ ở vùng shadow, dưới cằm, cổ, vai hoặc viền ngoài form. Khi vẽ đồ ăn, nên thêm dot pattern ở vùng highlight, vùng bóng đổ hoặc phần bề mặt cần cảm giác mọng. Khi vẽ trang phục, nên đặt texture theo hướng nếp vải thay vì quét ngẫu nhiên. Cách này giúp tranh có nhiều thông tin hơn nhưng vẫn giữ được sự sạch sẽ.
Gợi ý workflow sử dụng
Ở bước đầu, bạn nên hoàn thiện bố cục, màu nền và khối lớn trước. Brush Information Volume không nên thay thế bước dựng hình hoặc tô màu cơ bản. Sau khi tranh đã có form rõ ràng, hãy dùng brush nét gạch để tăng khối ở các vùng cần nhấn. Tiếp theo, dùng brush hạt hoặc tram để thêm texture nhẹ ở vùng chuyển màu. Cuối cùng, dùng brush line, pattern hoặc speedline để tạo điểm nhấn thị giác.
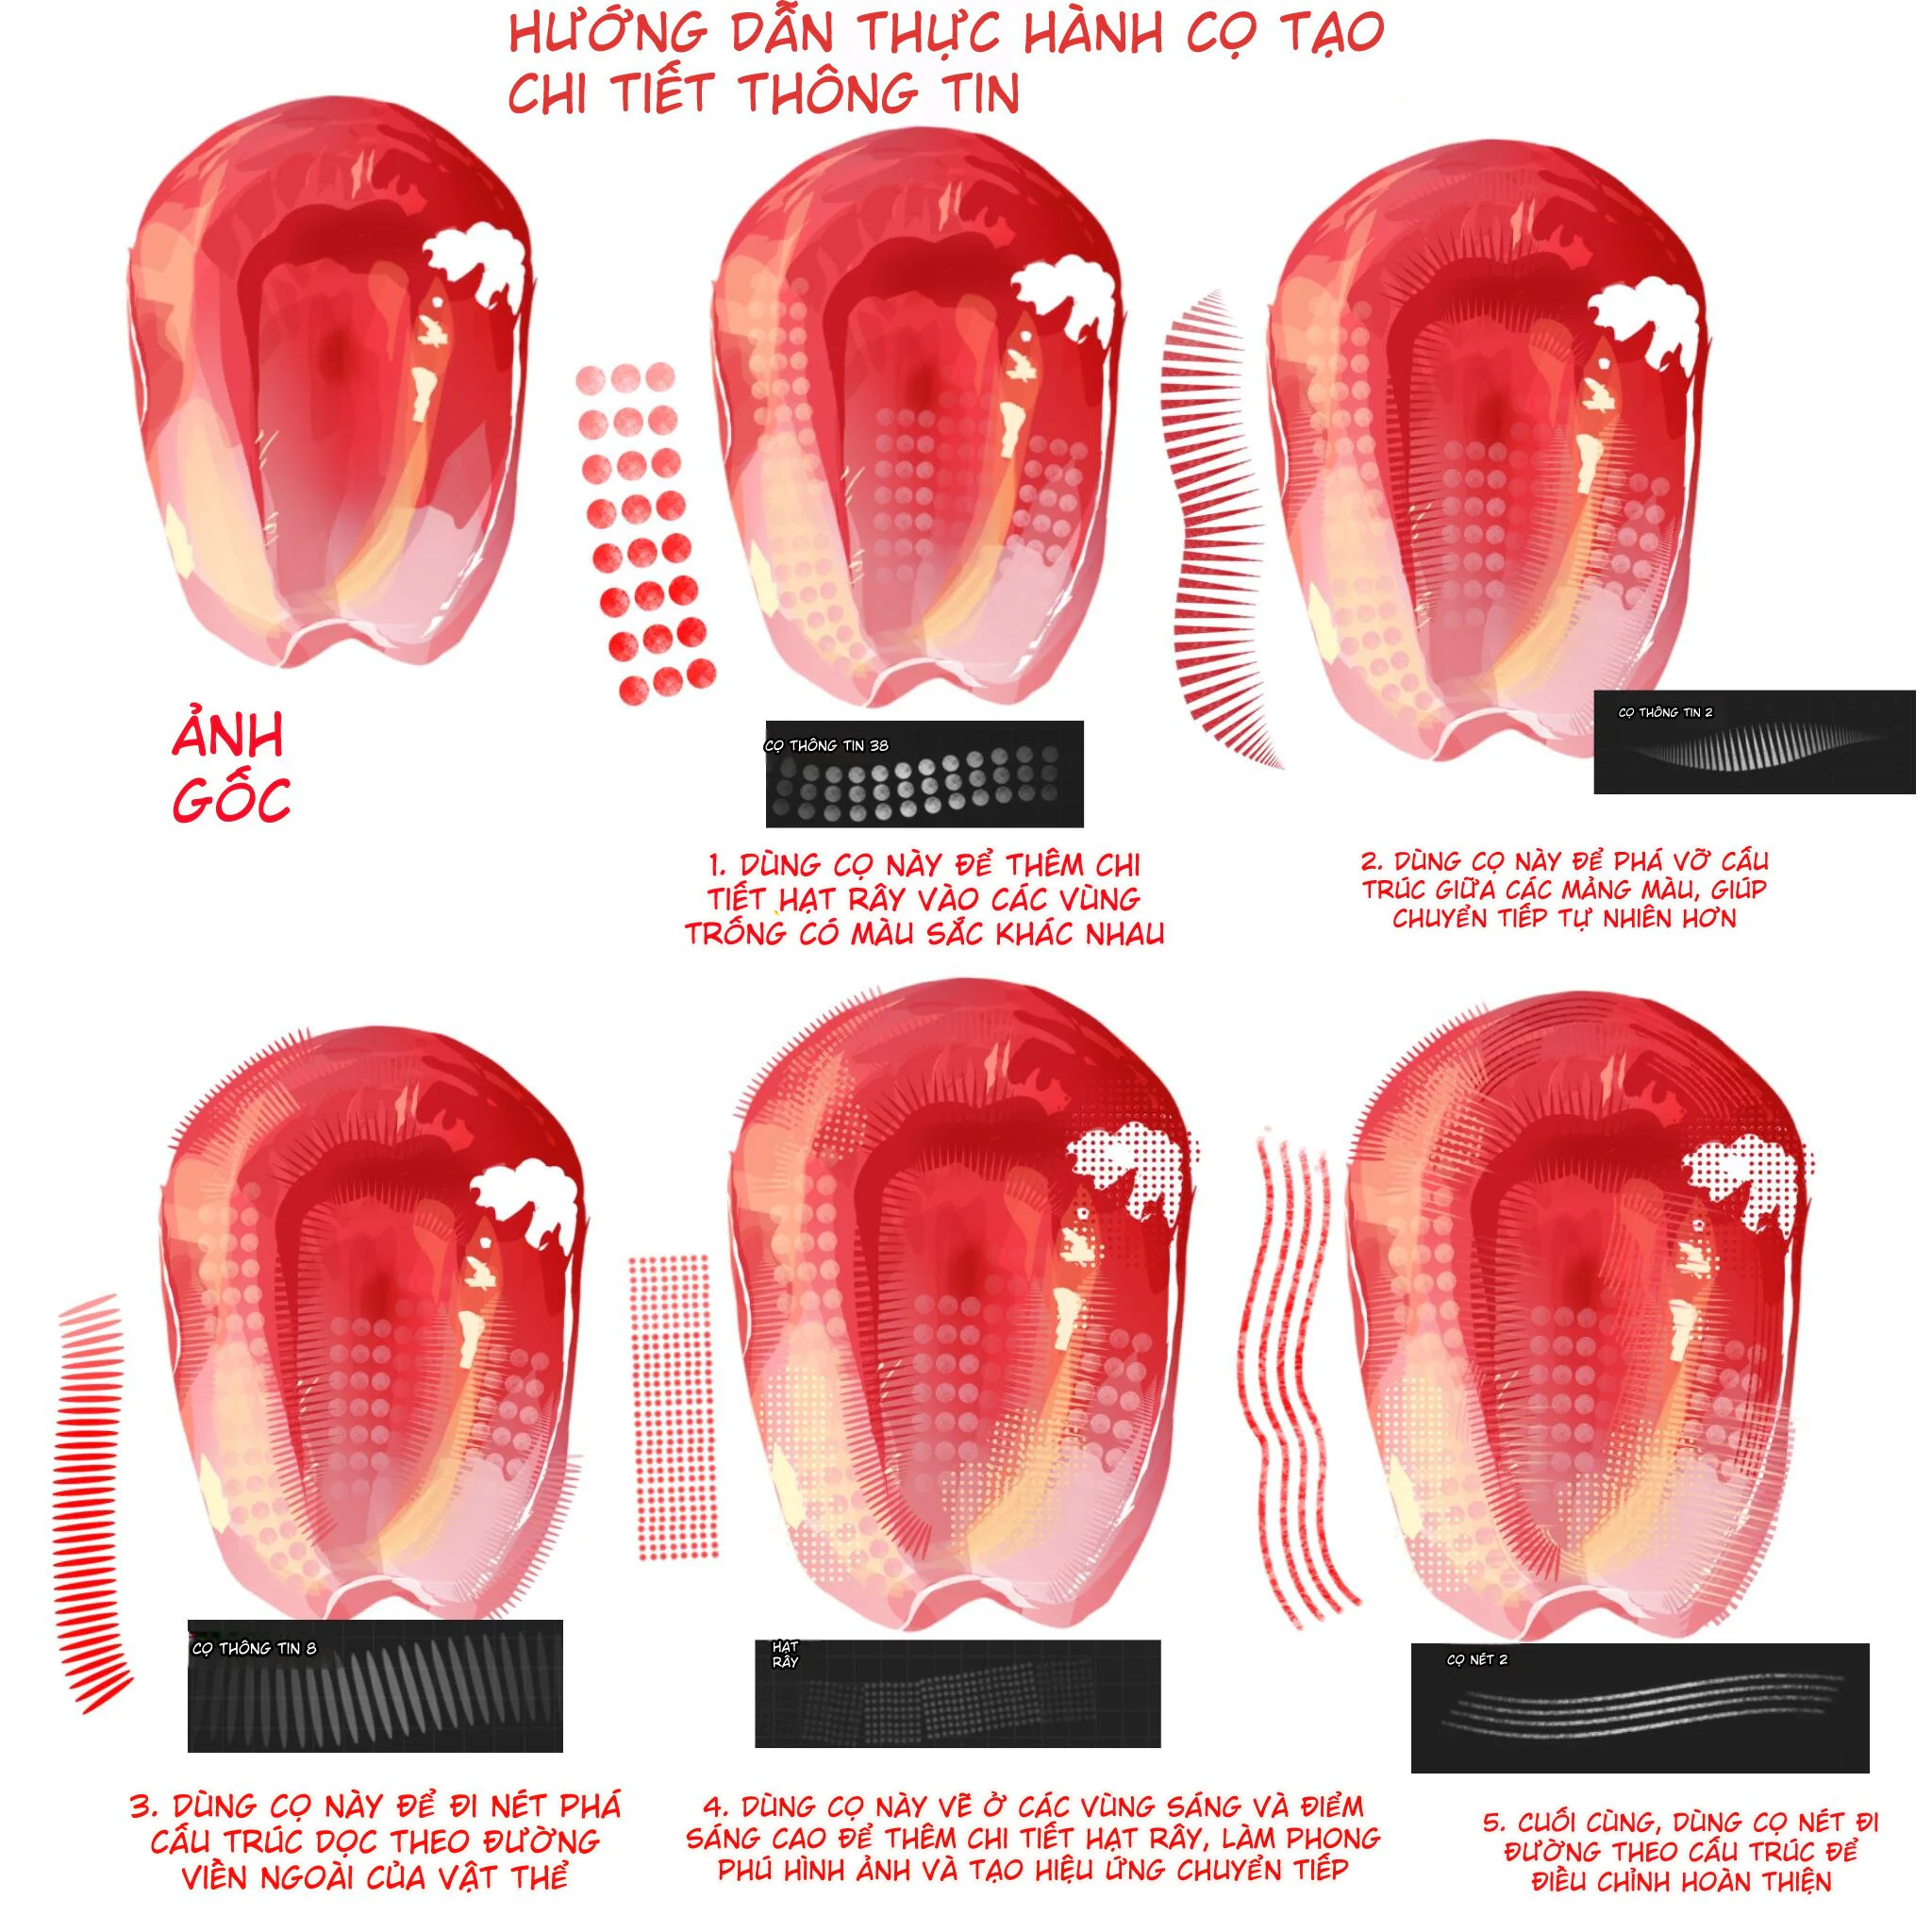
Với tranh nhân vật, hãy bắt đầu từ các vùng ít rủi ro như tóc, trang phục, nền và phụ kiện trước. Khi đã quen tay, bạn có thể dùng brush lên da hoặc khuôn mặt nhưng cần giữ opacity thấp để không làm bẩn màu. Với tranh đồ ăn hoặc vật thể, có thể mạnh tay hơn ở vùng texture vì bề mặt đồ vật thường chịu được nhiều chi tiết hơn da người.
Một mẹo quan trọng là luôn đặt brush texture trên layer riêng. Làm như vậy bạn có thể giảm opacity, đổi màu, mask bớt hoặc xoá vùng thừa mà không phá lớp màu chính. Nếu chi tiết quá gắt, hãy giảm opacity hoặc đổi layer mode phù hợp. Nếu chi tiết bị chìm, hãy tăng contrast nhẹ hoặc dùng màu sáng/tối rõ hơn theo vùng sáng tối của tranh.
Bộ brush này hợp với ai?
Bộ 48 Brush Information Volume rất hợp với người học digital art đang muốn nâng tranh từ mức “đã tô màu xong” lên mức “có chi tiết và có chất liệu”. Nếu bạn thường cảm thấy tranh của mình trống, phẳng, thiếu texture hoặc thiếu cảm giác hoàn thiện, đây là set brush rất đáng thử.
Bộ này cũng phù hợp với artist vẽ manga, comic, webtoon, anime, semi-real, concept art, minh họa đồ ăn, poster nhân vật và tranh có nhiều bề mặt cần xử lý. Đặc biệt, những ai thích phong cách hatching, tram, engraving, manga screen tone hoặc texture in ấn sẽ dùng được bộ này rất thường xuyên.
Lợi ích nổi bật khi sử dụng
Bộ brush giúp tiết kiệm thời gian khi tạo các lớp chi tiết nhỏ, nhất là những chi tiết dạng lặp như đường gạch, chấm hạt, đường cong, texture và pattern. Thay vì vẽ từng nét thủ công, bạn có thể dùng brush để tạo mảng trước, sau đó chỉnh lại bằng mask hoặc eraser cho phù hợp với form.
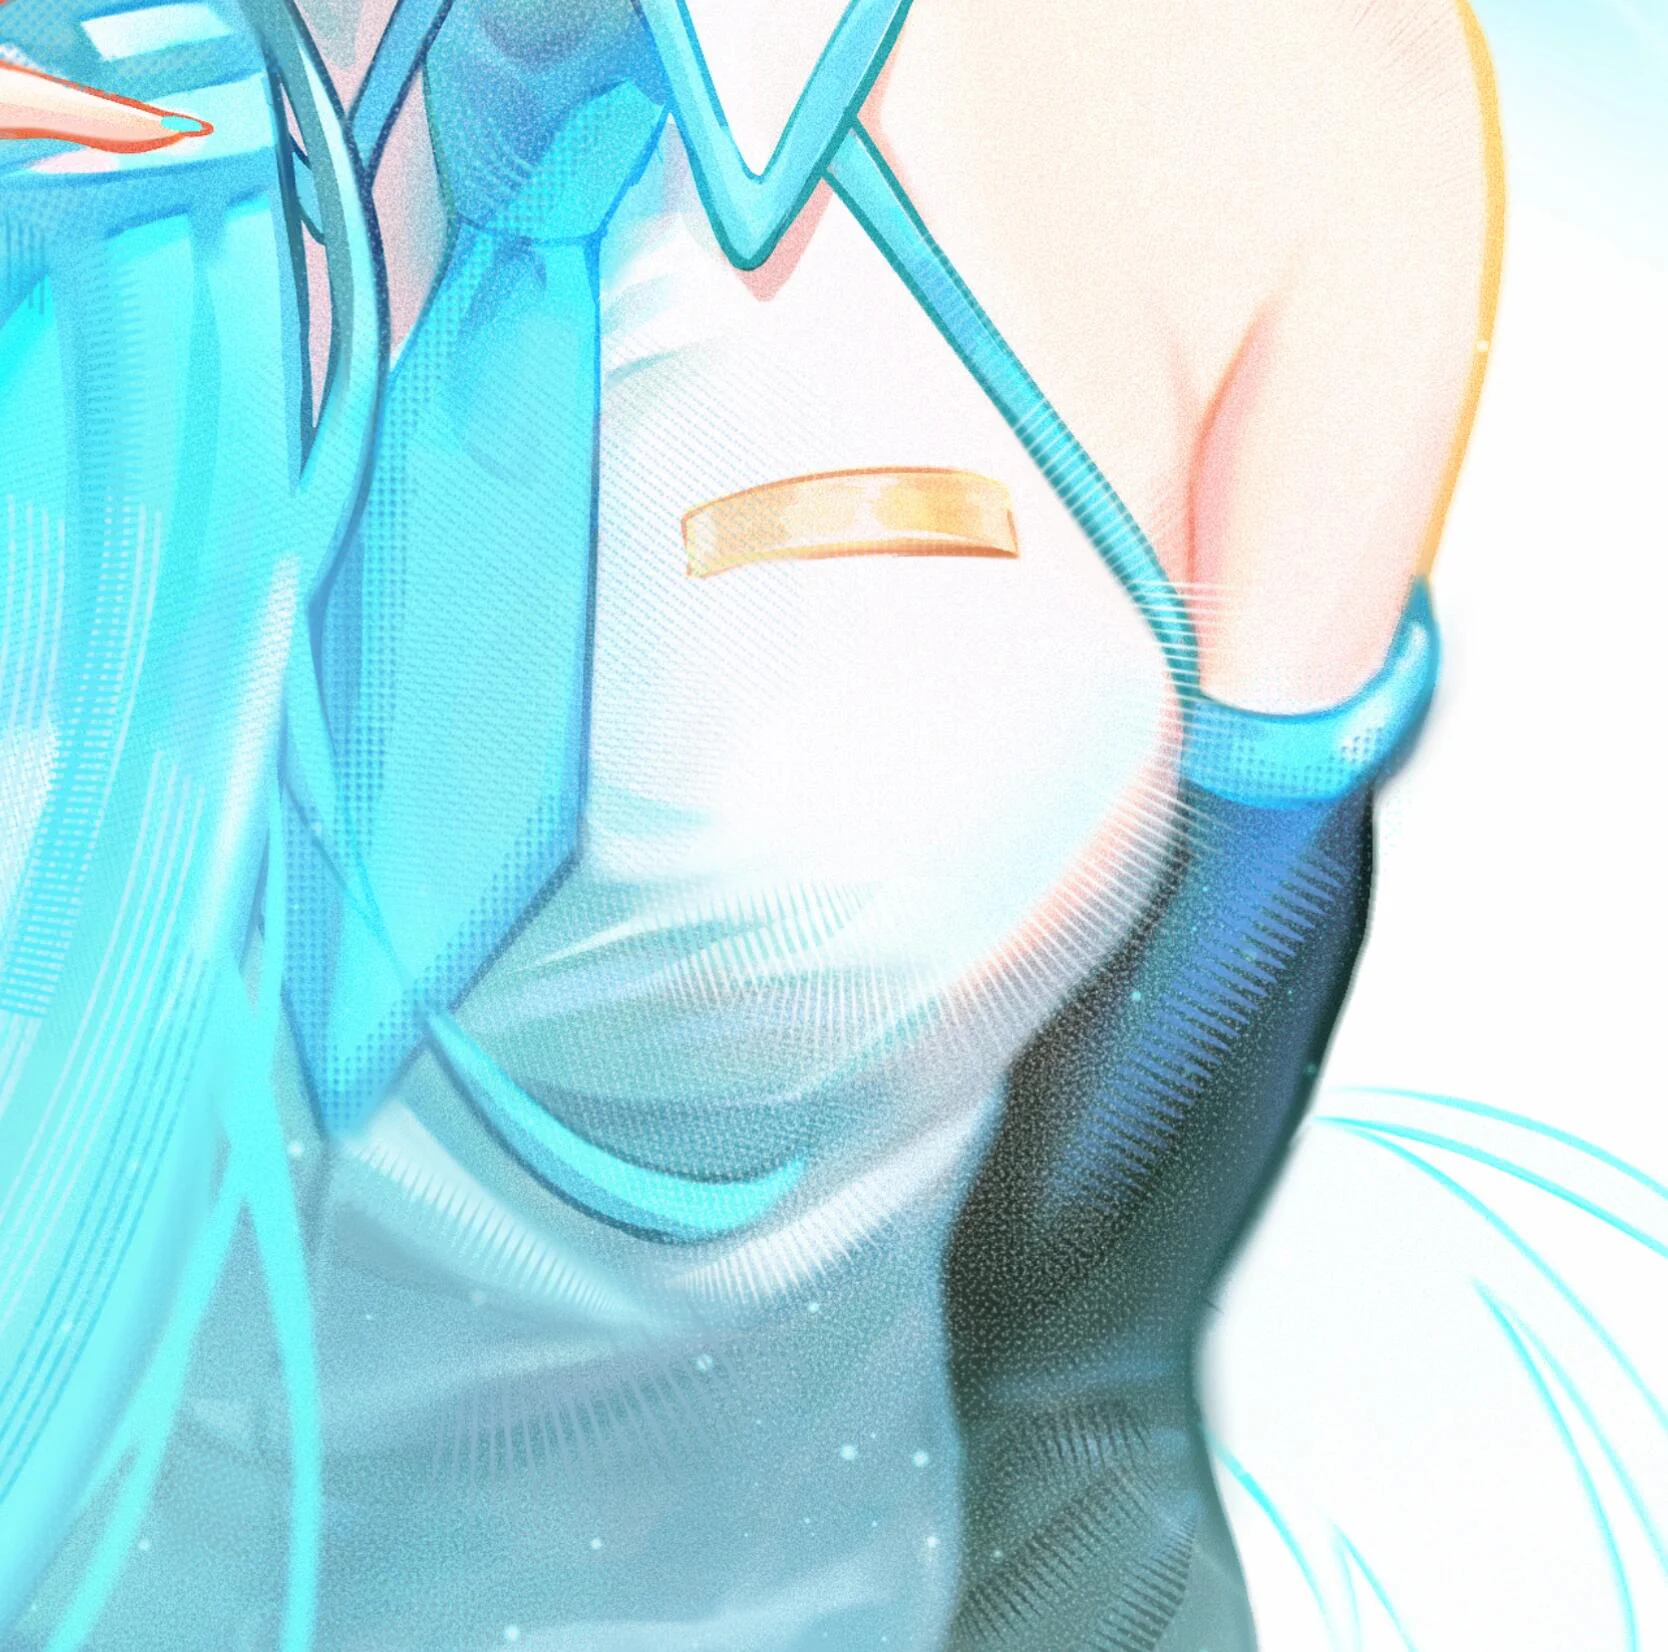
Bộ cọ cũng giúp tranh có chiều sâu hơn vì nó bổ sung thêm lớp thông tin thị giác lên trên nền màu. Những vùng vốn phẳng có thể trở nên giàu texture hơn, vùng shadow có thể có cấu trúc hơn, vùng highlight có thể lấp lánh và bắt mắt hơn. Khi dùng đúng mức, tranh sẽ nhìn chuyên nghiệp hơn mà vẫn giữ được phong cách riêng của artist.
Lưu ý khi dùng brush Information Volume
Không nên lạm dụng brush trên mọi vùng tranh. Nếu chỗ nào cũng có texture, tranh sẽ mất điểm nghỉ và người xem không biết nên nhìn vào đâu. Hãy giữ những vùng quan trọng cần sạch, nhất là mặt nhân vật, mắt, vùng highlight chính hoặc các vùng cần cảm giác mềm. Texture nên đóng vai trò hỗ trợ, không nên lấn át hình khối và màu sắc.
Ngoài ra, hãy chú ý hướng của brush. Với các nét gạch và đường cong, nếu đặt sai hướng form, vật thể có thể bị méo hoặc mất khối. Hãy đi brush theo bề mặt vật thể: theo độ cong của trứng, theo khối của cơ thể, theo hướng nếp vải, theo chiều tóc hoặc theo đường dẫn ánh sáng. Khi brush đi đúng hướng, chi tiết sẽ hòa vào tranh tự nhiên hơn.
Thông tin sản phẩm
Tên sản phẩm: Bộ Sưu Tập 48 Brush Information Volume Tạo Chi Tiết Và Texture
Số lượng: 48 brush
Loại tài nguyên: Brush digital art
Phần mềm áp dụng: Photoshop, Procreate, Clip Studio Paint
Phong cách: Manga, comic, anime, semi-real, digital painting, minh họa texture
Nhóm cọ chính: Nét gạch, hatching, tram, dot pattern, texture, speedline, đường cong, pattern trang trí, hiệu ứng bề mặt
Ứng dụng: Tạo chi tiết, tăng texture, dựng khối, phá mảng phẳng, làm giàu bề mặt, trang trí background, xử lý đồ ăn, trang phục, da, tóc và vật thể
Phù hợp cho: Digital artist, illustrator, comic artist, manga artist, người học vẽ Procreate, Photoshop, CSP
Nền tảng đăng tải: nextgz.net
Kết luận
Bộ Sưu Tập 48 Brush Information Volume là một set cọ rất hữu ích cho những ai muốn tranh digital art có thêm chiều sâu, texture và độ hoàn thiện. Bộ brush này không chỉ tạo hiệu ứng trang trí đơn thuần, mà hỗ trợ trực tiếp vào quá trình tăng thông tin thị giác cho tranh: từ nét gạch tạo khối, hạt tram, dot pattern, texture bề mặt cho đến các đường chuyển động và pattern phụ trợ.
Nếu bạn đang vẽ manga, comic, anime, semi-real, minh họa đồ ăn, tranh nhân vật hoặc các tác phẩm cần nhiều chi tiết nhỏ, đây là một bộ brush rất đáng đưa vào workflow. Chỉ cần dùng đúng chỗ, đúng lượng và đặt theo form vật thể, bộ cọ này có thể giúp tranh bớt phẳng, giàu chất liệu hơn và nhìn hoàn thiện hơn rõ rệt.
FAQ
Bộ 48 Brush Information Volume dùng để làm gì?
Bộ brush này dùng để tăng chi tiết và texture cho tranh digital art, bao gồm hatching, tram, dot pattern, đường cong, speedline, hiệu ứng bề mặt và các lớp thông tin thị giác giúp tranh có chiều sâu hơn.
Bộ brush này có phù hợp cho Procreate không?
Có. Bộ brush phù hợp với Procreate, đặc biệt hữu ích cho người dùng iPad muốn thêm texture, hatching, tram và chi tiết bề mặt trong quá trình vẽ.
Bộ brush này có dùng được cho Photoshop không?
Có. Bộ brush phù hợp cho Photoshop, hỗ trợ tốt trong minh họa, concept art, xử lý texture, tạo pattern và hoàn thiện tranh digital painting.
Bộ brush này có dùng được cho Clip Studio Paint không?
Có. Bộ brush rất hợp với CSP, nhất là khi vẽ manga, comic, webtoon hoặc các tranh cần nhiều nét gạch, hạt tram và hiệu ứng truyện tranh.
Information Volume trong vẽ là gì?
Information Volume có thể hiểu là lượng thông tin thị giác trong tranh. Khi thêm texture, hatching, tram, pattern và chi tiết nhỏ đúng cách, tranh sẽ bớt phẳng và có cảm giác hoàn thiện hơn.
Người mới học vẽ có nên dùng bộ brush này không?
Có, nhưng nên dùng ở bước hoàn thiện sau khi đã có màu và khối cơ bản. Người mới không nên phủ texture quá nhiều, mà nên dùng nhẹ ở vùng shadow, background, trang phục hoặc vật thể cần thêm chi tiết.
Brush hatching dùng để làm gì?
Brush hatching dùng để tạo các nét gạch đổ bóng, dựng khối, nhấn hướng sáng và làm rõ bề mặt vật thể. Đây là nhóm cọ rất hữu ích trong manga, comic và minh họa phong cách khắc nét.
Brush tram và dot pattern dùng khi nào?
Brush tram và dot pattern dùng để thêm hạt, tạo texture nhẹ, phá mảng màu phẳng, làm hiệu ứng in ấn hoặc tăng cảm giác bề mặt cho da, đồ ăn, nền, ánh sáng và shadow.
Có nên dùng brush texture trên toàn bộ tranh không?
Không nên. Brush texture nên dùng có chọn lọc ở vùng cần tăng chi tiết. Nếu dùng quá nhiều, tranh sẽ bị rối và mất điểm nhìn.
Bộ brush này phù hợp với phong cách nào nhất?
Bộ brush phù hợp với manga, comic, anime, semi-real, digital painting, tranh đồ ăn, minh họa nhân vật, concept art và các tranh cần tăng chi tiết bề mặt.
Article categories
Đánh giá bài viết
More from author
 Digital Art
Photoshop Select and Mask Cho Digital Artist: Tách Tóc, Refine Edge Và Layer Mask Không Phá Hủy
Astra + Blender + Godot: Dựng Ship 3D Không MCP Và Biến Failure Log Thành “Skill”
 Game Development
Asset Studio: Pipeline AI Local Tạo Asset 3D Game-Ready Trong Khoảng 11 Phút Trên RTX 5090
 Godot
Godot

Bình luận
0 bình luận
Đăng nhập để tham gia thảo luận cùng cộng đồng!
Đăng nhập ngayĐang tải bình luận...