Comparison of Learning Methods for Sketching Street Scenes and How to Choose a Direction
 Free
Free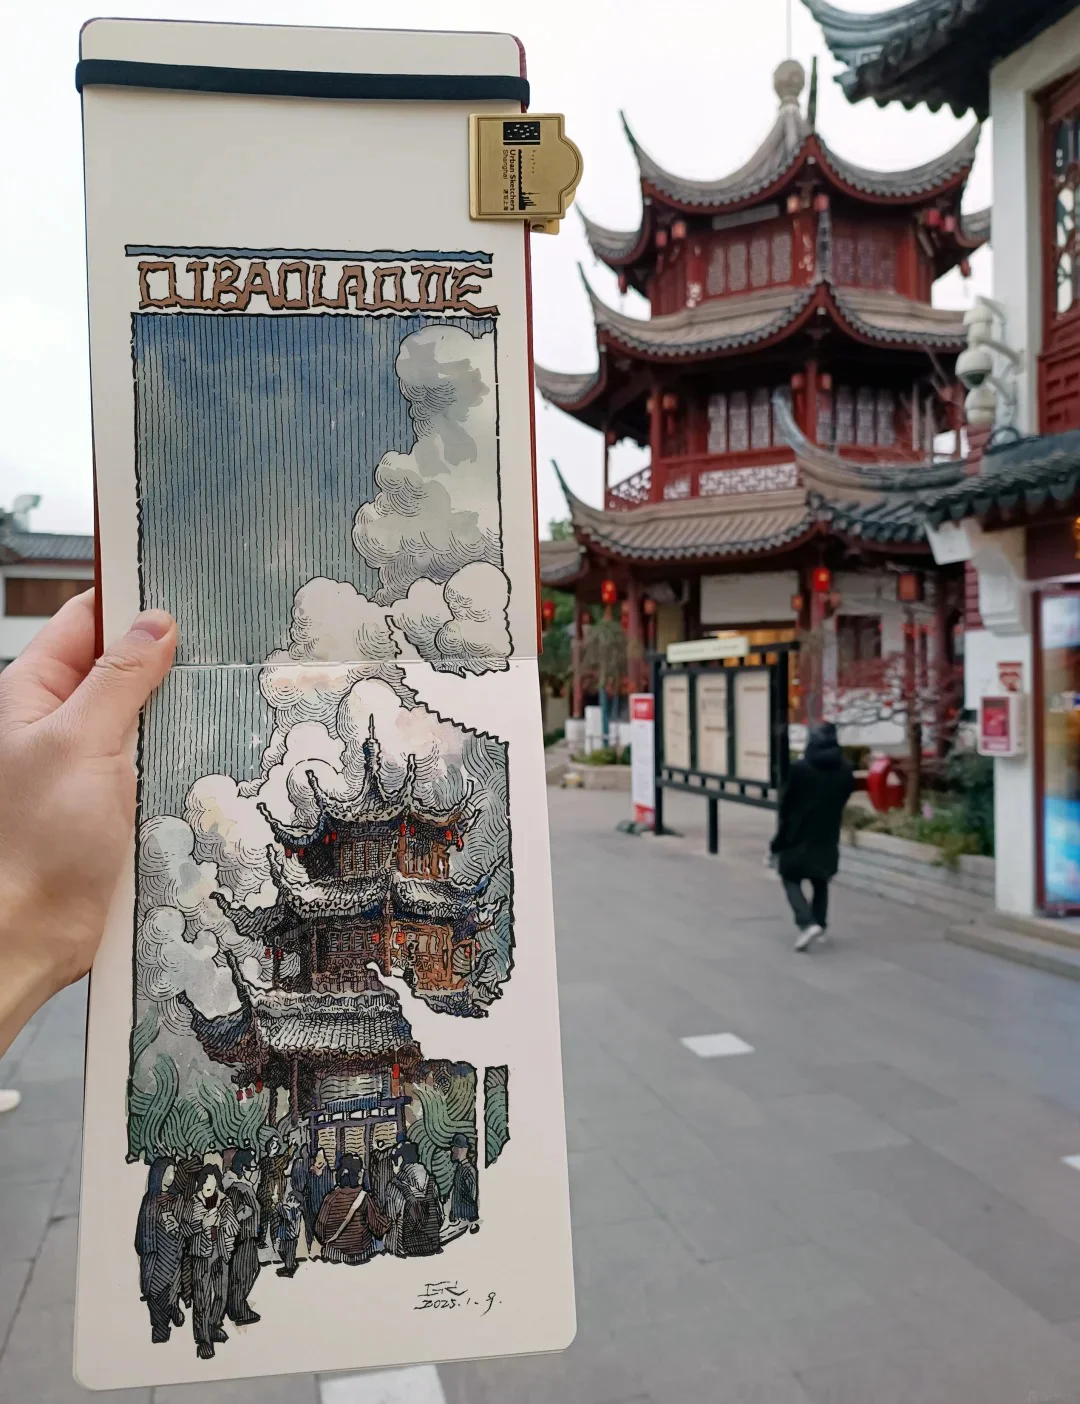
1. Define your learning goals: If you want to quickly grasp techniques and reduce the pressure of details, prioritize the minimalist method. This approach helps you naturally focus on proportion and space.
2. Choose learning resources: You can self-study through detailed A-to-Z guides, which are very suitable for beginners. Additionally, studying the styles of artists like Jeffrey T. Larson will broaden your creative vision.
3. Compare tools: Traditional drawing on paper helps you feel the materials and refine basic strokes. Meanwhile, digital tools like ibis Paint X with rulers and diverse brushes effectively support outdoor sketching.
4. Practice composition: Whichever method you choose, the key factor is selecting an impressive viewpoint and harmoniously dividing the space. Practice observation to make the composition naturally engaging. 5. Be persistent and flexible: By combining both free and structured approaches, you will develop your own style. Don't be afraid to experiment and continuously adjust.
The concept of sketching and its difference from detailed drawing
Sketching is a method of quickly recording visual impressions, focusing on overall composition and atmosphere rather than precise details. According to A-to-Z guides for beginners, this is an interesting and accessible art form. Conversely, detailed drawing requires meticulously reproducing every element such as texture, light, and proportion, often intended for finished works.
The main difference is shown through four aspects:
Goal: Sketching captures a moment; detailed drawing aims for completeness.
Time: A sketch usually takes only 5–15 minutes, while detailed drawing can take hours.
Technique: Sketching uses free, suggestive lines; detailed drawing requires high precision and complex shading techniques.
Level of detail: Sketching simplifies to avoid clutter, while detailed drawing shows every minute detail.
For example, when sketching a corner of Hanoi's Old Quarter, you only need a few brushstrokes to suggest the rhythm of life; but to draw the same scene in detail, you must spend at least 2 hours measuring proportions, accurately constructing each brick, and handling light. Thus, sketching is an ideal tool for quick recording and training observation, while detailed drawing suits those pursuing refinement.
Benefits of Street Scene Sketching
The benefits of street scene sketching go beyond just practicing technique; it is an artistic practice that helps you connect deeply with your surroundings, develop observational thinking, and authentically capture everyday moments. When you regularly practice Tips for Street Scene Sketching, you will notice clear positive changes in your creative process.
Below are the outstanding benefits summarized from practice:
Develop observation skills and visual memory: Drawing outdoors forces you to quickly grasp elements like light, shadows, proportions, and movement. After a few weeks, your ability to remember scene details improves significantly, helping you recreate a street corner with just a few sketch lines.
Record personal stories and emotions: Each sketch is a slice of life – from street vendors to ancient architecture. Many artists see this as a travel diary, vividly preserving memories of places visited. Le Thiet Cuong is an example with his minimalist style, focusing on the spirit of urban life.
Reduce stress and nurture creativity: Outdoor drawing brings a sense of relaxation, stimulating spatial and color thinking. Experimenting with new perspectives helps you break out of ruts, thereby inspiring all other art genres.
Build a solid technical foundation: Street sketching trains core principles like one-point perspective, proportion, and the use of quick lines, laying the groundwork for more detailed drawing.
A typical case is artist Jeffrey T. Larson, who often spends 15–20 minutes on each pen and watercolor street corner sketch. This method not only helps him capture urban life but also proves that regular practice significantly enhances observation skills and drawing speed. Thus, applying it correctly will help you progress quickly, while making sketching an indispensable part of your artistic journey.
Developing observation skills and visual memory
Street scene sketching is an excellent exercise for developing observation skills and visual memory. When you sit down at a street corner, you are forced to observe the overall scene, from spatial composition to small elements like people, trees, or architectural details. [E1] emphasizes focusing on natural elements and space, helping the drawer concentrate intensely. Observation skills are not just about seeing, but also analyzing and selecting: what is the focal point, what is the negative space, what is the proportion between objects. [E5] believes a harmonious sketch needs a beautiful viewpoint and reasonable space division, requiring you to observe from multiple angles before putting pen to paper. This process trains visual memory, as you often have to capture a fleeting moment, then recreate it on paper. To support this, you can practice by:
Choosing a familiar street corner and drawing quickly in 10 minutes, without using an eraser, forcing yourself to remember the main lines.
Focusing on proportions and light and dark areas instead of fussy details, as suggested by the minimalist style of many artists [E4].
Real-life example: When drawing a small café, you don't need to count every brick, but remember the shape of the awning, the characteristic tables and chairs, and the direction of the shadows. This makes the picture lively and trains your ability to grasp the essence of the scene. Gradually, you will find yourself more perceptive of the world around you, turning every walk into a unique visual diary.
Capturing everyday moments and stories
Drawing street scene sketches is not just about recording images, but also a way to preserve fleeting stories of urban life. Each quick stroke on a peaceful street corner can convey a sense of relaxation and spark unlimited creativity [E1]. By focusing on light-dark contrast and spatial composition, the drawer can truthfully narrate daily life [E2]. For example, when you sketch a sidewalk café in the morning, you capture not only the image but also the story of the busy vendor, the sunlight filtering through the leaves, and the distant honking. To do this:
Choose a scene with typical activities like a small market, a walkway, or street vendors.
Use quick lines, omitting unnecessary details to capture the dynamic moment.
Combine small written notes to add emotion or sound. Sketching is a bridge between observation and storytelling, helping you master composition and perspective naturally [E3]. With minimal detail, even beginners can easily practice and develop their ability to notice things around them [E4]. Thus, each sketch becomes a vivid diary page, marking the simple fragments of the city.
Essential Tools for Street Scene Sketching
To start street scene sketching, you don't need to invest too much; a few core tools are enough to quickly capture urban moments. Tools that are too poor can make practice frustrating, as ArcLine Academy emphasizes. Below is a list of essential tools:
Paper: Choose an A5–A6 sketchbook, smooth paper with a weight of 200 gsm to handle ink and diluted watercolor.
Pencil: Use 2H or HB for quick sketching, light lines easy to correct.
Pen: Technical pen 0.1–0.5 mm with pigment ink that doesn't smudge when wet.
Colors: Travel watercolor set of 6–12 colors, or gray markers (C1–C7) for quick shading. White gel pen for highlights on dark backgrounds.
Accessories: Lightweight clipboard with strap, pen case.
For example, when sketching a street corner with a café, you sketch the composition in pencil, outline the main lines in ink, then use markers for shading before applying light watercolor for the trees and signboards. This approach helps you train your observational eye while recording the street's story without needing too much equipment. Good tools don't replace skill, but choosing the right ones will maintain interest and support steady progress.
_1_想画就画Lin_来自小红书网页版.jpg)
Paper, pencils, pens: Choosing the right type
Choosing the right paper, pencils, and pens is the foundation for the street scene sketching experience. Beginners should focus on a minimal tool set: HB, 2B, 4B pencils for sketching and creating blocks, combined with a brush pen or marker for strong and flexible lines, along with high-weight paper from 160gsm upwards to prevent smudging and bleeding.
Specific choices:
Pencils: HB for light lines, 2B for main sketching, 4B for dark accents and shading. ArcLine Academy advises against buying a full set; practicing hand pressure control is the core.
Pens: Brush pen creates flexible thick and thin lines, ideal for trees and shadows; markers suitable for quick drawing of structures; white gel pen for highlights on dark backgrounds.
Paper: Sketch paper 120–200gsm, slightly rough surface for better pencil and ink grip. Avoid paper that is too thin, as it tears easily and doesn't hold lines well.
An important note: good tools don't replace skill, but tools that are too poor will cause frustration and discouragement, as ArcLine Academy pointed out. For example, when sketching a corner of Hanoi's Old Quarter, you use a 2B pencil to sketch the composition, a brush pen for the roof tile lines, and a white gel pen for wall highlights. Investing in the right tools allows for smooth drawing without discouragement.
Digital drawing applications for outdoor sketching
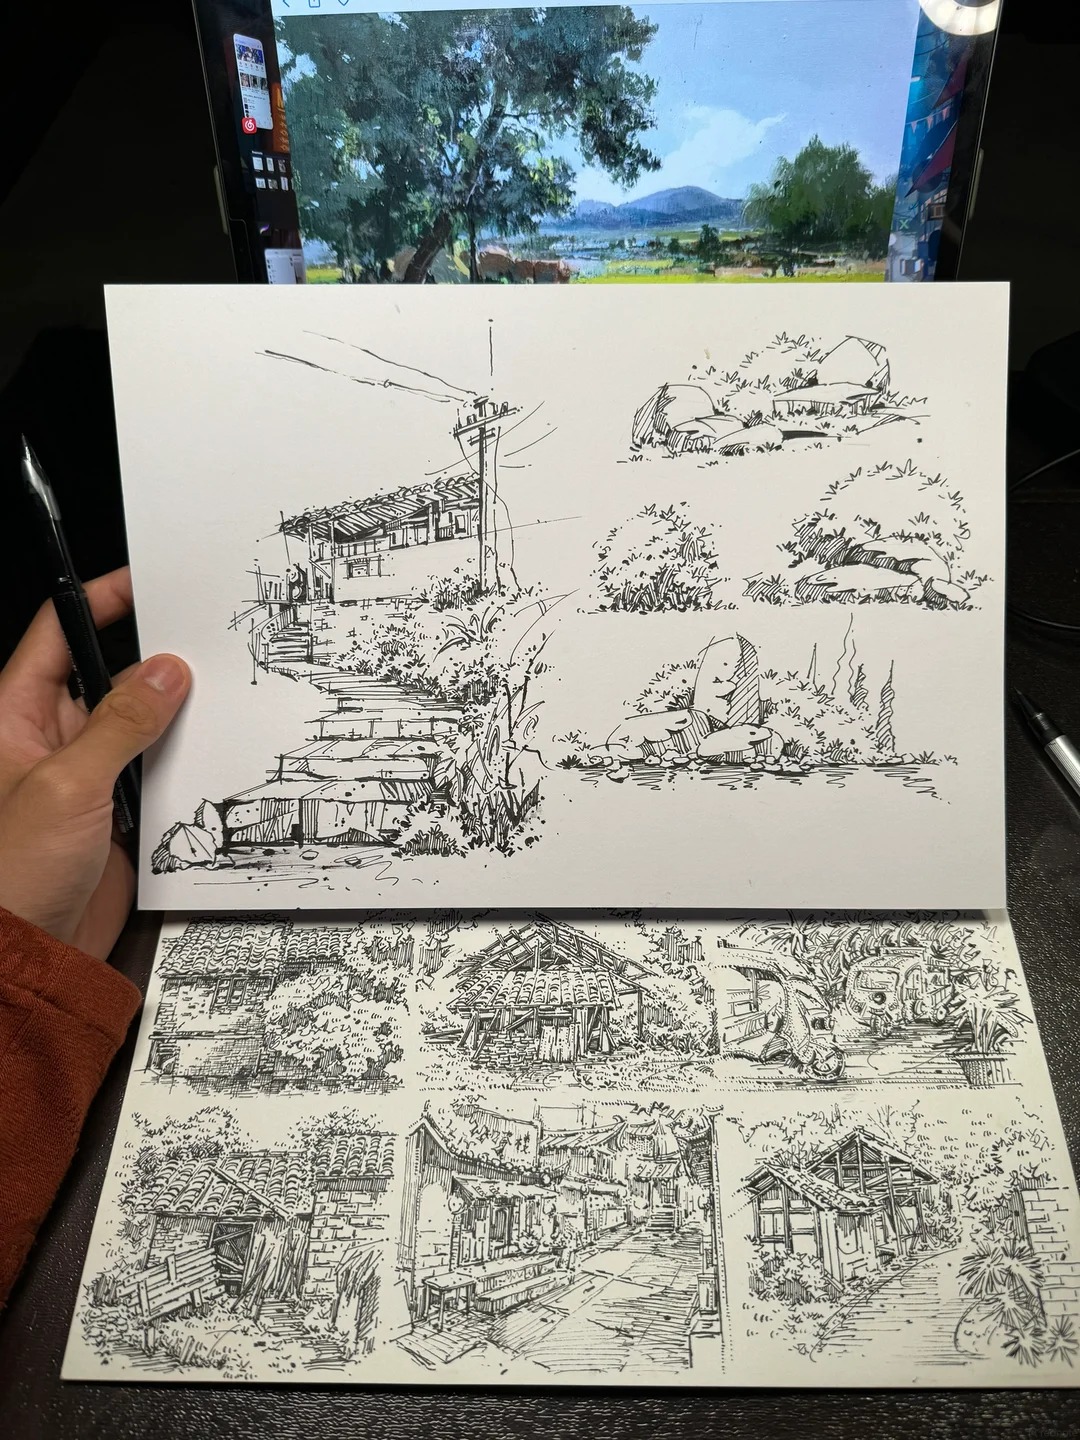
Nowadays, digital drawing applications like Procreate, Sketchbook, or Adobe Fresco open a new approach to outdoor sketching, especially for street scenes. However, the core principles remain unchanged: good tools don't replace skill (E3), and digital is just another medium. Drawing on a tablet offers many practical advantages:
The ability to undo and adjust flexibly allows the drawer to experiment with composition without fear of mistakes.
A rich library of colors and brushes effectively simulates traditional media like pens and markers (E4) without needing to carry bulky tools.
Layers allow separating lines, color blocks, and light, facilitating a visual balance between positive and negative space, light and dark colors.
A typical example is artist Pascal Campion (E2), who regularly creates digital street corner sketches rich in storytelling and cinematic light, proving that technology can capture lively street moments just as well as traditional methods. Most importantly, whether choosing a real pen or a stylus, the drawer must focus on observation and emotion to create authentic works.

Step-by-Step Guide to Sketching a Street Corner
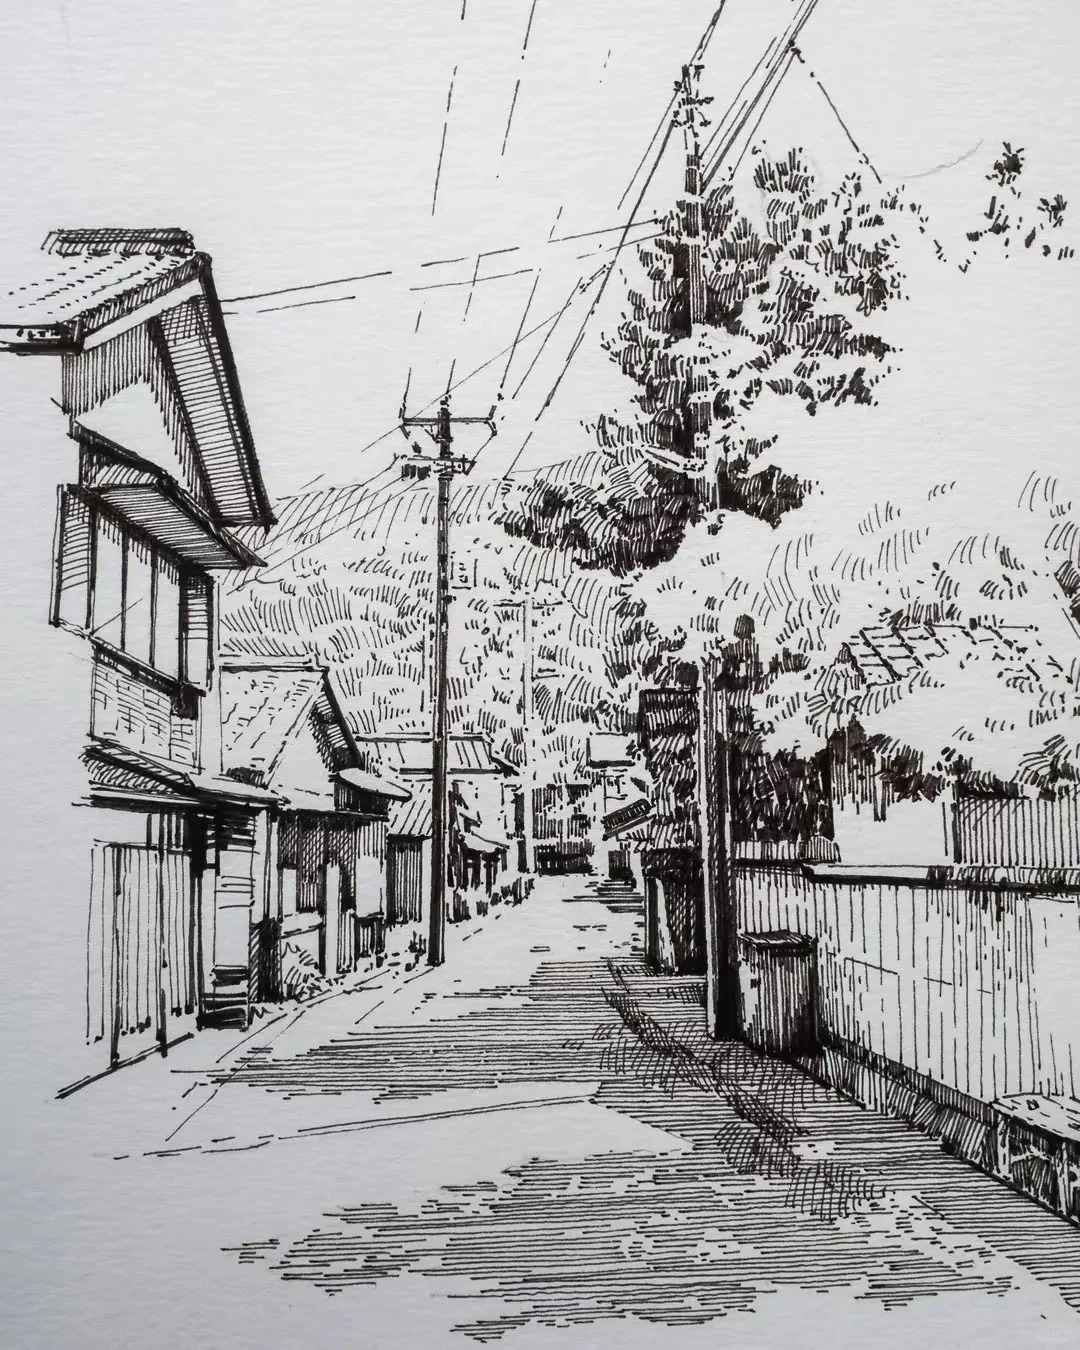
Choose a viewpoint: Observe a street corner, pay attention to the division between positive space (buildings, trees) and negative space (sky, sidewalk) for a balanced, engaging composition. This creates depth and avoids clutter.
Sketch the overall composition: Use a soft pencil (2B-4B), quickly draw large areas with simple lines. Focus only on the main shapes of houses, roads, trees; ignore small details. Minimalism helps beginners practice easily and gradually improve skills.
Create volume and light-dark contrast: Determine the light source (e.g., sun from the left), use ink or dark pencil to shade areas away from light. Harmonize light and dark areas to create spatial volume. Refer to how masters like Jeffrey T. Larson or Pascal Campion handle contrast in street corner sketches.
Add detailed focal points: After establishing volume, choose to draw a few characteristic details carefully (signboards, windows, people's shadows). Use colored markers or white gel pens for highlights on dark backgrounds, making the picture lively and giving the eye a place to rest.
Regular practice will help you improve speed and the ability to capture the spirit of the scene.

Step 3: Basic volume creation and shading
Creating volume and basic shading gives a street scene sketch depth and realism by simulating light and shadow in a minimalist way. This process focuses on the three-dimensional structure of objects, from buildings to trees, using hatching or block shading techniques.
Identify the main light source (usually the sun at a 45-degree angle) and the direction of illumination. Mark the direction with a small arrow on the paper.
Draw basic volumes for main objects: houses as boxes, tree trunks as cylinders, tree canopies as flattened spheres. Add light lines to indicate volume.
Draw cast shadows on the ground and adjacent walls based on the light direction. Elongated shadows must follow the overall perspective.
Create core shadows on the objects themselves by darkening the areas away from the light. Leave a faint reflected light area.
Use cross-hatching to increase tonal transitions, especially in the transition zones between light and dark, maintaining high contrast for the foreground.
Advanced Tips from Professional Artists
Professional artists have summarized many advanced tips to make street scene sketches lively and emotionally rich. They focus on choosing impressive viewpoints, skillfully handling light, and simplifying composition to capture the soul of the city. Below are techniques applied by masters like Jeffrey T. Larson or Pascal Campion:
Choose a strong composition and viewpoint: Before drawing, observe carefully to find a scene with a clear structure, harmoniously dividing space between the main subject and secondary elements. A good composition will guide the viewer's eye and create depth even with rough strokes.
Use light and shadow to create emotion: Light is a key element that gives a sketch soul. Artists often identify the main light source, then build dark areas to highlight the focal point. Pascal Campion is famous for using light-dark contrast to evoke a romantic street atmosphere.
Simplify details, keep lines confident: Don't get bogged down in every brick or branch. Use large color blocks and free brushstrokes to capture the spirit of the scene. Fabian Perez often omits fussy details, focusing on posture and movement.
Combine quick notes: Jot down feelings about the weather, sounds, or colors next to the drawing, turning the sketch into a lively artistic diary.
Regularly practicing these tips will help you elevate your sketching from mere recording to emotionally rich artwork.
How to choose an impressive viewpoint and frame
To get an impressive viewpoint and frame for street scene sketching, you need to combine real-world observation with compositional principles. Here are steps to help you choose effectively:
Identify the main subject and use the rule of thirds to divide the space. Choose a viewpoint where the horizon line is at the upper or lower third of the frame, avoiding the center which can feel static.
Create a frame with your hands or a viewfinder to adjust the 3:4 ratio. Frame so that elements like streets and buildings lead the viewer's eye into the center of the drawing, utilizing positive and negative space for balance.
Refer to the styles of famous sketch artists like Jeffrey T. Larson and Fabian Perez to learn how to create emotionally rich viewpoints. Observe how they handle light, shadow, and the connection between objects in the urban scene.
Pay attention to actual lighting conditions: prioritize early morning or late afternoon when shadows are long, creating depth and strong contrast for the viewpoint.
If you want to experiment, choose a high-angle or eye-level viewpoint to change perspective and bring novelty to the work.
Using color and light to create emotion
Color and light are core elements for conveying emotion in street scene sketches. They transform a quick recording into a work that evokes atmosphere and story. By adjusting light-dark contrast and choosing an appropriate color palette, you can guide the viewer's emotions. Here are the main principles:
- <
Đánh giá bài viết
More from author
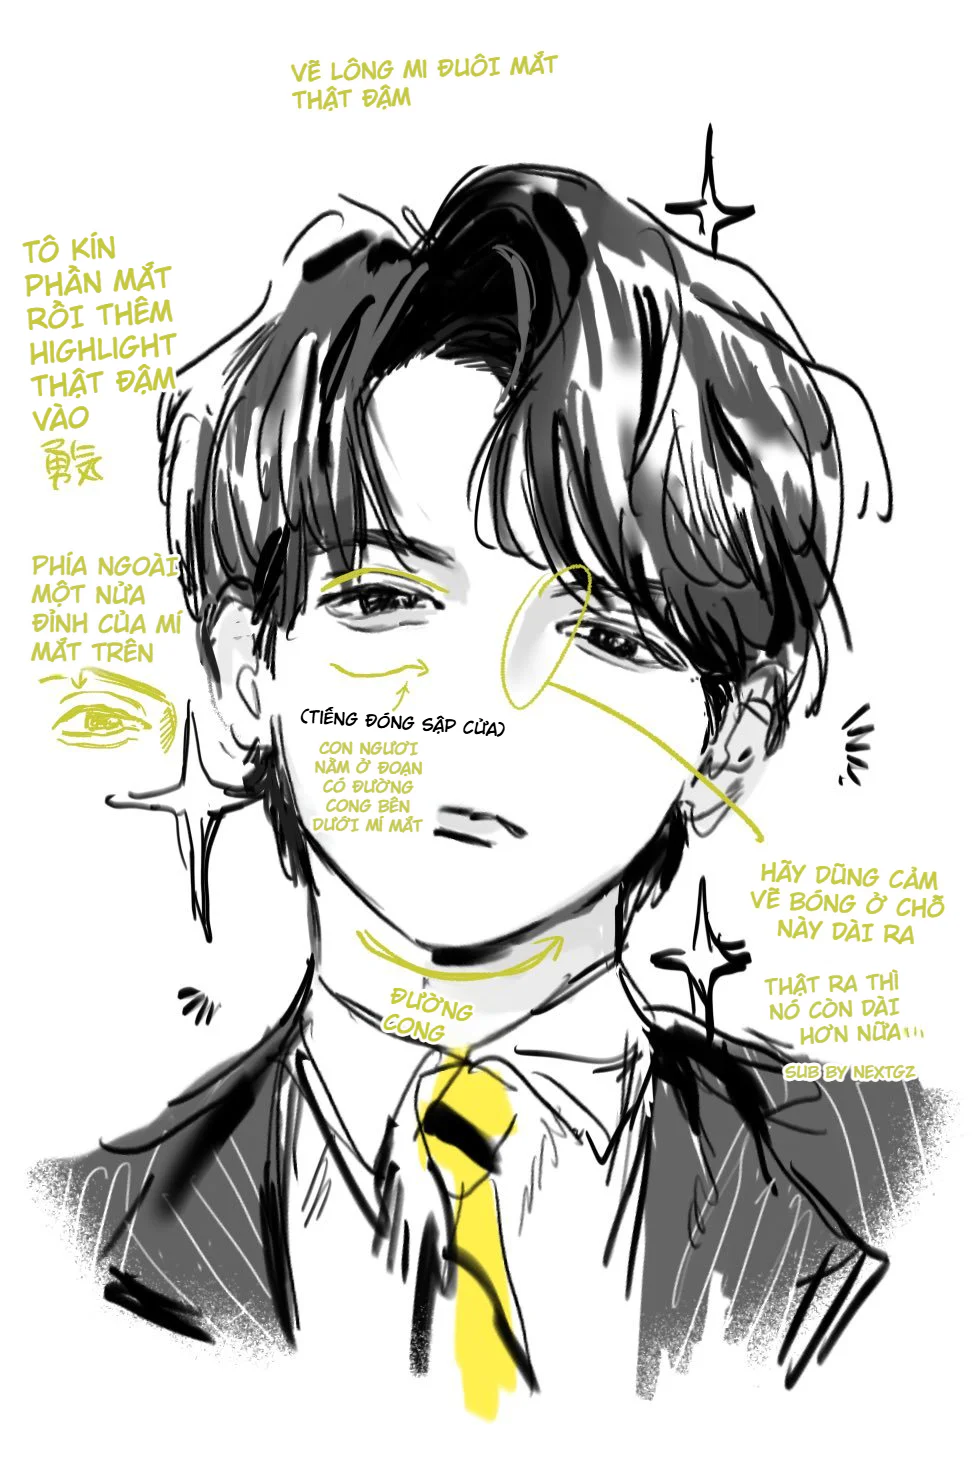
Cách vẽ nhân vật nam manga ngầu bằng mắt cụp, tóc đen bóng và halftone

Tự Học Clip Studio Paint Cơ Bản: Hướng Dẫn Toàn Diện Cho Người Mới Bắt Đầu

Bộ Sưu Tập 48 Brush Information Volume Tạo Chi Tiết Và Texture Cực Đỉnh Cho PS, Procreate, CSP

Cách tô màu tóc anime trong ibisPaint X theo quy trình 12 bước, lên khối đẹp mà không bị bệt
You might also like

Cách tô màu tóc bạc anime: quy trình đổ bóng, hòa màu và hoàn thiện tóc xám đẹp hơn
Cách tô màu tóc anime trong ibisPaint X theo quy trình 12 bước, lên khối đẹp mà không bị bệt

Hướng dẫn sinh tồn Cho Digital Artist 2026: Khi Kỹ Thuật Gặp Cá Tính

Bình luận
0 bình luận
Đăng nhập để tham gia thảo luận cùng cộng đồng!
Đăng nhập ngayĐang tải bình luận...