Guide to creating and managing Ruler in Clip Studio Paint: Guide Line, Symmetry and Manga construction
In-depth Guide to Creating and Managing Ruler in Clip Studio Paint: Guide Line, Symmetry, and Manga Drawing, with procedures, exercises, and practice checklist.
Official interface/schematic image. Author/provider: CELSYS / CLIP STUDIO PAINT User Guide; source: https://help.clip-studio.com/en-us/manual_en/510_ruler/Basics_of_creating_rulers.htm; credited per original documentation.
1. Introduction to Rulers in Clip Studio Paint and Their Role in Manga Drawing
Official interface/schematic image. Author/provider: CELSYS / CLIP STUDIO PAINT User Guide; source: https://help.clip-studio.com/en-us/manual_en/510_ruler/Basics_of_creating_rulers.htm; credited per original documentation.
The Ruler tool in CLIP STUDIO PAINT (CSP) is one of the most powerful drawing assistance features, especially useful for Manga construction. Rulers not only help you draw precise straight lines and curves but also support creating symmetrical layouts, aligning comic frames, and scientifically controlling your strokes. In this article, we will focus on two basic and most important ruler types: Guide Line and Symmetry Ruler, along with the Manga construction process from sketch to finish.
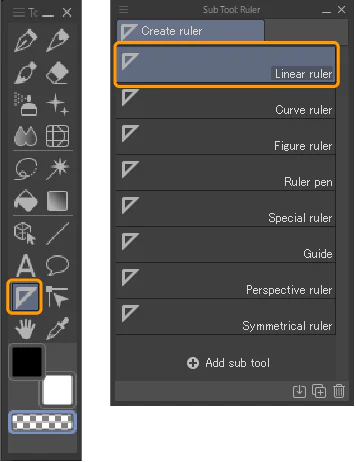
According to official CLIP STUDIO PAINT documentation, the Ruler is integrated into the Tool Palette with a ruler icon. When you select the Ruler tool, you will see Sub Tools such as: Linear Ruler, Curve Ruler, Figure Ruler, Symmetrical Ruler, Parallel Ruler... To manage all rulers on the canvas, you can open the Layer palette -> Ruler (or from the Layer menu -> Ruler/Frame). Every ruler created resides on its own layer or is attached to a drawing layer, and you can show/hide, lock, or delete them at any time.
Official interface/schematic image. Author/provider: CELSYS / CLIP STUDIO PAINT User Guide; source: https://help.clip-studio.com/en-us/manual_en/510_ruler/Basics_of_creating_rulers.htm; credited per original documentation.
2.1. What is a Guide Line and How to Create It
A Guide Line in CSP is a horizontal or vertical line (or a line at any angle) that helps you align objects on the canvas. This is an indispensable tool when constructing comic panels and Manga page layouts. There are two main ways to create a Guide Line:
Method 1: Drag from the top ruler (horizontal ruler) or left ruler (vertical ruler) onto the canvas. As you drag, a blue guide line will appear. You can drag multiple different guide lines.
Method 2: Go to View -> Grid/Guide -> Show Guide to display existing guides. To add a precise guide, select Layer -> Ruler/Frame -> Create Guide... or use the shortcut key (default is Ctrl+Shift+R). A dialog box appears allowing you to enter X/Y coordinates and rotation angle. This method creates guides with high precision, especially useful when aligning panel margins.
Once created, guide lines will appear as blue lines (color can be customized in Preferences) and will not print when exporting files. You can move guides using the Move tool (V) when the correct guide layer is selected.
To manage guide lines, you need to open the Layer palette (Window -> Layer). Guide lines are stored on a layer with the default name 'Guide'. You can:
Show/Hide: Click the eye icon on the Guide layer to temporarily hide all guides.
Lock: Click the lock icon to lock guides, preventing accidental movement.
Delete: Deleting the Guide layer removes all guides on it. To delete individual guides, select the Move tool (V), click on the guide you want to delete, then press Delete.
Additionally, you can create multiple different Guide layers for categorization (e.g., one layer for panel guides, one layer for character position guides). This helps organize the layout more clearly.
2.3. Applying Guide Lines in Manga Construction
In Manga drawing, guide lines are used to:
Define page margins (page margins) – typically 5-10mm from the paper edge.
Divide panels into equal sizes.
Align the position of characters' eyes and mouths when drawing multiple different angles on the same page.
Keep speech balloons and text on the same horizontal line.
Recommendation: Always create guide lines before starting your panel sketch. This saves you editing time later and creates a professional layout. You can refer to standard Manga sizes: for example, B4 page (257x364mm) often uses a 5mm margin, with panels 10-15mm from the edge.
3. Symmetry Ruler – The Perfect Symmetry Drawing Tool
Official interface/schematic image. Author/provider: CELSYS / CLIP STUDIO PAINT User Guide; source: https://help.clip-studio.com/en-us/manual_en/510_ruler/Basics_of_creating_rulers.htm; credited per original documentation.
3.1. Introduction to Symmetry Ruler
The Symmetry Ruler is a Sub Tool of Ruler that allows you to draw strokes symmetrically across one or more axes. When this feature is enabled, everything you draw on one side is automatically mirrored to the other side along the defined axis. CSP provides three main types of Symmetry Ruler:
Linear Symmetry: Symmetry across a straight line (mirror reflection). Commonly used for drawing faces and front-facing human bodies.
Curve Symmetry: Symmetry across a curved line. Used for flowing patterns or when you want non-straight symmetry.
Radial Symmetry: Symmetry across multiple axes radiating from a center point. Suitable for drawing patterns, mandalas, or circular motifs.
To use it, select the Ruler tool, then on the Sub Tool palette choose Symmetrical Ruler. In Tool Property, you can select the number of axes (2, 3, 4, 6, 8...). The center position and axis angle can be adjusted by dragging the square handles on the canvas.
3.2. How to Create and Set Up Symmetry Ruler in Manga
3.2.1. Creating Linear Symmetry
Draw a straight line as the symmetry axis: Select Symmetrical Ruler -> Linear Symmetry, click and drag on the canvas to create the line. A green color appears indicating the axis. You can move the axis by dragging the line using the Object tool (O). To activate drawing along the ruler, you need to enable the Snap to ruler icon on the toolbar or use the shortcut key (default is U). When Snap is enabled, every stroke on that layer will automatically snap to the symmetry axis.
3.2.2. Setting the Number of Axes
In the Tool Property of Symmetry Ruler, the 'Number of lines' option allows you to choose 2, 3, 4, 6, 8... corresponding to the number of symmetry axes. For example, choosing 4 creates symmetry across two perpendicular lines, like a four-way mirror. For drawing human faces, you typically only need 2 axes (1 vertical line).
3.2.3. Storing and Managing Symmetry Ruler
After creation, the Symmetry Ruler will appear on a separate layer in the Layer palette, named 'Symmetry ruler'. You can show/hide, lock, or delete it similar to Guide. If you want to apply the ruler to a specific layer, you can drag and drop the ruler layer onto the desired drawing layer or use the 'Attach to Layer' feature in the Layer menu.
3.3. Applying Symmetry Ruler in Manga Drawing
The Symmetry Ruler is a powerful assistant when constructing characters:
Drawing front-facing faces: Create a vertical axis down the middle of the face, draw one eye, half a nose – the rest is automatically completed.
Creating background patterns: Mandala patterns, radial effects, etc.
Recommendation: When drawing Manga characters, use the Symmetry Ruler for the rough sketch stage. Then, turn off Snap to adjust asymmetrical details like bangs, uneven eyes, or a smile – because a perfectly symmetrical face can sometimes look unnatural. Also note that the Symmetry Ruler works well with drawing tools in the Pen, Pencil, Brush group; but does not work with Fill or Gradient tools, and does not affect Figure tools unless Snap mode is enabled.
4. Manga Construction Workflow Using Rulers
Official interface/schematic image. Author/provider: CELSYS / CLIP STUDIO PAINT User Guide; source: https://help.clip-studio.com/en-us/manual_en/510_ruler/Basics_of_creating_rulers.htm; credited per original documentation.
4.1. Preparing the Canvas and Setting Up Guides for Panels
The first step is to create a new file with common Manga page size. According to CSP documentation, go to File -> New, select the [Manga] tab and choose a size like B4 (257x364mm) or A4 (210x297mm) with a resolution of 350-600dpi. Then, perform the following:
Create margins: Go to Layer -> Ruler/Frame -> Create Guide. Set the type to 'Vertical' and 'Horizontal' with a distance from the paper edge of about 5-10mm depending on the size. For example, create 4 guides: X=10mm, X=254mm (for B4) and Y=10mm, Y=354mm. You can also use the 'Bleed' feature in Manga document templates.
Divide panels: Use additional guide lines to mark the positions of frames. For example, create a vertical guide at X=130mm to split the page into two columns.
Lock the Guide layer to prevent movement while drawing.
You can also use the 'Frame Border' tool (frame icon) to create panels automatically, but this article focuses on manual rulers so you understand management clearly.
4.2. Constructing Characters with Symmetry Ruler
After establishing the page layout, move on to sketching characters within each panel:
Create a new layer for the sketch (name it 'Rough').
Select the Ruler tool -> Symmetrical Ruler, drag a vertical line down the middle of the character's face. However, since characters may be in different positions, you should create a separate Symmetry Ruler for each part or adjust later.
Enable Snap (magnet icon) and start sketching eyes, nose, chin. Strokes will automatically be symmetrical across the ruler axis.
Lock the Symmetry Ruler layer to avoid changing the axis position while drawing.
Note: If you want to draw multiple different characters on the same page, create a separate Symmetry Ruler for each character on different layers, or move the ruler axis to a new position after finishing each character. You can also temporarily turn off Snap to draw asymmetrical details like bangs, then turn it back on when needed.
4.3. Using Other Auxiliary Rulers (Curve, Figure)
In the Manga construction workflow, besides Guide and Symmetry, you can also leverage other rulers to draw faster:
Curve Ruler: Draw soft curves like ribbons, flowing hairlines. Select Linear Ruler -> Curve Ruler, then click to create anchor points, drag to create Bezier curves.
Figure Ruler: Draw basic geometric shapes (circles, ellipses, polygons) for perspective construction. When drawing Manga heads, you can use Figure Ruler with a circle to create the skull.
Parallel Ruler: Draw parallel lines, useful for architectural backgrounds, pipes.
Recommendation: When using Curve Ruler, create the curve first on a separate layer, then use the Pen or Brush tool with Snap to trace along the curve. For high precision, you can edit anchor points using the Object tool (O).
4.4. Finishing Inking and Coloring
After having a sketch aided by rulers, move on to inking and coloring (if any). At this stage, create a new layer for inks and temporarily turn off rulers (no Snap needed) to allow freer strokes. However, you can still enable Snap for necessary rulers like Guide to keep panel borders clean.
To draw even lines along guides, enable Snap and use Pen or Brush.
To color within a symmetrical area, create an additional color








Bình luận
0 bình luận
Đăng nhập để tham gia thảo luận cùng cộng đồng!
Đăng nhập ngayĐang tải bình luận...