 Digital Painting







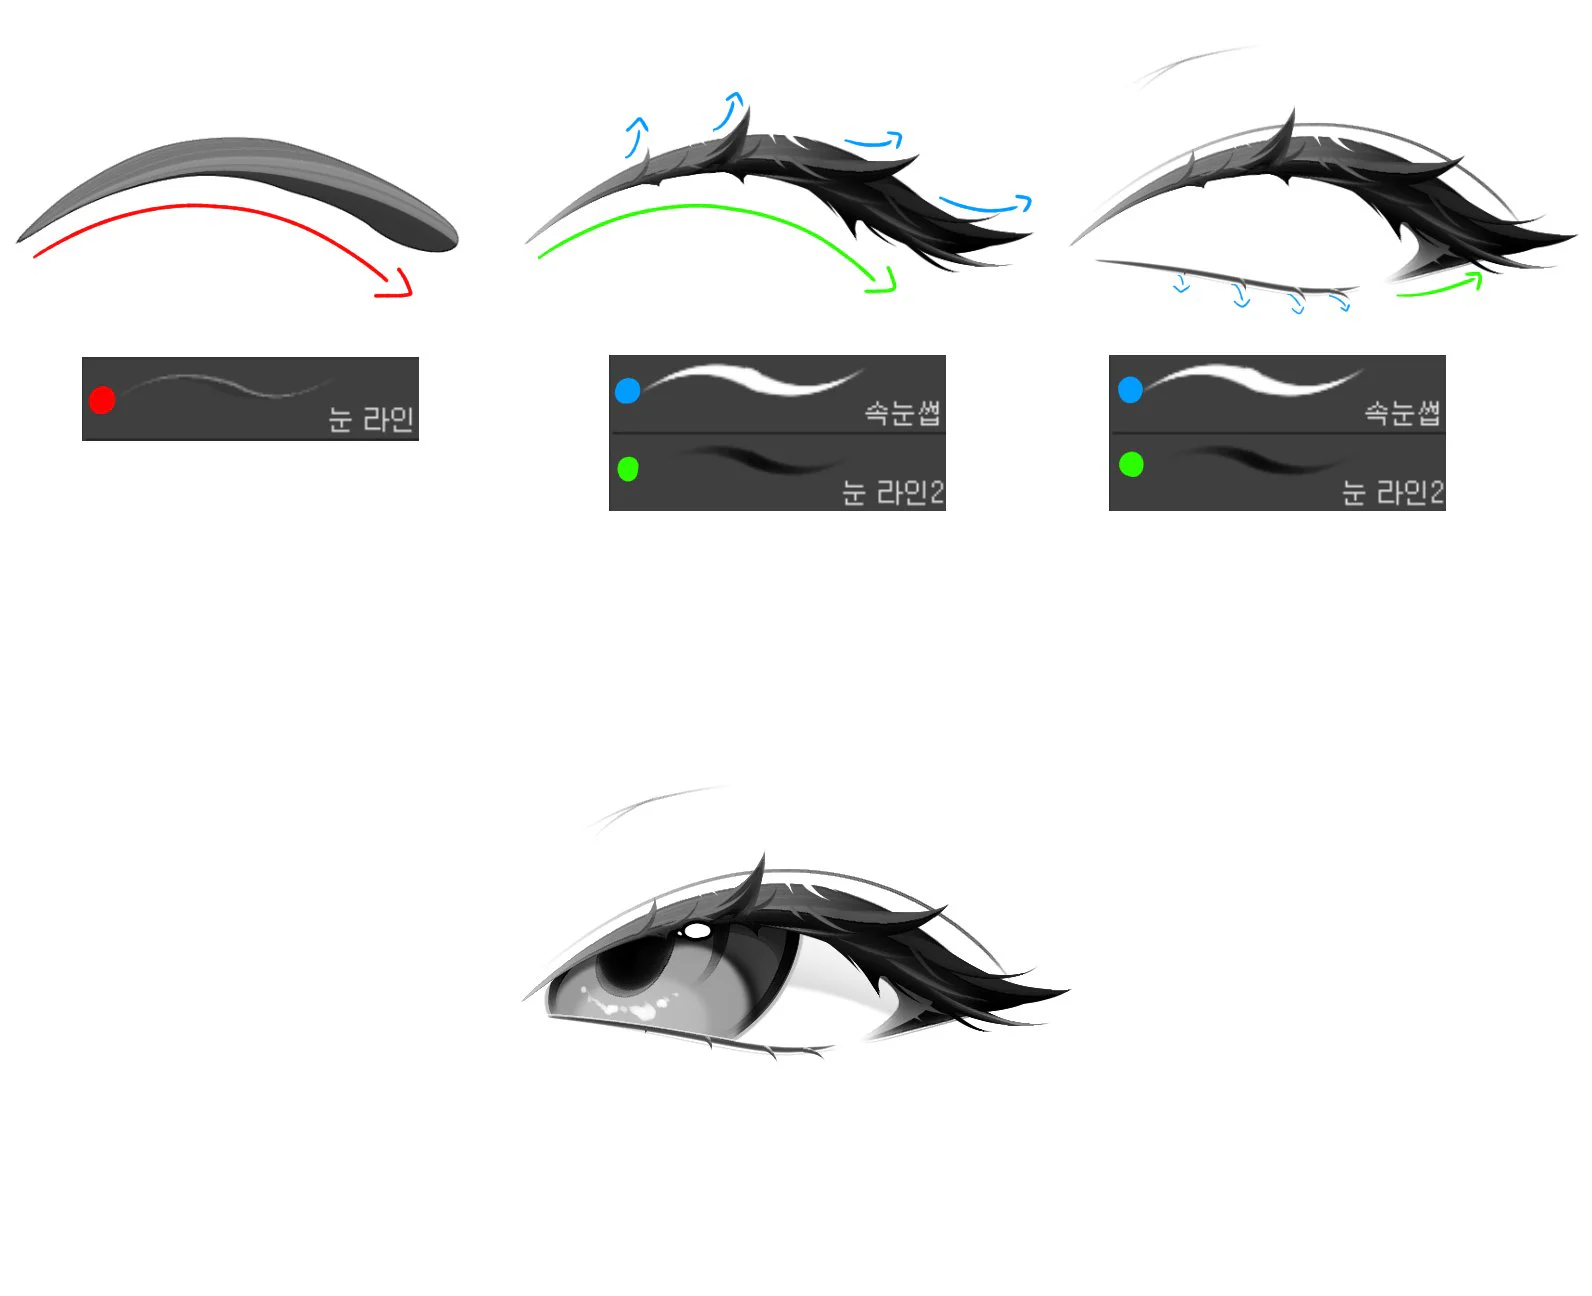
A beautiful anime eye doesn't start from the iris, the highlight, or the iris color; it starts from the curvature of the eyelid line and how the eyelashes are organized into clusters. The illustration in the post shows a very clear process: building the upper eyelid with a weighted curved stroke, transforming the tail end into directed eyelash clusters, adding the lower eyelid with a lighter stroke type, and only then placing the eyeball, iris, and light to complete the gaze.
The most valuable lesson is that the artist does not treat eyelashes as dozens of individual strands. The entire upper eyelid is handled as a large shape block with a flow. Afterwards, individual lash strokes are only separated at necessary points to create rhythm, sharpness, and character for the eye.
Source scope: the article was constructed directly from images provided by the user. The images contain brush labels in Korean including "눈 라인" — eye line brush, "속눈썹" — eyelash brush, and "눈 라인2" — eye line brush 2. The images do not specify software names, brush sizes, stroke stabilization, or pen pressure settings; the settings in the post are practice suggestions, not the original parameters.
1. What is the illustration teaching?
The image layout is divided into four main stages. The first stage shows only a thick, curved upper eyelid stroke tapering towards the tail. The second stage transforms that stroke into a mass of pointed eyelashes, where each point has its own direction but still follows the overarching curve. The third stage adds the lower eyelid and the eye opening area. The final stage places the iris, pupil, shadows, and highlight.
Three stroke types are distinguished by annotation colors:
- Red stroke — eye line brush: used to design the major curve of the upper eyelid.
- Blue stroke — eyelash brush: used to draw the pointed tips, creating lift and separating clusters.
- Green stroke — eye line brush 2: used to reinforce the eyelid edge, the lower lash line, or the tail area needing thinner strokes.
This shows that each brush doesn't necessarily create a unique "style." The more important role is that each brush handles a different level of form: large mass, detailed stroke direction, and auxiliary strokes.
2. Core principle: the eyelid is a band of mass, not a single line
If you only draw the upper eyelid as a uniform curve from start to finish, the eye often looks thin, weak, and lacking depth. The reference image builds the upper eyelid as a band with width. The area near the center and the outer corner of the eye is thicker, the inner corner is thinner, and the start of the stroke is rounded and tapered in a controlled manner.
Imagine the upper eyelid as a ribbon curving around the eyeball. This band has:
- An upper edge forming the main silhouette of the eyelashes.
- A lower edge in contact with the white of the eye.
- A thickness that varies by location.
- An outer corner that extends outward to create the expression's direction.
When treating the eyelid as a mass, the artist can easily control its weight and shadow. When treating it only as a line, it becomes very difficult to explain why the lash line area is dark and why the upper eyelid can partially cover the iris.
3. Step 1: Draft the upper eyelid curve
In the first stage, the illustration uses a dark gray curved stroke going down following the red arrow. The stroke has a pointed, low left end, then thickens in the middle before tapering down at the right tail.
Identify three points before drawing the stroke
- The inner corner: where the stroke starts, thinnest.
- The highest point of the curve: the peak of the eyelid, usually located above or slightly offset from the center of the iris.
- The outer corner: where the stroke ends, determining the emotion.
Don't draw the eyelid curve with a random motion. Mark the three points first, then connect them with a continuous curved line. If the eye is looking straight ahead, the peak can be lower and elongated. If the eye is wide open, the peak is higher. If the eye is sharp, the outer corner lifts and extends.
Controlling thickness
The thickness should not be uniform. An easy rule to follow is:
- Inner corner: thin.
- Area above the pupil: moderately thick.
- Outer half: thickest to create weight.
- Tail: tapers to a point but without breaking.
This thickness gives the feeling that the eyelash line truly has volume. It also helps the upper eyelid become the darkest area, keeping the focus on the eye.
4. Step 2: Transform the eyelid line into eyelash clusters
In the second stage, the upper eyelid is separated into several pointed clusters. The blue arrows indicate that the clusters don't all face the same direction. Some tips point upward, some extend sideways, and some drop slightly at the tail. However, they all still follow the large green curve below.
The concept of "clusters" is more important than "strands"
In anime, especially in sharp illustration styles, there's no need to draw every single eyelash. Instead, group many strands into triangular or leaf-shaped patches. Each cluster consists of:
- A thick base attached to the eyelid.
- A body that tapers quickly.
- A pointed tip facing outward.
Large clusters create the main rhythm; small clusters fill the gaps. If all clusters are equal, the lash line will look like a sawtooth. If there's only one continuous dark mass, the eye lacks lift.
Large – medium – small rhythm
The illustration shows individual lash tips of varying sizes. Organize them rhythmically:
- One large cluster near the center or outer half of the eye.
- Two to three medium clusters extending gradually toward the tail.
- Small tips interspersed to connect the shapes.
An uneven rhythm creates a natural feel. However, do not break the overall silhouette. When scaled down, the lash line must still read as a clean curve.
5. Eyelash direction and the movement of the gaze
Eyelash direction can change a character's personality without altering the iris:
- Tips pointing upward a lot: bright, lively eyes, giving a youthful feel.
- Tips extending sideways, long: sharp, mature, or seductive eyes.
- Tail dropping slightly downward: sad, gentle, or tired eyes.
- Thick clusters concentrated at the tail: a strong makeup style.
- Short, soft clusters: a natural, clear style.
The reference image uses many tips pulled to the right, giving the gaze a tendency to be long and sharp. However, some clusters at the top are lifted to prevent the lashes from becoming completely heavy.
6. Step 3: Add the lower eyelid line and define the eye opening
In the third stage, a thin curved line is added at the bottom. This stroke is much lighter than the upper eyelid. The blue arrows indicate the direction of small lower eyelash strokes, while the green arrow at the tail shows how to connect or slightly lift the outer eye corner.
The lower eyelid should not be as dark as the upper eyelid
If the lower rim is too dark, the eye can easily become framed and lose its transparent feel. An effective way to grade the lines:
- Upper eyelid: darkest and thickest.
- Outer eye corner: clear but tapered.
- Outer lower eyelid: thin line, can be broken.
- Inner lower eyelid: very light or omitted entirely.
In anime eyes, the lower rim usually only appears from the middle to the outer corner. The area near the inner corner can use a light gray stroke or be left out to keep the white of the eye clean.
Determine the eye opening
The distance between the upper and lower eyelids determines whether the eye is wide or narrow. Check the following:
- Does the highest point of the upper eyelid correspond to the iris's position?
- Does the lower eyelid curve along the eyeball, or is it flat?
- Do the upper and lower tails meet naturally?
- Does the inner corner have enough space, or is it squeezed?
A common mistake is for the upper eyelid to curve strongly while the lower eyelid is almost straight, making the eyeball feel less spherical. The lower eyelid should have a slight curve, no matter how subtle.
--- ---7. How to Draw Lower Eyelashes
Lower eyelashes in the image are represented by a few short strokes pointing downward. There is no need to draw them densely. Each stroke should:
- Start from the lower lash line or very close to it.
- Be thicker at the base.
- Taper quickly toward the tip.
- Angle outward diagonally rather than falling straight down.
If the character is young or the style is light, just two to four strokes on the outer half are enough. If the style is gothic or heavy makeup, you can increase the number but still group them into clusters.
8. Step 4: Placing the Eyeball, Iris, and Pupil
After the eye frame is stable, the final image adds the iris. This is a logical order because the eyelid shape determines which part of the iris is covered and the overall expression.
Placing the Iris Under the Upper Eyelid
The iris should not float as a perfect circle in the middle of the white sclera. The upper eyelid usually covers a significant portion of the iris, especially in sharp eyes or forward-looking eyes. The covered part gives the eye depth and avoids an overly surprised look.
Pupil and Gaze Direction
The pupil sits inside the iris but does not necessarily need to be at the geometric center. The gaze direction can shift left, right, up, or down. However, you need to check the white space on both sides to avoid a cross-eyed look.
Dark Area at the Top of the Iris
The final image has a large dark area at the top of the iris. This is a shadow cast by the upper eyelid and eyelashes. This area should visually connect to the upper eyelid, making the upper part of the eye heavier and the lower part brighter.
9. Handling Light and Dark Values in the Iris
The finished eye in the image uses a dark top – light bottom structure:
- Top of the iris: dark, close to the eyelid color.
- Middle of the iris: mid-gray.
- Bottom: lighter, with reflective flecks.
- Pupil: darkest.
- Highlight: white or near-white.
This structure creates a feeling of light passing through the cornea. You don't need a perfectly smooth gradient; you can use soft cel shading or controlled color transitions.
10. Placing Highlights to Keep the Eye from Looking Like a "Sticker"
In the image, there is one large highlight near the top and several small bright dots in the lower part. The large highlight represents the main light source; the small dots create a sparkling effect.
To make highlights look reasonable:
- All eyes on the same character must use a consistent highlight direction.
- The large highlight should not be placed completely outside the iris.
- Do not place too many dots of the same size.
- Some highlights may be partially covered by the upper eyelid.
- Keep a dark area around the highlight to make it pop.
11. The Role of the Three Brush Types in the Image
"눈 라인" Brush — Eye Line
Used for the large silhouette of the upper eyelid. A suitable brush should have pressure taper: press harder to increase thickness, lift to create a pointed tip. Medium stroke stability helps keep the curve clean but not overly mechanical.
"속눈썹" Brush — Eyelashes
Used to pull out pointed clusters or create individual lash branches. The brush should taper quickly and have good pressure response. You can use white on a black background in the brush thumbnail, but in actual drawing, the color is usually black, brown, or grayish purple.
"눈 라인2" Brush — Eye Line 2
Used for secondary lines, lower lashes, or areas needing softness. In the sample panel, this brush has a softer black stroke, suitable for avoiding an equally heavy edge around the entire eye.
If your software doesn't have these exact three brushes, you can substitute with one round pressure-sensitive brush and vary the size. Technique is more important than the preset name.
12. Suggested Layer Structure
- Face sketch and eye axis.
- Upper eyelid line.
- Upper eyelash clusters.
- Lower eyelid and lower eyelashes.
- White of the eye (sclera).
- Base iris.
- Pupil and shadow on the iris.
- Light color at the bottom of the iris.
- Highlights.
- Reflection color and final color adjustments.
Separating the eyelid and iris makes it easier to edit. If you need to change the expression, you can modify the upper eyelid without damaging the iris.
13. Complete Practice Workflow
Step 1: Establish the axis and eye angle
Draw a light line indicating the direction from the inner corner to the outer corner. Both eyes on the same face must follow a consistent perspective and tilt.
Step 2: Place the three points of the upper eyelid
Mark the inner corner, the highest point of the curve, and the outer corner. Connect them with a curved line that varies in thickness.
Step 3: Create the eyelash mass
Extend the outer half of the eyelid into a dark block. Split the block into three to five clusters: large, medium, and small.
Step 4: Refine the silhouette
Zoom out on the drawing. If the lashes look like one solid black blob, open gaps between the clusters. If they look like a sawtooth edge, merge some tips.
Step 5: Add the lower eyelid
Use thin strokes; do not close off the entire line. Keep the inner corner light.
Step 6: Draw the iris
Place the iris under the upper eyelid. Check the gaze direction and the amount of white on both sides.
Step 7: Create the upper eyelid shadow
Place a dark area on the upper half of the iris. The shadow should follow the curve of the eyelid, not become a mechanical horizontal band.
Step 8: Add light color and highlights
Brighten the lower half of the iris, add one large highlight and a few small dots with rhythm.
Step 9: Synchronize lines and color
Change black lines to cool brown, dark purple, or a color close to the hair if a softer style is needed.
Step 10: Check at a small size
The eye should still convey expression even when scaled down. If you only see a black blob, reduce the lashes; if the eye lacks impact, increase the weight on the upper eyelid.
14. Adjustments for Different Eye Types
Round, Cute Eyes
Increase the height of the upper eyelid, reduce the extension of the outer corner, and use short eyelash clusters. The lower eyelid curves more noticeably.
Sharp, Mature Eyes
Reduce the height, extend the outer corner longer and slightly lifted. Concentrate the lash clusters on the outer half. The iris is more covered by the upper eyelid.
Sad Eyes
The inner corner or the middle part is higher than the outer corner, with the outer corner slightly lowered. Lash clusters pull horizontally rather than pointing upward.
Tired Eyes
The upper eyelid is low, the lower eyelid is closer, and highlights are reduced. You can add a light shadow under the eye but avoid making the line too dark.
Heavy Makeup Eyes
Increase the thickness of the eyelid block, extend the outer corner clearly, and add large lash clusters. The lower eyelid can be darker but still lighter than the upper eyelid.
--- ---15. Common Mistakes
Drawing each individual eyelash from the start
The result is often messy and lacks silhouette. Establish large masses first, then separate a few clusters.
Every eyelash stroke is the same size
Create a rhythm of large – medium – small. The main cluster should be more distinct than the secondary ones.
Upper and lower lash lines have the same thickness
Reduce the weight of the lower lash line so the eye doesn't look boxed in.
The outer corner of the eye is broken
The main curve must be continuous. Eyelash clusters only separate within the silhouette, without breaking the overall direction.
The iris is not covered by the eyelid
The eye can easily look surprised or like an icon. Lower the upper eyelid or raise the iris to create overlap.
Inconsistent highlights
Check the light source on both eyes. Do not place highlights randomly just to make the eyes sparkle.
Absolute black lines everywhere
Change the line color according to the light and hair color. Keep black or near-black at the lash roots, lighten the secondary lines.
16. 30-Minute Stroke Practice Exercise
- 5 minutes: draw 20 upper lash line curves, practicing thin at the start – thick in the middle – pointed at the tip.
- 5 minutes: turn 10 curves into eyelash clusters of large – medium – small sizes.
- 5 minutes: draw five types of eye corners: upturned, horizontal, downturned, short, and elongated.
- 5 minutes: add the lower lash line with thin strokes, try both continuous and broken lines.
- 5 minutes: place the iris in five different directions of gaze.
- 5 minutes: finish one eye with shadows on the iris and highlights.
17. Pre-Finalization Checklist
- Does the upper lash line have a clear curved rhythm?
- Does the thickness vary from the inner corner to the outer corner?
- Do the eyelash clusters have different sizes and directions?
- Is the eyelash silhouette still clean when scaled down?
- Is the lower lash line lighter than the upper lash line?
- Is the iris naturally covered by the upper eyelid?
- Is the gaze direction clear and are both eyes synchronized?
- Does the shadow above the iris connect with the upper lash line?
- Do the highlights share the same light source?
- Is the expression readable when color is removed?
Conclusion
The illustration shows that an effective anime eye drawing process doesn't start by decorating the iris. First, the artist needs to design the upper lash line curve, then turn it into eyelash clusters with flow, prioritize the upper and lower lash lines, and only then build the eyeball and lighting.
Once you grasp the silhouette, cluster rhythm, and stroke weight, you can change the eye's personality with just a few small adjustments: raise the outer corner for a sharper look, shorten the clusters for a younger appearance, lower the corner for a sadder feel, or increase thickness for stronger makeup. The brush is just a tool; the stroke structure and movement direction are what truly matter.
Illustration source: images provided by the user. Korean brush labels have been translated according to the content shown in the images.




Bình luận
0 bình luận
Đăng nhập để tham gia thảo luận cùng cộng đồng!
Đăng nhập ngayĐang tải bình luận...