How to Draw a Hand Holding a Rigid Prop: Block Thinking and Anatomy for Artists
 Free
FreeHow to Draw a Hand Holding a Rigid Prop: Block Thinking and Anatomy for Artists
One of the hand poses that most easily discourages artists is a hand grasping a rigid object with a clear handle. It seems like you just need to place a few fingers around a block and you're done, but when actually drawing it, it's very easy to make mistakes: fingers arranged in parallel like sticks, a palm as flat as a sheet of paper, a thumb with no locking force, a wrist that looks broken, and overall the hand looks like it's just "stuck" onto the object rather than truly holding it. To fix this, the most effective method is not to copy the contour from photos, but to understand the large structure of the hand first. The hand is a very complex system of bones, joints, tendons, and soft tissue; the bones alone consist of 27 bones, and its entire operation is based on manipulating objects using very different hard and soft block systems.

The key point to drawing a hand gripping an object tightly is to see it as three overlapping layers. The first layer is the object block: it must always be constructed as a block with a clear direction, axis, and planes before the hand attaches to it. The second layer is the palm block: not flat, not squashed, but with a cupped shape and compression. The third layer is the system of fingers + thumb used to lock the block. In Proko's teaching on drawing expressive hands, the hand should be broken down into simple parts first, before thinking about small details; the initial focus should always be on shape, rhythm, and expression, not chasing skin folds or fingernails too early.
Start from the Object Block, Not from the Fingers
The most common mistake when drawing a hand holding an object is drawing each finger first, then trying to fit the object in afterwards. That method almost guarantees the hand's perspective will be wrong. More correctly, construct the object as a long box with a handle or at least a large cluster of planes, then decide:
which direction the object's main axis runs
how much the handle is tilted
from which side the hand is viewed
at what angle the wrist enters the object
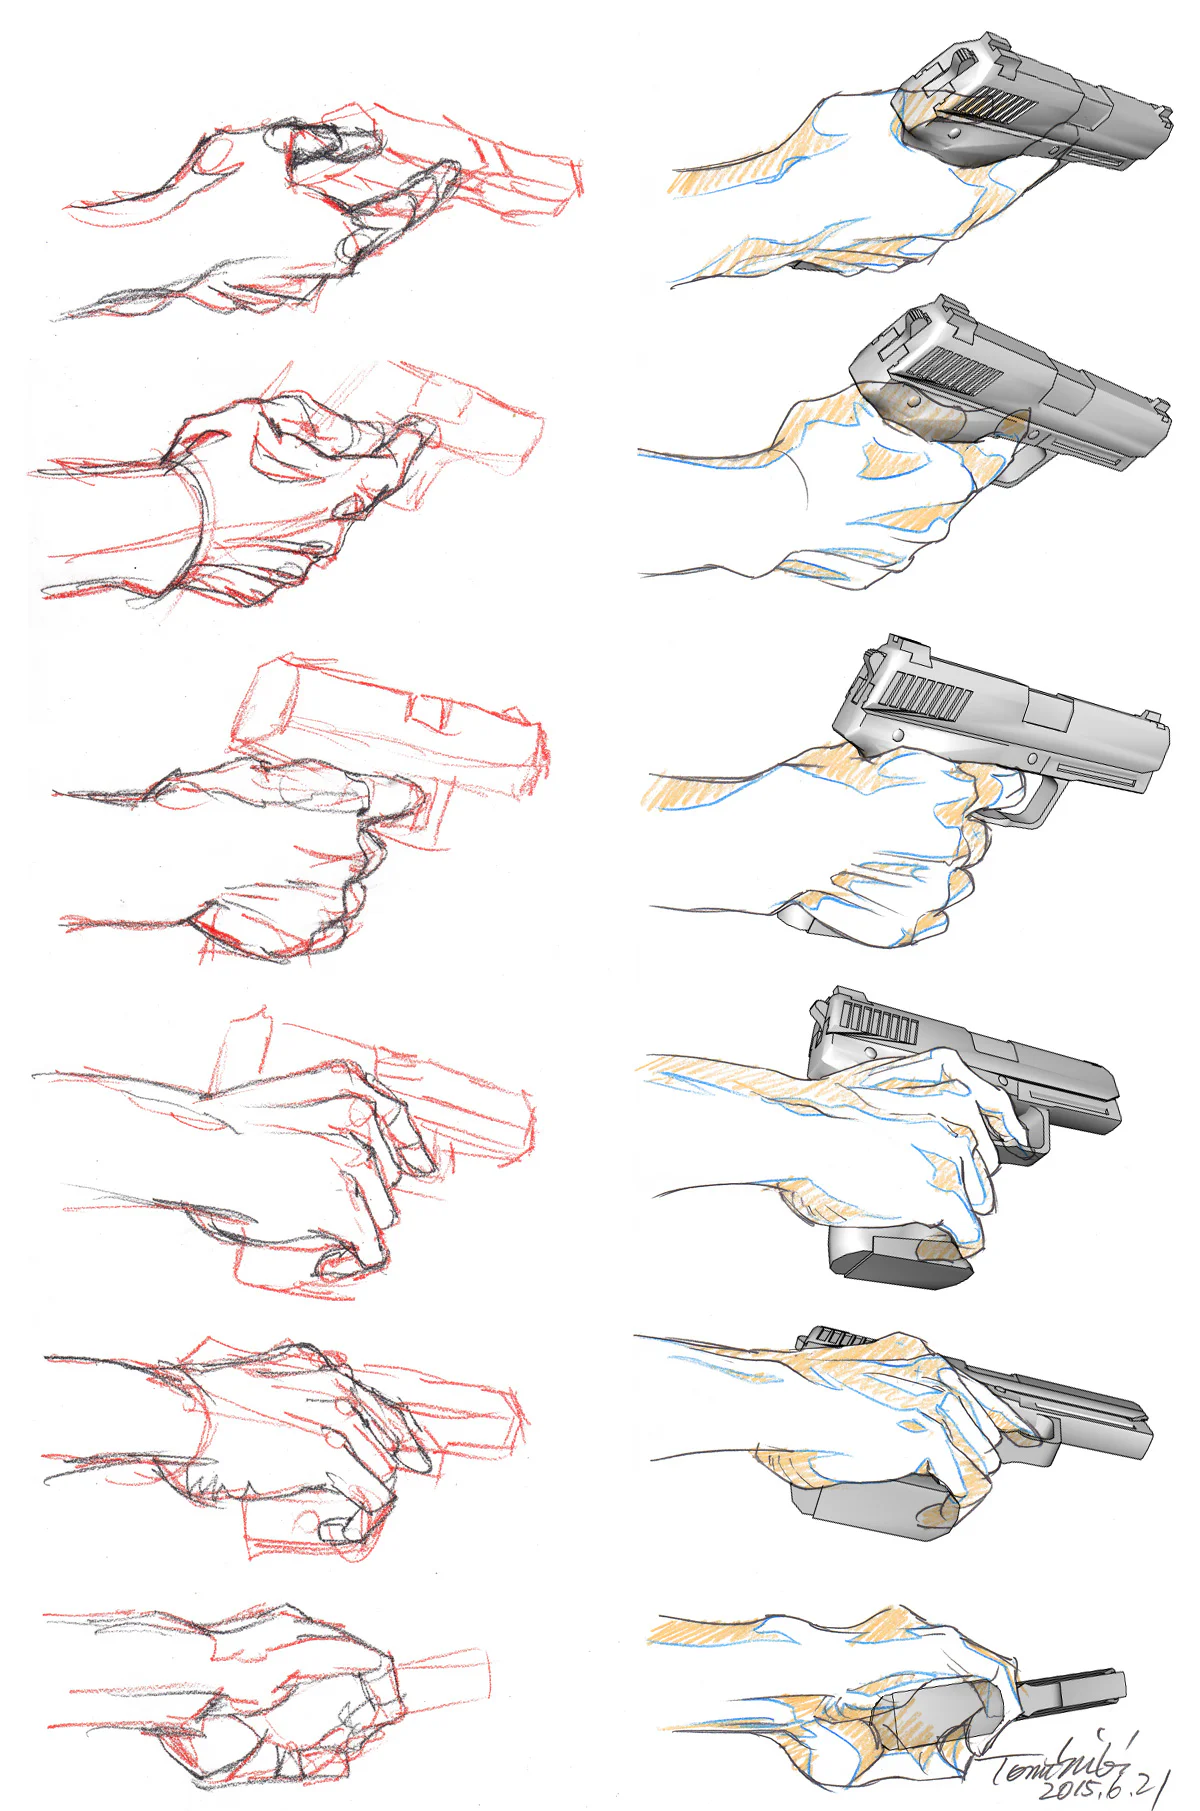
Only when the prop has a block does the hand have something to "hug." This is why in study sheets of this type, the initial red block construction is always very mechanical: boxes, wedges, short cylinders. It is this rigid block that determines the entire perspective of the hand.
The Palm Must Be Thought of as a Cupped Block, Not a Flat Plane
A beautiful hand holding an object doesn't come from the fingers, but from a palm that knows how to cup. If you construct the palm as a flat plane and then attach fingers, the hand will look fake immediately. From an anatomy perspective, the palm has prominent soft tissue areas, especially the thenar eminence at the base of the thumb and the hypothenar eminence at the base of the pinky. Kenhub describes the thenar as the short muscle mass on the radial side of the hand, and the hypothenar as the muscle mass on the ulnar side, forming the two most important "fleshy mounds" of the palm. It is precisely these two mounds that give the palm a sense of thickness, softness, and better ability to cradle an object.
In drawing practice, you can think of it very simply:
the palm is a block slightly concave in the middle, pinched by the thenar and hypothenar on either side. When the hand grips a rigid object, these two mounds will press together to varying degrees. If the object is large, the palm must open and the cupping is greater. If the object is small, the hand will close and the soft tissue mounds will bunch up more strongly. Just remembering that alone will make the hand feel much less like a "plastic glove."
The Thumb is the Force-Locking Component, Not a Secondary Detail
Many artists treat the thumb as a decorative finger sitting outside the hand block. But in reality, when gripping an object, the thumb is the main locking pin. This special ability comes from the trapeziometacarpal joint at the base of the thumb, a very flexible saddle joint. Kenhub clearly notes that this joint allows flexion–extension, abduction–adduction, axial rotation, and especially opposition, the movement that allows the tip of the thumb to press against the other fingers to lock and pinch an object.
For the artist, this translates into an extremely easy-to-remember principle:
The 4 long fingers create the embracing loop, but the thumb is the locking pin.
This means when constructing the hand:
don't place the thumb too late
don't draw the thumb as a branch growing out lifelessly
decide very early where it's pressing from, which finger it's locking against, and how open or closed the web between the thumb and index finger is
Just locking the thumb correctly will make the whole hand look much more secure.
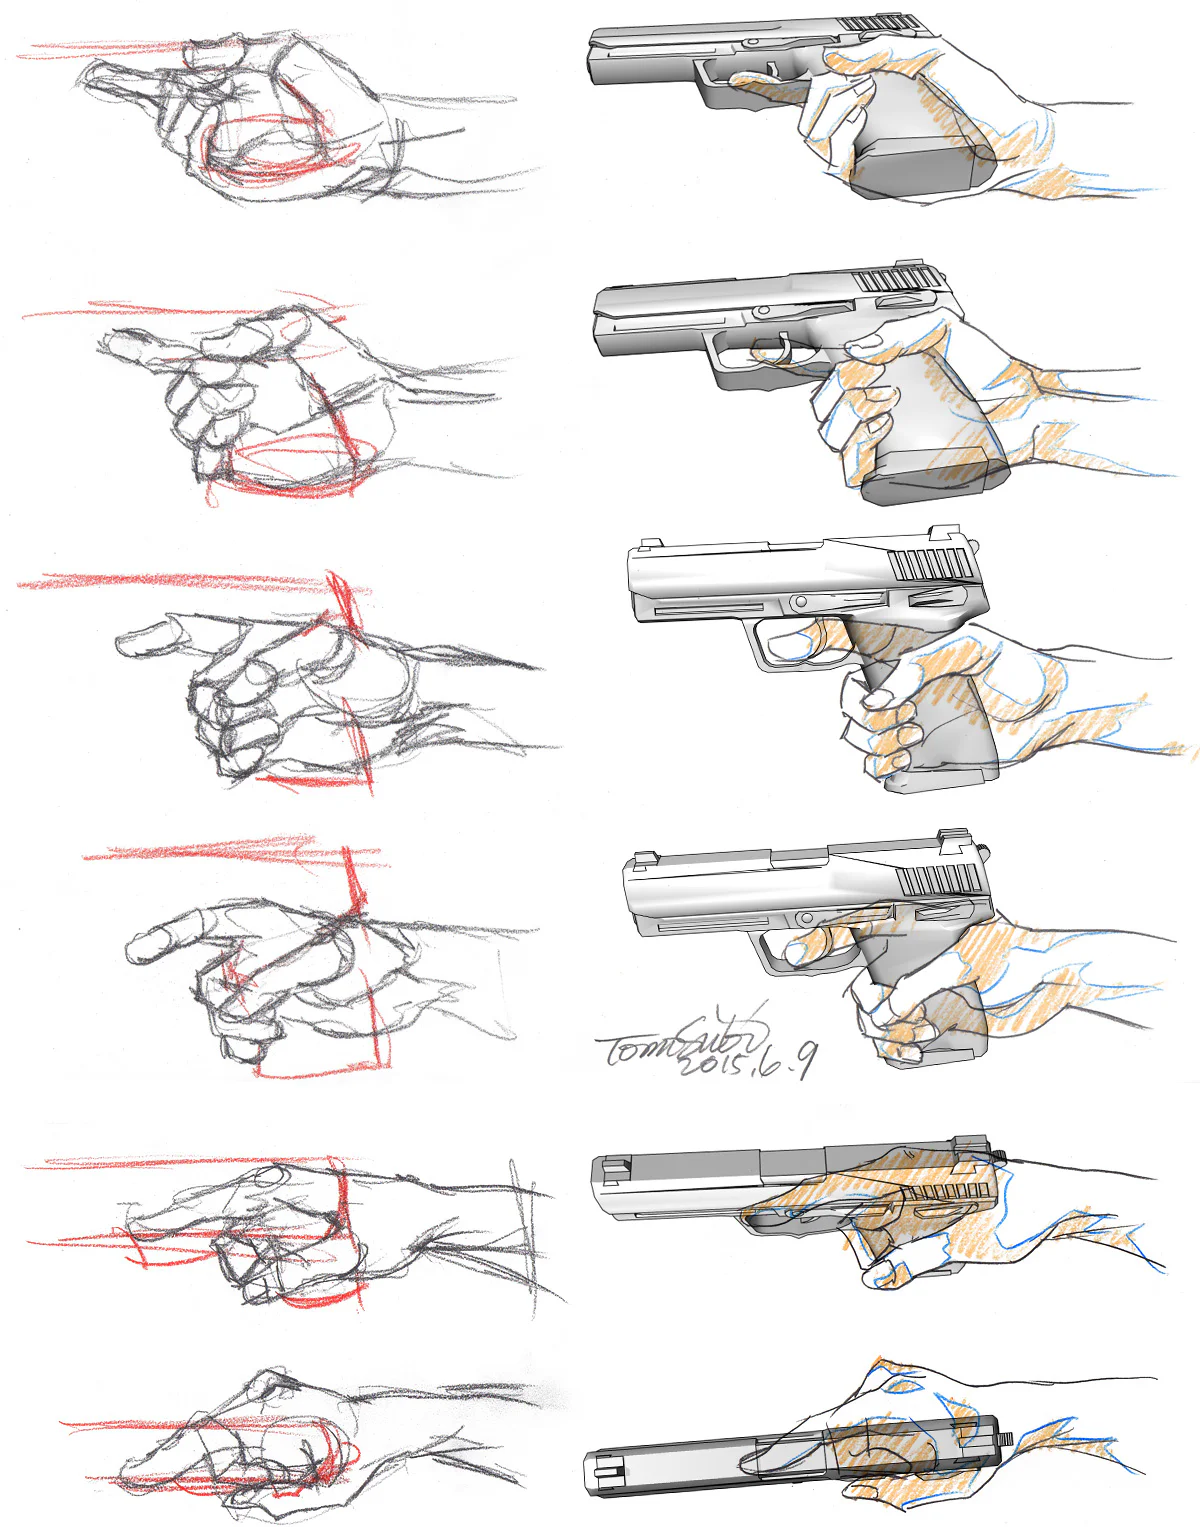
The Fingers Never Embrace an Object in a Perfectly Parallel, Uniform Way
Another very common mistake is the four long fingers embracing the object along four parallel lines, as if they were plastic tubes of the same length. This is wrong because the skeleton of the hand and fingers is not organized that way. In the lesson on hand bones for artists, Proko emphasizes that metacarpals and phalanges should be simplified into tapering cylinders or boxes, and the fingers tend to point, curve, and converge rather than being absolutely parallel.
When a hand embraces a rigid block, what you need to look for is not "where are the 4 fingers," but:
which finger makes the strongest contact
which finger is just following along
which knuckle protrudes from the silhouette
which joint is hidden
whether the pinky and ring finger are pressed together as a close pair
whether the middle finger is acting as the visual axis for the whole finger group
It's these small staggered details that make the hand look real.
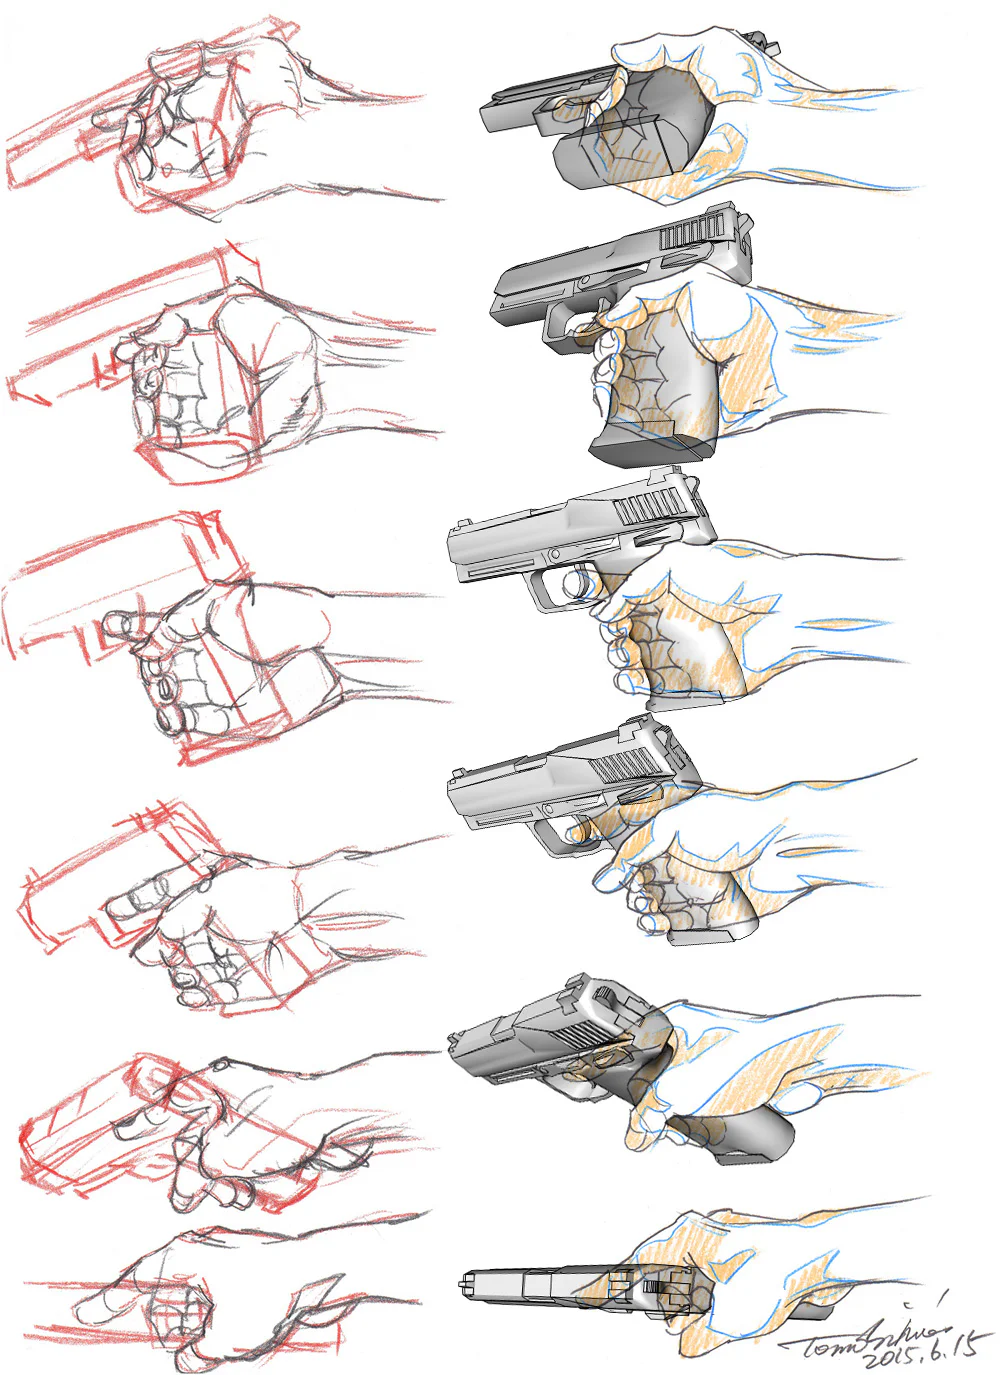
Clearly Distinguish the Palm and the Dorsum Through Line Language
One of the reasons these hand study sheets look very "hand-like" is because they maintain the contrast between the palm and the dorsum (back of the hand). On the palm side, the form is usually softer, fuller, more curved due to fat pads, thenar, hypothenar, and finger pads. On the dorsum side, the form is usually more angular, straighter, because bones and tendons are more prominent. Proko emphasizes this very clearly when teaching hand details: the palm side should be thought of as softer, convex, and thicker; the dorsal side is harder, flatter, and has clearer planes.
If you apply this principle directly to lineart, you get a very powerful tip:
lines on the palm side: use more curves, softer line weight
lines on the dorsum side: use more straight lines, sharper edges, less "chubby"
Just a small change in line language like that makes the hand look much less fake.
The Wrist is Not a Break Point, But the Bridge for the Entire Rhythm
A beautifully gripping hand almost always has a rhythm that flows seamlessly from the forearm to the fingertips. When the artist treats the wrist as a separate "break" point, the hand easily looks attached to the forearm like a toy. But if you look correctly, the wrist is where force is transmitted, direction is changed, and planes transition from the forearm to the hand. The Cleveland Clinic describes the hand and wrist as an extremely complex network of bones, muscles, tendons, and ligaments that allows for fine object control.
This means when constructing a hand-holding pose:
let the line of action flow through the wrist
don't change the angle too sharply right at the wrist without a clear reason
remember that the hand usually "emerges" from the forearm in a large rhythm, before the fingers separate
This way of thinking makes action hand poses noticeably smoother.
Practical Workflow for Drawing a Hand Holding a Rigid Prop
If I had to condense the whole set of images into one easy-to-apply process, I would follow this order:
1. Construct the Object Block First
Determine the main axis, top–bottom planes, where the handle is, and its tilt.
2. Place the Palm Block
Don't draw fingers first. Find:
the center of the palm
the thenar eminence
the hypothenar eminence
the thumb–index web
3. Lock the Thumb
Decide where the thumb is opposing/pressing against. This is the key step to creating the feeling of a "real grip."
4. Attach the Group of 3–4 Long Fingers as One Large Rhythm
Instead of drawing each finger completely separately, think ahead with:
a gripping block cluster
a common curved rhythm
then split into individual fingers
5. Adjust the Silhouette
Look for places where fingers protrude, knuckles stick out, which planes need to be sharp, which need to be soft.
6. Only Then Add Small Details
Now is the time to handle tendons, nails, skin folds, compression folds, and small planes.
Following this sequence correctly is much faster than getting bogged down in details from the start.
Mistakes That Make a Hand Holding an Object Look Fake Immediately
The first mistake is all fingers being parallel.
The second mistake is forgetting the thenar/hypothenar block, making the palm thin and flat.
The third mistake is the thumb not locking force, just sitting outside like decoration.
The fourth mistake is no distinction between the palm and the dorsum.
The fifth mistake is the wrist being broken/jarring, not connecting rhythmically with the forearm.
The final mistake is drawing the outer contour first without an internal block, causing the hand to not truly embrace the object.
Just fixing these mistakes will make the hand "read" much better very quickly.
How to Practice to Improve Quickly
To improve quickly with this type of hand, practice with small exercise clusters instead of trying to do a full render right away:
practice 10 poses with only the object block + palm block
practice the thumb–index web separately
practice one sheet with just the finger group closed around a box block
practice changing the viewing angle but keeping the same prop
practice different lines for the palm and the dorsum
Proko also emphasizes many times that when learning hands, you should start with simplifying the structure and use rhythm, shape, and expression to avoid getting lost in minutiae too early.
Conclusion
To convincingly draw a hand holding a rigid prop, what you need to learn is not to copy each finger to match a photo, but to understand how the hand embraces a block. When you know to construct the object block first, give the palm a cupped shape, use the thumb as an opposition pin, clearly separate the thenar – hypothenar, distinguish line language between the palm and dorsum, and maintain a continuous rhythm from the forearm to the fingertips, the hand will naturally look much more solid. That is also why these types of study sheets are useful: they don't teach you one fixed pose, but teach you a way of thinking that can be applied to all types of hands holding rigid props.
Where Should You Start When Drawing a Hand Holding an Object?
You should start from the object block and the palm block, not draw each finger first. After locking these two large blocks, then decide on the thumb and the group of long fingers.
Why is the Thumb Important When Drawing a Hand Holding an Object?
Because the thumb has opposition movement thanks to the trapeziometacarpal joint, allowing it to press against the other fingers to lock and pinch the object.
What are the Thenar and Hypothenar?
The thenar is the muscular mound at the base of the thumb, and the hypothenar is the muscular mound at the base of the pinky. These two areas create important thickness and cupping for the palm.
Why Does a Hand Holding an Object Often Look Fake?
Usually due to overly parallel fingers, a flat palm, a thumb with no locking force, and not clearly distinguishing the palm from the dorsum.
What Should You Practice to Draw a Hand Holding an Object More Naturally?
You should practice the palm block, finger rhythm, the thumb–index web, the silhouette of the finger group, and the rhythmic connection from the forearm to the hand, before getting into skin folds or nails.
Đánh giá bài viết
More from author
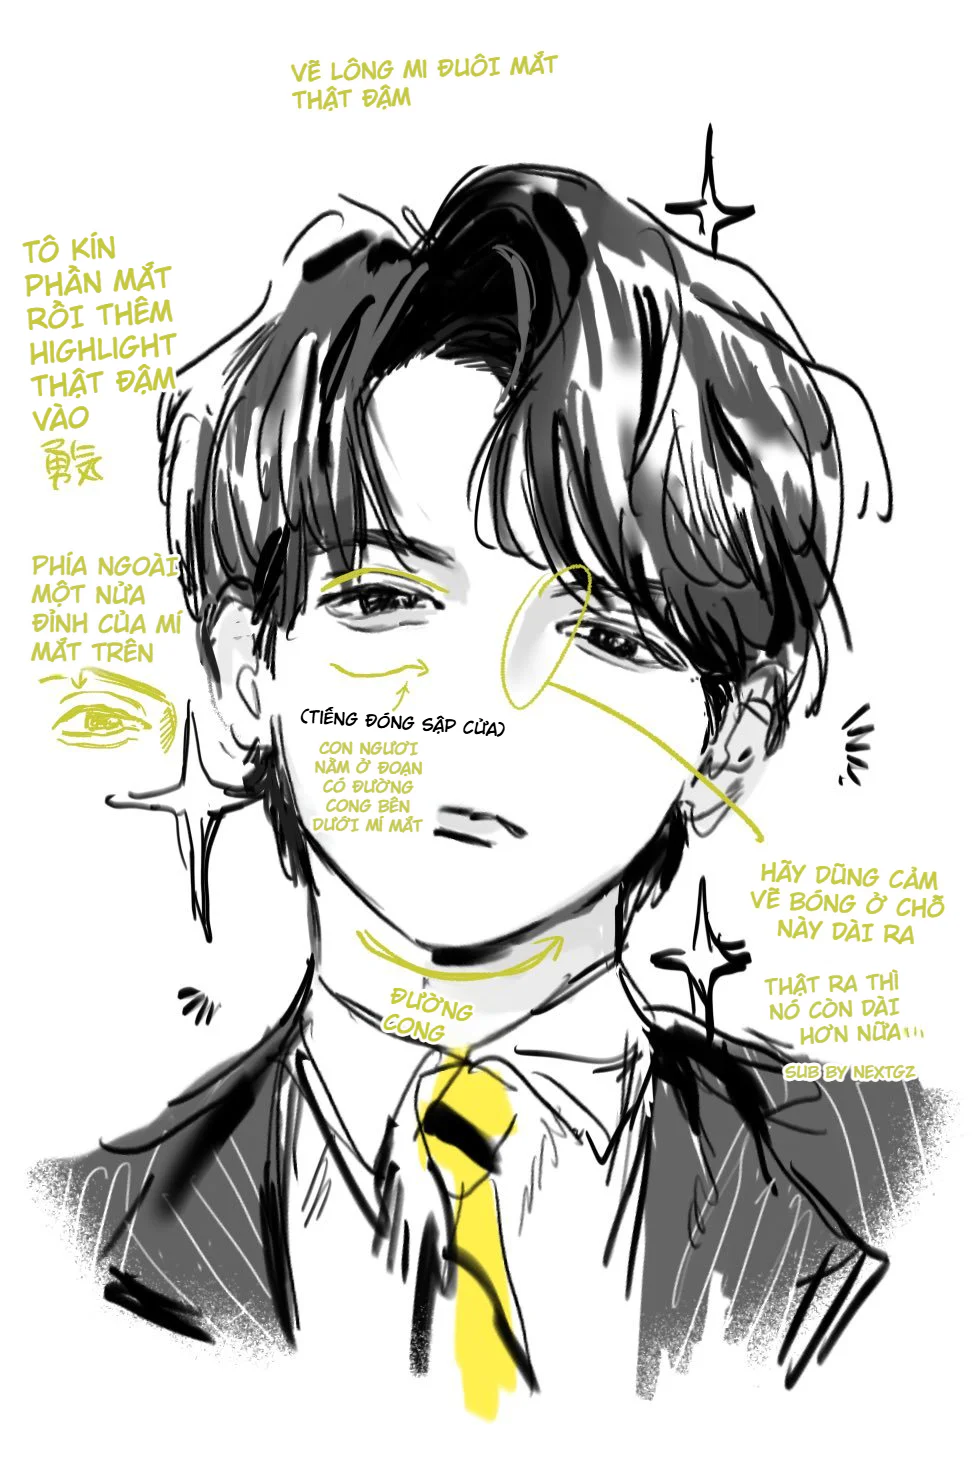
Cách vẽ nhân vật nam manga ngầu bằng mắt cụp, tóc đen bóng và halftone
So sánh các cách học Mẹo Vẽ Ký Họa Cảnh Đường và cách chọn hướng

Tự Học Clip Studio Paint Cơ Bản: Hướng Dẫn Toàn Diện Cho Người Mới Bắt Đầu

Bộ Sưu Tập 48 Brush Information Volume Tạo Chi Tiết Và Texture Cực Đỉnh Cho PS, Procreate, CSP
You might also like

Cách tô màu tóc bạc anime: quy trình đổ bóng, hòa màu và hoàn thiện tóc xám đẹp hơn

Cách tô màu tóc anime trong ibisPaint X theo quy trình 12 bước, lên khối đẹp mà không bị bệt

Hướng dẫn sinh tồn Cho Digital Artist 2026: Khi Kỹ Thuật Gặp Cá Tính

Bình luận
0 bình luận
Đăng nhập để tham gia thảo luận cùng cộng đồng!
Đăng nhập ngayĐang tải bình luận...