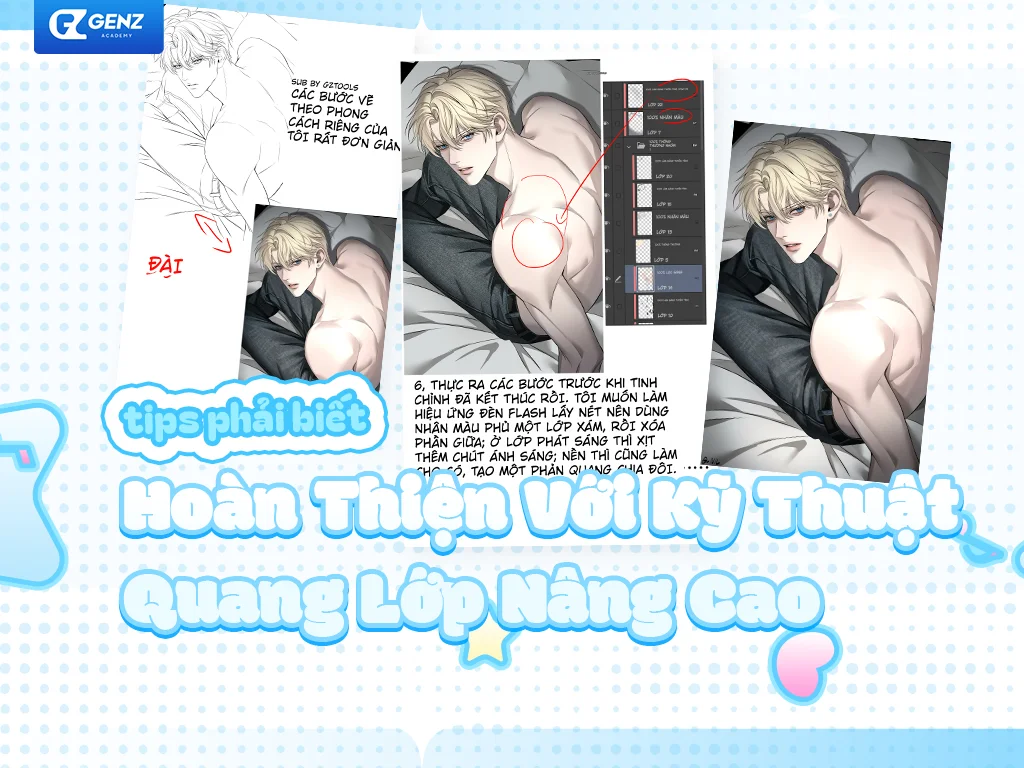
How to Create Light and Shadow Using Color Dodge: A Workflow for Rendering Light in Anime-Style Art
Guide on creating light and shadow using Color Dodge in anime art: from base color, Multiply, Color Dodge, Soft Light, detailed Multiply to Screen to enhance brightness, depth, and saturation.
 Free
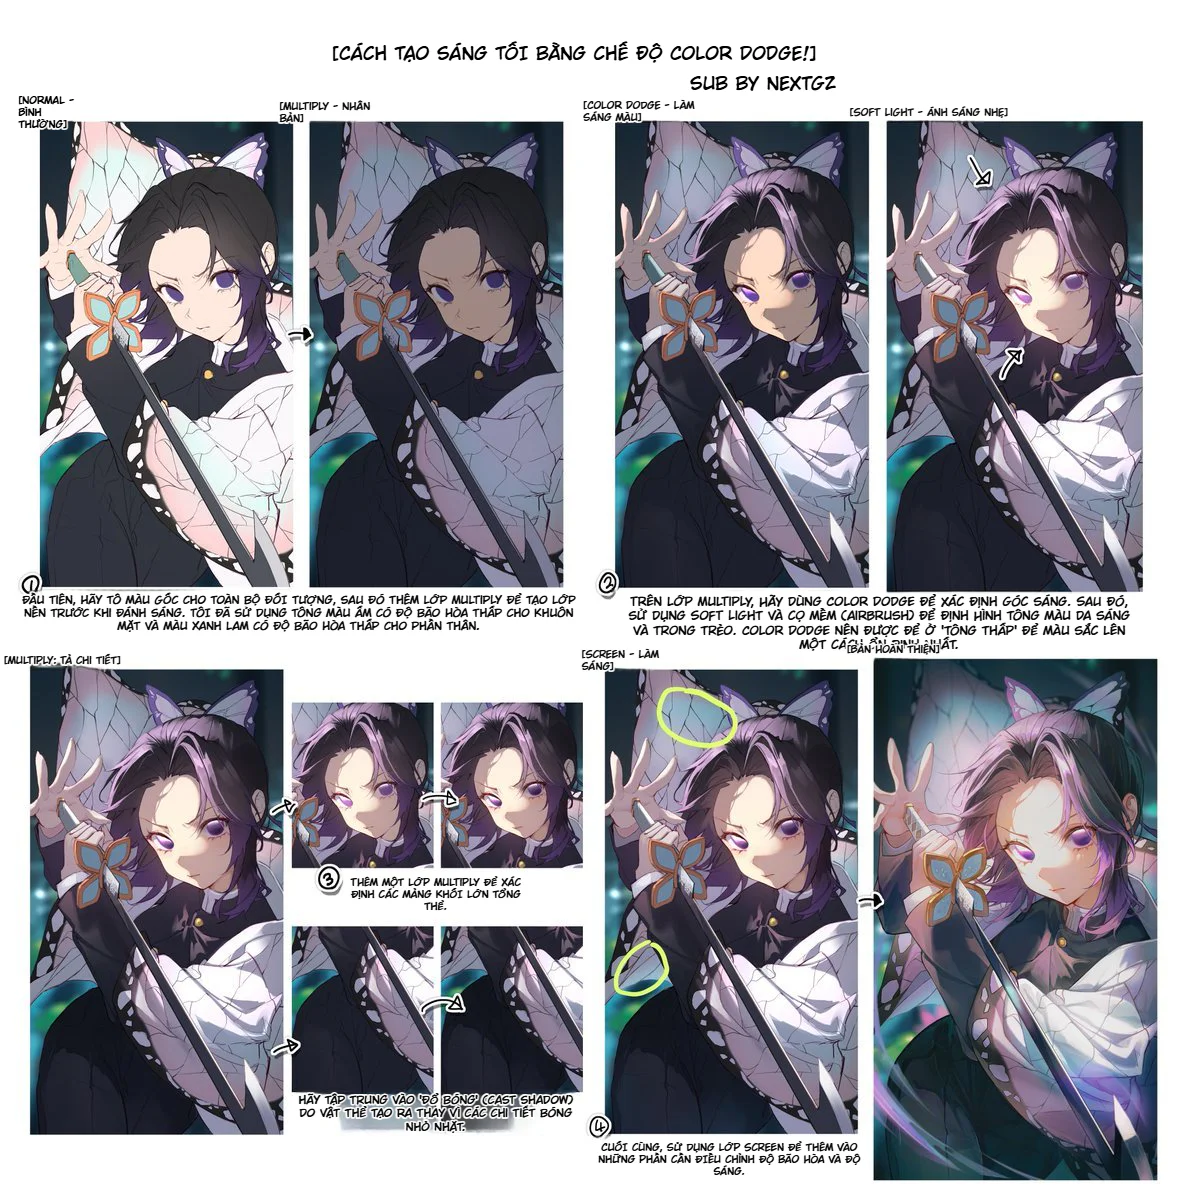
FreeBlend modes are not a last-minute trick to save a painting. Used correctly, they are a highly effective way to organize light and form, especially for high-contrast anime illustrations. The workflow in the image follows a very intelligent order: starting with the base color in Normal mode, locking in large shadows with Multiply, using Color Dodge to define the light source and push the lit areas, using Soft Light to blend the light more smoothly, then returning to Multiply to solidify the large forms and cast shadows, and finally finishing with Screen to fine-tune areas that need to be brighter and more saturated. Both Clip Studio Paint and Adobe describe these blend modes as tools for controlling how color layers interact, particularly useful for creating depth, brightness, and contrast in digital painting.
The most valuable lesson in this workflow is that it doesn't use Color Dodge as a magic wand swept across the entire image. Instead, it builds light in layers. This means the strongest highlights are only pushed after the painting has a solid base color and sufficiently strong shadows. This is why the final result looks bright, clear, and color-rich without appearing chaotically blown out. Art Rocket also notes that the value of blend modes lies in how they allow one color to affect the various values and hues beneath it differently, enabling artists to push light or shadow faster while preserving surface richness.
Why is this workflow effective for anime-style art?
Anime-style art typically has three clear needs when rendering light: highlights must pop, shadows must be clean, and colors must still look "good" after pushing contrast. If you only paint shadows with a dark color on a normal layer, the painting can easily look muddy. If you only sweep light with a pale color, it can look flat. Blend modes solve this problem because each mode processes light and dark with a different logic. In Clip Studio Paint, Multiply darkens by multiplying the blend layer's color with the base layer, making it ideal for shading; Screen is the opposite effect of Multiply, helping colors become brighter; while Color Dodge brightens the base color and reduces contrast, thereby creating more saturated midtones.
Put simply for practical application, this workflow allows you to assign clear roles to each step: Multiply handles the dark masses, Color Dodge handles the key lit areas, Soft Light handles color blending and soft light diffusion, and Screen handles the final boost layer. When each blend mode only carries its specific role, the painting becomes much easier to control compared to cramming everything into a single lighting layer.
Step 1: Keep the base color in Normal before adding light
The first frame in the image is the base color layer in Normal. This step seems simple but is the foundation of the entire workflow. The base color must be clear enough to later withstand Multiply and Color Dodge layers without becoming dirty or too washed out. When setting up the base, the key things to lock in first are:
local color of skin, hair, clothing
major light-dark relationships between forms
the character's silhouette
the location of the main light source
If the local color is too pale from the start, subsequent bright blend modes can easily make the image blurry or blown out. If the base is too dark and saturated, the following Multiply layer will cause the painting to darken too quickly. That's why many artists often choose a fairly "moderate" base, clean enough for layering but without pushing contrast too early. Blend modes are most effective when interacting with a stably organized color foundation.
Step 2: Use Multiply to establish the first shadows
The second frame of the image is the Multiply layer. This is the first step in locking in form and depth. In Art Rocket's guide to blend modes, Multiply is described as a mode that multiplies the blend layer's color with the base layer, producing a darker result and being especially useful for shading. Adobe also describes blend modes as tools that change how colors overlay to increase depth and contrast.
In this workflow, the first Multiply layer should do the following:
solidify the light-occluded side of the hair
lock in large shadows on skin and clothing
define areas under the chin, under the bangs, under sleeves, or parts blocked from light by other objects
ensure shadowed areas still have form, not just being a black patch
The important point is not to get lost in small details too early. In this first Multiply step, what's most needed are the large forms. The image in the tutorial also shows that after this step, the character already has much clearer depth, but small details haven't been fully pushed yet. That's the correct order.
Step 3: Use Color Dodge to define the light direction
This is the central step of the entire process. In Clip Studio Paint, Color Dodge is described as a mode that brightens the base layer's color and reduces contrast, thereby producing more saturated midtones. In Adobe, Color Dodge is also defined as brightening the base color to reflect the blend color. Simply put, this blend mode is very suitable for creating the feeling of light "hitting the surface," especially on skin, hair, eyes, and details needing a slight glow.
But the key point is that Color Dodge should not be used to "light up the whole painting." In the image, it's used to:
define the main light-catching area on the hair
clarify the lit side of the skin
add pop to details that truly receive light
suggest a feeling of clarity, lightness, and a bit of glow
When using Color Dodge, think in terms of "placing the focal point of light" rather than "sweeping light everywhere." A good Dodge area usually has:
clear highlight edges
a sufficient transition to the surrounding area
a solid dark background behind it to make the lit area pop
If overused, Color Dodge will quickly make the painting look blown out and lose form. But if used in the right places, it's an extremely powerful push for light while keeping colors rich.
Step 4: Use Soft Light to create soft light diffusion and color blending
The next frame in the image is Soft Light. This is a very smart choice after Color Dodge. Adobe describes Soft Light as a blend mode that darkens or lightens depending on the blend color, with an effect similar to a soft, diffused light source, like a diffused spotlight. It's softer than Hard Light and very useful when you want to infuse light or color without making highlight edges too harsh.
In practice, Soft Light is great for:
blending the hair's light-catching area more smoothly
gently pushing the pink, purple, or blue hues of ambient light onto skin or hair
helping the area just Dodged not look "detached" from the surrounding base
keeping the painting feeling like light is covering the surface, not just being a harsh, glaring patch
In this image, Soft Light plays the role of "beautifying the Dodge step." If Color Dodge is a spotlight shining directly on the image, then Soft Light is like a layer of soft glow that makes that light source less crude and integrates better into the whole.
Step 5: Return to Multiply to solidify large forms and cast shadows
A very noteworthy detail in this tutorial is that after pushing light with Dodge and Soft Light, the author returns to Multiply once more. This is a very correct move. The reason is that after having strong light, the painting can easily feel like it's "losing form," especially for characters with bright hair, bright skin, or clothing with many reflective surfaces. A second Multiply layer helps pull the painting back to a state with weight.
Art Rocket also emphasizes that Multiply is very suitable for shading and increasing an image's depth. In another article about fixing flat paintings, Clip Studio TIPS even proposes a two-layer solution: one Multiply layer to fix and deepen shadows, and one Glow Dodge layer to increase light and color. This is almost exactly the logic of the workflow in the image.
In this second Multiply step, you don't need to paint everywhere like in the first step. Prioritize:
cast shadows created by objects
core shadows of large forms
the deepest dark areas between hair, sleeves, folds
areas needing separation between foreground and background
This prevents the painting from being "swallowed by light."
Step 6: Focus on cast shadows, don't get lost in small incidental shadows
A very useful note in the image is to focus on shadows cast by objects rather than small, incidental shadows. This is a very correct mindset for a blend mode workflow. Large cast shadows are what help viewers quickly read the image's structure. If you get too caught up rendering tiny shadows without clear cast shadows, the painting will look busy but not solid.
In high-light anime illustrations like this one, cast shadows play a huge role because they:
clearly separate planes
add drama to the pose
make Color Dodge areas appear brighter due to adjacent dark backgrounds
keep the overall image from becoming overly "silky"
In short, Dodge and Soft Light make the image sparkle, but well-placed cast shadows maintain its persuasiveness.
Step 7: Use Screen to fine-tune final brightness and saturation
The final frame of the tutorial uses Screen. In Clip Studio Paint, Screen is described as the opposite effect of Multiply: it inverts the base color and then multiplies it with the blend layer's color, resulting in a color brighter than the original. This is a great blend mode for the "final brightness boost" step, when you don't want highlights as harsh as Color Dodge but still need to increase brightness and saturation in a few spots.
Screen is suitable for:
brightening the background behind the character
adding subtle ambient light
boosting some areas of skin, hair, or accessories where Dodge is making things too sharp
adjusting saturation/brightness in nearly finished parts
Unlike Color Dodge, Screen is much gentler. Therefore, it's very suitable for the final step when you just want to "polish" the painting.
Why is the formula Multiply → Color Dodge → Soft Light → Multiply → Screen logical?
Because it moves from form to light, then back to form, before the final polish. This is a very robust order.
Multiply 1: locks in base shadows
Color Dodge: defines the light focal point
Soft Light: blends light into color
Multiply 2: pulls back depth
Screen: fine-tunes final brightness and saturation
This method avoids the two most common mistakes beginners make:
one is using too many bright layers, causing the painting to lose form; the other is not knowing how to bring back the sparkle after adding shadows.
Common mistakes when using Color Dodge in digital painting
The first mistake is using Color Dodge with too large a brush, too high opacity, and over too large an area. This causes the light to blow out white and lose all color transition.
The second mistake is Dodging on a base that doesn't have a solid enough Multiply layer. The light then looks like a filter, not attached to the form.
The third mistake is not using a "blending" layer like Soft Light, making the Dodge area look completely detached from the painting.
The fourth mistake is not returning to shadows after pushing light, leading to a flat painting.
The final mistake is using Screen for every type of light. Screen gives nice brightness, but it cannot replace the role of Color Dodge in creating strong highlight focal points.
A concise process you can use right away
If you need a very simple summary, you can follow this formula:
Set up base color in Normal
Establish main dark forms with Multiply
Place main lit areas with Color Dodge
Use Soft Light to integrate light into the whole
Add Multiply to lock in shadows and cast shadows
Use Screen for final brightness/saturation adjustments
Conclusion
This tutorial is worth learning because it shows that Color Dodge should not stand alone. To achieve beautiful, deep light, you must let it work alongside a logical system of blend modes. Multiply handles dark forms, Color Dodge handles the light focal point, Soft Light handles diffusion and blending, and Screen helps with gentle final light adjustments. Clip Studio Paint describes Multiply as a mode very useful for shadows, Screen as the opposite effect of Multiply, and Color Dodge as brightening the base color and creating more saturated midtones; Adobe describes Soft Light as a soft, diffused light source affecting the image. When combining these roles in the correct order, you get a very powerful lighting rendering workflow for anime art that still preserves form and color.
FAQ
What is Color Dodge used for in digital painting?
Color Dodge is used to brighten the base color and create strong highlights. It's very suitable for main light-catching areas, soft glows, and surfaces needing a luminous feel.
Why should you shade with Multiply before using Color Dodge?
Because Multiply helps establish dark forms and depth first. When the dark foundation is solid, Color Dodge can then create strong highlights without flattening the painting.
How is Soft Light different from Color Dodge?
Soft Light gives a softer effect, like a soft, diffused light source; Color Dodge is stronger, creates harsher highlights, and is typically used to define the focal point of light.
When should Screen be used?
Screen is suitable in the final step to fine-tune brightness and saturation in areas needing a gentler touch than Color Dodge. It is the opposite effect of Multiply and results in a color brighter than the original.
Can you use just one blend mode for all lighting?
You can, but it's harder to achieve good results and harder to control. A multi-blend-mode workflow allows clear separation of roles for shadows, key light, diffused light, and final adjustments, making it much more stable.
Đánh giá bài viết
More from author
Cách vẽ nhân vật nam manga ngầu bằng mắt cụp, tóc đen bóng và halftone
So sánh các cách học Mẹo Vẽ Ký Họa Cảnh Đường và cách chọn hướng
Tự Học Clip Studio Paint Cơ Bản: Hướng Dẫn Toàn Diện Cho Người Mới Bắt Đầu

Bộ Sưu Tập 48 Brush Information Volume Tạo Chi Tiết Và Texture Cực Đỉnh Cho PS, Procreate, CSP
You might also like
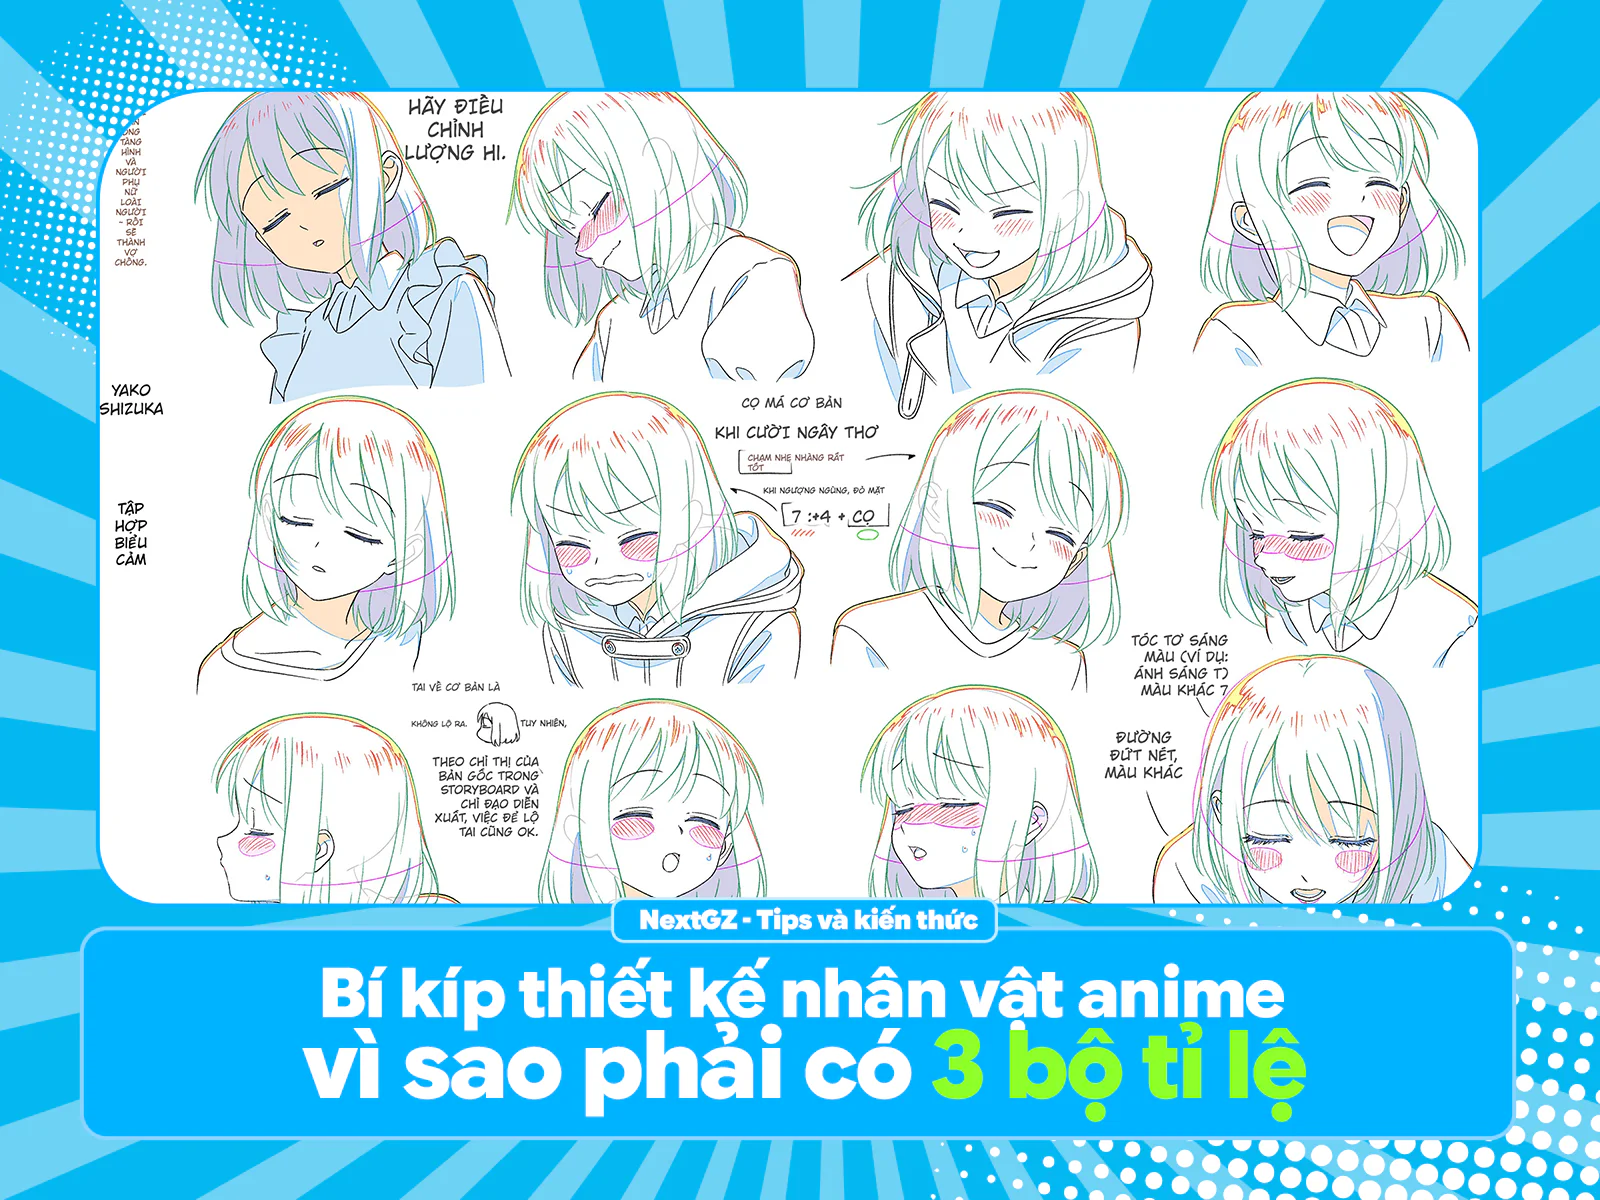
Bí kíp thiết kế nhân vật anime: vì sao phải có 3 bộ tỉ lệ và ~50 biểu cảm?
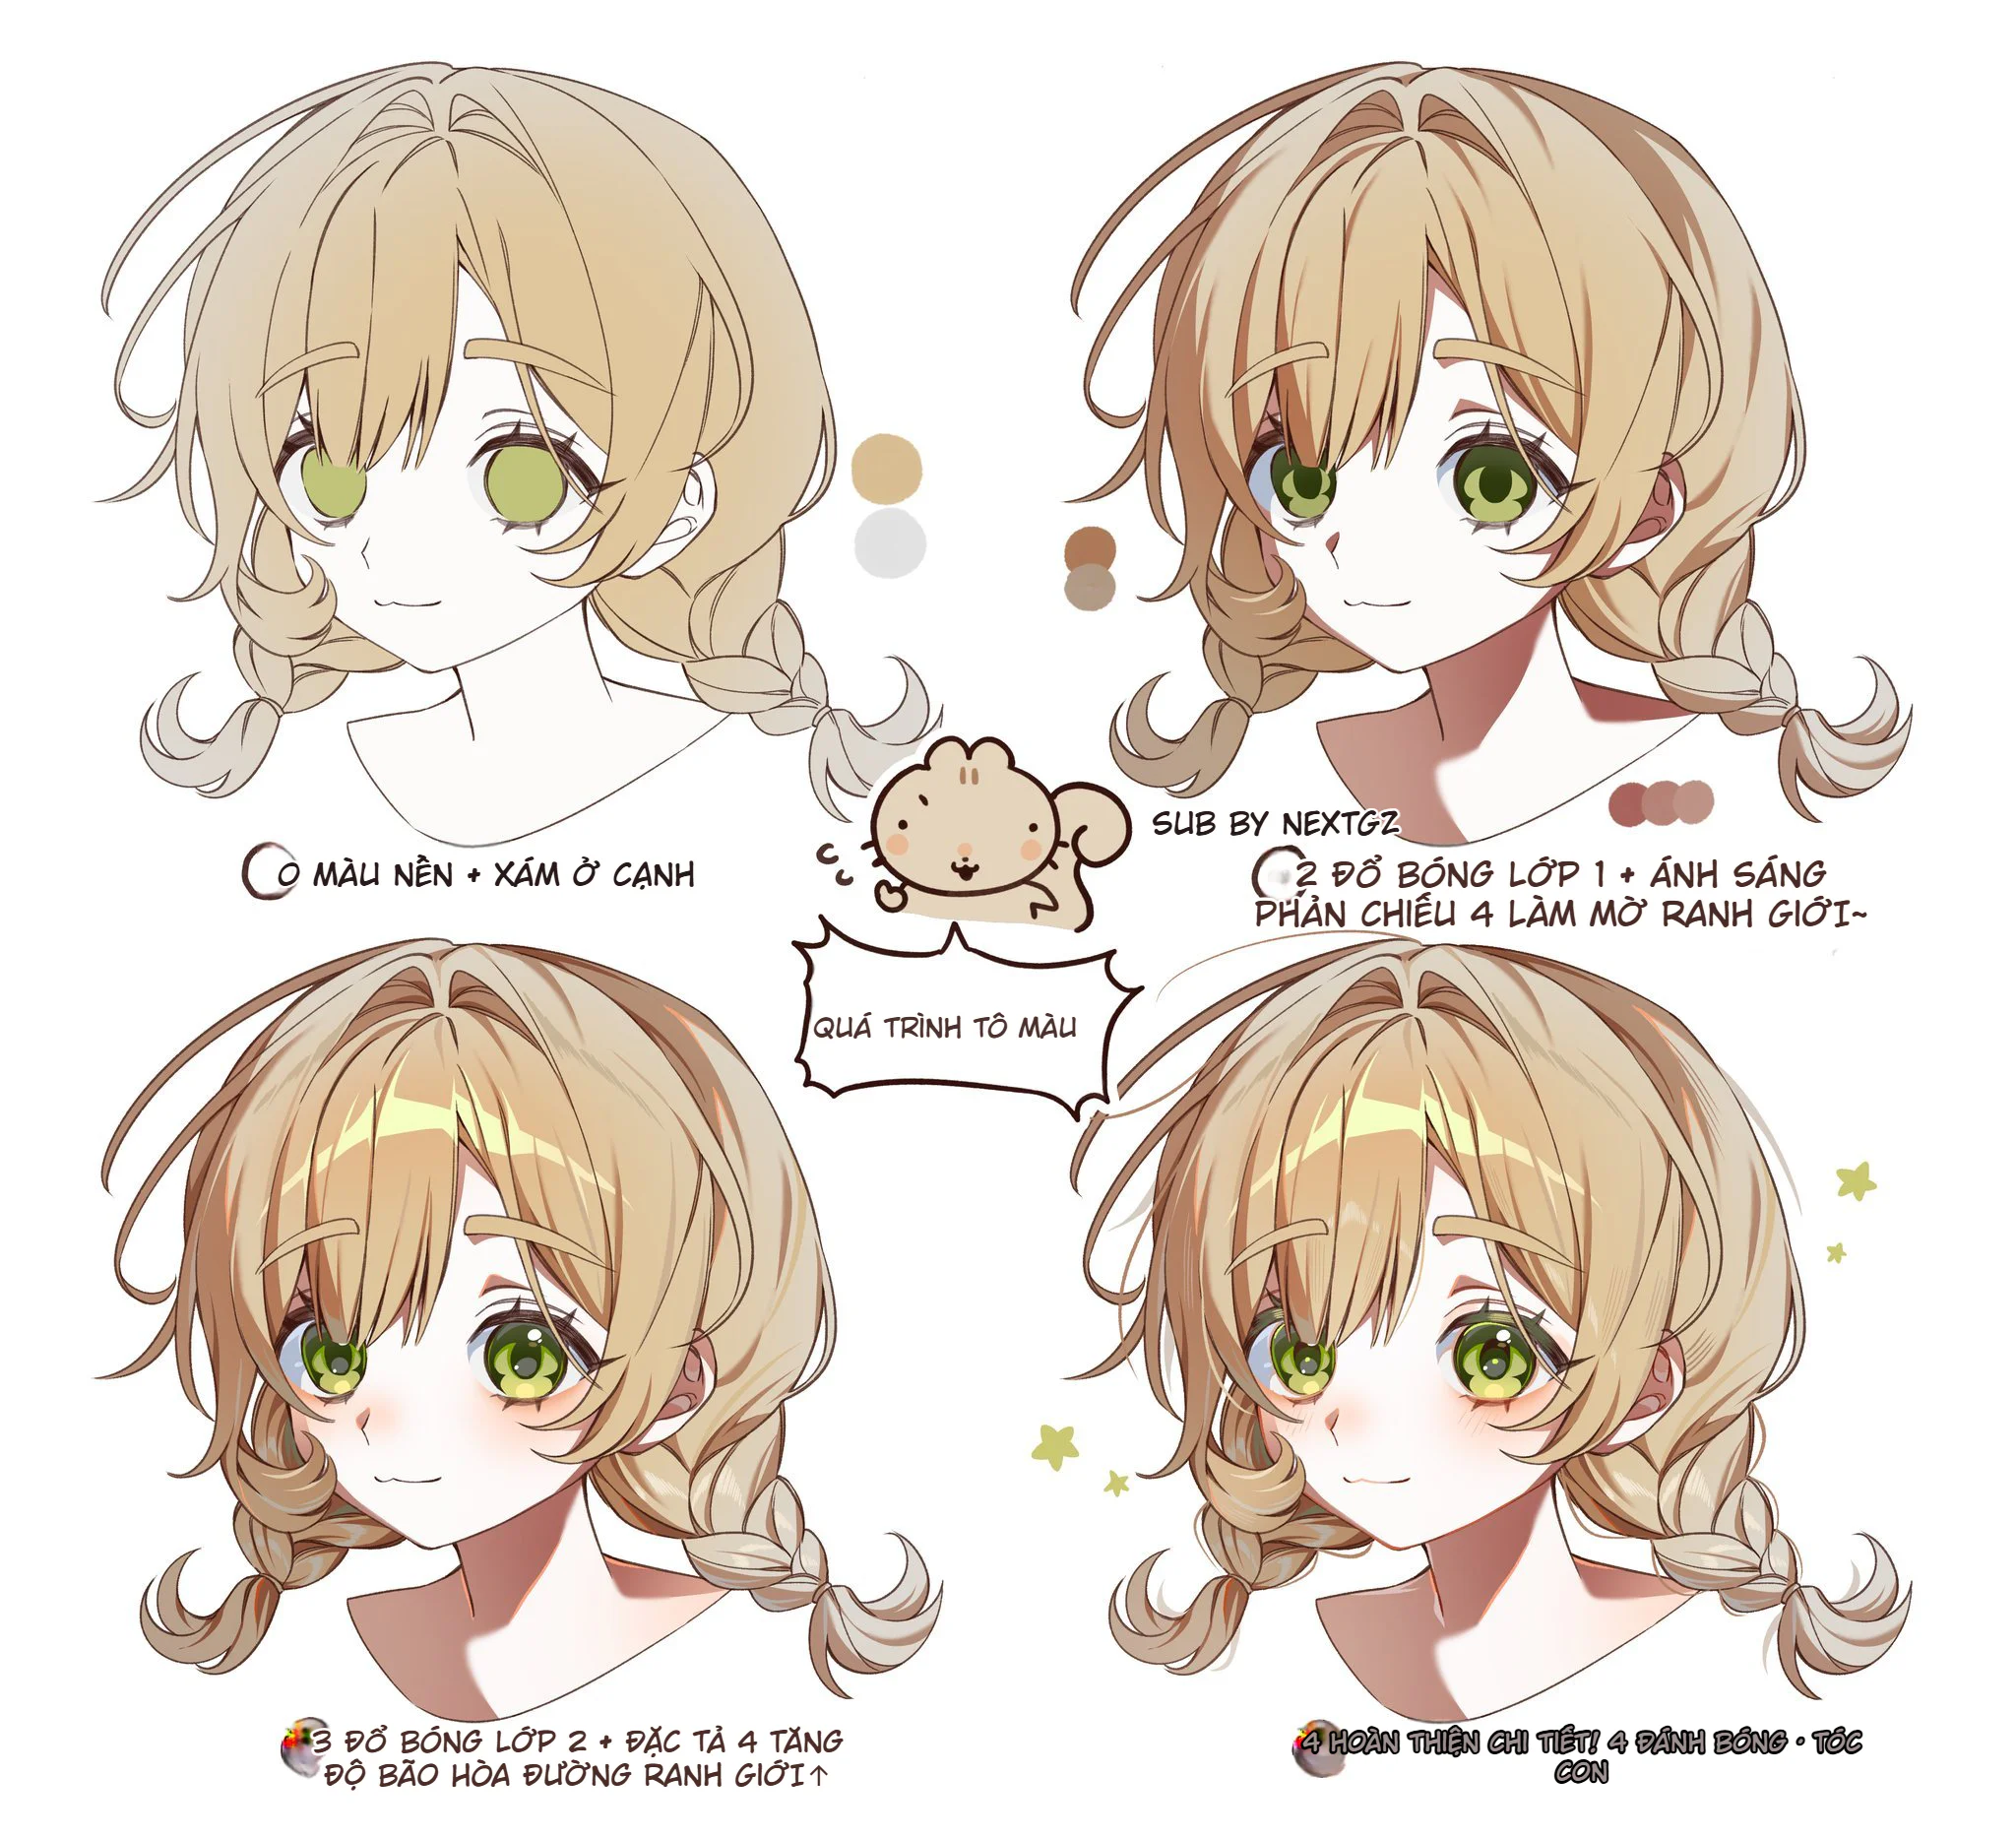
Cách tô tóc anime vàng mềm mịn: quy trình 4 bước từ màu nền đến hoàn thiện chi tiết
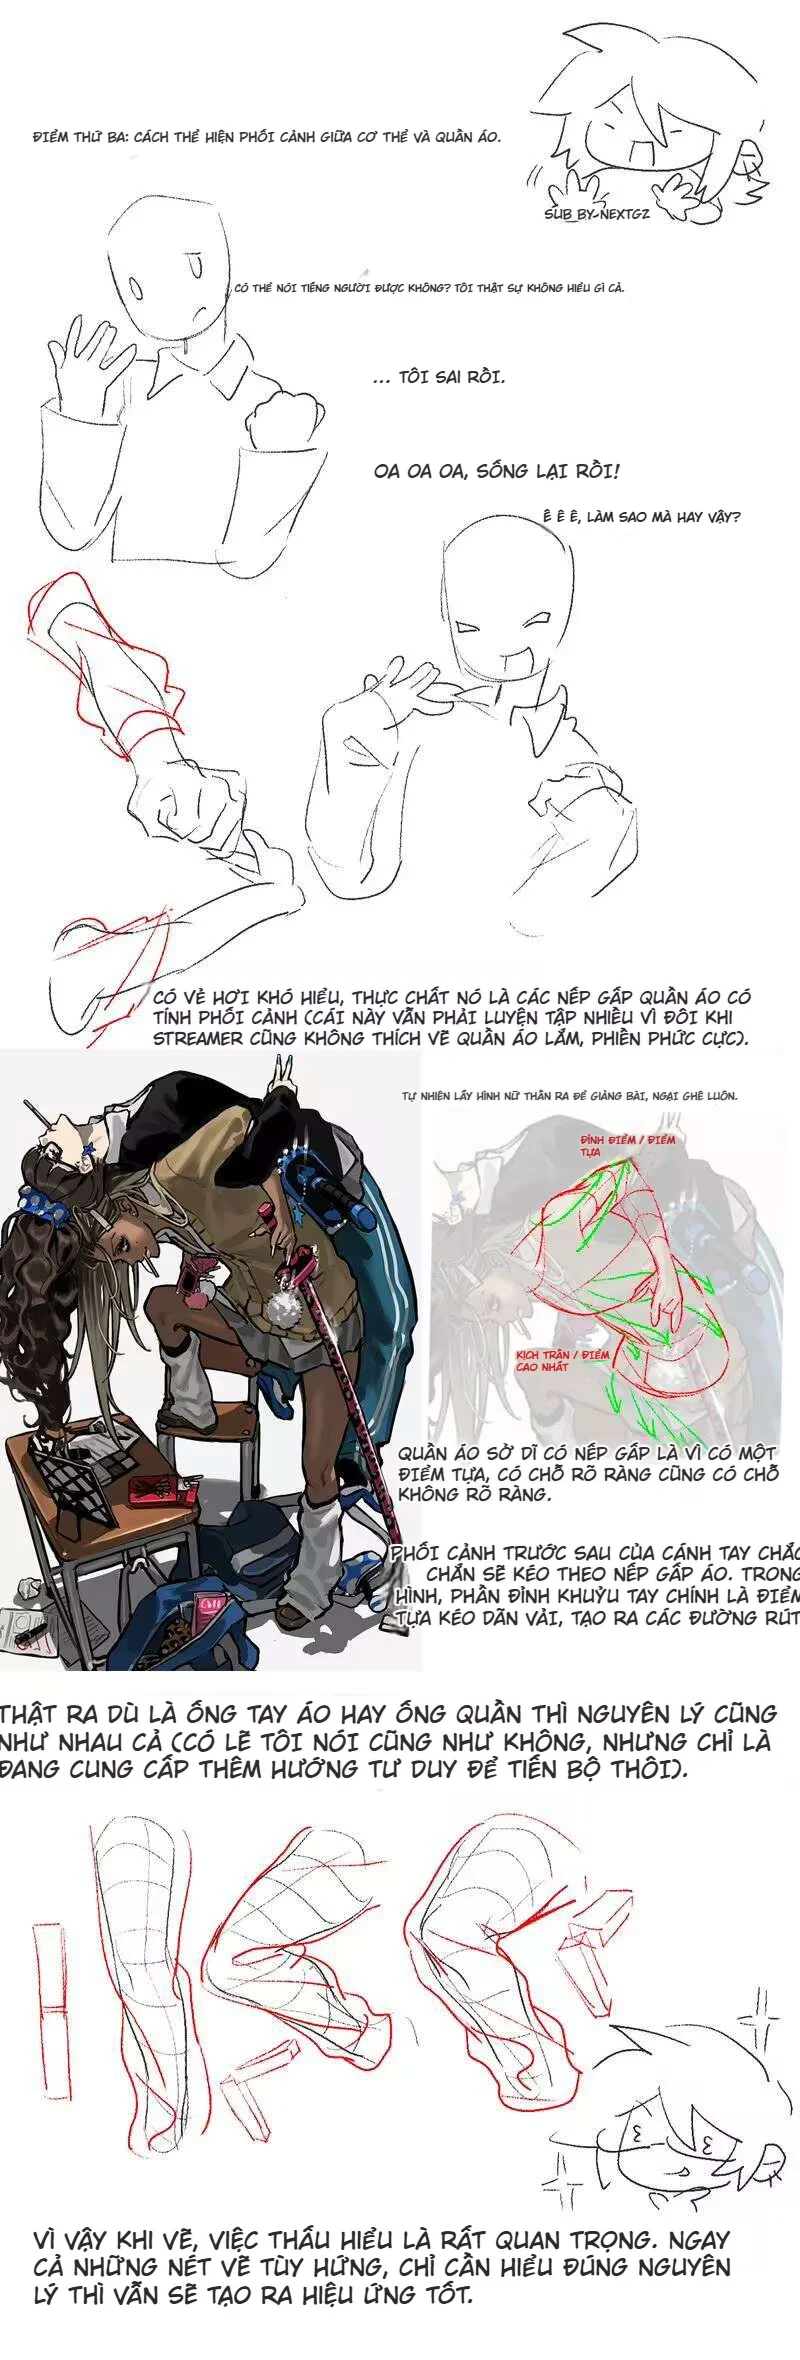
Cách vẽ dáng người sinh động: tư duy động thái cơ thể cho người mới học vẽ

Bình luận
0 bình luận
Đăng nhập để tham gia thảo luận cùng cộng đồng!
Đăng nhập ngayĐang tải bình luận...