How to Draw Anime Digital Painting: From Sketch to Completion with Advanced Layer Lighting Techniques
Drawing anime in a digital painting environment is not just a trend, but has become an essential skill for young artists who want to develop a career in the creative field.
 Free
Free
Introduction
Drawing anime in a digital painting environment is not just a trend; it has become an essential skill for young artists who want to develop a career in the creative field. By combining traditional anime style with modern digital painting technology, you open up endless possibilities to create unique and professional works. This article will guide you through the entire process of digital anime painting, from the most basic steps to advanced rendering techniques used by professional artists.
Foundation to Prepare Before You Start
Choosing the Right Digital Painting Software
In 2025, the market for digital drawing software has matured significantly. Procreate is currently the top choice for iPad users, thanks to its intuitive interface and excellent processing performance. Adobe Photoshop still holds the most popular position among concept artists and professional illustrators. Clip Studio Paint stands out even more in the manga and anime field due to its advanced tools specifically designed for comic artists. Corel Painter is suitable for those who want to simulate the characteristics of traditional hand-drawn art most realistically.
When choosing software, consider your specific needs. If you focus on anime and manga, Clip Studio Paint is the optimal choice. If you want high flexibility and comprehensive rendering tools, choose Photoshop or Procreate.
Necessary Equipment
To draw digital anime effectively, you will need a high-quality drawing tablet. A drawing tablet is not just an input device; it is an extension of your hand. It must support good pressure sensitivity, allowing you to control the thickness, tilt, and varying opacity based on the pressure applied. Your computer or iPad also needs sufficient processing power, especially when working with files containing many layers.
A color-calibrated monitor is absolutely essential. If the colors are inaccurate on your screen, the entire artwork will be affected. It is advisable to invest in a monitor with high color accuracy, especially if you plan to print your work or sell it online.
The Digital Anime Drawing Process from A to Z
Step 1: Sketching Basic Shapes
Before starting to draw any details, take time to construct the shapes for the character. This is the foundation of a high-quality anime drawing. Divide the frame into equal parts to ensure proper body proportions. In anime, the body proportion is usually 1:7 or 1:8, meaning the total body height is 7 to 8 times the length of the head.

Start by drawing a large circle for the top of the head. Below this circle, draw an inverted trapezoid to create the chin area. Add two curved lines on the sides to define the face contour. For accuracy, draw a vertical centerline dividing the face into two equal halves; this is a crucial step for facial features to be symmetrical.
After the head, continue constructing the neck, shoulders, torso, and other limbs using basic shapes like cylinders and boxes. Don't get too detailed at this stage; just determine the overall composition and proportions of each part.
Step 2: Drawing Facial Features
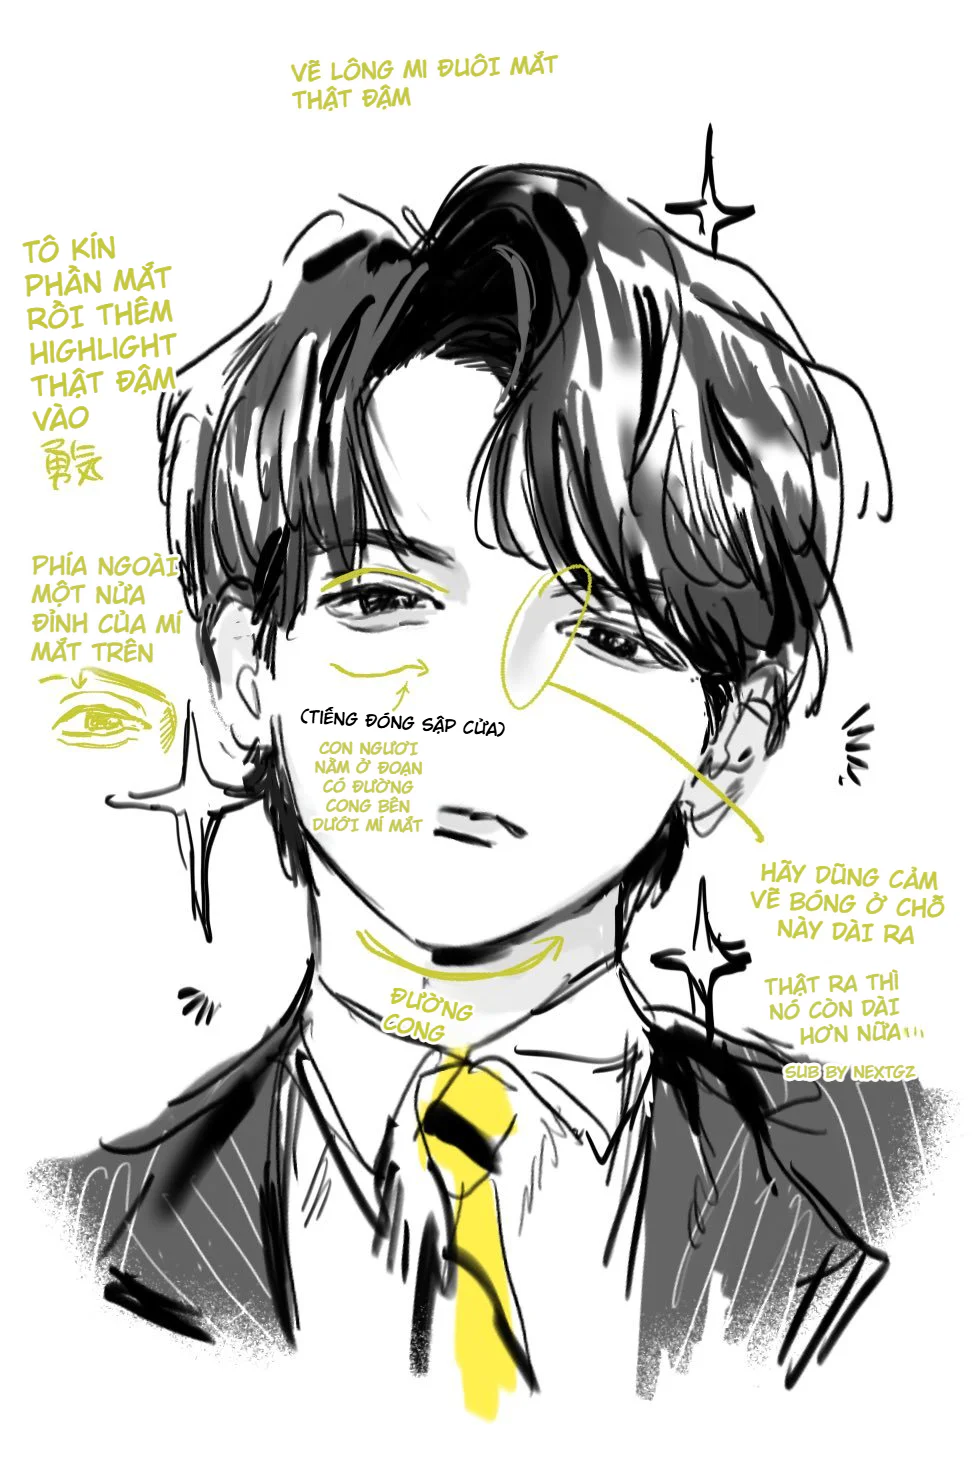
After completing the shape sketch, it's time to start drawing the facial features. In anime, the eyes are the most important element as they determine the character's expression.
Drawing Anime Eyes
Anime eyes are usually very large and occupy a significant portion of the face. Start by drawing a large eye shape in the form of an oval or a rounded rectangle. Draw two curved lines above to create the upper eyelid. The upper eyelid is usually thicker than the lower one, creating an elegant look for the character.

Inside the eye, draw a large circle for the iris. Within this iris, draw a smaller circle for the pupil. To create a shiny effect for the eyes, leave one or two small white dots in the pupil. This is a small detail that makes the eyes look much more lively and expressive.
Drawing the Nose and Mouth
The nose in anime is usually drawn very simply, just one or two thin lines. The nose can be a small straight line, a very small triangle, or even just a dot. There is no need to draw details, as it would lose the anime feel.
The mouth is drawn in the middle area between the nose and chin. The shape of the mouth can be a curved line like a smile, or a straight or slightly curved line to express different emotions. If the character is smiling, draw an upward-curving line. If the character is sad, draw a downward-curving line.
Drawing Eyebrows
Eyebrows are a key factor in determining expression. Eyebrows are drawn above the eyes, in the form of two curved or straight lines. The shape of the eyebrows will change depending on the emotion you want to convey.
Step 3: Shaping the Hair
Anime hair comes in diverse styles and is a great way to express the character's personality. Instead of drawing individual strands of hair, first construct large blocks for the hair. Divide the hair into large sections, then add details for smaller locks.
Start by sketching the overall shape of the hair. It can be long hair, short hair, curly hair, straight hair, or any style. Then, divide the hair into sections to determine the direction and length of each lock.
To make anime hair look more natural, draw additional small locks around the face and at the back. These locks will create a soft and natural feel for the drawing, rather than a rigid block of hair.
Step 4: Finalizing the Sketch
After completing the main details, erase the extra lines from the shape construction process. Keep only the lines that clearly describe the character's form. At this point, you will have a clean, beautiful sketch ready for the next step: coloring.
When erasing, do it gently, avoiding smudging or damaging the main lines. If using digital software, you can create a separate layer for the sketch and a separate layer for the main lines, making the editing process easier.
Advanced Coloring and Rendering Techniques
Step 5: Creating Base Layers and Determining Colors
Before starting to color, create a separate layer for the sketch to separate it from the coloring layer. Then, create a new layer below this sketch layer to begin coloring.
Determine the main color palette you will use for the character. Choose colors that are harmonious and suitable for the character's personality and context. If the character is a strong warrior, you might choose warm colors like red, orange, yellow. If the character is a cold mage, choose cool colors like blue, purple, white.


Start by coloring the background for the base layer. Choose a suitable background color to make the character stand out. Then, color each part of the character: hair, skin, clothes, accessories.
Step 6: Using Blend Modes to Create Rendering
This is the part that many beginners often overlook, but it is incredibly important for elevating the quality of the artwork.
Multiply mode is one of the most popular Blend Modes for creating shadows. When you use Multiply, the colors will blend and darken the area you paint. This is great for creating shadows for hair, skin, and clothes. Paint the shadows on a separate layer, set it to Multiply mode, and you can easily adjust the darkness of the shadow using the opacity slider.

Overlay mode is used to create light and highlights without losing the original color. When you paint a highlight on an Overlay layer, it will interact with the layers below naturally, creating the feel of light reflecting on a surface.
Screen mode is similar to Overlay but stronger. Screen will make the areas you paint become brighter. This is very useful for creating magical light, spell effects, or very bright highlights.
Color mode is a magical tool you should know about. When you set a layer to Color mode, you can change the color without affecting the brightness or darkness. This is very useful when you want to adjust the color tone of large areas without having to repaint from scratch.
Soft Light mode is a gentler option compared to Overlay. Soft Light creates more subtle light and dark effects, suitable for areas needing smooth gradients from light to dark.
Step 7: Establishing the Overall Form and Determining Light and Shadow
Before going into details, establish the overall form for the entire character. This is the stage where you determine the light source, where the shadows fall, and the light-to-shadow ratio in the image.

Choose a wide brush and start blocking in large areas of color. At this point, don't worry too much about details. Instead, focus on building an accurate light and shadow composition. Which part is the brightest? Which part is the darkest? Which parts are in between?
During this overall blocking-in process, change colors continuously. Instead of using just one color for the hair, try mixing different colors. For example, for the hair, you could use blue, green, and even a bit of purple. This will make the artwork look more vibrant and interesting.

When blocking in the overall form, use Blend Mode layers to create effects. If you want to create shadows, use Multiply. If you want to create light, use Screen or Overlay.
Step 8: Refining Details and Enhancing Depth
After establishing the overall form, it's time to start adding fine details. Now you can switch to smaller brushes and start sharpening edges, adding small hair strands, and brightening key highlights.

Pay attention to the eyes – this is the part viewers will focus on first. Make sure the eyes have high depth, with clear highlights and sharp shadows.

Add secondary details like light reflections on clothes, subtle drop shadows under the chin, or highlights on the edges of the hair to create a sense of depth.
Common Mistakes to Avoid
Using Too Much Black or White
A very common mistake is using 100% black or 100% white to create shadows and highlights. This will make the artwork look stiff and unnatural. Instead, use richer colors. For example, instead of using pure black for shadows, use dark blue or dark purple. Instead of pure white for highlights, use light cream or light yellow.
Overusing Filters and Effects
Digital Painting software offers many attractive filters and effects, but overusing them will ruin your artwork. Use filters carefully and purposefully. Filters should be a tool to enhance the artwork, not to hide drawing mistakes.
Skipping the Overall Blocking-In Process
Many beginners start detailing too early. They will draw small hair strands, clothing details, before completing the overall light and shadow composition. This will lead to having to redraw many times and wasting time. Always block in the overall form first
Đánh giá bài viết
More from author
Cách vẽ nhân vật nam manga ngầu bằng mắt cụp, tóc đen bóng và halftone
So sánh các cách học Mẹo Vẽ Ký Họa Cảnh Đường và cách chọn hướng
Tự Học Clip Studio Paint Cơ Bản: Hướng Dẫn Toàn Diện Cho Người Mới Bắt Đầu

Bộ Sưu Tập 48 Brush Information Volume Tạo Chi Tiết Và Texture Cực Đỉnh Cho PS, Procreate, CSP
You might also like
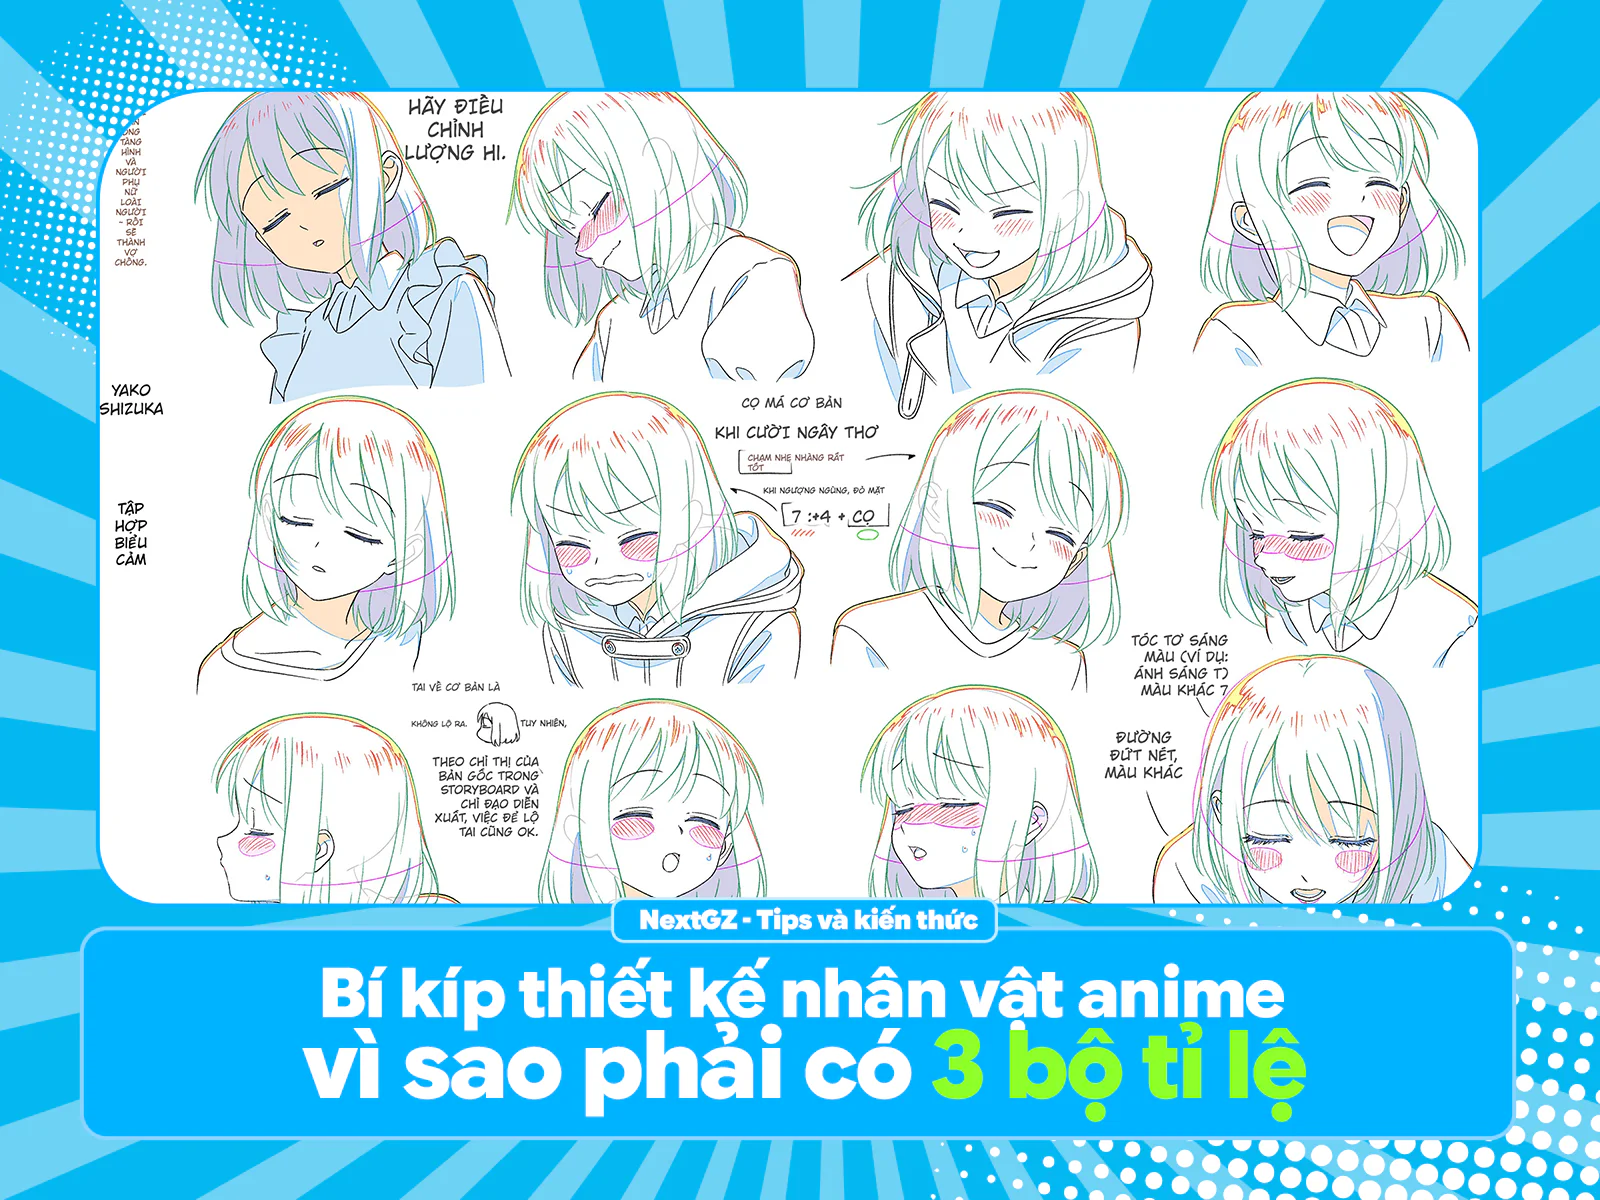
Bí kíp thiết kế nhân vật anime: vì sao phải có 3 bộ tỉ lệ và ~50 biểu cảm?
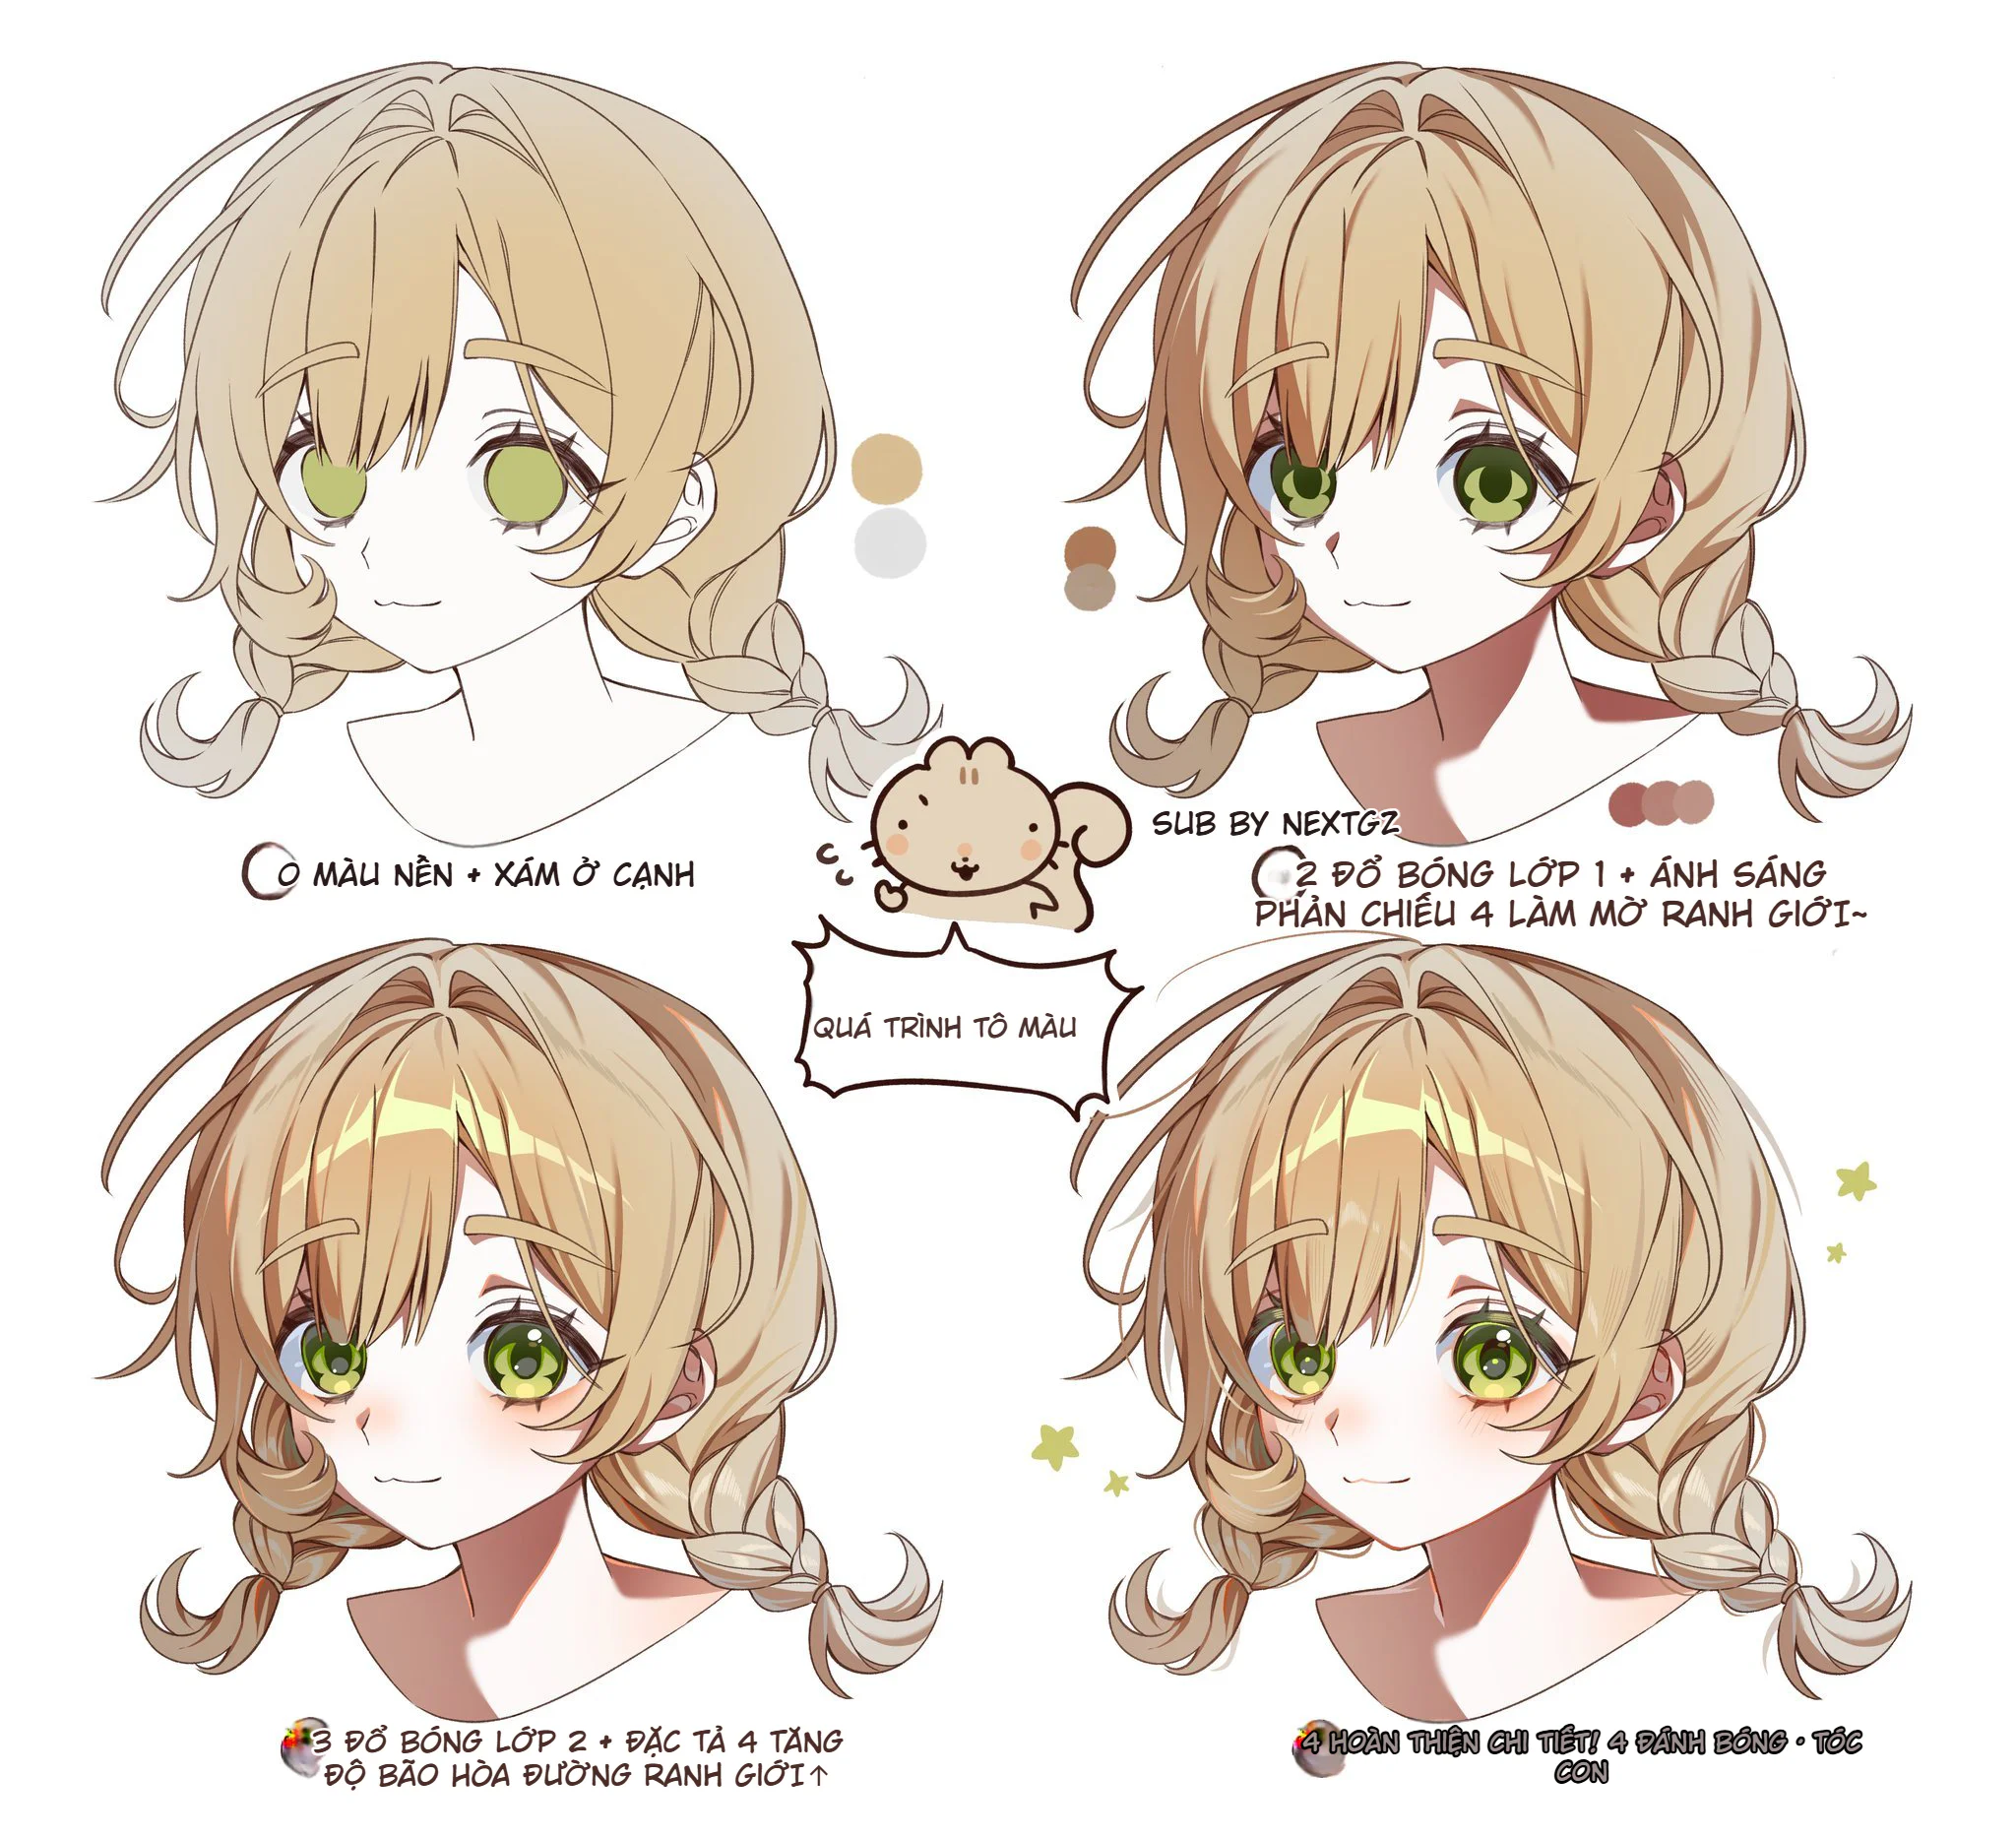
Cách tô tóc anime vàng mềm mịn: quy trình 4 bước từ màu nền đến hoàn thiện chi tiết
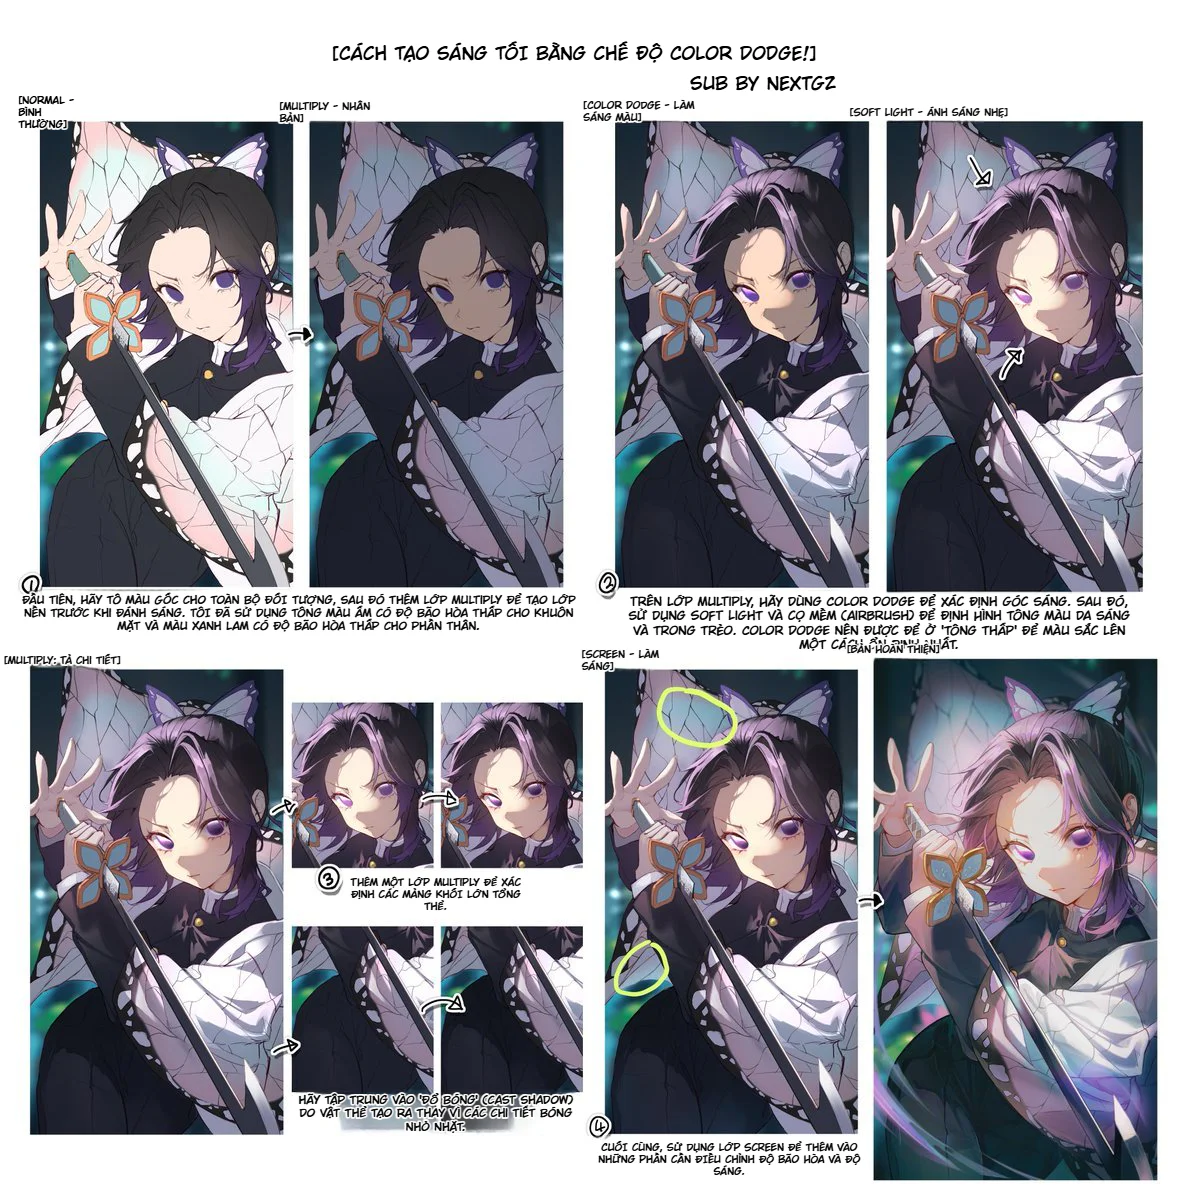
Cách tạo sáng tối bằng Color Dodge: workflow render ánh sáng cho tranh anime
Bình luận
0 bình luận
Đăng nhập để tham gia thảo luận cùng cộng đồng!
Đăng nhập ngayĐang tải bình luận...