How to Draw Dynamic Poses: Body Gesture Thinking for Drawing Beginners
 Free
Free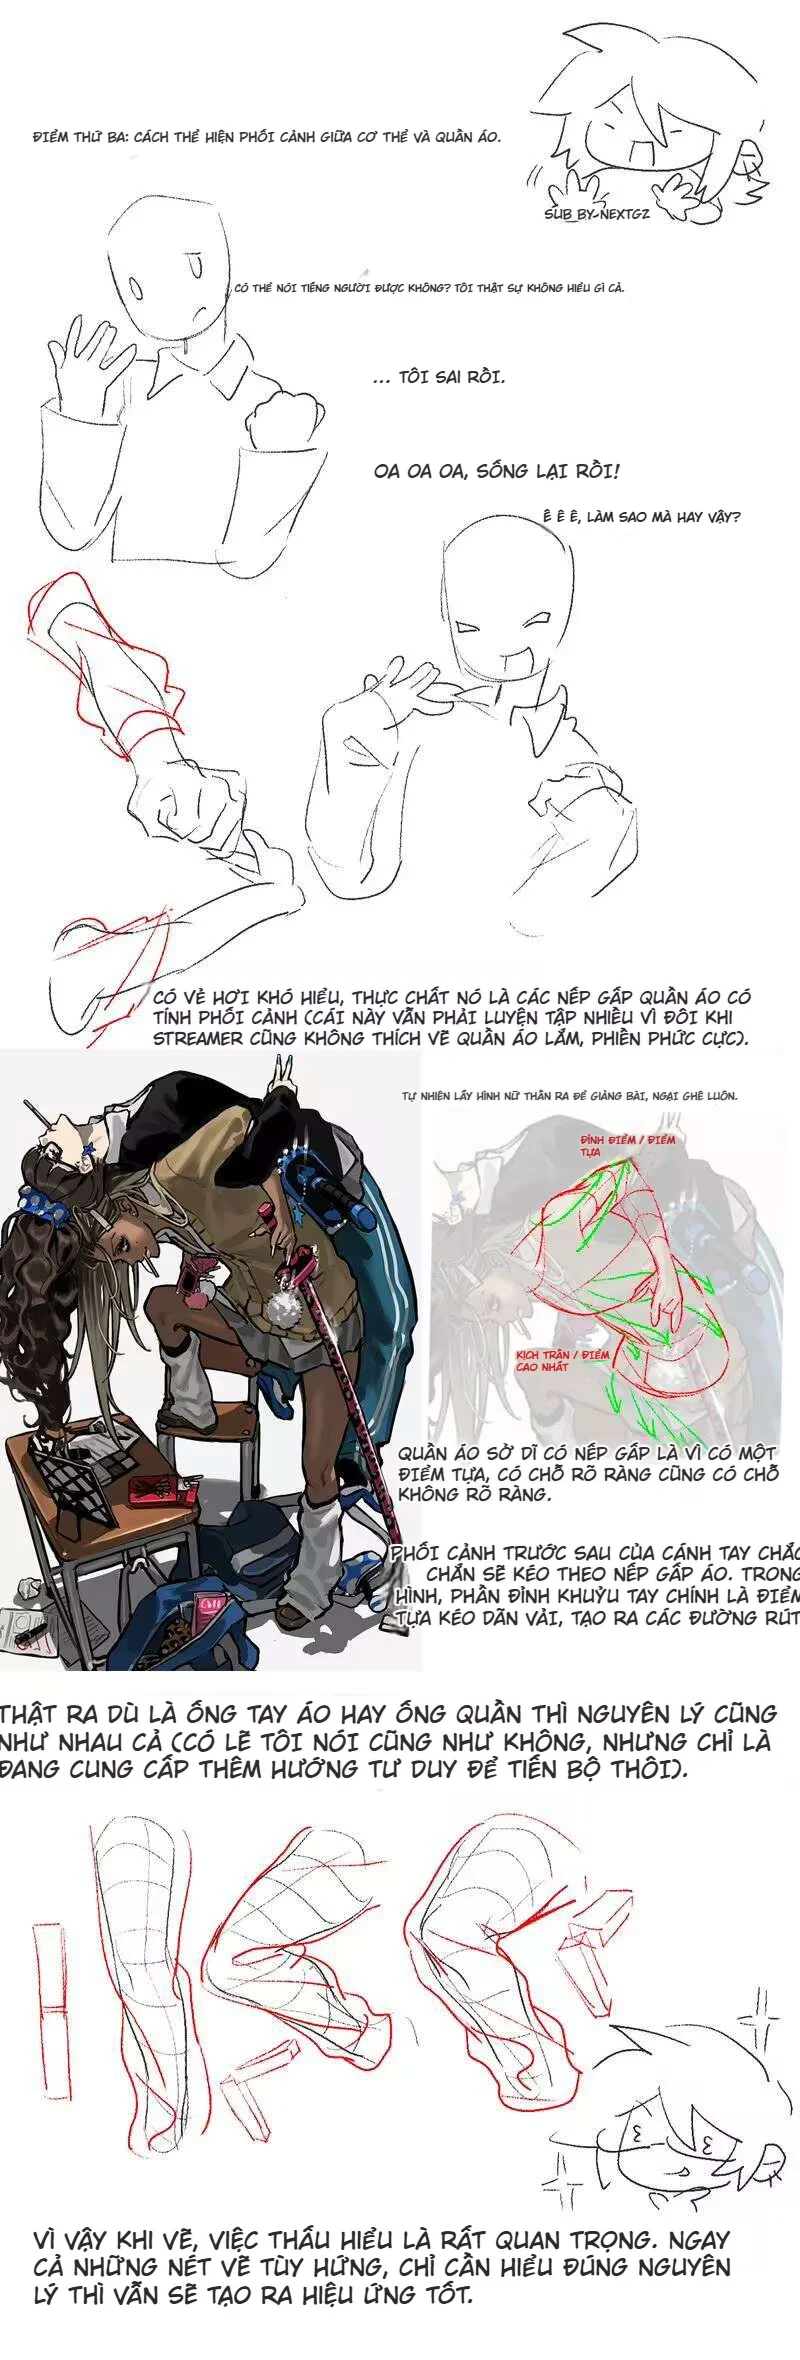
One of the reasons why a figure looks stiff isn't because you haven't memorized enough anatomy, but because you're looking at the body as a "static shape" instead of a system of masses that are rotating, tilting, compressing, stretching, and overlapping. What's great about this set of images is that it doesn't start with muscles or complicated details. It starts with the most important thing: how to think about movement. This mindset also aligns perfectly with the foundation of gesture drawing: Proko emphasizes that gesture should be drawn with the fewest possible lines to capture the main idea, starting from the line of action, which is the main action line representing the largest flow of movement in a pose.
1. What the first image teaches: don't build a person like a log
The first page clearly states a foundational idea: first, see the body as simple geometric masses. The head is a large mass, the chest and hips are the two main masses, the limbs are long tubes, and everything can tilt, shift, and rotate. This is an extremely correct way to save a pose from feeling like a wooden mannequin. In gesture drawing, the initial goal is not to fully describe the body, but to capture the flow and rhythm of movement. Proko describes the line of action as the largest line showing the direction of the pose, while subsequent gesture lines should be very simple, often using only C-curves, S-curves, or straight lines, and using as few strokes as possible.
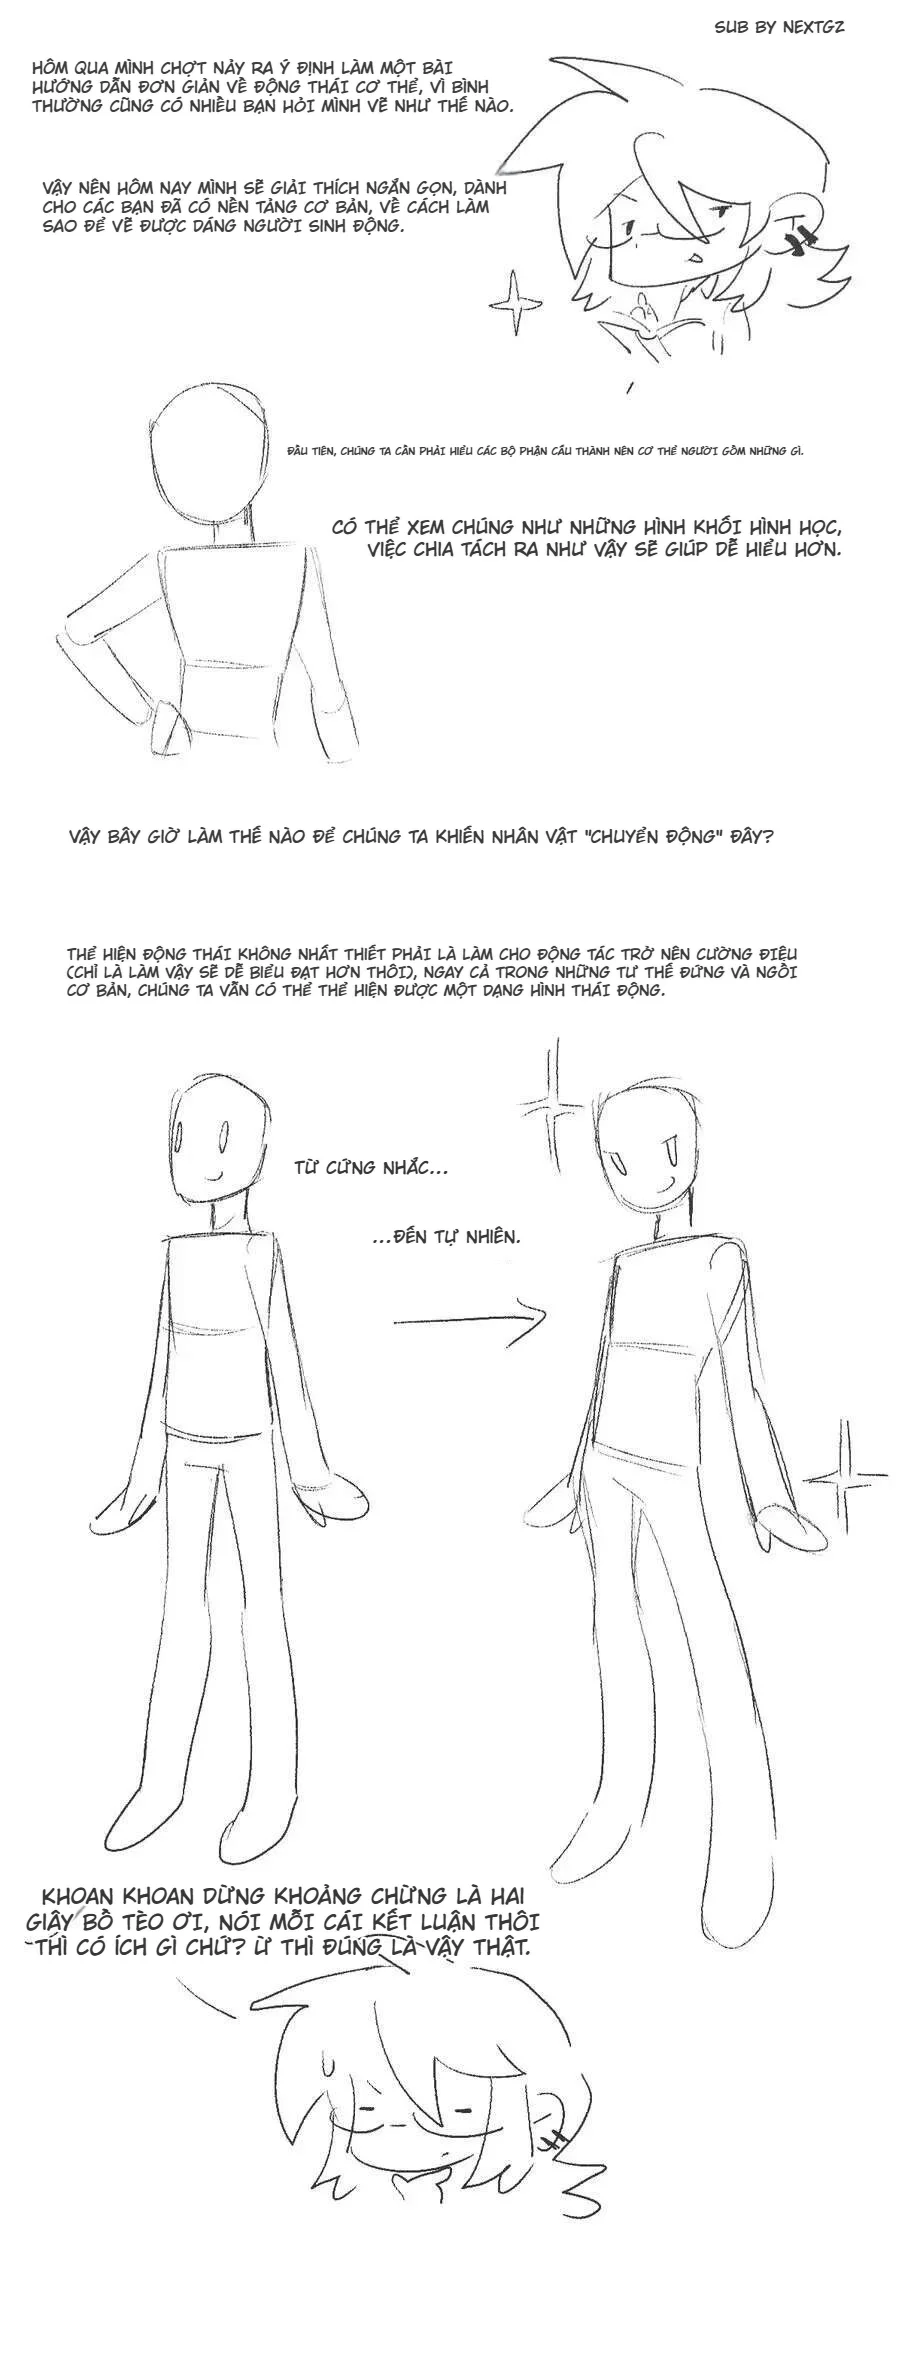
In the image, the author also very directly illustrates the transition from rigidity to naturalness. The character on the left stands almost symmetrically, limbs hanging straight down, weight unclear. The character on the right begins with a shifted hip, a shifted shoulder, arms hanging unevenly, and legs no longer parallel. Just that much makes the pose "breathe" significantly more. This is something Proko also emphasizes: if you overuse vertical and horizontal lines, the figure will easily become stiff; conversely, using more diagonals, shifts, and asymmetry will make the body look more dynamic.
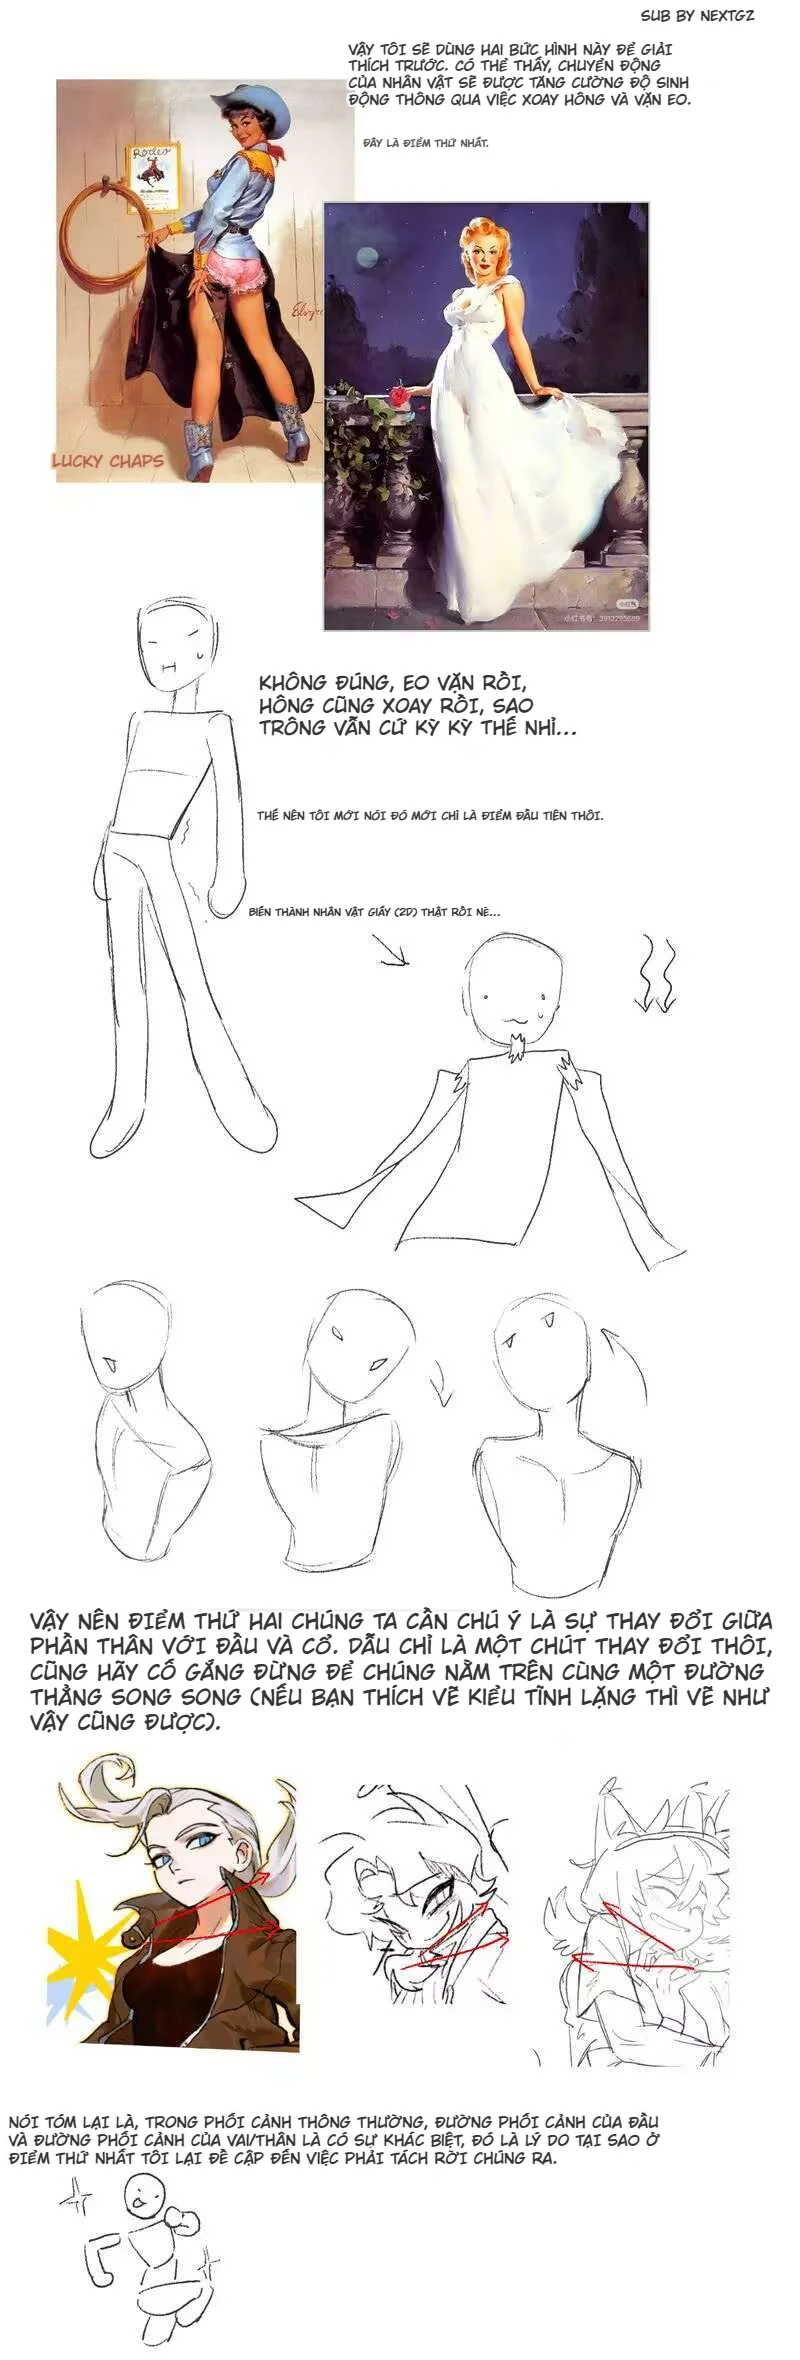
2. Rotating the hips isn't enough; you must separate the shoulders, neck, and head
The second page is the most valuable part of the entire set. The author points out a very common mistake: thinking that just twisting the waist and rotating the hips makes the pose dynamic. But no. If the head, neck, shoulders, and upper torso still follow a logic that is too flat, the character can still easily become "cardboard." Proko calls this simplified torso the bean: a simple mass that helps you focus on four important things: left-right tilt, forward-backward lean, spinal rotation, and foreshortening. When practicing the bean, Proko also advises to push the pose to a slightly more extreme level, so your eye gets used to observing the degree of tilt, rotation, and compression/stretch.
The set also describes a major principle very accurately: only when the head – neck – shoulders – ribcage – hips begin to have a shifting relationship with each other does the pose become lively. This is also where Proko analyzes very clearly in gesture step-by-step: when one side of the torso is pinched, the other side will stretch, and the shoulders and hips will usually tilt in two different directions to create that compression – stretch. If these two axes are too flat or too parallel, the pose will quickly lose force.
3. The correct mindset about the torso: not a stationary box, but a mass with direction in space
A very strong point of this set is that the author doesn't stop at "tilting a bit for fun," but also extends to the perspective of the torso. This is a step many people skip, so even if the character has tilted shoulders and shifted hips, they still don't truly have spatial depth. Proko suggests that when constructing the torso, think of it as an "envelope shape" with a centerline and outer edges, then use wrapping lines to indicate how it is leaning forward, leaning back, or rotating in space.
In the images, you'll see the author constantly emphasizes separating the head/neck from the shoulder-torso area. This is a great way to avoid the "everything lies on one plane" syndrome. When the neck leans one way, the shoulders rotate another, the chest tilts slightly, and the hips twist the opposite way, the character will feel like they are truly standing in 3D space, not a 2D cutout.
4. To make a pose come alive, observe where it compresses and where it stretches
If you had to reduce the entire set to a single principle, it would be: dynamic beauty comes from where something is being compressed and where something is being stretched. In the images, this appears at the waist, shoulders, neck, arms, and even in the clothing. Proko describes it very clearly: when the torso tilts to one side, there will always be one side compressed and one side stretched; observing this pair of relationships will help you draw more convincing movement.
That's also why a pose with "correct proportions" can still be very boring. If you just place the parts in the correct positions but don't give them a compress-stretch, opposition-balance relationship, the character will stand like a display model. But when you start asking: which side is shortening, which side is lengthening, which side is bearing force, which side is relaxed, the figure will immediately have rhythm.
5. The third image: clothing is not a random covering; it must follow the body's dynamics
The third page moves to an extremely important idea: the body's dynamics must show through the clothing. The set explains very visually that folds are not something added haphazardly "for detail," but are the result of anchor points, tension, slack, and the direction of the underlying limb. Whether it's a sleeve or a pant leg, the principle remains the same: where there is an anchor point / support point, where there is tension, the folds there will have logic.
This part aligns very well with the mindset of constructing form in basic drawing curricula: first, you must understand the underlying mass, then design the folds. In feedback about drapery on Proko, "simplifying folds based on the underlying form and tension points" is seen as the key to avoiding clothing that is messy and meaningless. Even Drawabox emphasizes that learners must always think they are building a three-dimensional spatial illusion, not just drawing on a flat sheet of paper.
To put it more simply: if the arm is a tube pointing forward, then the folds of the sleeve must also tell the story of that tube pointing forward. If the knee is bent sharply, the pant leg must show the areas of bunching, stretching, and the rotation direction of the leg. Beautiful folds aren't about quantity, but about whether they clarify the mass and movement.
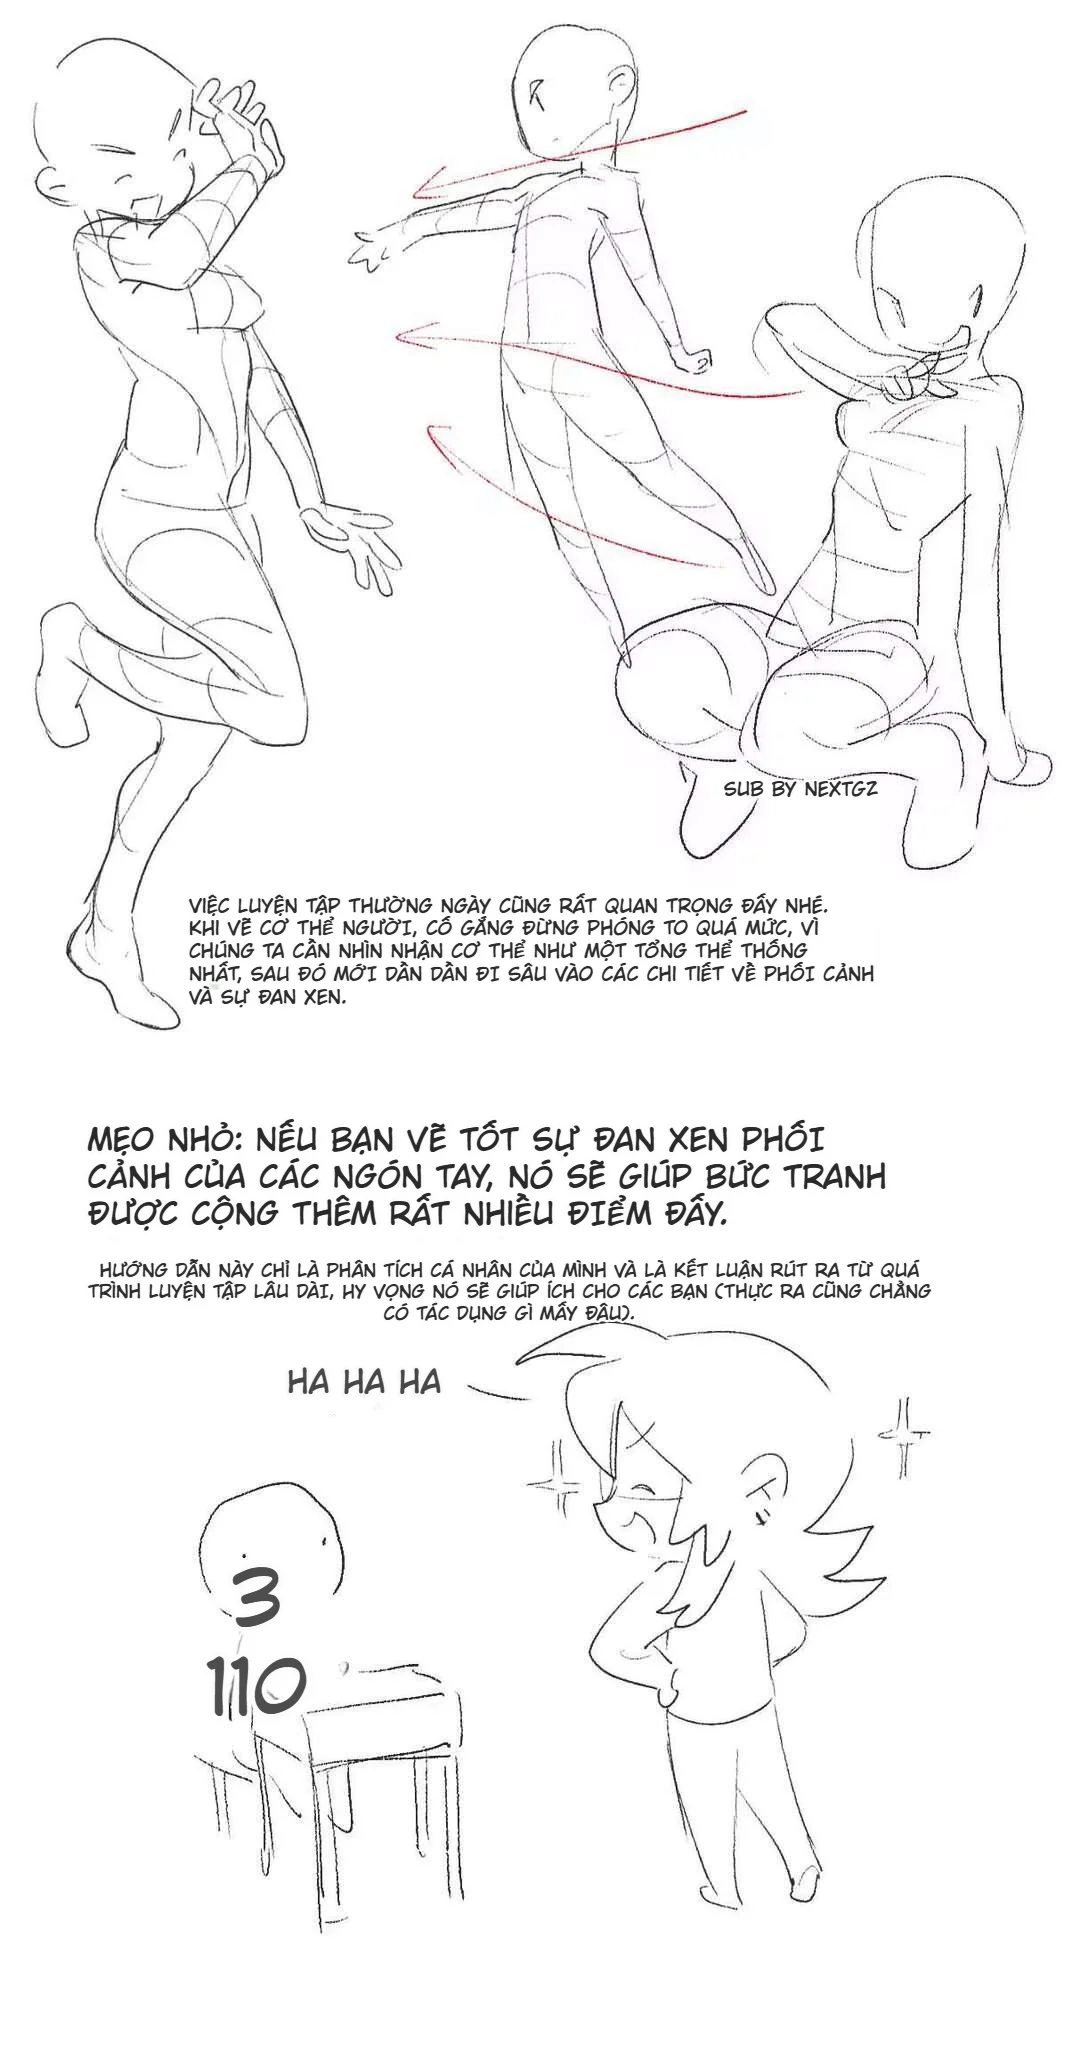
6. The final image: overlapping perspective is a huge bonus point
The last page of the set emphasizes a small but actually very big tip: if you handle overlapping perspective well, especially in fingers, arms, knees, feet, the drawing will immediately gain points. This is a very accurate observation. When body parts start to overlap and intersect according to spatial logic, the viewer's eye will perceive depth much more clearly. In the Drawabox curriculum, overlap is considered a core tool to emphasize that you are working in three-dimensional space, not on a flat sheet of paper.
The set also concludes with very sound advice: practice from the overall first, don't zoom into details too early. Proko also says rapid gesture is very useful precisely because it forces you to decide quickly: capture the silhouette, line of action, and volume first, then layer structure and details on top. This practice method builds line confidence and reduces the overthinking habit that makes figures stiff.
7. So what is the practical process for drawing a less stiff pose?
Based on this entire set, you can apply a very concise process as follows.
First, find the line of action. Don't rush to divide anatomy, don't rush to think about muscles. Just ask: which direction is this pose leaning, where is the force being "thrown." This is the emotional backbone of the entire figure. Proko sees this as the mandatory opening step of gesture.
Next, block in the head, chest, hips with large masses. At this point, don't try to draw beautifully; just determine if the axes are too parallel, if the shoulders are shifted relative to the hips, if the torso is compressed on one side and stretched on the other. If not, the pose will still be stiff.
After that, add the neck, arms, legs in the form of large rhythms. Let the limbs "converse" with the torso, instead of sticking straight out like sticks. Use many diagonals, avoid mechanical symmetry, and think about the force concentrated on the supporting leg or arm. Proko advises using asymmetry and different long-short rhythms to maintain movement.
When the figure's masses are stable, then overlay the clothing. But overlay it according to body logic, not in a decorative way. Ask yourself: where is the anchor point, where is it being pulled, where is it being bunched. If a fold doesn't tell a story about force, it's just noise.
Finally, add overlap and foreshortening at key points: hands, forearms, knees, feet, hair, or accessories. This is the layer of seasoning that turns a pose from okay to truly having depth.
8. How to practice to improve faster
The original set says it very correctly: daily practice is very important. But practicing correctly is more important than practicing for a long time. An effective warm-up is to do very short poses, focusing only on capturing the line of action, shoulders-hips, and the compress-stretch relationship of the torso. Proko encourages rapid gesture exercises because they force you to make quick decisions and reduce stiffness from overthinking.
You can also split exercises into three groups:
practice only the torso bean
practice only the head – neck – shoulders
practice only clothing according to tension
Doing this will help you understand the lesson faster than trying to perfect a full-body drawing from start to finish.
Conclusion
The best point of this tutorial set is that it doesn't turn "body dynamics" into something overly academic. It brings everything back to the core: the body is a mass in motion, not a stationary statue. To make a pose lively, you must let the shoulders and hips have a relationship with each other, let the torso have direction in space, let the clothing follow the force of the underlying form, and let body parts begin to overlap each other intentionally. These principles are also the foundation of gesture drawing: few lines, clear flow, clear axes, clear rhythm, then gradually add detail.
Đánh giá bài viết
More from author
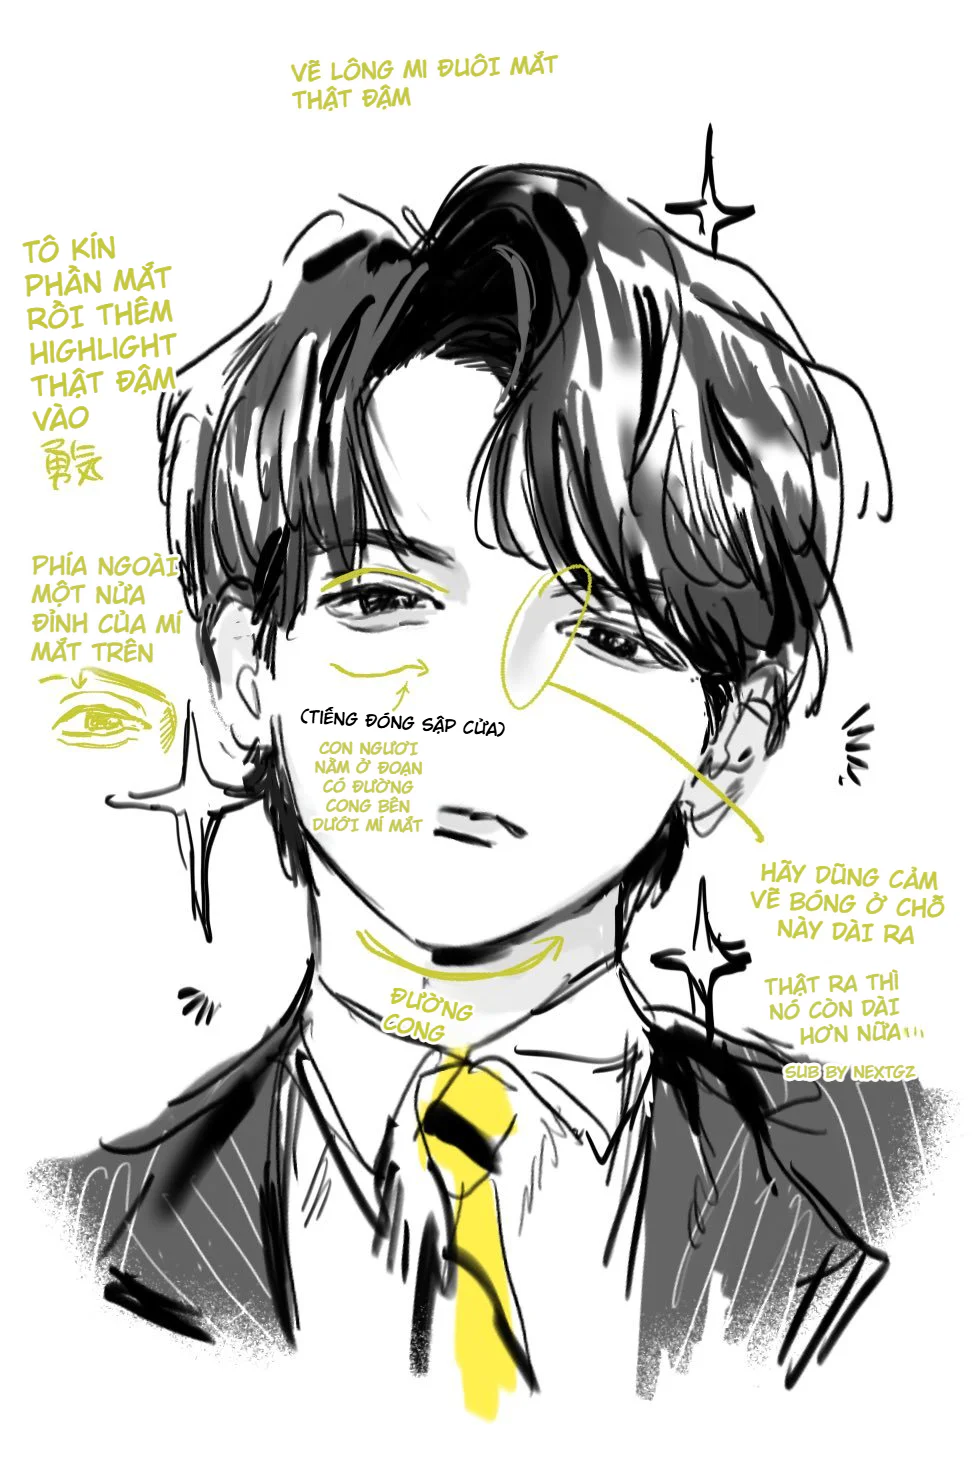
Cách vẽ nhân vật nam manga ngầu bằng mắt cụp, tóc đen bóng và halftone
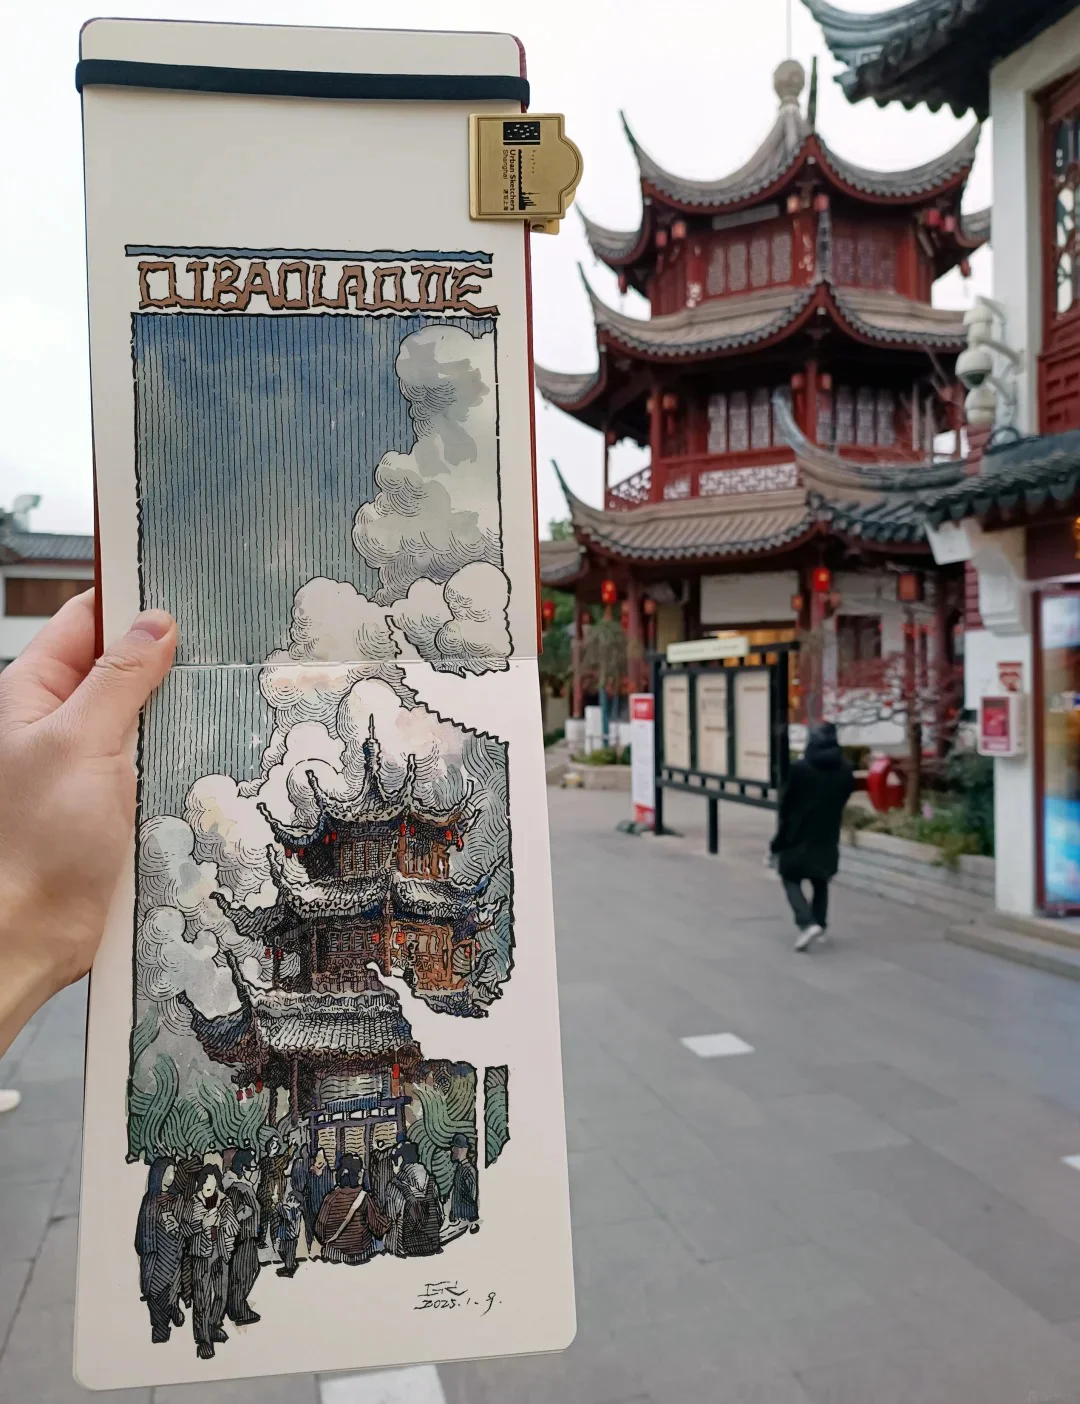
So sánh các cách học Mẹo Vẽ Ký Họa Cảnh Đường và cách chọn hướng

Tự Học Clip Studio Paint Cơ Bản: Hướng Dẫn Toàn Diện Cho Người Mới Bắt Đầu

Bộ Sưu Tập 48 Brush Information Volume Tạo Chi Tiết Và Texture Cực Đỉnh Cho PS, Procreate, CSP
You might also like
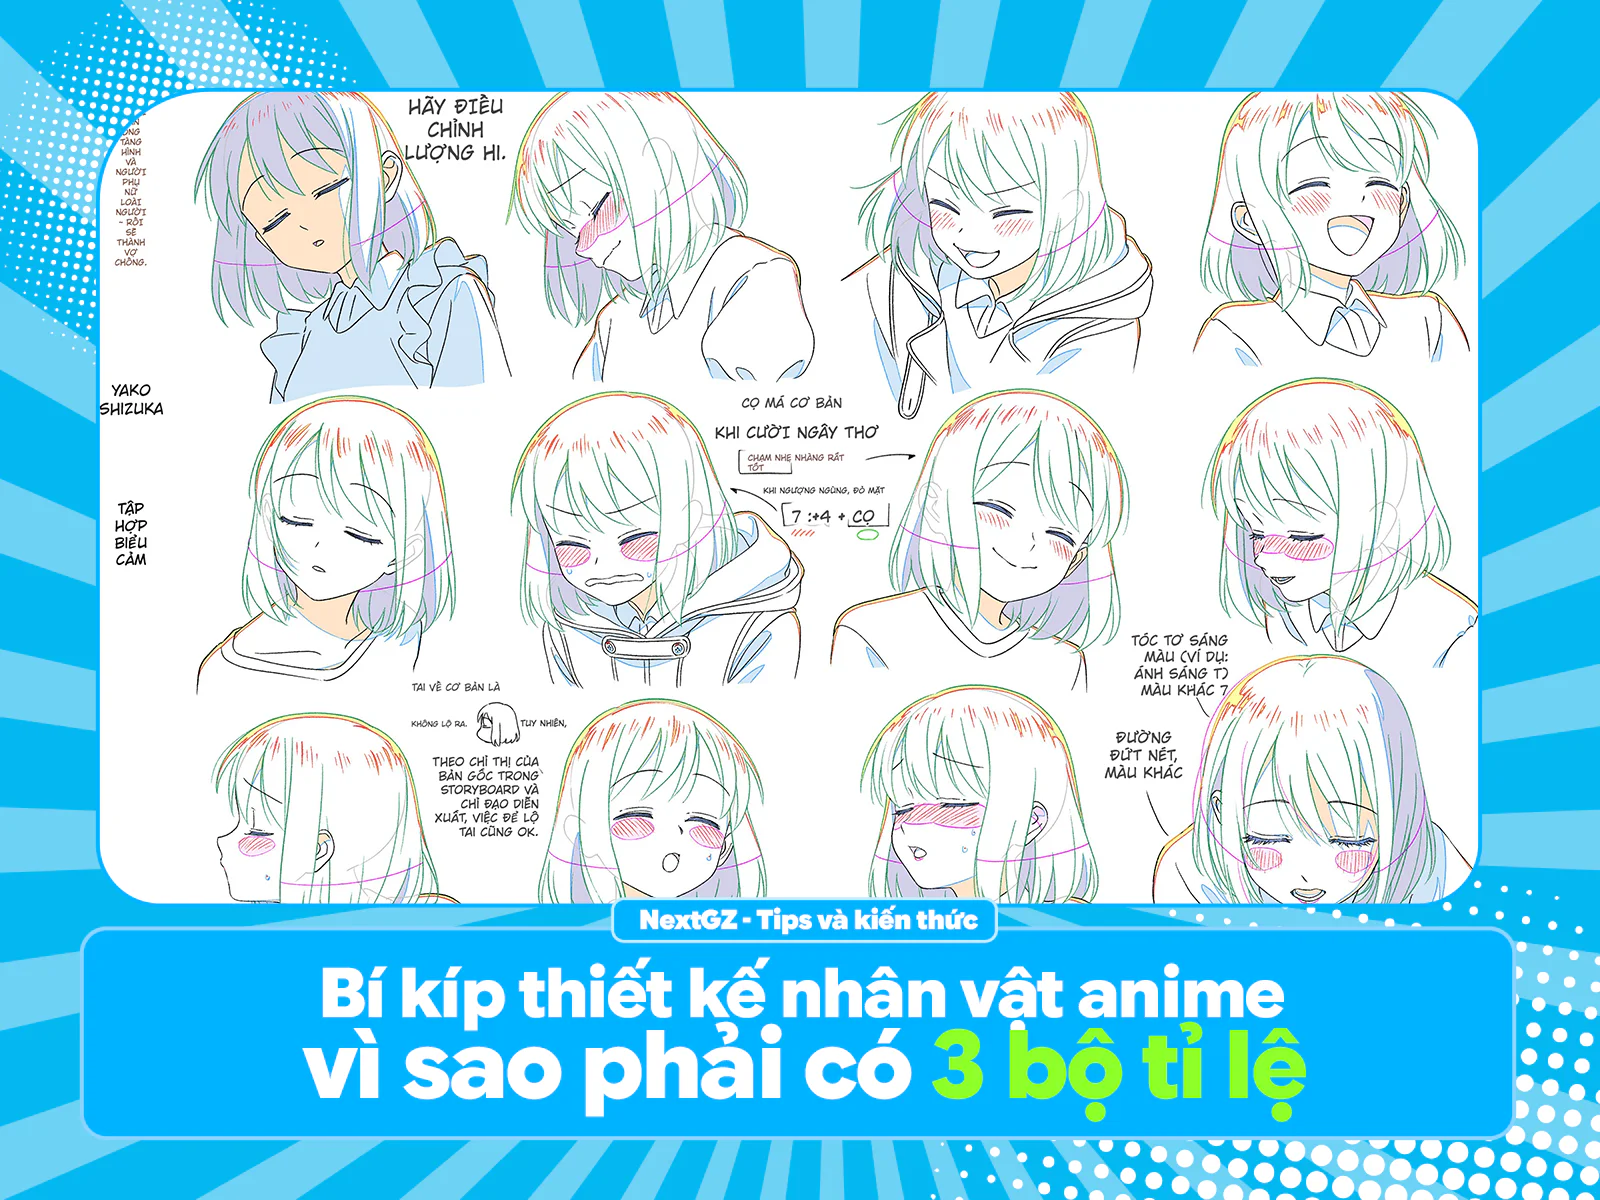
Bí kíp thiết kế nhân vật anime: vì sao phải có 3 bộ tỉ lệ và ~50 biểu cảm?
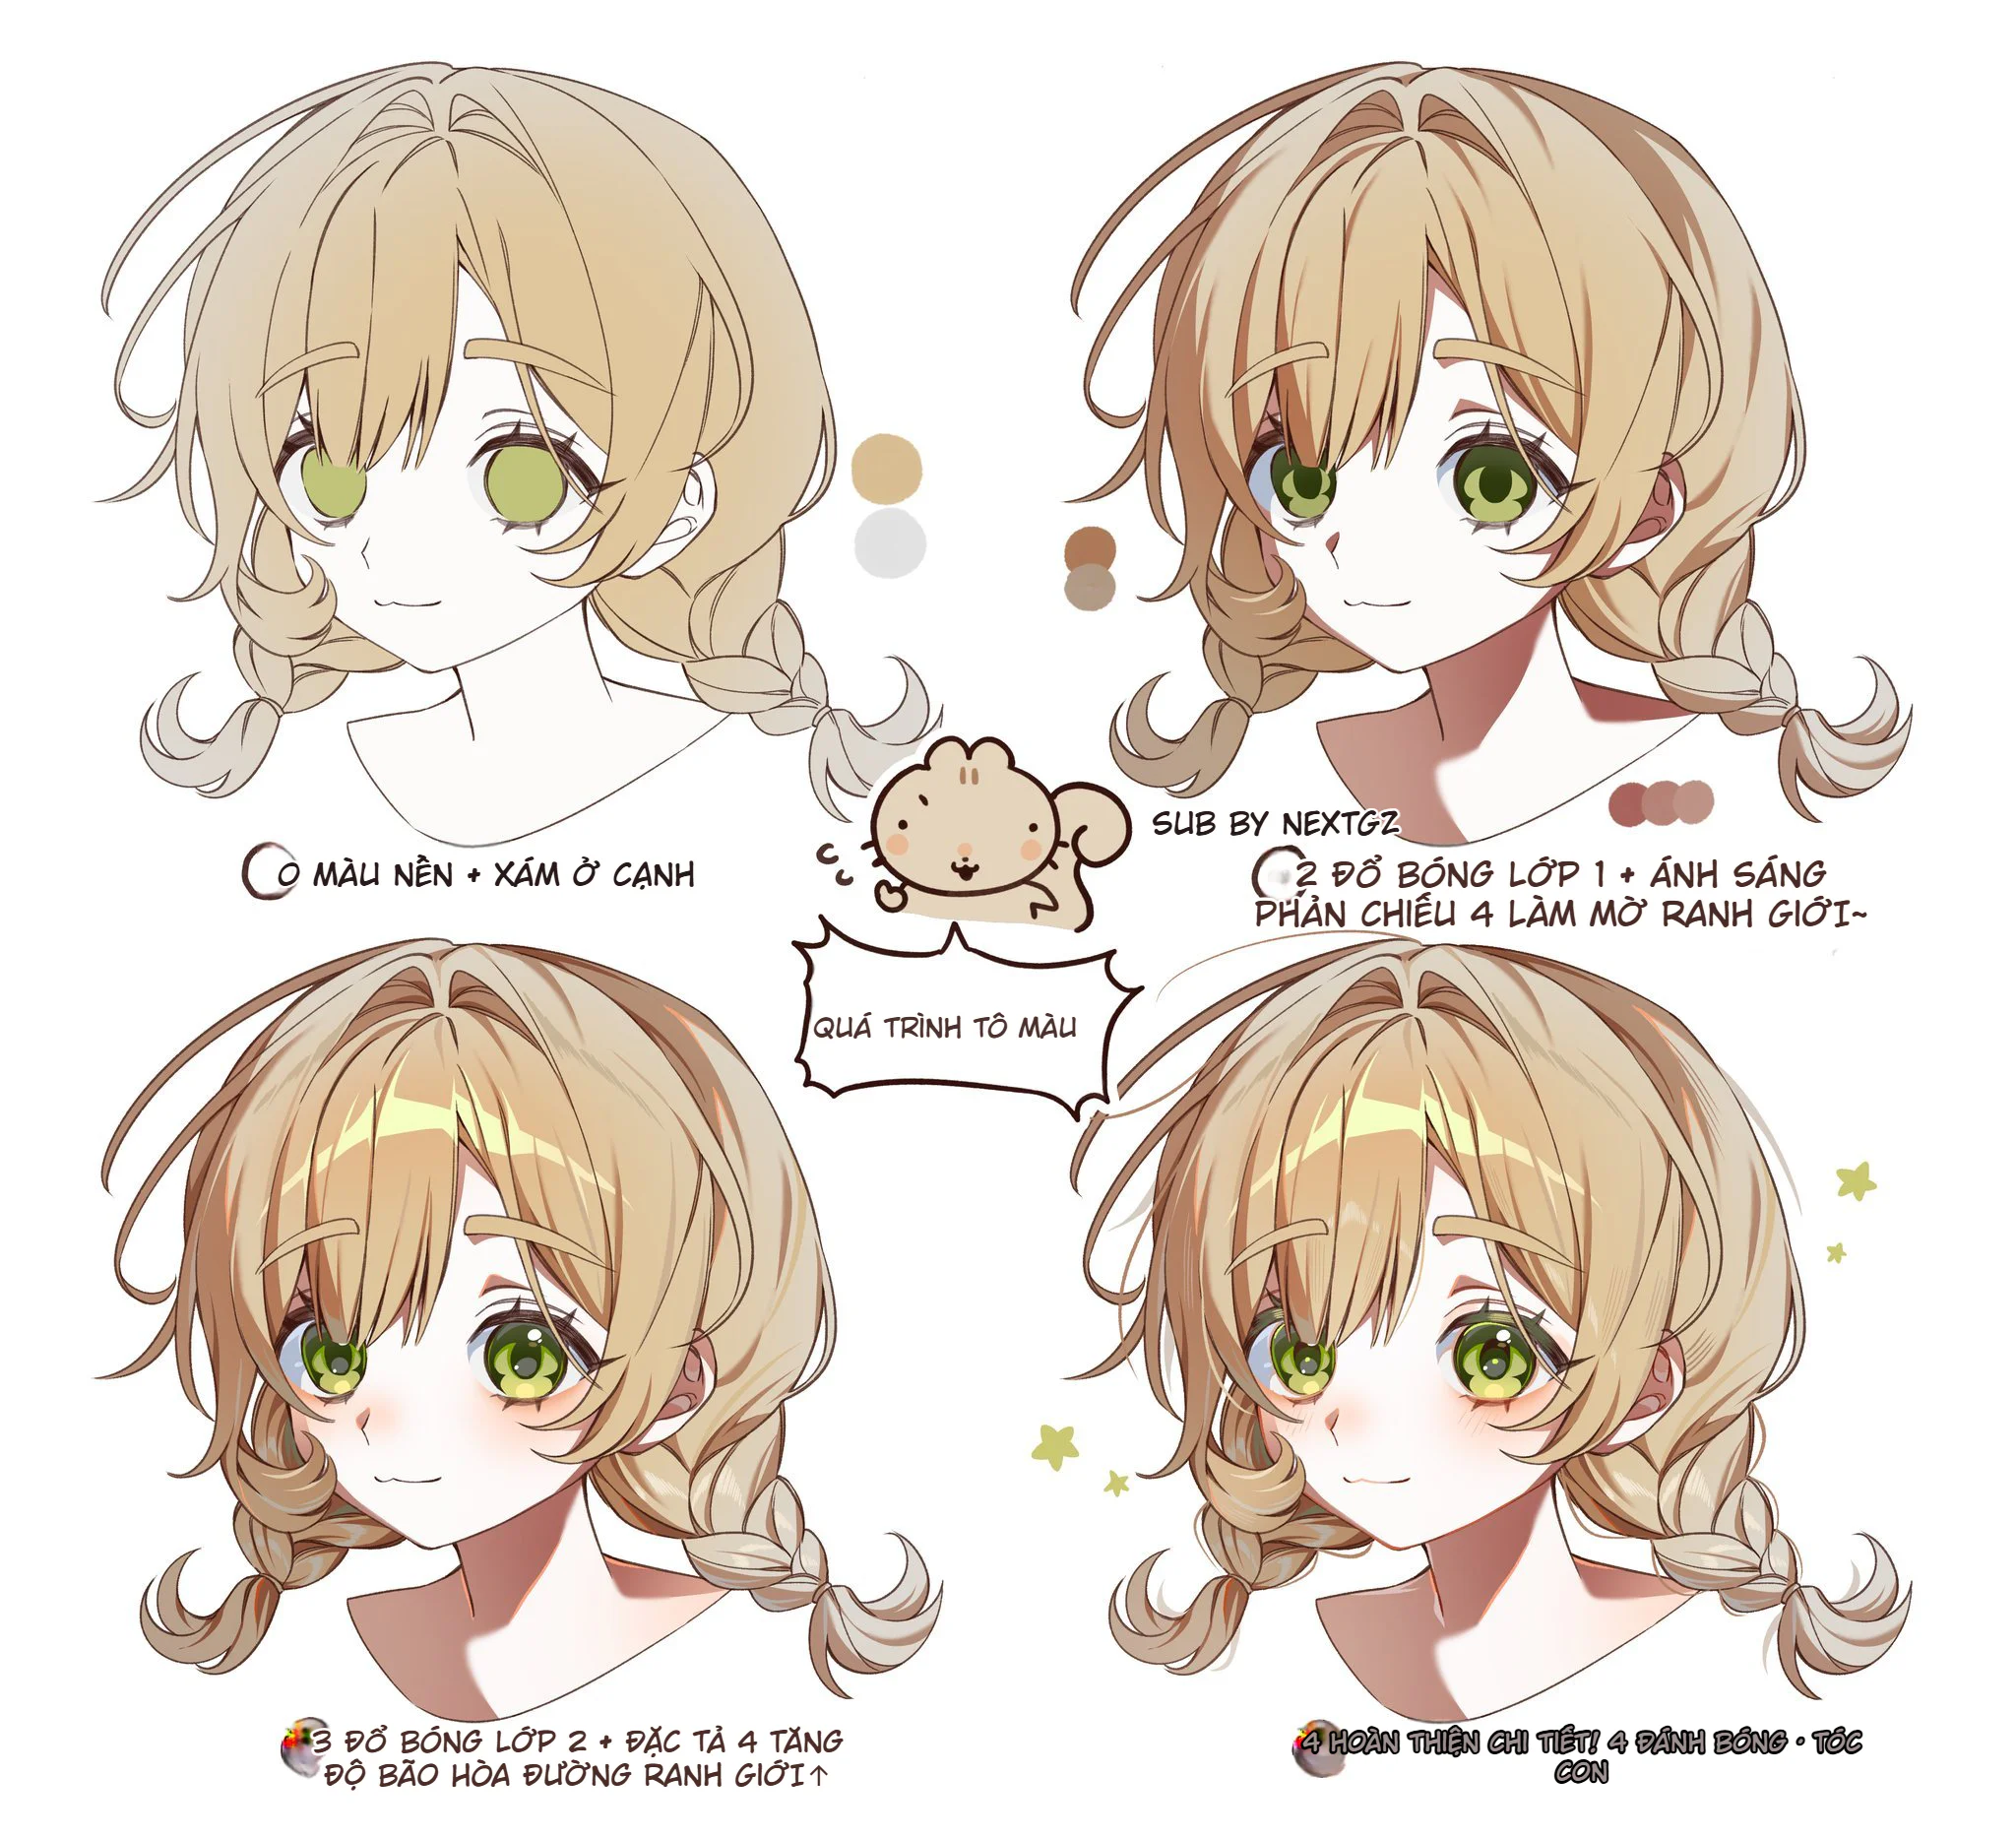
Cách tô tóc anime vàng mềm mịn: quy trình 4 bước từ màu nền đến hoàn thiện chi tiết
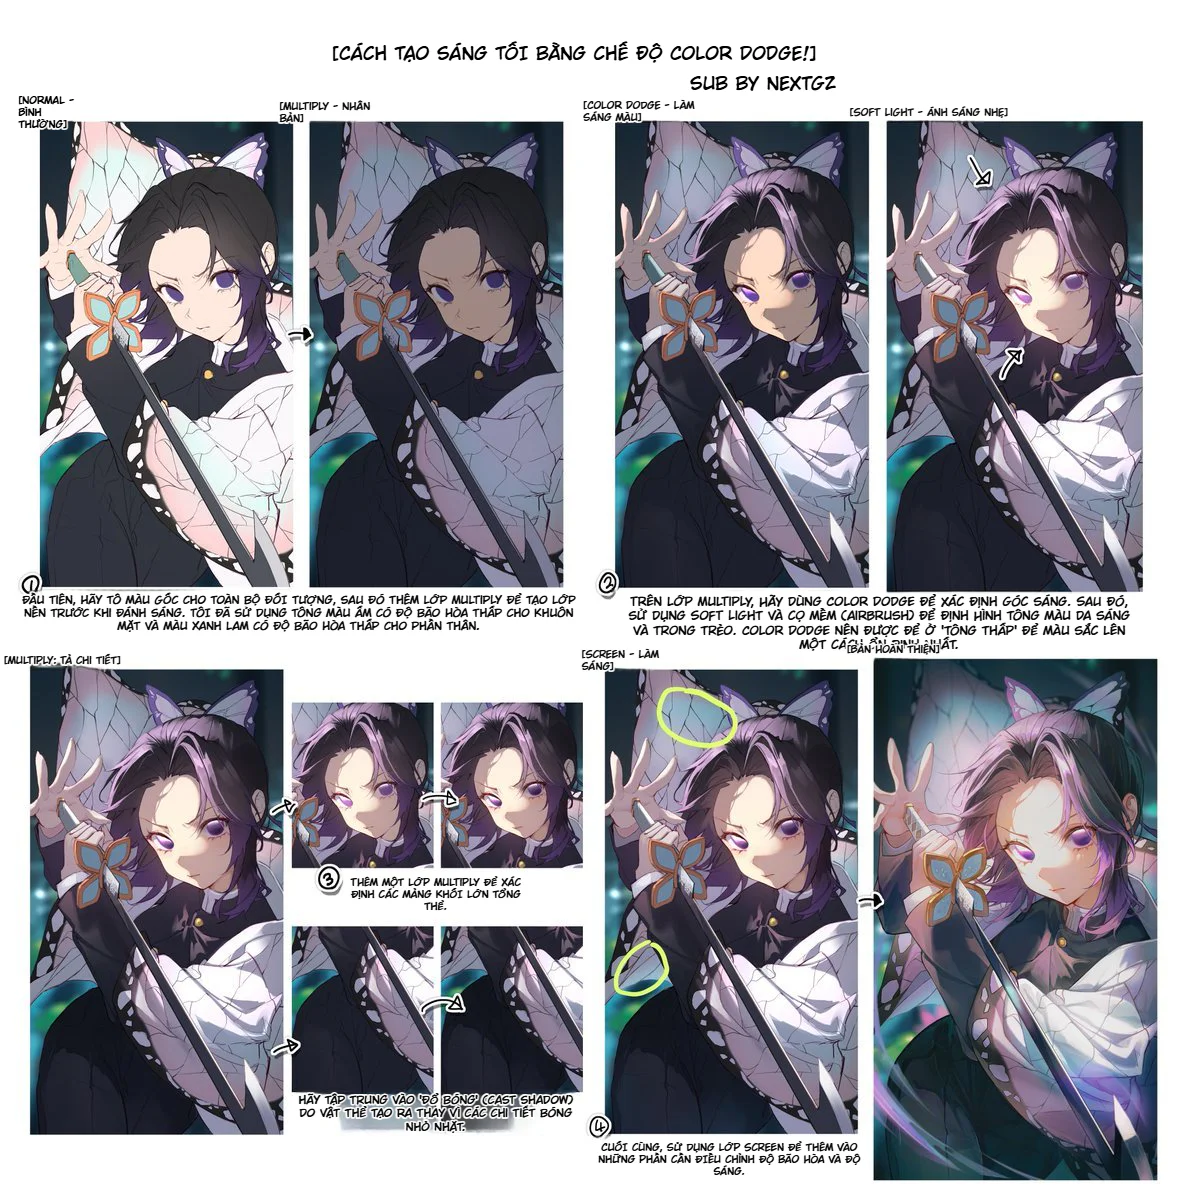
Cách tạo sáng tối bằng Color Dodge: workflow render ánh sáng cho tranh anime

Bình luận
0 bình luận
Đăng nhập để tham gia thảo luận cùng cộng đồng!
Đăng nhập ngayĐang tải bình luận...