How to Draw the Forearm and the Back of the Hand Simply: An Easy-to-Remember Block Thinking for Artists
 Free
FreeIf there's one part of the body that many drawing beginners both fear and are reluctant to tackle, it's the forearm. Many can draw the shoulder, draw the bicep, even block out the torso quite well, but when it comes to the part from the elbow down to the wrist, they get confused: they don't know how the bones run, which mass is the flexor, which is the extensor, which side is the pinky side, which is the thumb side, and why the same forearm looks like three completely different shapes when viewed from the side, from the back of the hand, or when the elbow is bent. What's great about this set of notes is that it doesn't force you to swallow an entire anatomy book. It gives you a better shortcut: remember the forearm as a few large masses, and then refine from there. This learning method is also quite close to the approach for artists: first, simplify the form into large, readable groups, instead of immediately getting lost in muscle names and small details.
1. To draw the forearm less chaotically, first know the two main bones
In terms of basic structure, the forearm is formed by two long bones: the radius and the ulna. The radius is on the thumb side, while the ulna is on the pinky side. At the elbow, the ulna forms the very prominent protruding part we often call the elbow tip, the olecranon. This is an extremely important landmark because if you place the ulna incorrectly, the entire forearm can easily rotate in the wrong direction. In basic materials on arm and elbow anatomy, the relationship thumb side = radius, pinky side = ulna is considered the foundation for reading the arm's orientation.
For artists, the quickest way to remember is this: find the pinky side first. If you've locked down the pinky side, you've almost locked down the ulna, and from there it's easy to deduce the other side is the radius. This is also why the notes image clearly states things like "the pinky side of the ulna is always the flexor group." In anatomical terms, the medial side of the forearm contains the flexors, with the flexor carpi ulnaris being a superficial muscle lying very close to the ulnar side.
2. Divide the forearm into two large strips: flexors and extensors
The most brain-saving step in this set of notes is dividing the forearm into two large masses: the flexor group and the extensor group. In real anatomy, these are the two main muscle compartments of the forearm: flexors at the front help flex the wrist and fingers, while extensors at the back help extend the wrist and fingers. For drawers, you don't need to remember every single muscle name from the start; just grasp "one strip on the front, one strip on the back, and a bone ridge in between" is enough to make the form much less chaotic.
In the image, the purple color is used for the extensor group and pink for the flexor group. This simplification is very worth learning because it turns the forearm from a hard-to-remember anatomical cluster into two contrasting, easy-to-see planes. When the wrist is supinated, flexed, pronated, or rotated, these two planes will change in visibility, but in terms of form-building thinking, you can always start from those two large strips first. This is precisely the "simplify first" logic that many anatomy for artists lessons emphasize.
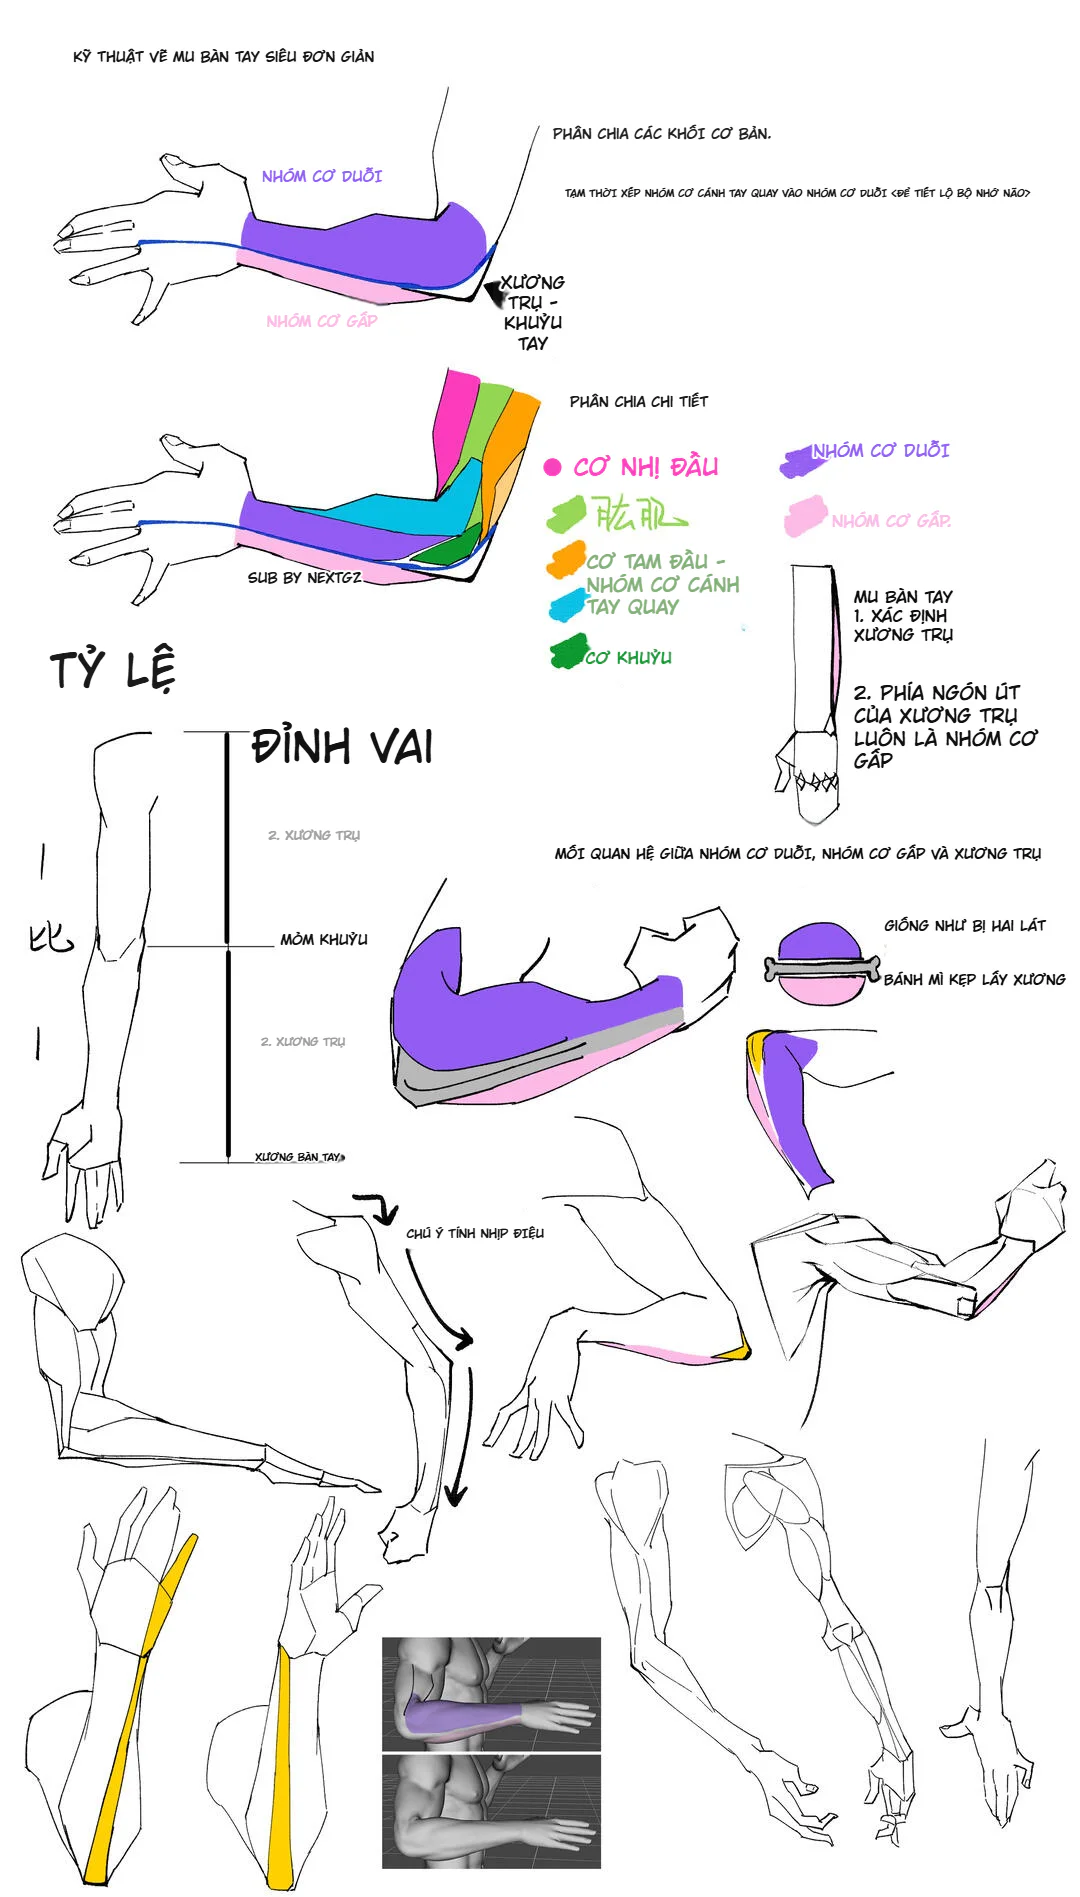
3. Think of the ulna as a rigid spine, and the flexors – extensors as two layers wrapping around it
The notes have a fun but very accurate "sandwich" example: the bone in the middle, the two muscle groups like two halves clamping onto it. Of course, the real body is more complex than that, but for drawing learners, this analogy is extremely effective. It helps you remember that the forearm is not a uniformly round cylinder. It has:
a fairly rigid bony edge
a side that bulges with the muscle group
a side that is slimmer or has a sharper transition depending on the viewing angle
and at the elbow and wrist, there will be very clear changes in thickness
When you think in terms of "mass wrapping around bone," the contour will naturally look better. Proko often emphasizes that mannequinization with masses and thinking about plane changes gives the form solidity, preventing it from looking flat like contour-only drawing.
4. The mass that makes the outer forearm look best is the brachioradialis
A point beginners often overlook is that the outer forearm looks good and powerful not just because of the common extensors, but thanks to a very "photogenic" mass: the brachioradialis. This is a muscle on the radial side of the forearm, originating near the lateral elbow area and running down near the lower end of the radius. Functionally, it is a strong flexor of the forearm when the arm is in a semi-pronated position; in terms of form, Kenhub describes it as the part that creates the very clear outer contour of the elbow–forearm.
In drawing practice, as long as you remember a "large strip" running from the outside of the elbow down towards the thumb side, the forearm will immediately look less like a plastic tube. This is why in many anatomy lessons for artists, the brachioradialis is often seen as an extremely useful landmark for "locking the form," not just a muscle whose name needs to be memorized.
5. The forearm is not uniform from top to bottom: thicker near the elbow, slimmer near the wrist
The notes also show a very true point about silhouette: the forearm is not uniformly thick. The part near the elbow is usually thicker and has more defined mass, while down near the wrist it narrows gradually. This makes anatomical sense, as the large muscle bellies are more concentrated near the elbow area, while further down, the tendons and attachment points become more streamlined. This is especially easy to see in the extensor group: many muscles gradually thin out as they run towards the wrist and the back of the hand.
When constructing lines, this is something to remember: don't draw the forearm as a straight cylinder from end to end. Give it a rhythm of swell – tighten – swell – tighten. Just a small change in the contour makes the arm look much more "buff" and rhythmic.
6. For the upper arm, remember simply: front is biceps/brachialis, back is triceps
The image also includes the upper arm part to connect the logic from the shoulder down to the wrist. The quick way to remember here is:
the front is biceps and brachialis, leaning towards flexion
the back is triceps, leaning towards extension
This aligns with the standard anatomy of the arm region: the anterior compartment contains the biceps brachii, brachialis, and coracobrachialis; the posterior compartment is mainly the triceps brachii. The triceps is also the main extensor of the elbow, and its tendon attaches to the back of the olecranon, so when you flex and extend your arm strongly, the area behind the elbow is worth paying attention to.
For artists, the goal at this stage is not to memorize all origins and insertions. Just remembering "front bulges like biceps, back is solid like triceps" is enough to make the upper arm connect logically with the forearm.
7. Simple proportion: shoulder – elbow – wrist must have a clear rhythm
The notes also establish a proportional axis from the shoulder tip → elbow tip → wrist to help learners remember the overall rhythm of the entire arm. Although specific proportions will vary by style, what's more important is being able to read these three major landmarks as a logical rhythmic sequence. In figure study, Proko considers joints and superficial bony landmarks as important for measuring proportion and controlling form, especially the shoulder, elbow, and wrist in the upper limb.
More practically, if you've correctly locked in the three landmarks:
where the shoulder is
which direction the elbow is bending
whether the wrist is supinated or pronated
…then the muscles inside will more easily follow. But if the three major landmarks are wrong, no matter how detailed the rendering, the arm will still look off.
8. The back of the hand and the forearm must "communicate" with each other
The part about the back of the hand/dorsal side, and that's also why the notes emphasize the extensor area on the back of the hand. Functionally, extensor tendons help extend and straighten the fingers, hand, and wrist; therefore, when you draw the back of the hand, thinking in terms of extension aligns much better with the form than when drawing the palm.
Simply put: don't separate the hand and forearm as two randomly assembled pieces. If this is the back of the hand, then the logic of the extensor group should flow smoothly from the elbow, through the forearm, to the wrist, and then fan out into the back of the hand and fingers. Just remembering that flow direction will greatly reduce the mistake of "forearm one style, hand another style."
9. How to quickly construct a good-looking forearm from imagination
If I had to condense this entire lesson into a quick drawing process, I would go like this.
First, determine the direction of the ulna and the pinky side. This is the anchor. If you're not sure which side is the ulna, stop, don't render.
Next, construct a large mass for the extensor group on the back-of-hand side and a large mass for the flexor group on the palm side. Don't think about individual muscle fibers yet. Just the two main strips.
Then, add the brachioradialis as a strip that locks the outer contour from the outside of the elbow down towards the radial side. This is what makes the form look weighty.
Finally, taper it gradually towards the wrist, and let the outline have rhythm. Don't draw it as a uniform tube. If you need to emphasize strength, clarify the elbow tip and vary the thickness between near the elbow and near the wrist. For landmarks, the olecranon and the wrist planes are very useful for maintaining rotation direction.
10. Mistakes that make the forearm look fake immediately
The first mistake is forgetting the ulna/radius, so the arm rotates incorrectly from the structure.
The second mistake is drawing the forearm like a uniform cylinder, with no swell-tighten rhythm.
The third mistake is forgetting the brachioradialis, making the outer contour of the forearm very bland and lifeless.
The fourth mistake is treating the back of the hand and forearm as separate, so the tendons and flow are broken.
The final mistake is trying to learn all the muscle names before knowing how to divide into large masses. In practice for artists, the more effective approach is usually to group into large masses first, then gradually delve deeper.
Conclusion
This set of notes is worth learning not because it teaches all the anatomy of the arm, but because it chooses the most useful shortcut for drawers: start from the ulna bone, divide into flexor – extensor muscles, add the brachioradialis to lock the contour, and then connect to the biceps/triceps above. This is a way of thinking very suitable for artists because it's simple enough to apply quickly, yet still closely follows the real anatomical logic of the forearm and elbow. Once you're familiar with these large masses, you'll find the forearm much less intimidating.
SEO-Friendly FAQ
Where should a simple way to draw the forearm start?
It should start from the two bones, radius and ulna, especially identifying the ulna on the pinky side, then dividing the forearm into the flexor and extensor muscle groups.
Why is the ulna important when drawing the forearm?
Because the ulna is on the pinky side and forms the very clear landmark at the elbow, the olecranon, helping you correctly read the rotation direction and structure of the arm.
How are the flexor and extensor muscle groups different?
The flexor group in the anterior compartment of the forearm helps flex the wrist and fingers, while the extensor group in the posterior compartment helps extend the wrist and fingers.
What role does the brachioradialis play in drawing?
It is a muscle on the radial side of the forearm, creating the very clear outer contour of the elbow–forearm and is an extremely useful form landmark for artists.
How is the triceps related to the elbow?
The triceps is the main muscle of the posterior compartment of the upper arm, its common tendon attaches to the back of the olecranon of the ulna, and it is the main extensor of the elbow.
Đánh giá bài viết
More from author

Cách vẽ nhân vật nam manga ngầu bằng mắt cụp, tóc đen bóng và halftone

So sánh các cách học Mẹo Vẽ Ký Họa Cảnh Đường và cách chọn hướng

Tự Học Clip Studio Paint Cơ Bản: Hướng Dẫn Toàn Diện Cho Người Mới Bắt Đầu

Bộ Sưu Tập 48 Brush Information Volume Tạo Chi Tiết Và Texture Cực Đỉnh Cho PS, Procreate, CSP
You might also like

Bí kíp thiết kế nhân vật anime: vì sao phải có 3 bộ tỉ lệ và ~50 biểu cảm?

Cách tô tóc anime vàng mềm mịn: quy trình 4 bước từ màu nền đến hoàn thiện chi tiết
Cách tạo sáng tối bằng Color Dodge: workflow render ánh sáng cho tranh anime
Bình luận
0 bình luận
Đăng nhập để tham gia thảo luận cùng cộng đồng!
Đăng nhập ngayĐang tải bình luận...